|
| |
| Sun Java[TM] System Identity Manager 7.0 Deployment Tools | |
Chapter 1
Using the Identity Manager IDEThe Identity Manager Integrated Development Environment (Identity Manager IDE) is Java application that enables you to view, customize, and debug Sun Java™ System Identity Manager (Identity Manager) objects in your deployment.
This chapter provides instructions for using the Identity Manager IDE. The information in this chapter is organized as follows:
OverviewThe Identity Manager IDE provides a graphical and XML-based view of objects in your environment, and you can use this application to perform the following tasks:
The rest of this section provides a general, high-level overview of the Identity Manager IDE, and the information is organized as follows:
Major Features
Major features provided by the Identity Manager IDE include:
- Integrated Explorer window that allows project, directory-based, or runtime views of a project
- Action menus for document modification
- Custom editors, including:
- Object property sheets and graphical value editors for enumerating XML object properties and editing basic object types, XPRESS, and XML objects without typing XML
- Drag and drop palette for adding workflow services, approvals, users and workflow tasks to XML source without typing XML
- Registered waveset.dtd definition file that enables syntax highlighting and auto-completion for XML elements and attributes
- Integrated debugger for workflows, forms, and rules
- Rule tester for verifying standalone and library rules
- Form previewer for previewing and troubleshooting forms in an external browser
- Checkout View feature allows you to check out, modify, and check in Identity Manager views (such as a user view).
- CVS integration
How Identity Manager IDE Compares to BPE
The Identity Manager IDE is a fully integrated NetBeans plugin that was designed to replace Identity Manager’s Business Process Editor (BPE) application. Using the Identity Manager IDE offers the following advantages when compared with the BPE:
- Provides closer alignment with deployment best practices, including:
- Provides platform support for editors, palette, debugger, and navigation
- Reduces open-endedness by providing code completion for XML elements and attributes
- Provides contextual information, with integrated tools to facilitate editing
Note
The BPE is still supported for backward compatibility.
For information about using the BPE, see Appendix A, "Using the Business Process Editor."
Installing the Identity Manager IDEThis section provides instructions for installing and configuring the Identity Manager IDE application.
Before You Begin
To run the Identity Manager IDE, you must have the following installed on your local system:
- Identity Manager version 7.0
- NetBeans 5.0 running under JDK 1.4.2 or 5.0
- You can download NetBeans 5.0 from the following location:
- Alternatively, NetBeans 5.0 is bundled with JDK 5.0. You can download this product bundle from the following location:
http://java.sun.com/javase/downloads/index.jsp
Installing the Module
Identity Manager IDE is packaged as a module plug-in that you must register with NetBeans. To install and register the module, perform the following steps:
- Start NetBeans 5.0.
- From the NetBeans menu bar, select Tools > Update Center.
- When the Update Center Wizard displays (Figure 1-1), select Install Manually Downloaded Modules, and then click Next.
Figure 1-1 Selecting the Module Location
- In the next Select Location of Modules panel, click Add to locate and select the Identity Manager IDE NetBeans plugin file (com-sun-idm-ide.nbm) that is available in the Identity Manager distribution in the top-level directory. When you are done, click Next.
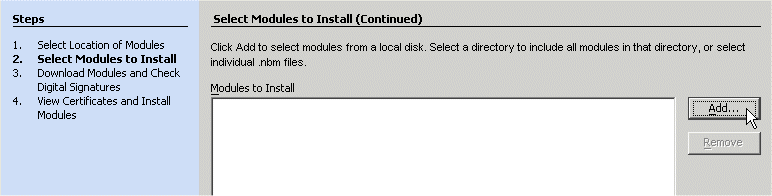
- When the Select Modules to Install panel displays (Figure 1-2), click Next again to download the module.
Figure 1-2 Specifying the Module to Install
- When the Identity Manager IDE License Agreement displays, click Accept.
- The Download Modules panel displays to show you the status of the module(s) being downloaded. Click Next.
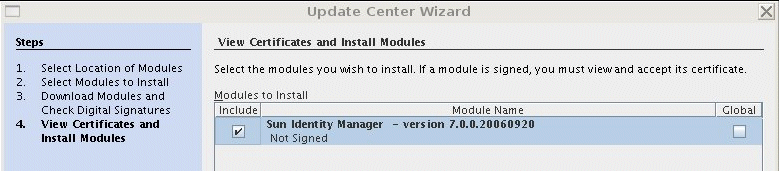
- The View Certificates and Install Modules panel displays (Figure 1-3), containing a list of the module(s) you downloaded. Enable the check box alongside the module name.
Figure 1-3 Select the Module to View Its Certificate
- A pop-up displays, asking if you really want to install an unsigned module.
- Click Finish.
NetBeans installs the Identity Manager IDE module.
You can now
Working with the Identity Manager IDE InterfaceThe Identity Manager IDE interface consists of the following windows:
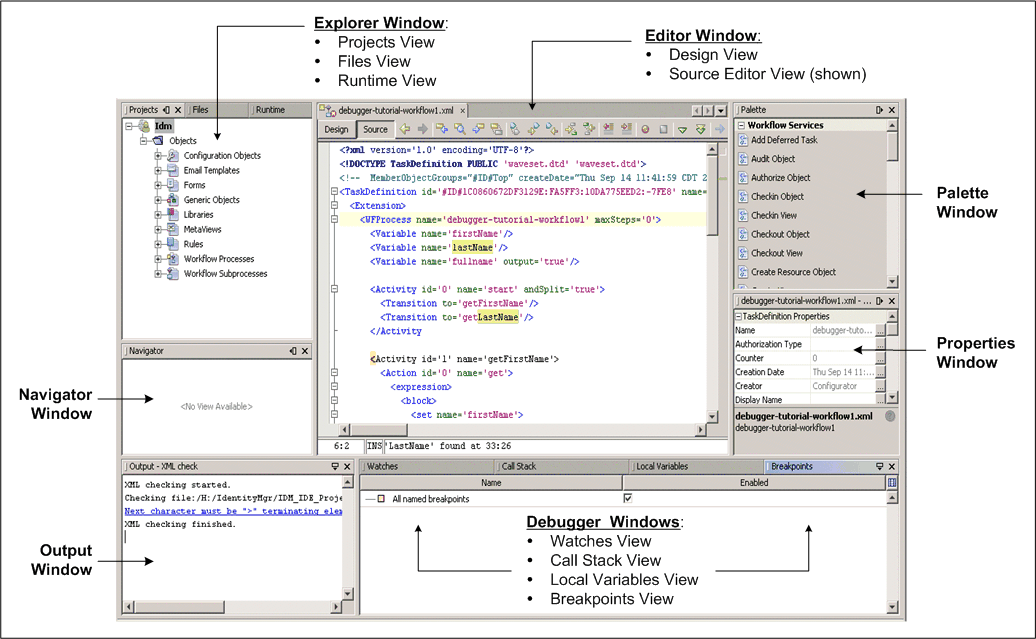
Figure 1-4 Identity Manager IDE User Interface
Not all of these windows display when you first open the Identity Manager IDE, but will open automatically (or can be opened) as you use different features in the application.
This section introduces each window, and the information is organized as follows:
Explorer Window
The Explorer window, located in the upper right corner of the Identity Manager IDE provides three windows:
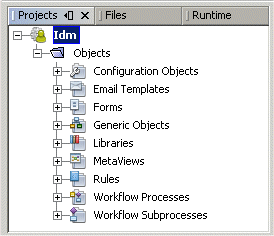
Projects Window
The Projects window displays by default when you open the Identity Manager IDE, and it provides a vertical, logical view of all open projects.
Expand a project node for a hierarchical view of the XML objects in the project. Most elements that make up an XML object are represented by nodes in the tree.
When you right-click on a project node, or on any of the object nodes, in this window, a pop-up menu displays with options that enable you to perform different tasks. (See Table 1-1 for an overview of these options.)
Table 1-1 Pop-Up Menu Options
Node
Pop-Up Menu Options
Description
Project
Debug Project
Select to debug the project. (See Working with the Identity Manager IDE Debugger.)
Close Project
Select to close the project.
Properties
Select to view the project’s connection settings. (See Viewing and Editing Project Properties.)
Objects
New
Select to create a new object for this project.
CVS
Select to manage CVS versioned-controlled files from within Identity Manager IDE.
Repository
Select to download objects from the repository to your local file system, upload objects from your local file system to the repository, and to checkout a view. (See Working with Repository Objects.)
Find
Select to search your project for text, object names, object types, and dates. You can search all projects in the Project window, or select and search a specific location.
Cut, Copy, Paste
Select these options to cut and paste, or copy and paste, objects.
Delete
Select to delete selected objects from the project.
Refactor
Select to modify the object’s code structure and update the rest of your code to reflect the modifications.
Tools
Select to create JUnit tests, add to Favorites, manage Internationalization, or to apply a Diff patch.
Properties
Select to view and edit the selected object’s properties.
Show Typed Nodes
Select to show or hide the “type” nodes (Such as Forms or Rules) in the Project window.
Files Window
Select the Files window for a directory-based view of your projects, including files and folders that do not display in the Projects Window.
You can open and edit your project configuration files, such as the project build script and properties files.
Runtime Window
Select the Runtime window for read-only access to the Identity Manager catalog (waveset.dtd) under the DTD and XML schema catalogs.
Editor Window
The Editor window provides a toolbar and a display area that enable you to work with objects in Design view or Source Editor view.
- Click the Design button to work with a graphical representation of Workflow Process and Workflow Subprocess objects. (See Design View for additional information.)
- Click the Source button to work with the object’s XML source.
(See Source Editor View for additional information.)The remaining buttons on the toolbar change, depending which view is selected.
You can drag items from the Palette window into the Editor window. For example:
Dragging items into Design view, updates the XML source and the node tree in both the Projects and Files views. (See Palette Window for more information.)
Design View
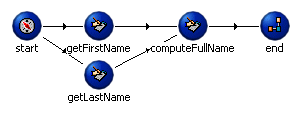
The Design View window provides a graphical diagram of a workflow, where each node represents a specific process activity and the lines represent transitions.
Figure 1-6 Example Design View
In Design View, you can use the toolbar to perform the following tasks:
In addition to these buttons, you can use the Workflow Selector menu (also provided on this toolbar) to select and work on a workflow or workflow subprocess in Design view.
When you edit a workflow in Design View, the Palette window displays items loaded from the workflow library. You can drag these items from the Palette and drop them into Design View to create an activity node in the diagram (which also updates the XML source and the node tree in the Project and Files views). See Palette Window for more information.
Source Editor View
The Source Editor is a full-featured text editor that is integrated with the Explorer Projects window and the Debugger.
This view opens automatically when you create a new, editable object from the available Identity Manager IDE templates, or you can open the Source Editor by double-clicking an editable object in Projects window.
Figure 1-7 Example Source Editor View
The Source Editor displays the object’s unfiltered XML. You can click in the left margin immediately adjacent to an XML tag to set a breakpoint. For example, if you click in the margin next to the <WFProcess...> tag, you can set a breakpoint at the start of the workflow.
When you select objects for editing, the Palette window displays (typically in the upper right side of the Identity Manager IDE) with items from the workflow library and XPRESS categories. You can drag items from the Palette and drop them into a line in the Source Editor to create XML text at that point in the XML source.
Table 1-3 describes the toolbar buttons (from left to right) provided for the Source Editor view. The table also provides keyboard shortcuts for these tasks.
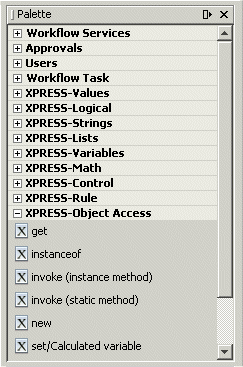
Palette Window
You can use the Palette window to drag new workflow services, approvals, users, and workflow tasks into a workflow displayed in Source Editor or Design view windows.
When you select objects for editing, the Palette window displays (typically in the upper right side of the Identity Manager IDE), and provides access to different items — depending on the editing view in which you are working.
In either view, you can drag items from the Palette window into the design or into the XML source. Dragging items into Design view creates an activity node in the diagram. Dragging items into the Source Editor view creates XML text where you dropped the item.
Figure 1-8 Palette Window for Create User
Properties Window
Use the Identity Manager IDE Properties window to view a properties sheet for the XML element associated with an object node selected in the Explorer. A properties sheet consists of the name and property values (such as file sizes, modification times, or result information) for a selected node.
To open the Properties window, select Window > Properties from the main menu bar or right-click on a node in the Projects window and select Properties from the menu. (When this window is open, you can double-click an object node to update the contents of the window.)
Figure 1-9 Example Properties Window
The Properties window also provides access to a Property Editor where you can edit an object’s XPRESS statements. You can use this editor dialog to change the object’s value, type, style (to simple or calculated), add or delete expressions, or move the expression up or down.
To open a Property Editor, click the Ellipses (...) button or double-click the XPRESS statement in the Properties window.
For additional information about the Properties and Property Editor windows, see Editing Object Properties.
Output Window
The Output window displays messages from the Identity Manager IDE when it finds errors during debugging. These messages usually include hyperlinks to the lines in your source code that caused the errors.
The Output window opens automatically when you run the Debugger, or you can open this window by selecting Window > Output from the main menu bar.
Figure 1-10 Example Output Window
Debugger Windows
The Debugger provided for the Identity Manager IDE is similar to the Java debugger and to the Debugger provided with the BPE — you can set line, global, view, or form cycle breakpoints in the code, start the Debugger, and have the code stop in the XML.
The Identity Manager IDE Debugger also enables you to add a watch to show the value of a particular variable. Another nice feature is that the Debugger is integrated with the Rule Tester and Form Previewer (discussed later in this chapter).
The Debugger provides the following window to help you troubleshoot your XML source:
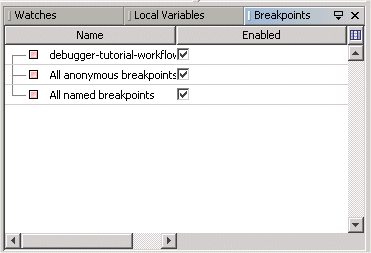
Breakpoints Window
Breakpoints window lists all of the breakpoints you have set for the current project, including a short description of the breakpoint and a boolean flag that indicates whether the breakpoint is currently enabled or disabled. You can enable or disable a breakpoint directly in the Breakpoints window by changing the Enabled property.
Select Window > Debugging > Breakpoints from the main menu bar to open the Breakpoints window.
Call Stack Window
The Identity Manager IDE automatically launches the Call Stack window when you run the Debugger.
When the Debugger reaches a breakpoint, the execution stack (a series of calls that the thread performed to get to the breakpoint) displays in the Call Stack window. In XPRESS, these calls are XPRESS operations such as BLOCK or CASE.
If additional functions appear in the call chain, these functions are listed in order. This list is called a stack trace, and it displays the structure of the execution stack at this point in the program's life.
Note
If you close the Call Stack window (or it is unavailable for another reason) you can re-open the window by selecting Window > Debugging> Call Stack from the main menu bar.
Local Variables Window
The Local Variables window lists all variables that are in scope at the current point of execution when the Debugger stops at a breakpoint. Variables represent values of the following types:
The Local Variables window remains blank when debugging is inactive or when execution is not stopped at a breakpoint.
If the current element is an XPRESS end tag, the result of the last evaluation displays in the Local Variables window when you stop the Debugger. This evaluation value also applies to other tags for which last value makes sense. For example, as Identity Manager evaluates <Argument> tags to workflow subprocesses, the argument value shows in the Local Variables window.
Watches Window
The Debugger allows you to use watches, which enable you to track changes made to variable or expression values when you run the Debugger. A watch can be any valid XPRESS expression.
When you specify a watch, the Watches window lists all of the variables, expressions, types, and values that are being watched when you debug the project. This list may also contain hyperlinks to take you to the object type in the XML source.
The Identity Manager IDE automatically launches the Watches window when you run the Debugger (or you can select Window > Debugging > Watches from the main menu bar).
Using Keyboard Shortcuts
Through NetBeans, Identity Manager IDE enables you to use different keyboard combinations to run commands and navigate in the Identity Manager IDE, including:
- Menu shortcuts help you navigate, activate, and select menu options from the menu bar.
- Source Editor shortcuts help you execute commands and actions in the Editor. Some of these shortcuts are common to all file types, while others are only available when editing certain file types.
- Window shortcuts help you navigate, activate, and select operations in the Identity Manager IDE windows.
- Help shortcuts help you navigate the Identity Manager IDE Online Help System.
For a detailed description of available keyboard shortcuts and instructions for using them, refer to the online help.
Note
To assign shortcuts, select Tools > Options, and when the Options dialog displays, select Keymap.
Working with Identity Manager IDE ProjectsTo use Identity Manager IDE effectively, you must also understand some basic concepts about the Identity Manager IDE project. This section provides the following information:
What is a Project?
A project is a location where Identity Manager IDE stores information about repository connections (such as the default server and password), options, Debugger breakpoints, open sources, and automatically saved files.
Projects are tied to a specific repository. You can associate more than one project with a repository, but only one repository per project.
Note
Identity Manager IDE projects allow you to interact directly with CVS. Refer to your NetBeans documentation for information.
You can create two project types in Identity Manager IDE:
- Sun Identity Manager: Select this project type to download source files from Identity Manager.
- Sun Identity Manager with Existing XML Objects: Select this project type if you have existing XML files containing Identity Manager objects on your local file system (similar in concept to creating a new Java project from existing sources).
For example, if you have an existing deployment with Identity Manager objects stored in CVS, you can specify the Sun Identity Manager with Existing XML Objects project type to retrieve those objects from CVS and create a project with those files.
Creating a Project
To create a new project, use the following steps:
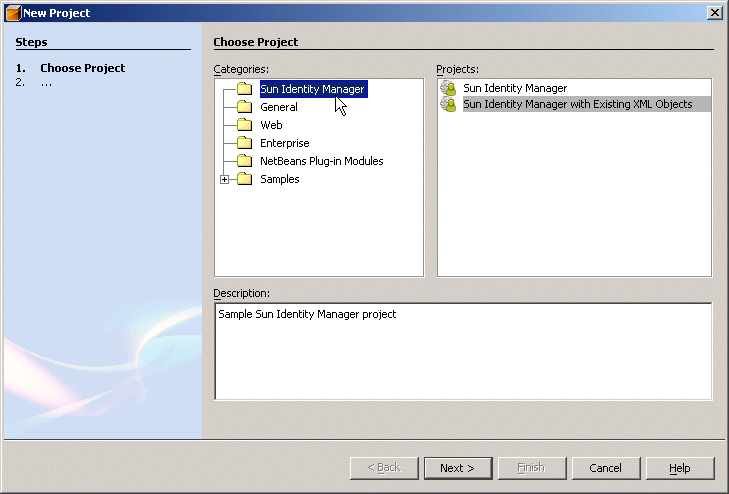
- Select File > New Project.
- When the New Project wizard displays (Figure 1-11), select Sun Identity Manager from the Categories list to indicate what type of project you are creating.
Figure 1-11 New Project Wizard: Specify a Category
- Select one of the following sample Sun Identity Manager projects from the Projects list.
- When you are finished, click Next.
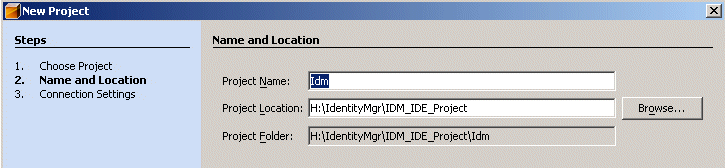
- The Name and Location panel displays so you can specify a file system location in which to store this project. Enter a project name, a directory location, and a project folder name into the fields provided, and then click Next.
Figure 1-12 New Project Wizard: Specifying Where to Store the Project
Note
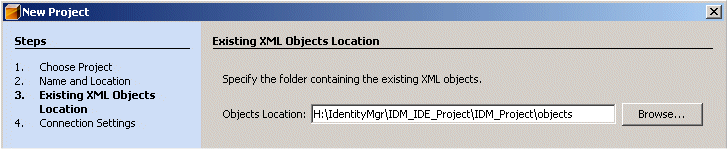
If you are creating a Sun Identity Manager with Existing XML Objects project, the Existing XML Objects Location panel displays as shown in Figure 1-13.
If you are creating a Identity Manager project, skip Step 6 and go to Step .
Figure 1-13 New Project Wizard: Specifying Location of Existing XML Objects
- Specify the directory path and folder where your XML objects are stored, and then click Next.
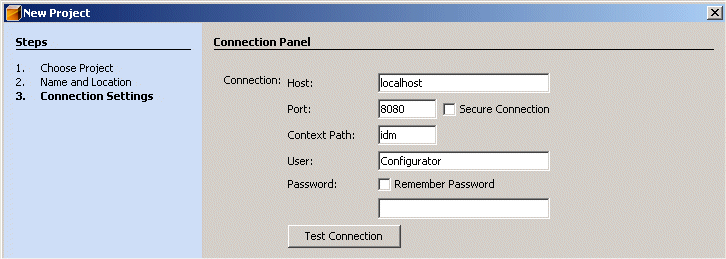
The Connection panel displays (Figure 1-14).
Figure 1-14 New Project Wizard: Specifying Connection Settings
- Enter the following information to define how you are going to connect to Identity Manager instance for development:
- Host: Enter the name of the host where your project is running.
- Port: Enter the number of the TCP port on which the directory server is listening.
Enable the Secure Connection box if you want Identity Manager IDE to use SSL when opening the connection.
- Context Path: Enter the Context Root for your Identity Manager installation (for example, /idm)
- User: Enter your administrator user name.
- Password: Enter your administrator password.
Enable the Remember Password box if you want Identity Manager IDE to remember and automatically enter your password for future sessions.
- After setting all of the connection parameters, click Test Connection to check the status of your connection to the project environment.
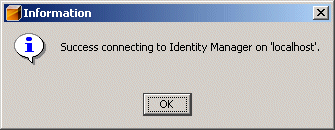
- If the Login dialog displays, provide your login information, and then click OK to test whether you can access the Identity Manager server specified in the project properties.
If you have a successful connection, the following pop-up displays (see Figure 1-15).
Figure 1-15 Successful Connection
If the connection fails, an error message displays to provide information about the failure. Correct the problem and test the connection again.
Note
You can also test connections in Identity Manager IDE when you edit an existing project’s properties.
- Click OK to close the pop-up, and note that your project is now available in the Identity Manager IDE Projects window (upper left corner).
Choosing an Existing Project
To open an existing project, use the following steps:
- Select File > Open Project.
- When the Open Project dialog displays (Figure 1-16), browse to the project folder you want to use and click Open Project Folder.
Figure 1-16 Open Project Dialog
If you already have one or more projects open, the Open as Main Project check box (upper right corner) becomes active.
- Enable this box if you want to specify this project as the main project.
- Click Open Project Folder and the selected project is added to the Explorer window.
Viewing and Editing Project Properties
After creating or choosing a project, you can use either of the following methods to view or edit the project’s properties:
The Project Properties dialog displays (Figure 1-17) so you can review the project’s connection settings. If you edit any of these properties, click Test Connection to verify that you can still connect to your project environment.
Figure 1-17 Testing Connection to Project Environment
Working with Repository ObjectsIdentity Manager IDE enables you to work with repository objects on your local file system, rather than working directly in the repository (as with the BPE).
This section describes the procedures for
Supported Object Types
You can work with the following object types in the Identity Manager IDE:
- Configuration Object: A persistent object that contains forms and workflow processes.
- Email Template: Templates used to send notification of various changes and actions to users and administrators. You might use an email template, for example, to notify an approver of a pending request, or to notify a user that his password has been reset.
- Form: An object associated with a Web page that contains rules about how a browser should display user view attributes on that page. Forms can incorporate business logic, and often are used to manipulate view data before it is presented to the user.
- Generic Object: An object typically used to represent views, such as simple collections of name/value pairs. Generic objects have an <Extension> of type <Object>.
- Library: An object used to organize closely related objects, typically rules, into a single object in the repository. Organizing objects into libraries makes it easier for workflow and form designers to identity useful objects.
- MetaView: In Identity Manager, a meta view is a unified view of all resources, providing a common data model in which to view a set of resources and how attributes on these resources flow from one to another.
- Rule: Objects in the Identity Manager repository that contain functions written in the XPRESS, XML Object, or JavaScript languages. Within Identity Manager, rules store frequently used logic or static variables for reuse in forms, workflows, and roles.
- Workflow Process: A workflow is a logical, repeatable process during which documents, information, or tasks are passed from one participant to another. Identity Manager workflows comprise multiple processes that control user accounts, such as account creation, update, enabling, disabling, and deletion.
- Workflow Subprocess: An object used to create a workflow subprocess to include in a workflow.
Downloading and Reloading Objects from the Repository
One of the advantages to using the Identity Manager IDE, is that it enables you to download and modify objects outside of the repository.
Downloading Objects
To download an object from the repository to the Identity Manager IDE for the first time, use the following steps:
- Right-click the Objects node (or any object type node in Projects window) and when the pop-up menu displays, select Repository > Download objects.
- The Download Objects From Repository dialog displays so you can browse the objects in the Repository. Expand the Object Type node and select the object from the list.
Tip
You can download multiple objects from the repository by pressing the Ctrl key as you select the objects from the list.
- When you are ready, click the Download button.
The selected object nodes, and children that represent individual elements in the object, will be displayed in the Explorer. You can double-click child nodes to go to their XML elements and view them in the property sheet.
Reloading Objects
To replace (overwrite) an object in the current project with a new version of that object from the repository, use the following steps:
- Right-click the object node and when the pop-up menu displays, select Repository > Reload objects.
Tip
You can download multiple objects from the repository by pressing the Ctrl key as you select the objects from the list.
- An Overwrite Files? dialog displays to let you know that the object already exists on your local file system, and asking you to confirm that you want a fresh copy from the repository.
- When you are ready, click the Reload button.
The selected object nodes, and children that represent individual elements in the object, will be displayed in the Explorer. You can double-click child nodes to go to their XML elements and view them in the property sheet.
Uploading Objects to the Repository
To upload new or modified objects from your local file system back to the repository, use the following steps:
Checking-Out Views
The Identity Manager IDE allows you to check out a particular view (such as a user view) from the repository for editing.
To check out a view, right-click the Objects folder in Project window and select Repository > Checkout view from the popup menu. Provide the View type and View name and the view contents will display in tree format.
After editing, right-click on the view to check it back into the repository — just like any other XML object.
Creating a New Object
To create a new object for your project, use the following steps:
- Right-click the Objects node (or an object types node) and select New > File/File Folder.
- When the New File wizard displays
- Select Sun Identity Manager Objects in the Categories list and choose one of the object types from the File Types list. Click Next.
- Enter a file name and the folder where you want to store the file. Click Finish to close the New File wizard.
By default, Identity Manager IDE automatically specifies the current project directory and current project’s objects folder, but you can specify a different location.
The new object displays as a child node under the selected object type node. In addition, the new object’s XML source is displayed in the Source Editor view.
Editing Object Properties
You can edit an object’s properties from the Properties window or by right-clicking the object node (or an object types node) and selecting Properties from the pop-up menu.
Figure 1-18 Example Properties Window
The Properties windows provide one or more of the following features:
- Text field: Displays if the property requires a string value.
Type a new value into the text field, and then click Enter.- Drop-down menu: Displays if several, specific values are available for the property. Select the value from the list or double-click the property name to rotate through the available values.
- Ellipsis (...) button: Displays if the property has a property editor. Click this button to open the property editor dialog. Change or replace the existing value and then click OK to save your changes and close the property editor dialog.
- Property Editor: Double-click the object’s XPRESS statement or click its Ellipses (...) button to open a Properties Editor (Figure 1-19) where you can edit an object’s XPRESS statements by changing the object’s value, type, style, add or delete expressions, or move expressions up or down.
Figure 1-19 Example Properties Editor Window
Working with XMLTo edit an object’s XML, double-click on the object node you want to edit in the Project or Files window. If the Source Editor view does not display by default, click the Source button.
The object’s unfiltered XML displays in the Source Editor, so you can edit, check, and validate the XML as needed.
When you select objects for editing, the Palette window displays with items from the workflow library and XPRESS categories. You can drag items from the Palette and drop them into a line in the Source Editor to create XML text at that point in the XML source.
Using Auto-Completion
When you install the Identity Manager IDE, it registers the waveset.dtd definition file, which enables auto-completion for XML elements and attributes.
To use the auto-completion feature, begin typing an XML element or attribute, and then press Ctrl+Spacebar. NetBeans displays a list of the elements and attributes that can be used to automatically complete the element.
Identifying and Correcting Malformed XML
If you load a file into the Identity Manager IDE with malformed XML, or if you edit a file and the edits do not conform to the definition (DTD) file, an error icon displays on the object’s top-level parent in both the Project and File windows.
Figure 1-20 Error Icon
In addition, when an object has malformed XML
- The object’s child nodes do not display.
- The Add, Clone, and Upload commands, some context menus and buttons become disabled.
- You cannot use the Form Preview or Test Rule features for Forms, Rule, or Library nodes.
- XML added directly to the XML editor is not lost, but a node for the added object will not display until you fix the XML.
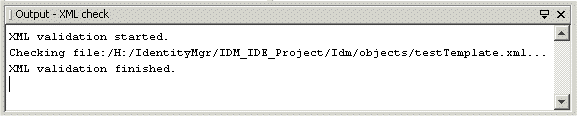
If you right-click in the Source Editor window and select Validate XML from the pop-up menu, the results — including a link to the malformed XML source — display in the Output window. Click this link and Identity Manager IDE highlights the line just below the malformed XML in the Source Editor window so you can easily locate and correct the problem.
Validating XML
You can immediately validate a object’s XML by right-clicking in the Source Editor and selecting Validate XML from the context menu.
Check the Output window for the results, which should be similar to the following message:
XML validation started.
Checking file:/H:/IdentityMgr/IDM_IDE_Project/Idm/objects/
System%20Configuration.xml...XML validation finished.
Working with the Identity Manager IDE DebuggerThe Identity Manager IDE provides a graphical Debugger that you can use to debug Identity Manager forms, rules, and workflows. You can use this Debugger to set breakpoints and watches, step through code, examine and modify variables, examine classes and the callstack, follow threads, and run multiple sessions.
This section describes how to use the Identity Manager IDE Debugger, and if you have previously used a code debugger for a procedural programming language, you should be familiar with the terms used here. The information is organized as follows:
Caution
The Identity Manager IDE Debugger is enabled by default, but you should always disable it when you are finished debugging to prevent someone from accidently connecting it to an application server in your production environment.
Instructions for disabling the Debugger, are provided in Disabling the Debugger.
Starting the Debugger
To start the Identity Manager IDE Debugger, select Run > Debug Main Project from the main menu bar.
When you start a debugging session, the Identity Manager IDE automatically opens a set of Debugger windows that display runtime information about your program. From these windows, you can
Setting Breakpoints
You use breakpoint commands in the Debugger to halt the execution of an object before executing a specific line of code.
When you are using the Debugger, breakpoints apply regardless of where you launched the form or workflow. While most debuggers allow you to set breakpoints only on source locations; the Identity Manager IDE Debugger also permits you to set breakpoints at conceptual execution points, such as Refresh view. In this case, the Debugger suspends operation whenever a Refresh view operation occurs. You can then step-into the Refresh view and watch the underlying form processing in progress.
You can view a summary of all source breakpoints in the Breakpoints window (typically located in the lower-left corner of the Identity Manager IDE). You can also click on a breakpoint in the Breakpoints window to navigate to that breakpoint in the Source Editor.
When it stops at a breakpoint, the Debugger also displays variables (that are in scope) at the current execution point.
Figure 1-21 Breakpoints Window
The easiest way to set a breakpoint is to click in the left margin of the Source Editor, immediately adjacent to the tag where you want to add a breakpoint.
You can also select Run > New Breakpoint from the main menu bar. When the New Breakpoint dialog displays, select XPRESS from the Debugger menu. The content in the dialog changes to provide the following options:
- Breakpoint Type menu: Identity Manager is the only option that is available from this menu, and it is selected by default.
- Global tab (default): Select to enable one or both of the following options:
- All anonymous breakpoints — Sets a breakpoint on an anonymous source.
- All named breakpoints — Use this option when you do not know which form a particular page is using. You can set this breakpoint and go to the page. You should then disable the All named breakpoints option and refine your breakpoints to something more specific within that particular form, or the Debugger will stop at every breakpoint.
- View Cycle tab: Select to set breakpoints associated with commonly used views (such as Checkin View, Checkout View, Get View, or Unlock View).
The tutorial examples provided with Identity Manager illustrate how to use breakpoints. See Using the Identity Manager IDE Tutorial: Debugging Forms, Rules, and Workflows.
Using Watches
The Identity Manager IDE Debugger enables you to use watches, which can be any valid XPRESS expression. Watches serve two purposes:
The Debugger evaluates watches in the current context when you first enter the Debugger, and everytime it suspends while stepping or at a breakpoint. The Debugger also re-evaluates watches whenever you add or modify a watch.
The tutorial provided with Identity Manager (debugger-tutorial-workflow1.xml) illustrates how to use watches. See Example 1: Debugging a Workflow and a Rule.
Stepping Through an Executing Process
Stepping through describes the sequential, deliberate analysis of an executing process’ functions.
Terminology
Step into, step over, and step out are terms borrowed from debuggers of procedural programming languages, in which the execution order is implied by the structure of the language. However, in Identity Manager forms and workflows, the order in which elements occur in the code do not reflect the order in which they are executed.
Consequently, these terms have slightly different meanings when used in the Identity Manager IDE (or in the Business Process Editor (BPE)):
- Step-Into: Describes moving to the next point of execution on the current thread. Step-Into is always the smallest amount by which you can proceed through a process in the Source Editor.
- Step-Over: Describes moving from the current begin tag to the current end tag without stopping at an interim element. Stepping over permits you skip almost everything between a start and end tag. However, if the next point of execution does not occur between the start and end tags of the current element, debugging halts there instead.
For example, in a workflow containing multiple active virtual threads, you can step to the start tag of an action, but the next element to be executed is a different action. In this case, the process stops executing at a different point. Thus, you avoid accidently skipping over a potentially significant element.
- Step out: Describes moving incrementally until the execution stack is one less than the current. Similar to step-over. If the next point of execution has a different parent execution stack, it will stop there instead.
Table 1-4 provides a snapshot of how the Identity Manager IDE Debugger would proceed through this code sample:
Debugging Forms
This section explains how to work with Anonymous Sources and provides instructions for configuring and launching the Forms Previewer utility.
For detailed information about how the Identity Manager Forms Engine processes a form, see Sun Java™ System Identity Manager Workflows, Forms, and Views.
Note
You can check the execution stack in the Call Stack window to see which pass is currently being processed.
Working with Anonymous Sources
When stepping through forms, the Debugger can identify anonymous sources.
Anonymous sources are forms (or portions of a form) that are generated on the fly (such as Login forms and MissingFields forms), and do not correspond to a persistent form that resides in the Identity Manager repository.Because these forms do not reside in the repository, and thus lack unique identifiers, you cannot set individual breakpoints on anonymous sources. However, you can step through an anonymous source if you set an All anonymous sources breakpoint (as described in Setting Breakpoints).
This setting enables the Debugger to stop execution at points that do not have direct XPRESS source. As a result, the Debugger breaks any time it encounters a line from an anonymous source.
Configuring and Launching the Form Previewer
Identity Manager IDE provides a Form Previewer feature that enables you to preview your forms in an external browser. The Form Previewer is integrated with the Debugger, so you can also troubleshoot your forms.
When you preview a form, you are prompted to log in to Identity Manager.
To avoid having to log in every time you preview a form, enable the System Configuration object’s allowInterAppAuthenication property as follows:
- From Projects tab, expand the Generic Objects node and double-click System Configuration to view the XML in the Source Editor window.
- Scroll down (or use Edit > Find) to locate the allowInterAppAuthentication attribute and change the value to true, as shown in the following example:
- Select File > Save from the main menu bar to save your change.
Use one of the following methods to launch the Form Previewer feature:
Identity Manager IDE launches a new Identity Manager session in a browser window, and displays your form in the context of the Identity Manager Administrator user interface. In addition, information about the uploaded form displays in the Identity Manager IDE Output window.
Note
A tutorial is provided with Identity Manager (debugger-tutorial-workflow1.xml) to help you understand how to debug forms, rules, and workflows. Instructions for using this tutorial are provided in Using the Identity Manager IDE Tutorial: Debugging Forms, Rules, and Workflows.
Testing Rules
Identity Manager IDE provides a rule tester that enables you to verify standalone and library rules.
As you edit a rule in the Source Editor, you can use the Rule Tester to test it. You provide values for any rule argument in the Source Editor and then “run” the rule. (You can also embed trace statements.)
The best way to illustrate the rule tester is using an example. The following sections provide example procedures for testing standalone and library rules. In addition, the tutorial provided with Identity Manager (debugger-tutorial-workflow1.xml) illustrates how to debug rules. See Using the Identity Manager IDE Tutorial: Debugging Forms, Rules, and Workflows.
Example 1: Testing Standalone Rules
This example illustrates how to test a simple, standalone rule:
- Right-click Objects > Repository > Download Objects to download the Accountname First dot Last rule from the repository.
- Expand the Rules node and double-click Accountname First dot Last to open the rule.
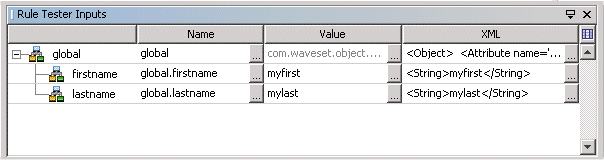
- Right-click in the Rule Tester Inputs window and select Add value from the menu.
- When the New Value dialog displays, enter the following information:
- Right-click in the Rule Tester Inputs window again, and enter another new value with the following information:
- Name: global.lastname
- Type: String
- Value: mylast
Your Rule Tester Inputs window should look similar to Figure 1-22.
Figure 1-22 Rule Tester Inputs Window
- You can now test the rule.
Click the Test Rule button
(far-right of the Source Editor toolbar) or right-click the Accountname First dot Last rule in the Project window and select Test Rule from the pop-up menu.
Note
A message displays to warn you that the rule test will automatically save the rule and publish it to the repository. Click Yes or Always to proceed.
You should see output displayed in Rule Tester Output window, similar to the following:
<String>myfirst.mylast</String>
<String>myfirst.mylast</String>
<String>myfirst.mylast</String>
- Next, try testing the rule and running the Debugger at the same time.
If the Debugger is not already running, click the Debug Main Project buttonon the main menu bar.
- Go the Source Editor window and click in the margin next to the <Rule> tag in the XML and add a breakpoint.
- Select Window > Debugging > Breakpoints to open the Breakpoints window.
- Click the Test Rule button and the Debugger will stop at your breakpoint.
(See the result in the Breakpoint window.)- Click the Step Into button
seven times to step through your rule, observing the results in the Local Variables window.
- Click Resume and observe the results in the Rule Tester Output window.
Example 2: Testing Library Rules
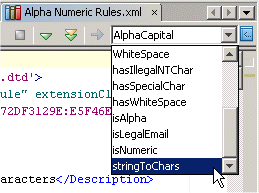
Testing library rules is very similar to testing standalone rules, except that you use the Rule Selector menu located in the Source Editor toolbar.
- If necessary, download the Alpha Numeric Rules library from the repository and double-click the node to open this library rule in the Source Editor.
- Use the Rule Selector menu on the Source Editor toolbar to select stringToChars (Figure 1-23).
Figure 1-23 Using the Rule Selector Menu
The testStr argument displays in the Rule Tester Inputs window because this rule declares a formal argument.
- Give the testStr argument a value (right-click on the argument name in the Rule Tester Inputs window, select New Value, and enter a value in the New Value dialog).
- Click the Test Rule button to run the rule and observe the results in the Output window.
Debugging Workflows
Workflows are executed by a single Java thread, and are represented in the Call Stack window by a single Java thread. However, within a workflow, each activity becomes its own virtual thread.
During workflow execution, the workflow engine cycles through a queue of virtual threads. Each virtual thread is in one of the states described in the following table.
After all transitions have completed, the workflow process subsequently begins executing.
To validate your workflow revisions after making changes, select the object or process in the Projects window, and then select Tools > Validate to test it. Check the Output window for messages.
Note
A tutorial is provided with Identity Manager to help you understand how to debug workflows. Instructions for using this tutorial are provided in the next section, Using the Identity Manager IDE Tutorial: Debugging Forms, Rules, and Workflows.
Using the Identity Manager IDE Tutorial: Debugging Forms, Rules, and Workflows
Identity Manager provides a tutorial (debugger-tutorial-workflow1.xml) to help you learn how to use the Debugger with forms, rules, and workflows. This tutorial contains sample forms, rules, and workflows that are used throughout this section.
This section is organized as follows:
Getting Started
To use the debugger-tutorial-workflow1.xml tutorial,
- Use one of the following methods to import the debugger-tutorial-workflow1.xml file:
- Download debugger-tutorial-workflow1 and debugger-tutorial-workflow2 from the Repository to your project. (If necessary, see Downloading and Reloading Objects from the Repository for instructions.)
- After restarting the application server, select Run > Debug Main Project from the main menu bar to launch the Identity Manager IDE Debugger.
Example 1: Debugging a Workflow and a Rule
This example illustrates how to debug a simple workflow and rule that uses the workflow, including how to step-into and step-through workflow debugging and rule execution.
To complete this exercise you must perform the following steps:
Step 1: Launch the Process
To launch the workflow debugging process:
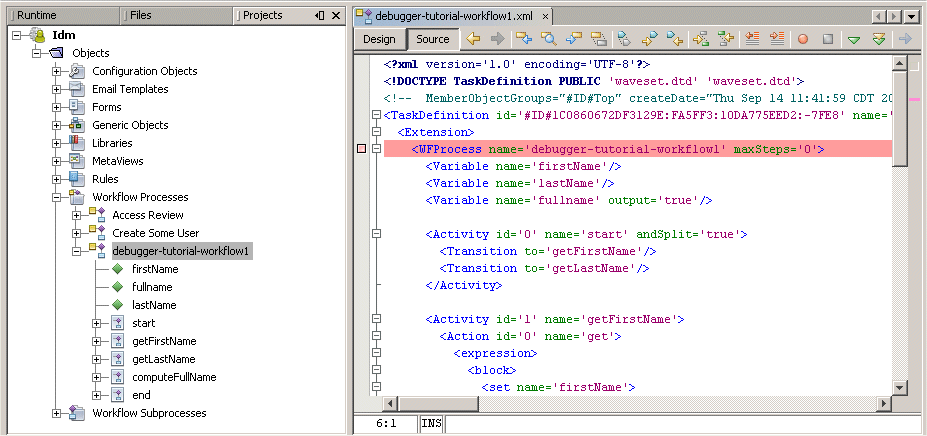
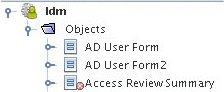
- In the Project window, expand the Workflow Processes node, and then expand the debugger-tutorial-workflow1.xml node.
- Double-click the debugger-tutorial-workflow1.xml node to view the XML in the Source Editor.
Figure 1-24 Open debugger-tutorial-workflow1.xml Source
- Set a breakpoint at the start of the workflow by clicking once in the margin, to the left of the <WFProcess> tag.
- If necessary, click the Debug main Project button on the main menu bar.
- Log in to Identity Manager.
- Select Server Tasks > Run Tasks, and when the Available Tasks page displays, click debugger-tutorial-workflow1.xml in the Name column.
- Check the Source Editor, and you should see that debugging halted at your breakpoint.
Also, note the following:
Below the Thread is your execution stack. This stack is an upside-down stack trace, with the calling function on top and the called function at the bottom. (It is upside down compared with how most debuggers represent execution stacks.)
The top most frame in the stack says Checkin View (ProcessViewer), which indicates that the workflow is being called by the checkinView method of the ProcessViewer. Because you do not have access to the Java source code for this stack frame, clicking on it will not display new information. However, the stack frame does provide context about where the workflow is being launched from.
The next frame in the stack is highlighted because it corresponds to the current point of execution, which is the beginning of the workflow process (<WFProcess>).
- In the Local Variables window, you should see a list of all variables that are currently in scope at the current point of execution, including
Now you are ready to start execution. Go to the next section for instructions.
Step 2: Start Execution
To start execution:
- Click the Step-Into button
on the main menu bar.
The Debugger moves to the start activity. Notice that the execution stack contains a Virtual Thread [start, step=0] (executing), which indicates there is a Virtual Thread for the start activity that is currently in the executing state.
- Double-click on the debugger-tutorial-workflow1 frame (two levels up) to highlight the WFProcess, which shows you the caller location.
- Double-click on the bolded entry in the Call Stack window to return to the current line.
- Click Step-Into again.
The Debugger moves to the </Activity> line in the Source Editor, and if you look in the Call Stack window, the Virtual Thread [start, step=0] is now pending outbound.
You can now proceed to Step 3, in the next section.
Step 3: Step Through the getFirstName Thread
To step-through the getFirstName thread:
- Click Step-Into.
The Debugger highlights the transition to getFirstName.
- Click Step-Into again.
The Debugger creates a new Virtual Thread for getFirstName as a result of this transition, and this Virtual Thread is currently in the ready state.
Note that Virtual Thread [start, step=0] is still pending outbound because it is an and-split operation, and must take all possible transitions.
- Click Step-Into again.
The Debugger jumps to the getFirstName activity in the Source Editor, and in the Call Stack window, the state changes from ready to executing.
- Click Step-Into again.
The Debugger moves to the get action.
- Now, click Step-Into three more times or until the Debugger reaches the </set> tag in the Source Editor.
Check the Local Variables window and note that the firstName value is set to <String>myfirstname</String> as a result of the </set>.
- Add a watch expression:
- If necessary, open the Watches window. Right-click in the window and select New Watch from the menu.
- When the New Watch dialog displays, type the following XPRESS statement into the Watch Expression field, and then click OK.
<ref>firstName</ref>
The Debugger evaluates the watch expression, and its value should be <String>myfirstname</String>, which is the value you just set in Step 5.
Step 4: Step Into and Over the getLastName Thread
Use the following procedure to step-into and over the getLastName thread:
- Click Step-Into three more times or until the Debugger reaches the </Activity> line for getFirstName.
Note that Virtual Thread (getFirstName, step=1) is now pending outbound.
- Click Step-Into.
The Debugger returns to the Virtual Thread (start, step=0), and is about to process the transition to getLastName.
- Click Step-Into.
The start becomes inactive because all transitions have been processed and, because of this transition, getLastName is now in the ready state.
- Click Step-Into.
At this point, the start Virtual Thread goes away because it is inactive, and the Debugger moves to the Virtual Thread (getLastName, step=2), which is now in the executing state.
- Click Step-Over to skip to the end of getLastName.
Check the Local Variables window, and the lastName variable should be set to <String>mylirstname</String>. Both the getFirstName and getLastName virtual threads are pending outbound.
- Click Step-Into.
The Debugger is on the transition from getFirstName to computeFullName.
- Click Step-Into.
getFirstName becomes inactive and a new Virtual Thread, (computeFullName, step=3) is created. This thread is in the pending inbound state because it is still waiting on the inbound transition from getLastName. (The wait occurs because it is an and-join operation. If it were an or-join operation, process status would immediately go to ready.)
- Click Step-Into.
The Debugger is now on the transition from getLastName to computeFullName.
Step 5: Step Into computeFullName Processing
Use the following procedure to step-into computeFullName processing:
- Click Step-Into.
The Virtual Thread (computeFullName, step=3) goes from pending inbound to ready because of this transition.
- Click Step-Into.
Virtual Thread (computeFullName, step=3) is now executing.
- Click Step-Into five more times.
If you check the Source Editor, you should see that the Debugger is now on the </argument> tag for firstName, and that Last Value in the Local Variables window is now <String>myfirstname</String>. This value is passed for the firstName argument.
Step 6: Step Through Rule Processing
To Step Through rule processing:
- Click Step-Into three more times.
The Debugger steps into the Compute-Full-Name rule.
- In the Call Stack window, click the frame to move up one frame.
The <rule> call in debugger-tutorial-workflow1 is highlighted to indicate from where the rule is being called.
- Double-click the bolded line to re-select that line.
- Click Step-Into three more times or until the Debugger reaches the </ref> tag.
The Last Value entry is now <String>myfirstname</String>, which is the result of the <ref>firstName</ref>.
- Click Step-Into three more times or until the Debugger reaches the </concat> tag.
Now, the Last Value entry is the result of the <concat> expression.
<String>myfirstname mylastname</String>
- Click Step-Into twice more and the Debugger returns to the </rule> tag.
Step 7: Conclude Workflow Processing
To conclude workflow processing:
- Click Step-Into until you reach the </set> element.
You should see that the fullname variable is updated to
myfirstname mylastname.- Click Step-Into twice more.
Virtual Thread (computeFullName, step=3) is now pending outbound.
- Click Step-Into four more times.
end goes to ready, then executing, and then the Debugger reaches the </WFProcess> tag, which indicates that the process is now complete.
- Click Step-Into.
The Call Stack window now displays After Checkin view, which means the checkin-view operation that launched this workflow is now complete.
- Click the Continue button on the main menu bar to resume execution.
If the browser request has not timed out, the Task Results diagram with the process diagram displays.
Example 2: Debugging a Workflow Containing a Manual Action and a Form
This example illustrates how to debug a sample workflow containing a manual action and a form. Use debugger-tutorial-workflow2 tutorial file and perform the following steps:
- Expand the Workflow Processes node, and double-click debugger-tutorial-workflow2. to view the XML in the Source Editor.
- Set a breakpoint on the <WFProcess...> tag.
- If necessary, click the Debug main Project button on the main menu bar.
- Log in to Identity Manager, and navigate to Server Tasks > Run Tasks.
- When the Available Tasks page displays, select debugger-tutorial-workflow2. from the Name column.
Notice that the Debugger has stopped at the breakpoint you set.
- Click Step-Into six times or until the Debugger marks <ManualAction... name='getNameAction'>.
- Click Step-Into.
- When the Stepping into Manual Action dialog displays to explain that form processing occurs in a different thread, click Yes or Always.
- Set a breakpoint on the <Form> tag to see the processing occur.
When the form processing is complete, the workflow continues execution in a separate thread. Consequently, you must set a breakpoint on the </ManualAction> to observe workflow processing after the form has completed processing.
Note that the Debugger set breakpoints on the <Form> and </ManualAction> tags as indicated. In addition, the Call Stack window indicates After Checkin View, and you have stepped out of the workflow process because workflow processing proceeded as far as possible (until the manual action completes).
- Click Continue, and the Debugger stops processing at the breakpoint set on the <Form> element.
Note the following entries in the Call Stack window:
- Derivation — Indicates that form execution is on the Derivation pass.
- Checkout View (WorkItem:...) — Indicates that processing is occurring in the context of a checkout view for the given work item.
- ManualAction forms — Operate against the work item view and manipulate workflow variables through the variables object. Expand the variables object to see the non-null workflow variables.
- Because this form contains no <Derivation> expressions, click Continue to proceed to the next processing phase. The HTML Generation (root component) pass of form processing begins.
HTML Generation Phase (Root Component)
To generate HTML for the root component:
- Click Step-Into twice.
The Debugger just processed the title <Property> element, and the Last Value entry in the Local Variables window contains the value of this property.
- Click Step-Into three more times.
The Debugger skips the form fields and goes directly to the </Form> element because this pass focuses only building the root component of the page.
- Click Continue to begin the HTML Generation (subcomponents) pass of form processing.
HTML Generation (Subcomponents)
To generate HTML for the subcomponents:
- Click Step-Into 13 times or until the Debugger reaches the </Form> tag.
The Debugger iterates over each of these fields and evaluates their display properties.
- Click Continue.
The Debugger displays No suspended threads because execution has resumed. Control has now returned to your Identity Manager browser window.
- Return to the Identity Manager browser window, and enter your first and last name as prompted, and click Save.
Return to your Debugger frame, and note that the Debugger is now suspended on your breakpoint.
- Expand the Variables subtree in the Local Variable window, and note that the names you just entered are displayed as the firstName and lastName values.
The Debugger is currently in the Confirmation phase of form processing.
Confirmation
Because this form has no confirmation fields, no processing occurs.
Click Continue to begin the Validation phase of form processing.Validation and Expansion
Because this form contains no Validation expressions, no obvious processing occurs.
- Click Continue to skip the Validation phase and proceed to the Expansion phase of form processing.
- Click Step-Into six times.
The Debugger moves to the <rule> tag of the <Expansion> of the variables.fullName field.
- Click Step-Into five times, and the Debugger steps into the <Rule> element.
- Click Step-Into seven times or until the Debugger reaches the </Rule> element.
The Last Value contains the full name.
- Click Step-Into again and processing resumes in the form.
- Click Step-Into again.
The top-level variables.fullName has the value of the Expansion expression you just ran. This value is a top-level entity rather that a child of the variables data structure because during form processing, form outputs are kept in their own temporary form_outputs data structure, with path expressions flattened.
After form processing, form outputs are assimilated back into the view. In the implicit variables form_inputs and form_outputs, form_inputs shows the unmodified workitem view, and form_outputs shows the output fields that are assimilated back into the view after form processing completes.
In general, form_inputs identifies the view, and form_outputs contains data to be assimilated back into the view. However, not all forms are necessarily tied to a view (for example, active sync forms). The form engine is a general data mapping engine, mapping from form inputs to form outputs. The view handler is responsible for passing the view into the form engine and assimilating the outputs back into the view.
- Click Continue.
The Debugger reaches the </ManualAction> breakpoint that you set previously when the Debugger stepped into the Manual Action. The firstName and lastName variables are the values that you entered. The fullName value is the result of the Expansion expression that just ran.
- Click Step-Into five times until you get to <ManualAction... name='displayNameAction'>.
- Click Step-Into again. (If prompted, click Yes or Always.)
- Click Continue.
The Debugger is now on the Derivation pass for displayNameForm.
Derivation and HTML Generation (Root Component)
To complete the derivation and HTML generate phase
- Click Continue to begin the HTML Generation (root component) processing for displayNameForm.
- Click Step-Into eight times or until the Debugger reaches the </Property> element for subTitle.
- Click Continue twice.
The Debugger displays the following message:
No suspended threads because execution has resumed. Control has now returned to the browser window.
- Return to your Identity Manager browser window.
The information displayed is the same you entered.
- Click Save and return to your Debugger frame.
The Debugger is now on the Confirmation pass, processing the displayNameForm.
Validation and Expansion
To begin validation and expansion,
- Click Continue to begin the Validation pass.
- Click Continue to begin the Expansion pass.
- Click Continue again.
The Debugger is now on the </ManualAction> tag because the manual action is complete. At this point, workflow processing has resumed.
- Click Step-Into five times or until the Debugger reaches the </WFProcess> tag, indicating that the workflow has completed execution.
- Click Continue.
- Return to the Identity Manager window and you should see the workflow process diagram. Click OK.
Example 3: Debugging the Tabbed User Form and Refresh View
This sample debugging procedure illustrates how Debugger breakpoints apply regardless of where you launch a form or workflow.
To complete this procedure, you must perform the following steps:
Setting a Breakpoint
To set a breakpoint:
- Right-click in the Breakpoints window and select New Breakpoint from the menu.
- When the New Breakpoints dialog displays, select XPRESS from the Debugger menu and then select the View tab.
- Enable the Refresh View check box.
The Debugger will now execute a breakpoint whenever a view is refreshed during execution.
Creating New User
To create a new user:
- In Identity Manager, select the Accounts tab, and then select New User from the top, left drop-down menu.
- When the Create User page displays, enter a first name and a last name (for example, jean faux).
- Click a different tab to trigger a refresh view operation.
Note that Identity Manager is now suspended because it hits a breakpoint.
Viewing Before Refresh View Results
Return to the Identity Manager IDE and note the following:
In the Local Variables window, expand the global subtree and locate the firstname and lastname values that you typed in the form. Note that the fullname is currently null.
Viewing After Refresh View Results
To view the After Refresh view results,
- Click Continue.
The Call Stack window lists After Refresh View, indicating it now displays the state of the view just after the refresh occurred. Note that the fullname value is now jean faux.
- Click Continue again.
The form resumes execution. Return to the Identity Manager browser window and change First Name to jean2. Click a different tab to trigger another refresh.
Back in the Identity Manager IDE Source Editor, the form processing is suspended at Before Refresh View.
Stepping Through the Form
To Step Through the form,
- Click Step-Into to reveal the fullname expansion in execution.
The Call Stack window lists Before Expansion, which indicates that the form variables have not been expanded.
- Click Step-Into again.
The Call Stack window now lists Before Expansion, iteration=0, indicating that you will see the form variables before the first Expansion pass.
- Click Step-Into again.
The Call Stack window lists an anonymous source (Tabbed User Form (Anonymous, line: 3)(begin)). The anonymous source is a wrapper form created on the fly and it is related to the MissingFields form.
- Click Step-Into two more times until you reach the beginning of Tabbed User Form.
- Continue to click Step-Into until you reach <Field name='global.fullName'> (Approximately 20 to 30 step-into operations.)
- Click Step-Into 15 times or until you have reached the </Field> element.
While stepping, notice that the Last Value entry at the </concat> tag is
jean2 faux, and that the form_outputs value is global.fullname: jean2 faux.Complete Form Processing
To complete form processing:
- Click Step-Out seven times.
At this point, the Call Stack window should indicate:
Refresh View (User)
After ExpansionThe Local Variables window displays the state of the form variables after all expansions have run.
- Click Step-Out again.
You have now reached After refresh view. The Local Variables window now displays the view variables.
- Expand the global subtree.
Note that fullname is now jean2 faux.
- Click Continue.
Stopping the Debugger
To stop the Identity Manager IDE Debugger, select Run > Finish Debugging Session from the main menu bar.
Disabling the Debugger
You should always disable the Debugger when you are finished debugging to prevent someone from accidently connecting it to an application server in your production environment.
To disable the Debugger, use the following steps:
- From Projects tab, expand the Generic Objects node and double-click System Configuration to view the XML in the Source Editor window.
- Scroll down (or use Edit > Find) to locate the serverSettings.<server>.debugger.enabled attribute and change the value to false, as shown in the following example:
- Select File > Save from the main menu bar to save your change.
- Restart your application server.
Running the Debugger Outside a Test Environment
When you encounter problems in production that require debugging, it is best to try to reproduce and debug those problems in a test environment. Setting breakpoints in the Debugger can quickly bring down the application server in your production environment, where a large volume of traffic occurs. You might also block others from using the system (depending where you set the breakpoints).
If you cannot debug in a separate test environment, follow this procedure:
- Divert all live traffic to a subset of your cluster by taking one of the nodes in your cluster offline. (For the purpose of this task, call this node server-a.)
- Use the Identity Manager IDE to edit the System Configuration object by setting the SystemConfiguration serverSettings.server-a.debugger.enabled property to true.
- Restart server-a so that the change to the System Configuration property setting can take effect.
- Change your project settings; specifying the proper host (server-a), port, context path, user, and password.
- Start the Debugger.
- When you have finished debugging, set serverSettings.server-a.debugger.enabled to false and restart server-a to prevent the Debugger from connecting to your live production environment.
- Reintegrate server-a into your on-line cluster.
Uninstalling Identity Manager IDE from NetBeansIf for any reason, you want to uninstall the Identity Manager IDE module from NetBeans, perform the following steps:
- If necessary, open NetBeans.
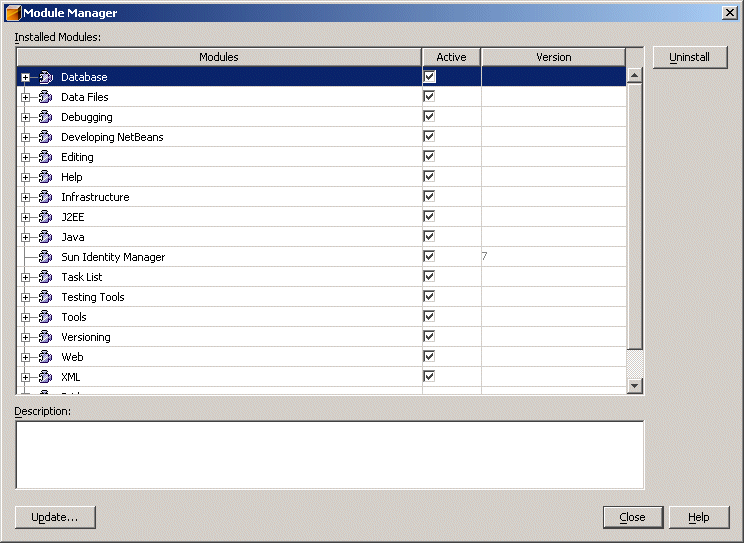
- Select Tools > Module Manager from the NetBeans menu bar.
The Module Manager dialog displays (Figure 1-25), listing all of your installed modules. The Active column indicates which of these modules are enabled.
Note
The Identity Manager IDE allows you to disable the modules you do not need to minimize start-up time and save memory. Disabled modules are not deleted from your installation directory, but are simply ignored by the Identity Manager IDE. You can re-enable disabled modules at any time.
Figure 1-25 Selecting the Module to Uninstall
- Select Sun Identity Manager from the list of modules.
- Click Uninstall.
- A pop-up displays, asking you to confirm that you want to uninstall the Sun Identity Manager module. Click OK to proceed with the uninstall process.
- When the process is complete, close the Module Manager.


 located on the Source Editor toolbar.