|
| |
| Sun Java[tm] System Identity Manager Quick Start Guide | |
Chapter 4
Quick Start ScenarioThis Quick Start Scenario provides a guided demonstration of some of Identity Manager’s most powerful features. The demonstration consists of three sections:
In addition, the following users are provided to illustrate how different people in an organization can use Identity Manager:
In a typical deployment, you can create different administrators who have subsets of these capabilities. For example, you might create a Report Administrator (to run reports), a Password Administrator (who can reset user passwords), and so forth.
Additionally, you can grant administrators capabilities in certain Identity Manager organizations to limit their scope of control – referred to as delegated administration. For example, administrators can have the Approver capability for the Sales organization, which allows them to approve or reject account creation for new users in the Sales organization, but not for new users in the Engineering organization.
Basic ProvisioningThis section provides instructions for
Creating Accounts on a Configured Server
You can create an account on the resource configured in the Setup Wizard by creating an Identity Manager user with the assigned resource, as follows:
- Open a Web browser and type the following address into the address bar:
http://localhost:8080/idm/
Note
Depending on the options that you selected during the Tomcat installation, the port may be different.
- Login to the Identity Manager Administrator interface as the Configurator user. The default password for this user is configurator.
- Click the Accounts tab to navigate to the Accounts page.
- Select New User from the New Actions menu to create a new user.
- Enter the following information on the Identity tab:
- In the Individual Resource Assignment field on the Assignments tab, select the resource that you configured in the Setup Wizard.
- Optionally enter any additional information about the resource account on the Attributes tab.
- Click Save.
The Create User Results should show that a Lighthouse user was created (this is the virtual user in Identity Manager) and that an account was created on the resource. You can use native tools on the resource to verify that the account was actually created.
- Click OK at the bottom of the Results page.
The user that you just created should display on the List Accounts page.
Configuring Identity Manager to Send Email Notifications
Use the following steps to configure Identity Manager to send email notifications when new users are created:
- Select the Server Tasks > Configure Tasks tabs to access the Task Configuration page.
- Click Create User Template to edit properties for the workflow that runs when a user is created in Identity Manager.
- Select the Notification tab.
- Select Administrator List for the Determine Notification Recipients from field.
- Select demoapprover from the Administrators to Notify field.
This is the demoapprover user that was created in the Setup Wizard. When you select this user, Identity Manager will send email to the email address that you specified in the Setup Wizard when new users are created in Identity Manager.
- Select Account Creation Notification as the for the Email Template field.
- Click Save.
- Repeat steps 4–11 from the Creating Accounts on a Configured Server section to create a new user.
- If you configured an SMTP server in the Setup Wizard, Identity Manager will send an email to the demoapprover.
- If you configured a notification file in the Setup Wizard, you can open the notification file in a text editor to see the email that would have been sent.
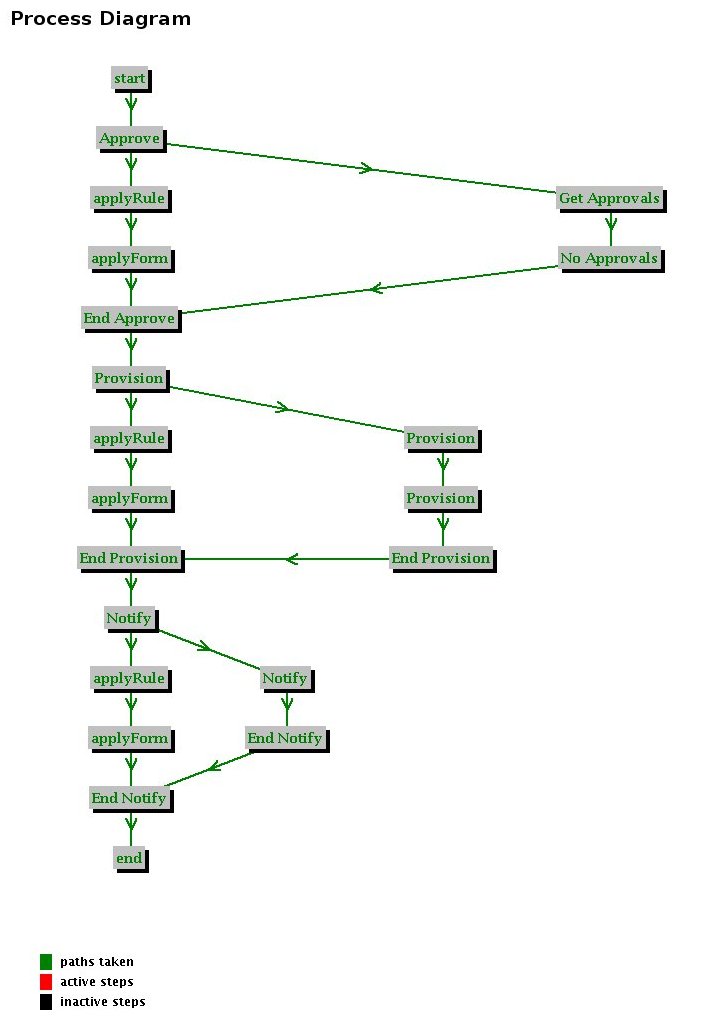
Identity Manager uses a process diagram to illustrate the steps that are executed by the workflow when creating, updating, or deleting a user. If user interaction is required during a workflow (such as an approval) the process diagram shows which workflow steps have run and which steps will run after the required interaction is completed.
Figure 4-1 Example Process Diagram
For more information about workflows, and an illustrated example of altering the approval workflow, see Sun Java™ System Identity Manager Workflows, Forms, and Views.
Configuring Identity Manager to Approve Account Creations
When you add a user to the Identity Manager system, administrators who are assigned as approvers for new accounts must validate the account creation. Identity Manager supports four categories of approvals, applied to these Identity Manager objects:
- Organization — Approval is needed for the user account to be added to the organization.
- Role — Approval is needed for the user account to be assigned to a role.
- Resource — Approval is needed for the user account to be given access to a resource.
- Additional Approvals — Approvals are determined with a rule, query, or list in the Configurable Task. You will use this approval type for this scenario.
For this scenario, you will require the demoapprover administrator to approve an account creation, as follows:
- Select the Server Tasks > Configure Tasks tabs to access the Task Configuration page.
- Click Create User Template to edit properties for the workflow that is run when a user is created in Identity Manager.
- Select the Approvals tab.
- Select Administrator List for the Determine additional approvers from field.
- Select demoapprover for the Approval Administrator field.
- Enable all checkboxes in the Editable column of the Approval Attributes table to allow the approver to modify these attributes when approving user creations.
- Click Save.
- Repeat steps 4-11 in the Creating Accounts on a Configured Server section to create a new user.
Notice that the Create User Results page states that the creation is pending an approval from demoapprover. If you view the List Accounts page, the new user will not yet appear.
- If you configured an SMTP server in the Setup Wizard, Identity Manager will send an email to the demoapprover to notify the administrator that an account creation approval has been requested.
- If you configured a notification file in the Setup Wizard, you can open the notification file in a text editor to view the email that would have been sent.
- Click Logout to log Configurator out of Identity Manager.
- When the Login page displays, log in as demoapprover and use the password that you specified in the Setup Wizard.
Notice that there are only three tabs in Identity Manager when you are logged in as demoapprover – Home, Passwords, and Work Items.
Identity Manager only displays tabs and sub-tabs for pages that the logged in user can use. Because demoapprover only has the Approver capability, these three tabs are the only pages that are available.
- Select the Work Items tab to view the Awaiting Approvals page.
Note
The process diagram (described in Configuring Identity Manager to Send Email Notifications) is stalled at this point, awaiting an approval.
- Click the approval link in the table, and then click the approval.
- If necessary, you can change user attributes or add comments about the approval.
Note
You can forward an approval to a different user by selecting that Identity Manager user’s name in the Forward to list.
- Click Approve to approve the account creation request.
- Logout demoapprover and log back in as Configurator.
- Click the Accounts tab to verify that the new user was created after the approval. Also, demoapprover should receive an email notification that the account was created.
End User Self-ServiceThe End User Self-Service section demonstrates how end users can use Identity Manager to login with authentication questions when they forget their password, change their password on all resource accounts, and change their personal data.
In this section you are assuming the role of an end user and performing the following tasks:
Changing Your Authentication Questions’ Answers
To change the answers to your authentication questions:
- To view the login page for the end user interface, open a Web browser and type the following address into the address bar:
http://localhost:8080/idm/user/login.jsp
Note
Depending on the options that you selected for the Tomcat installation, the port may be different than 8080.
- Enter the User ID and Password of a user that you created in the Basic Provisioning section.
- Click Authentication Questions, and then click the Profiles tab.
- Enter an answer for the displayed question.
- Click Save to save the new answer to your question.
- Click Logout.
Changing Your Password
To change your password:
- Enter the same User ID that you entered in step 2 of the previous section, but leave the Password blank.
- Click Forgot Your Password?.
- Enter the same answer that you provided in step 4 of the previous section.
- Click Login.
Because the login occurred with a forgotten password, you are prompted for a new password.
- Enter a new password.
Notice that the new password will be set on the Lighthouse account (the Identity Manager user) and on the account on the configured resource.
- Click Change Password.
Changing Your Personal Data
To change your personal data:
Advanced FeaturesThis Advanced Features section demonstrates
Loading Users into Identity Manager
One of the first steps you perform for an Identity Manager deployment is to load all accounts from the managed resource into Identity Manager so they can be managed. Generally, most deployments manage multiple resources; however, for the purposes of this quick start scenario, only a single resource will be managed.
- Select the Resources tab to access the List Resources page.
- Expand the resource tree to find the resource that you configured in the Setup Wizard.
- Enable the resource’s checkbox to select the resource.
- Select Edit Reconciliation Policy from the Resource Actions list to define how accounts found on the resource will be reconciled with the users found in Identity Manager.
Initially, Identity Manager will have only a few administrators (Configurator, Administrator, demoapprover) and the users that you created in the Basic Provisioning section.
All other users on the managed resource will be considered UNMATCHED when reconciled because there are no Identity Manager users that match the resource accounts that are found.
- Select Create new user based on resource account for the UNMATCHED situation in the Situation Options table.
The remaining situation options are used to determine how Identity Manager responds to other reconciliation situations. For this Quick Start Scenario, do not change the default values for these options.
- Click Save to save the reconciliation policy.
- Enable the resource’s checkbox.
- Select Full Reconcile Now from the Resource Actions list to initiate a full reconciliation from the resource.
- Enable the resource’s checkbox.
- Select View Reconciliation Status from the Resource Actions list to view the status of the full reconciliation.
The time it takes to complete a full reconciliation can vary widely, based on the number of users on the managed resource, the speed of the managed resource, the speed of the Identity Manager server, and so forth.
- When the reconciliation is complete, review the information provided to see how many accounts were created.
- Select the Accounts tab to navigate to the List Accounts page.
Notice that all users from the resource are now listed on this page.
Detecting Changes on the Managed Server
Identity Manager accommodates bidirectional synchronization, depending on target resource functions and market need.
- Identity Manager’s Active Sync feature allows information that is stored in an authoritative external resource (such as an application or database) to synchronize with Identity Manager user data. Setting up active synchronization for an Identity Manager resource enables it to “listen” or poll for changes to the authoritative resource.
For the purpose of this Scenario, you will use reconciliation to detect changes on a managed server. Use the following instructions:
- Natively create a new user on the managed resource.
The method for creating a new user will vary depending on the resource.
- Select the Resources tab to access the List Resources page.
- Expand the resource tree to find the resource that you configured in the Setup Wizard.
- Enable the resource’s checkbox to select the resource.
- Select Incremental Reconcile Now from the Resource Actions list to initiate an incremental reconciliation from the resource.
- Enable the resource’s checkbox.
- Select View Reconciliation Status from the Resource Actions list to view the status of the incremental reconciliation.
- After the reconciliation is complete, review the information to see how many accounts were created.
- Select the Accounts tab to access the List Accounts page.
Notice that the new user you created on the resource is now listed on this page.
Viewing the Historical User’s Change Report
To view a user’s change report history:
- Open a Web browser and type the following Web address in the address bar:
http://localhost:8080/idm/
Note
Depending on the options that you selected during the Tomcat installation, the port (8080) may be different.
- Login to the Identity Manager Administrator interface as the Configurator user.
- Select the Reports tab to access the Run Reports page.
- Click the Historical User Changes Report link to provide information about which report to run.
- Enter the Account ID of the user specified in the End User Self-Service section.
- Click Run.
- Review the historical change report.
Notice that events such as creation, modifications, change password, login, and logout are reported. The report provides information about when the change occurred, which user caused the change, the result of the change, attribute-level before and after values for creations and modifications, which interface the change occurred in, and so forth.
- You can run this report for all users by clicking the Run button located next to the User Historical Change Report on the Run Reports page.
Next StepsThere are many other important features in Identity Manager that are not discussed in this Quick Start Guide, such as:
For more information about these and other Identity Manager features, consult the Identity Manager publications listed in the Related Documentation and Help section of the Preface.
To contact a Sales representative for more information about the Identity Manager product, get information about self-qualifying, or sign-up for the Identity Champions newsletter be sure to visit the following web site and select the Sun Identity Insights Program checkbox:
https://subscriptions.sun.com/subscription_center/ecomm.jsp