| C H A P T E R 7 |
|
SAS Domain Access Configuration |
This chapter describes how to configure SAS access configuration for JBOD and open systems arrays. It contains the following sections:
Serial attached SCSI (SAS) domain access configuration enables you to configure data hosts to access a specified group of storage devices. Sun Storage Common Array Manager SAS access configuration provides the traffic segregation, resource flexibility, controlled resource sharing, protection, and topology control functionality required to manage SAS-based systems.
By default, SAS access configuration is disabled, which means all hosts can access all disks.
Sun Storage Common Array Manager provides SAS access configuration management for:
You should become familiar with the following terms and concepts before configuring SAS access configuration.
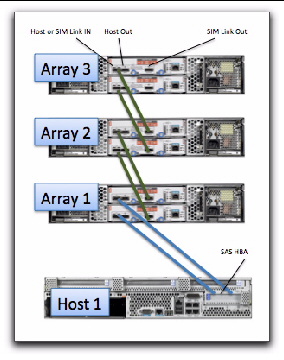
FIGURE 7-1 illustrates the physical components using the Sun Storage J4500 Array as an example.
FIGURE 7-1 SAS Domain Configured for the Sun Storage J4500 Array
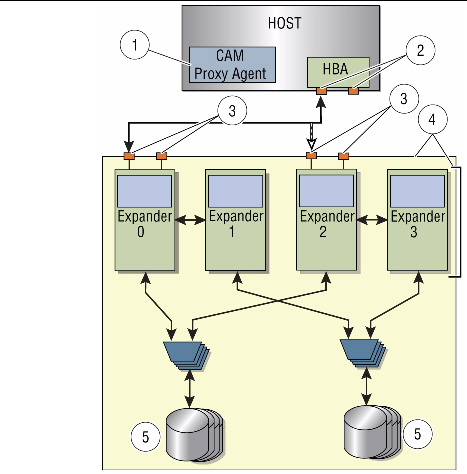
Sun Storage Common Array Manager provides support for Access Configuration (SAS zoning) of the Sun Storage F5100 Flash Array and Sun Storage J4000 Array Series (J4200, J4400, and J4500). Through Access Configuration, you can assign each host its own storage resources. Accomplished on a per host SAS port, per target level, access configuration offers the following benefits: storage resource segregation, controlled resource sharing, protection, and topology control.


This section describes the following:
You can design each connected SAS port to have exclusive ownership over a specific set of targets in a single array or across cascaded arrays.
The dual SAS fabric design of the J4x00 arrays is initially seen as two separately configured (zoned) SAS domains. In a clustered or multipath situation, where you want two hosts to have access to the same disks for failover, each domain must be configured identically in the array management software for each side of the multipath connection or cluster. The array management software provides zoning templates for common configurations, as well as the ability to import and export user-defined templates.
The Sun Storage F5100 Flash Array consists of four independent fabrics. See the array’s documentation for more information.
Access Configuration features requires a supported LSI-based HBA, such as:
| Note - Sun Storage Common Array Manager also supports JBOD management via the 8-port PCIe RAID HBA (SGXPCIESAS-R-EXT-Z). However, this HBA is not supported in an Access Configuration environment. |
For more information, refer to the documentation included with the HBA used.
Use the following guidelines when configuring access for array storage resources, as appropriate for your installation. Examples are given for initial configuration (with or without multipath failover) and adding array storage to an existing configured array.
This section describes the following:
| Note - The Sun Storage F5100 Flash Array does not support multipathing or clustering. |
You can use the Sun Storage J4x00 array in a serial-attached SCSI (SAS) multipathing configuration to provide fault tolerant connectivity to storage. Although J4x00 arrays use single port SATA drives, the I/O circuitry provides a redundant data path to each disk port if the connections to the drives use independent controller paths (i.e., SIM0 and SIM1 for J4200/J4400 arrays and SAS A and B for the J4500 arrays).
Using the multipathing feature of the SAS protocol, the J4x00 can be configured to provide a redundant data path from host to disk. When used in conjunction with RAID and clustered server configurations, multipathing can help increase the availability of your J4x00 storage.
| Note - The J4500 array is not supported in a clustering configuration. |
The J4x00 multipathing supports active-active and active-passive operation, as follows:
| Note - Sun Storage F5100 Flash Arrays do not support cascading between individual domains or between F5100 arrays. |
There are three sets of steps required to cascade (or add) a J4x00 array to an existing J4x00 series array from the browser interface.
If multiple arrays are to be cascaded, add them one at a time, using the following procedures:
This procedure takes you through the steps required to disable the Access Configuration state for existing arrays, in preparation for cascading additional arrays.
1. Create a backup of all existing data.
2. From the Access Configuration page, check the SAS addresses, write down the SAS port WWN’s and associated drives for each domain, and then perform an Export operation for each.
Prior to re-cabling, you must record the SAS port WWN and the desired associated targets.The configuration will need to be recreated because the SAS port might be attached to a different array in the cascade or different ports on an array.
3. Unregister related arrays in the array management software:
a. From the navigation pane, select Storage Systems.
The Storage System Summary page is displayed.
b. Select the checkbox to the left of the array and click Remove.
Proxy hosts for un-registered arrays will automatically be removed as well.
Before cascading can occur, all arrays that will be cascaded as new or additional storage must be prepared using this procedure.
1. Specify ports for each array: Connect both sides of the new array (SIM0/SIM1 for J4200/J4400 arrays or SAS A/SAS B for J4500 arrays) directly to a server running a full installation.
The array must not be cascaded to another J4x00 array at this time.
2. Log into the management host by entering the address: https://host-name:6789
where host-name is the DNS name of the server connected to the array
3. From the Storage System Summary Page, click Register and then register the attached array (following the instructions in the wizard), using the host name or host IP address of the data host in the Registration window.
4. Expand the Array tree for the server until the Access Configuration screen for the first SAS Domain appears.

|
Caution - Be sure you have selected the appropriate array before going to Step 5. The Reset to Default procedure clears existing zoning configurations. |


Typically, new arrays will not have a password set. If you assigned a password for the array’s Access Configuration, you will need it to perform Step 5. If the previous password is not known, you can clear it using the methods specified in your J4200, J4400, F5100, or J4500 documentation.
5. For each SAS domain of the array, go to SAS Domains >Administration > Cascade Storage for the selected SAS domain, and click Prepare Storage.
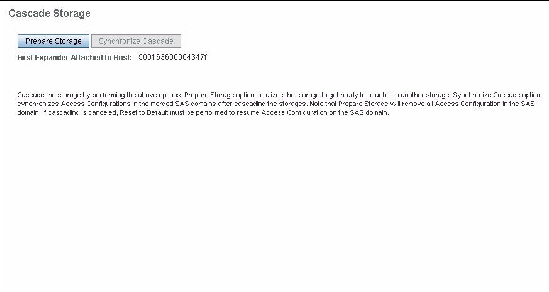
| Note - The CLI equivalent command is
sscs modify -p,--prepare-cascade sas-domain <sas-domain-name> command |
6. Unregister all arrays to be cascaded from the array management software:
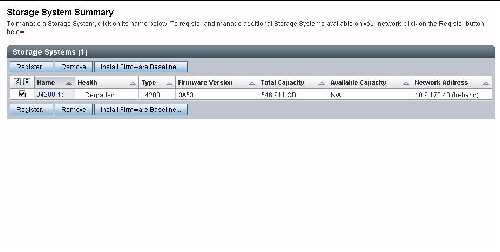
a. From the navigation pane, select Storage Systems.
The Storage System Summary page is displayed.
b. Select the checkbox to the left of the array and click Remove.
7. Disconnect the array from the server, and then disconnect AC power to the array.
Prerequisite: If any SAS ports from any attached hosts are not seen, verify that multipathing is disabled on those hosts. In addition, a reboot might be necessary to force an attached host to register its SAS ports with the storage arrays.
1. Disconnect all other attached hosts so your configuration resembles:
2. Connect the new array in cascade fashion to the existing J4x00 array(s).
In FIGURE 7-2 and FIGURE 7-3, Array 1 is either an existing or a new storage array. Array 2 is a new array which is attached to the primary array management server.
FIGURE 7-2 Temporary Cabling of J4500 for Initialization of the Cascade
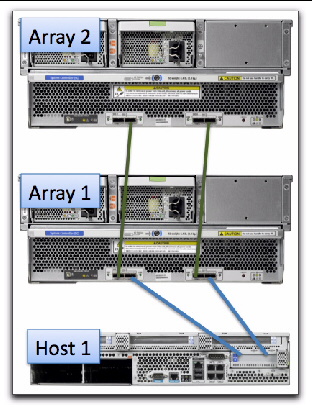
FIGURE 7-3 Temporary Cabling of J4200/J4400 Arrays for Initialization of the Cascade
3. Power on all arrays by reconnecting AC power.
The new array might take a few minutes to be recognized by the server’s HBA.
4. From the Storage System Summary page, register the newly cascaded array configuration.
All attached arrays should be found. If they are not, perform a host reboot (i.e., Full reboot reconfigure on Solaris) and attempt the registration again.
5. Synchronize the password for the selected SAS Domain with the current and newly attached arrays.
a. From the Administration page for the selected SAS domain, select “Change Password in the Array Registration Database.”
b. Enter your desired (or existing) password
6. Go to SAS Domains > Administration > Cascade Storage for the first SAS domain, and click Synchronize Cascade.
This synchronizes the zoning permission tables and initializes the connections between the arrays.
| Note - The CLI equivalent command is:
sscs modify -y,--synch-cascade sas-domain <sas-domain-name> command |
7. Attach additional hosts and change cabling from the primary array management server (host) as shown in cabling diagrams for your particular array.
When you have completed Step 7, all the arrays in the cascade should be discovered and the access configuration for all domains will be in the “disabled” state.
| Note - See FIGURE 7-4 and FIGURE 7-5 for the initial cascading setup for J4500 arrays. |
FIGURE 7-4 shows an example of how two hosts attach to two J4500 arrays. Refer to your user documentation for cabling instructions for your particular array.
FIGURE 7-4 Recommended Cascading Configuration for J4500 Array
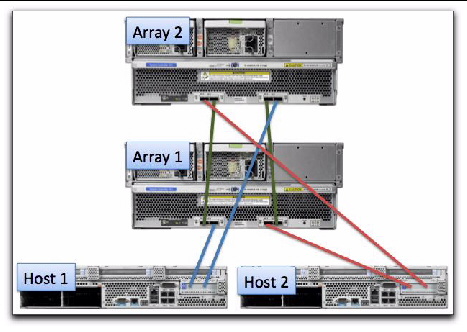
FIGURE 7-5 Recommended Cascading Configuration for J4200/J4400 Array Types
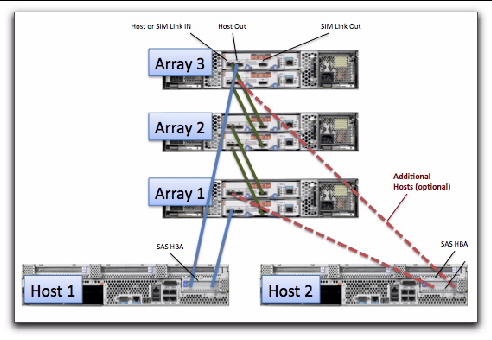
8. From the selected SAS Domain’s Access Configuration page, click Configure.
At this time, all arrays, domains, and SAS ports from all attached hosts should be seen within the corresponding Access Configuration Pages.
If SAS ports from any attached hosts are not seen, verify that multipathing is disabled on those hosts. In addition, a reboot might be necessary to force an attached host to register their SAS ports with the storage arrays.
9. For connections between the host and array that do not attach to a different port on this array (or another array due to configuration guidelines), implement Access Configuration for those SAS ports.
a. From the selected SAS Domain’s Access Configuration page, configure the SAS port and storage for the SAS domain.
b. If multiple SAS ports are seen, they should also be configured at this time (i.e., SAS port #1 might have disks 1-6 and SAS port #2 might have disks 7-12).
10. Repeat Step 8 and Step 9 to assign targets to the server (host) for all SAS domains found under the entry for the primary management server.
11. Configure the multipathing software for each attached host so that the multipathing drivers control any drives shared by multiple paths.
12. Export Access Configuration information for each SAS port.
Prerequisite: If you have configured multipathing, disable multipath software until after the access configuration is complete so the arrays will see all SAS ports.
The first server you will configure is referred to as the “primary array management server” and each additional server you set up for Access Configuration is referred to as “(additional) host.” The server used to configure access configuration can also be the combination of a management station and single proxy server.
1. Install the full version of the array management software that supports zoning for the J4x00 array on the primary array management server (unless it is already installed).
2. Attach all SAS cables from all desired hosts, as indicated in your array user documentation.
For example, you might attach the first server for the J4x00 array to either the input port on one controller or an input on each side (SAS A/B or SIM 0/1) if multipathing is desired.
3. Log into Sun Storage Common Array Manager from the primary array management server you configured by opening the browser and entering the following address:
Where host-name is the DNS name of the server connected to the array.
4. From the Storage System Summary page, click Register and follow the instructions in the wizard to register the arrays to the IP address of the first server.
5. If all attached SAS ports are not shown in the Access Configuration page, configure and reboot the primary array management and configure your multipathing software if multiple paths are attached at this point.
If the primary array management does not immediately recognize the array, use the appropriate host commands to scan for storage.
6. Configure the Access Configuration for each SAS port attached to the storage.
In the Access Configuration page, the SAS port(s) from the additional host(s) should be visible; however, they may only be represented as unique SAS addresses (no host names) since the proxy has not been discovered yet. Configuration for the additional host SAS ports should be done at this time by selecting the desired drives for one of the second host’s SAS ports, then repeating for each SAS port on the second host.
a. Expand the array tree for the server until the Access Configuration page for the first SAS Domain is displayed.
b. Click Access Configuration > Configure to assign targets to each server.
c. For each SAS port, choose the desired targets (disks or FMods) to which the SAS port should have access.
For multipath HBA initiator pairs, make sure the targets are the same.
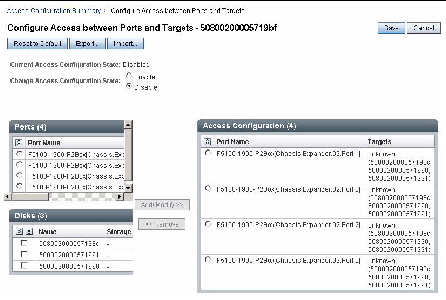
e. Verify the Access Configuration setting is set to “Enable” and click Save.
The selected settings will be applied to the SAS Expander devices in the storage.
7. Repeat Step 6 for each SAS domain.
8. Power cycle the attached hosts using the appropriate options (i.e., reconfigure-reboot on Solaris) which will perform a full re-scan of the attached storage.
The recommended configuration sequence is to start by connecting one SAS port to a management host. Then configure SAS Access Configuration for this port, and connect the remaining hosts per your plan.
TABLE 7-2 provides a summary of tasks required to prepare for and configure SAS access configuration.
Using Access Configuration features, you can assign each host its own storage resources, optimizing efficiency through segregation and topology control. Access configuration is accomplished on a per host SAS port, per hard-disk level.
Use the planning worksheets in Appendix B as you gather data for your configuration.
1. Determine if your SAS storage will consist of one array or multiple arrays cascaded together.
2. Determine how many SAS domains you want on your storage system. If you want to form larger domains, cable SAS expanders together.
3. Note the available disks or FMods to be target devices.
4. Decide how to assign storage:
a. Select a template to automatically assign SAS ports to targets.
b. Manually map SAS ports to targets and determine which SAS ports will map to which targets.
c. If you want to group storage devices into target groups of shared storage, decide which SAS ports to link to which target groups.
5. After you complete Access Configuration for one host, connect remaining SAS ports to hosts per your plan.
Using the Register Array wizard, you can choose to have the software auto-discover the array, or you can choose to manually register an array. The array management software discovers the array on the subnet through a proxy agent running on a data host.
1. From the Storage System Summary page, click Register.
The management software launches the Register Array wizard.
2. Follow the instructions in the wizard.
After the array is registered, the SAS Domain Summary page displays the new array.
1. From the left navigation pane, select the desired SAS Domains page located under the Host or Array that you want to configure.
The SAS Domain Summary page displays, showing the discovered domains.
2. Click a domain name in the SAS Domain Summary page.
The SAS Domain Details page is displayed.
3. Expand a domain name in the navigation pane.
The Access Configuration and Administration menu items are displayed.
4. Click one of the following links:
If you want to change a SAS domain’s default name to a name that you can easily identify, do the following:
1. Select the SAS domain name to open the SAS Domain Details page.
From the SAS Domain Details page you can change the domain name. You can also view the:
2. Double-click the Name field and enter a unique, meaningful name for this SAS domain.

|
Caution - This step assumes you are configuring a new array. If data exists on the array, perform a full back up as a precautionary measure. |
1. From the left navigation pane, click Access Configuration for the SAS domain you want to configure.
The Access Configuration Summary displays showing any existing access configurations.
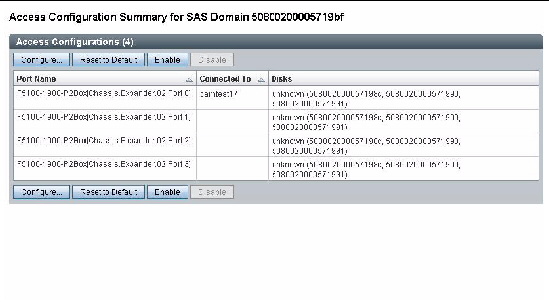
2. Click the Configure button to configure access between SAS ports and targets.
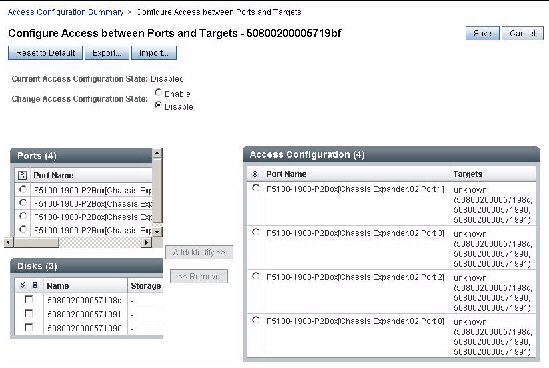
3. Select the SAS port you want to configure.
4. Select the targets you want the selected SAS port to access.
The selected SAS port and target configuration is displayed.
6. To save this configuration, click Save.
The array management software saves the configuration to allow access control between the specified SAS ports and targets.
7. Click Export to save the configuration to a template (see Creating a SAS Access Configuration Template).
You can use the wizard to apply a predefined access configuration template.
1. From the left navigation pane, click Access Configuration for the SAS domain you want to configure.
The Access Configuration Summary page displays showing any existing access configurations.
The Configure Access Between Ports and Targets page is displayed.
The Import Access Configuration wizard is displayed.
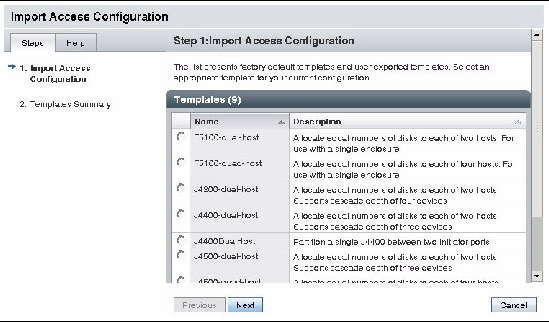
4. Select the template that matches your configuration needs.
The templates represent some common configurations. For example, Simple Zone Split will evenly divide all available targets across all SAS ports. You can also create a custom configuration and Export to a template (see Creating a SAS Access Configuration Template).
5. If you select a template that requires more information, the wizard displays a page similar to the following. Select the appropriate targets you want to configure from the drop down menu and click Next.

6. Review the selected configuration, and select one of the following:
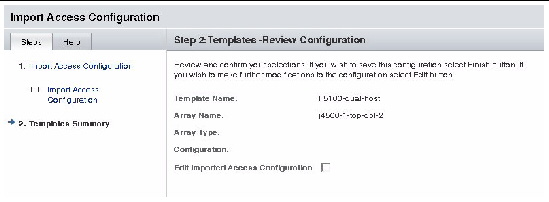
7. If you select Edit imported Access Configuration, you return to the Configure Access Between Ports and Targets page. Make any additional modifications to the template and click Save.
The Export function enables you to create a custom configuration and save it as a template.
1. From the left navigation pane, click Access Configuration for the SAS domain you want to configure.
The Access Configuration Summary displays any existing access configurations.
The Configure Access Between Ports and Targets page is displayed.
3. Select the SAS port and targets this initiator can access (see Manually Configuring SAS Port to Target Access for details).
The selected SAS port and targets configuration is displayed, as shown in the following example:
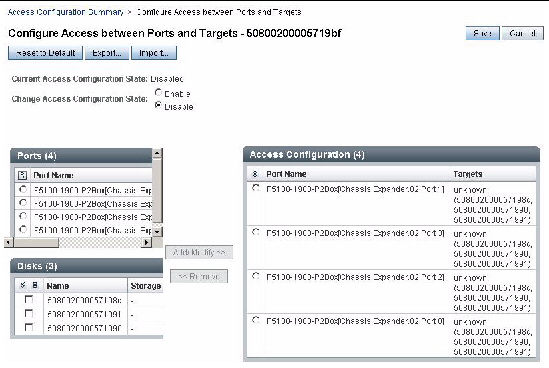
The Export SAS Domain page is displayed.
5. Enter a name, and optional description, for the new template and click Save.
The template is now available as one of the templates in the Import Access Configuration wizard.
You can set an access configuration password in Sun Storage Common Array Manager to prevent unauthorized changes to the SAS domain. The access configuration password is stored both in the array management software and on each JBOD SAS expander.
1. To manage the access configuration password, click SAS Domains > domain_ID > Administration for the domain you want to manage.
2. Select one of the following options:
For more information about access configuration passwords, see Online Help.
Change the domain-wide access configuration state by selecting one of the following options:
|
Remove SAS access configurations from all SAS ports. This will allow all SAS ports to have access to all targets. |
|
|
Temporarily disable SAS access configuration, but leave all configurations intact. |
See the Online Help for more information.
This section includes possible issues you might encounter when using the Access Configuration (SAS Zoning) features.
The potential for SATA affiliation conflicts exists in J4500 and F5100 arrays, or in J4200 or J4400 arrays when any SATA drives are installed. Conflict can occur when more than one SAS port tries to access the drive via the same SIM or Controller path (i.e., more than one host attached to SIM0/1 on a J4200/J4400 array; more than one host attached to a F5100 array domain; or more than one host attached to SAS-A/B on a J4500 array).
Possible symptoms of SATA affiliation conflicts are:
When more than one instance of Sun Storage Common Array Manager probes a SATA drive from a single SAS domain, SATA affiliation issues occur which lead to possible symptoms as stated above. For this reason, only a single array management host is connected to a SAS domain unless drives have already been zoned to prevent SATA affiliation issues. After the access configuration (zoning) is completed from a primary array management server (or a primary array management server with only one active proxy agent), the array management software can be installed or enabled on additional proxy hosts as desired.
1. Un-register all CAM proxy agents on any hosts other than the one being used to configure the Access Configuration.
This can also be accomplished by un-installing the CAM proxy agent or by not installing the CAM proxy agent until Access Configuration is complete.
| Note - A single CAM proxy can be used if the primary array management host is not directly attached to the storage via a SAS connection. |
2. Do not run commands on hosts other than the one used to configure the Access Configuration (i.e., format, cfgadm, etc.) which might attempt to access the attached storage.
Copyright © 2010, Oracle and/or its affiliates. All rights reserved.