|
Replacing the Chassis |
This document describes how to replace the chassis for the Sun Disk Shelf-24x3.5” SAS-2.

|
Caution - Only trained service personnel should remove the covers on this equipment. |
This product is intended for restricted access, whereby access is controlled through the use of a means of security (for example, key, lock, tool, badge access), and personnel authorized for access have been instructed on the reasons for the restrictions and any precautions that need to be taken.
When completing the procedures in this guide, observe the following electrostatic discharge (ESD) precautions:
To verify that the chassis has failed, check the following:
| Note - A lit amber fault LED on a component indicates a problem with that component, but not necessarily a chassis failure. |
Before you start to replace the failed chassis, complete these tasks:
To replace a failed chassis, you must complete the following steps, which are explained in detail in the remainder of this guide:
1. Remove the failed chassis. See To Remove the Failed Chassis.
2. Install the new chassis. See To Install the New Chassis.
3. Install components into the new chassis. See To Install Components Into the New Chassis.
4. Power on the new chassis. See To Reconnect Power and Cables.
|
1. From the back of the cabinet, locate the chassis that you are replacing.
2. Remove the power cord tie strap from each power cord.
3. Ensure that the power supply on/of switch is in the “O” (off) position.
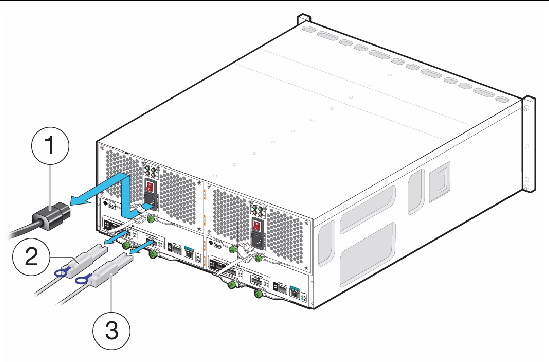
4. Unplug each power cord from its power supply connector (FIGURE 1).

|
Caution - For products with multiple power cords, all power cords must be disconnected to completely remove power from the chassis. |
5. Label each mini-SAS cable connection for reconnection to the same connectors on the replacement chassis.
For example, Disk Shelf 1, SIM Link Out to Disk Shelf 0, Host or SIM Link IN.
6. Disconnect the labeled mini-SAS cables from each SIM board (FIGURE 1):
a. Grasp the metal body of the connector with one hand, and use your other hand to firmly grasp and pull the tab.
b. Pull the tab gently toward the connector body, and then with your other hand, extract the connector from the chassis.
FIGURE 1 Removing Power Cables and Mini-SAS Cables
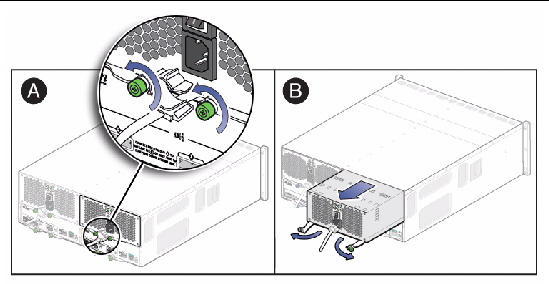
7. From the back of the cabinet, remove each power supply from the chassis (FIGURE 2):
a. Loosen the two captive screws on the power supply ejection levers.
| Note - You might need a Phillips No. 2 screwdriver to loosen the screws. |
b. Swing the ejection levers fully outward to eject the power supply.

|
Caution - Be careful to not damage the circuit board connector extending from the back of the power supply. |
FIGURE 2 Removing a Power Supply
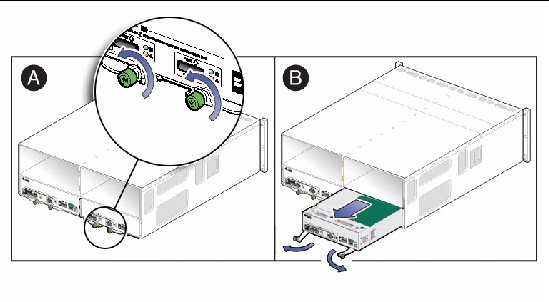
8. From the back of the cabinet, remove each SIM board from the chassis (FIGURE 3):
a. Loosen the two captive screws on the SIM board ejection levers.
b. Pull the ejection levers fully outward to partially eject the SIM board from the chassis.
c. Pull the SIM board from chassis.
d. Place the SIM board on a static-free surface or in static-free packaging.
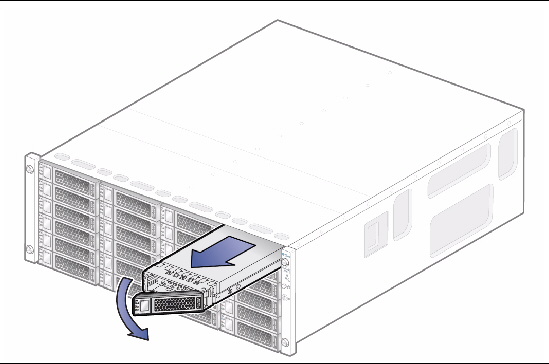
9. From the front of the cabinet, remove each disk drive and disk filler assembly (FIGURE 4):

|
Caution - Potential loss of data access.Data might be lost if an active disk drive is removed. If you remove an active disk drive accidentally, wait at least 30 seconds before reinserting it. |
a. Press the disk drive release button, allowing the disk ejection lever to move to the right.
b. Swing the ejection lever fully out and to the right to partially extract the disk drive from the chassis.
c. Grasp the middle of the disk drive and pull it toward you to remove it from the chassis.
d. Record the slot location on the outer drive casing.
Use the same slot location when installing each disk drive in the new chassis.
e. Place each disk drive on a static-free surface or in static-free packaging.
FIGURE 4 Removing a Disk Drive or Disk Filler Assembly
10. After you have removed all of the components from the chassis, remove the chassis from the cabinet:

|
Caution - The empty weight of a chassis is approximately 13.6 kg (30 lbs). You might need two people to remove the chassis from the cabinet. |
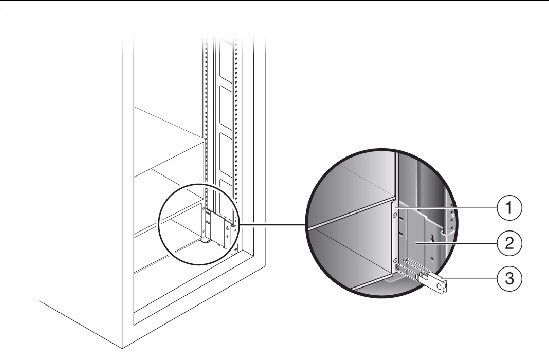
a. From the back of the cabinet, remove the two system locking clips from the lower corners of the rear chassis (FIGURE 5).
Use a screwdriver for leverage to help you pull out each clip.
FIGURE 5 Removing the System Locking Clips
c. From the front of the cabinet, loosen the four captive screws, two on either side of the chassis.
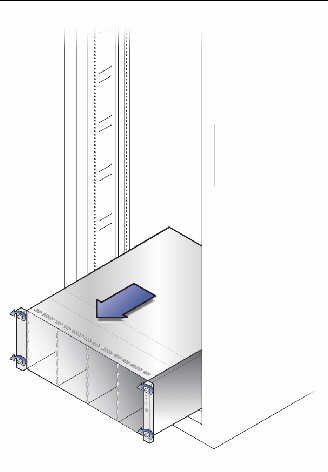
d. Grasp each side of the chassis and pull it toward you, and remove it from the cabinet (FIGURE 6).
FIGURE 6 Removing the Chassis From the Cabinet
e. Package the chassis and return it to Oracle.
|

|
Caution - Follow all ESD precautions (see ESD Precautions) and use care when handling all components. |
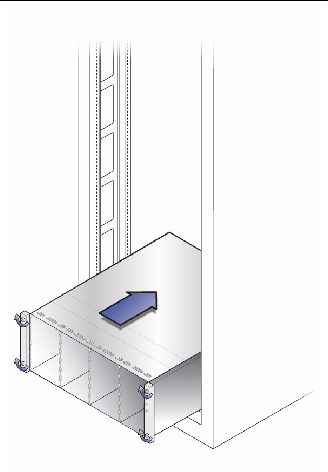
1. From the front of the cabinet, slide the new chassis into the cabinet until the front flanges of the chassis touch the vertical face of the cabinet (FIGURE 7).
FIGURE 7 Installing the New Chassis Into the Cabinet
2. Tighten the captive screws, two on each side of the chassis front, to secure the chassis to the cabinet.
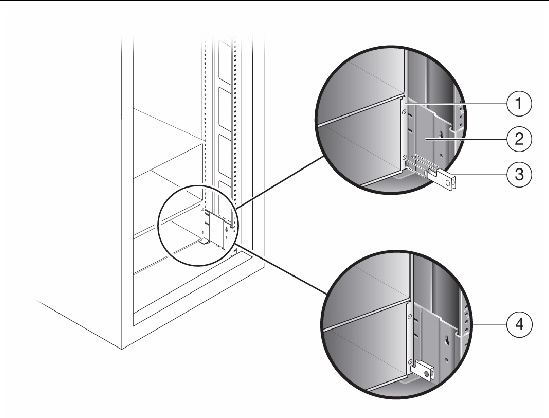
3. At the back of the cabinet, slide a system locking clip onto each lower corner of the chassis (FIGURE 8).
Use a screwdriver for leverage to help you push in the clip.
FIGURE 8 Installing the System Locking Clips
|
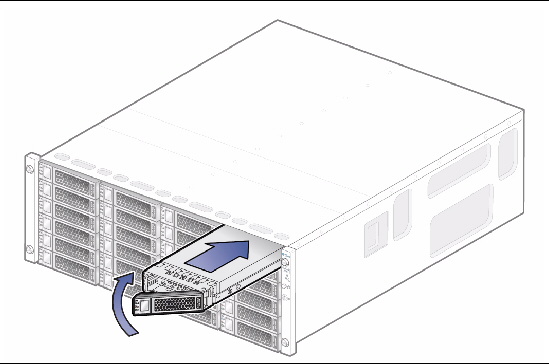
1. From the front of the cabinet, install each disk drive and disk filler assembly into the chassis by completing the following steps for each drive and filler (FIGURE 9):
a. Unlatch and swing the disk drive ejection lever to its fully open position.
b. Align the disk drive with the open slot and slide the drive into the chassis until the ejection lever engages with the chassis connectors and the lever begins to swing closed.
c. On the disk front panel, press the ejection lever closed until it snaps in place on the disk front panel to seat the drive into the chassis.
FIGURE 9 Installing a Disk Drive or Disk Filler Assembly
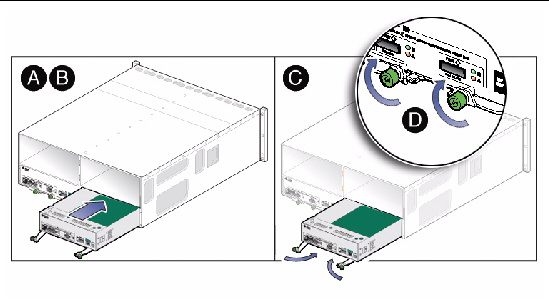
2. From the back of the cabinet, install the two SIM boards into the chassis SIM slots (FIGURE 10) by completing the following steps for each SIM board:

|
Caution - Possible incorrect configuration or driver information.Reinstall the SIM boards into the identical slot locations from which they were removed in the failed chassis. |
a. Swing both SIM board ejection levers to the fully open position.
b. Align the SIM board with the open slot and slide it into the chassis until it engages with the chassis connectors and the ejection levers begin to swing closed.
c. Simultaneously push both ejection levers toward the middle of the board to seat it in the chassis.
d. Tighten the two ejection lever captive screws to secure the board.
FIGURE 10 Installing a SIM Board
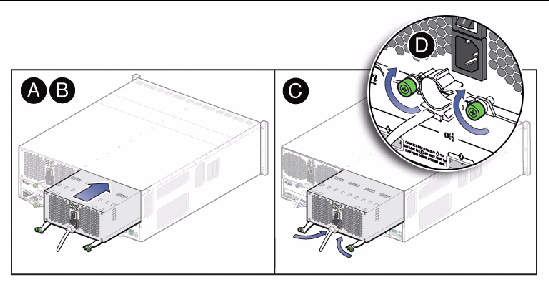
3. From the back of the cabinet, install the two power supplies into the chassis slots by completing the following steps for each power supply (FIGURE 11):
a. Swing both power supply ejection levers to the fully open position.
b. Align the power supply with the open slot and slide it into the chassis until it engages with the chassis connectors and the ejection levers begin to swing closed.

|
Caution - Be careful to not damage the circuit board connector extending from the back of the power supply. |
c. Simultaneously push both ejection levers toward the middle of the power supply to seat it in the chassis.
d. Tighten the two ejection lever captive screws to secure the power supplies.
e. Ensure that the power supply on/off switch is in the “O” (off) position.
FIGURE 11 Installing a Power Supply
|

|
Caution - Possible incorrect configuration or loss of data. Reconnect all mini-SAS cables to their original locations on each SIM board in the new chassis. |
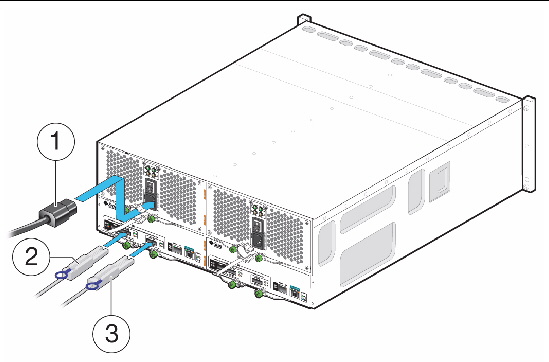
1. Reconnect the mini-SAS cables to the appropriate connections as recorded on labels when the cables were removed (FIGURE 12).
2. Reconnect the power cables to the power supply connectors (FIGURE 12).
3. Replace the power cord tie strap on each power cord.
4. Turn on the power switches on the disk shelf power supplies.
5. Turn on the cabinet circuit breakers, if applicable.
FIGURE 12 Reconnecting the Power Cables and Mini-SAS Cables
6. Check the status of the chassis.
The amber fault LED for each component in the chassis should be off.
If the amber fault LED is lit for any component, reseat the component to ensure that it is properly installed. If the amber fault LED remains lit, contact Customer Service Personnel.
We are interested in improving the product documentation and welcome your comments and suggestions. Submit comments about this document by clicking the Feedback[+] link at:
Please include the title and part number of your document with your feedback:
Sun Disk Shelf-24 3.5" SAS-2 Chassis Replacement Guide, part number 820-7246-11
Copyright © 2010, Oracle and/or its affiliates. All rights reserved.