| Sun StorageTek 6140 Array Release 2.0 Getting Started Guide |
| Sun StorageTek 6140 Array Release 2.0 Getting Started Guide |
| C H A P T E R 7 |
|
Using the Management Software and Setting Up the Array |
This chapter provides an overview of the management software and the steps required for first time you log in. It contains the following sections:
The Sun StorageTek 6140 Array provides two interfaces for accessing the configuration software and the monitoring software for the array:
For access instructions, see Logging In and Out Using the CLI.
For access instructions, see Logging In Using the Browser Interface.
The following explains how to log in to and out of a remote host using the CLI. Do so either by remotely logging in to a management software station or by using the Solaris remote client on a remote host.
|
Note - Be sure to add the /opt/SUNWsesscs/cli/bin directory to your path. |
2. Log in by typing the following command:
% sscs login -h 6140-hostname [t] -u username
TABLE 7-1 describes the optional arguments associated with the sscs login command for the Sun StorageTek 6140 Array.
You can now use CLI commands to perform the same software operations as those available in the browser interface. For more information, see the sscs(1M) man page, located in /opt/SUNWsesscs/cli/man.
|
Note - To locate the sscs(1M) man page, you must update your MANPATH variable or use the -m option with the man command. |
3. Log out by typing the following command:
You can start the management software on any system that is connected to the user LAN.
1. Open a supported web browser.
|
Note - For information about supported web browsers, see the Sun StorageTek 6140 Array Release Notes. |
2. Enter the IP address of the management host using this format:
https://6140-management-host:6789
6140-management-host is the IP address of the machine where you installed the Sun StorageTek 6140 management software.
3. Enter root for the user name and the root password of the machine on which you installed the software.
The Sun Java Web Console page is displayed.

The Sun Java Web Console page provides two entry points:
When you select one of the entry points, the appropriate page is displayed.
At this point, you are logged in to the system. Before you begin configuring the system, you should become familiar with the components of the browser interface and how to get help.
|
Note - The connection closes automatically if there is no activity for approximately 15 minutes. |
This section describes the tasks for setting up the array and includes the following topics:
For more information about the management software, you can click the Help button at the top right corner of any window. For more information, see Getting Help.
To access the management software, start by selecting Sun StorageTek Configuration Service from the Storage section of the Sun Java Web Console page.
The Array Summary page is displayed (FIGURE 7-1).
From here, you can carry out the setup tasks described in the following subsections, including registering and naming arrays, setting the array password, setting the system time, adding new users, and enabling premium features.
This section describes the user interface elements and navigation methods. It includes the following topics:
The Sun StorageTek 6140 Array browser interface is the main interface for the system.
This section describes the main elements of the browser interface:
The access buttons (FIGURE 7-2) are located across the top of the web page and enable you to access some of the most common functions and displays.

The access buttons have the following functions:
The quick status displays (FIGURE 7-3) provide user role and server name information, as well as the status of current alarm.

The displays provide the following information:
For a description of the alarm symbols, see the Sun Storage Automated Diagnostic Environment online help. Click the Search tab and type controls and indicators.
You use the navigational controls to move between web pages to view, configure, manage, and monitor the system.
FIGURE 7-4 shows the navigation pane available for the Sun StorageTek Configuration Service.
FIGURE 7-5 shows the navigational tabs available for the Sun Storage Automated Diagnostic Environment.


The content part of each page displays system information and provides a method for performing actions that allow you to administer, manage, monitor, and service the system.
You can click links on each page to display more detailed information about a storage component or device. You can also use browser interface elements such as icons, buttons, check boxes, and radio buttons to perform system administration and storage management tasks.
FIGURE 7-6 shows a typical page content area for the Sun StorageTek Configuration Service.
TABLE 7-2 describes commonly used elements in the content part of the page.
You can open the online help system by clicking the Help button at the top right corner of the page (FIGURE 7-7).

The online help system is context sensitive and will display help for the current page. The help system also provides conceptual, procedural, and reference information. You can use the Table of Contents, Index, and Search tabs to locate help topics that contain information you are looking for.
To set up the array for basic operation, perform the procedures outlined in the following sections:
Using the Array Registration wizard, you can have the management software either auto-discover one or more arrays that are connected to the network and are not already registered, or you can choose to manually register an array.
The auto-discover process sends out a broadcast message across the management host subnet to identify any unregistered arrays. The discovery process displays the percentage of completion while the array management software polls devices in the network to determine whether any new arrays are available. When complete, a list of discovered arrays is displayed. You can then select one or more arrays to register from the list.
Manual registration enables you to register an array by identifying the IP address of its controller. This option is typically used only to add a storage array that is outside of the subnet of the management host.
The Array Registration wizard displays firmware information for each array and lists any action recommended to bring each array up to the current firmware baseline level. You can choose to perform the recommended firmware upgrade action now or you can modify the array firmware later by selecting the array and clicking the Upgrade Firmware button on either the Array Summary page or the Administration > General page.
You can automatically discover and register arrays that are on the same subnet as the management host.
If the arrays are not on the same subnet as the management host, use Register Array to manually discover the array (see Manually Registering an Array).
To automatically discover and register arrays on the management host subnet:
1. In the Register Array wizard, click Auto Discover Arrays.
The management software detects the array you installed on its subnet and adds it to the Array Summary page.
|
Note - It takes approximately 2 minutes for the software to discover each array. |
2. Verify that the array has been added to the Array Summary page.
3. If the array is not displayed, do one of the following:
If the array is still not displayed, you can register the array manually as described in the next section.
1. Click Sun StorageTek Configuration Service.
The Array Summary page is displayed.
The management software launches the Register Array wizard.
3. Follow the instructions in the wizard.
|
Note - The password of the array is not a required entry. No array is shipped with a default password. This field is used only if the array being registered is one that was previously managed and had a set password. To give the array a password, see Setting an Array Password. |
1. Click Sun StorageTek Configuration Service.
The Array Summary page is displayed.
2. Select the check box to the left of the array you want to remove from the list of registered arrays.
This enables the Remove button.
Each array requires a unique name.
1. On the Array Summary page, click the array you want to name or rename.
2. In the navigation pane, choose Administration > General Settings.
The General Setup page is displayed.
3. In the Name field, enter a unique name consisting of up to 30 characters.
The General Setup page contains other features that you may decide to configure. See the online help for more information.
Your next step is to set a password for the array, if you want, while you are still on the General Setup page.
A new Sun StorageTek 6140 Array is shipped with a blank, or empty, password field. Sun recommends that you establish an array password during initial setup for security purposes. The password prevents other management hosts from unauthorized access to the configuration of the array.
To set an array password on a new array:
1. On the General Setup page, click Manage Passwords.
The Manage Passwords page is displayed.
2. Select Change Array Password.
3. Leave the Old Password field blank.
This is the only time you can leave this field blank, when you establish a password for a new array.
4. Enter a new password consisting of up to 30 characters for the array.
5. Enter the password again to confirm the new password.
The General Setup page is displayed.
The management software stores an encrypted copy of the array password, known as the local password, on the management host. Use the Update Array Password in Array Registration Database to ensure that there is no password conflict with another instance of the management software.
If you need to change the array password and you do not have the password that was set during installation, you can use the Service Interface menu of a controller serial port to reset the array password.
1. Access the serial port Service Interface menu using the procedures specified in Using the Serial Port Interface to Assign IP Addresses.
2. Select Reset Storage Array (SYMbol) Password.
3. Enter y to confirm that you want to reset the array password.
The array password is reset to no password and a confirmation message is displayed.
4. To redefine a password for the array, see Setting an Array Password.
You can also update the system time and date on the General Setup page. When you set the time and date for a selected array, the values are updated for all arrays in the system.
There are two ways in which you can update the system time and date:
1. On the General Setup page, scroll down to the System Time section:

2. Select the current hour and minute according to a 24-hour clock.
3. If the date is incorrect, change the month, day, and year to the current date.
4. Click OK to save your changes.
The General Setup page is refreshed, and Success is displayed at the top of the page.
For more information about the fields and buttons on the General Setup page that you can use after you set up your system, see the online help.
One default user name and two user roles are supplied with the management software.
One default user name, root, with an assigned user role of storage is supplied with the management software.
The user role assigned to a user determines that user's access to the management functions for the array. TABLE 7-3 describes the valid user names and user role functions and the requirements for each.
Multiple instances of the same user name can be logged in concurrently. However, because users with the storage user role have write privileges, there is a risk that the changes of one logged in user will overwrite previous changes of another logged-in user. Therefore, you should develop policies about who can make changes and how to notify others.
Before you can add a user and assign that user a user role, the user name must be defined in the Solaris Operating System /etc/passwd file or network information server (NIS).
1. To view the list of defined users, choose Administration > User Management in the navigation pane.
The User Summary page is displayed.
2. To add a new user, click the Add button.
The Add New User page is displayed.
3. In the User Name field, enter a valid user name.
The user name must be defined in the Solaris Operating System /etc/passwd file or NIS.
4. From the User Role list, select the role you want to assign for this user.
You can assign a user to one of the user roles identified in TABLE 7-3.
The User Summary page is displayed with a success message, and the name is added to the list.
|
Note - Newly added users should enter the same password for the Sun Java Web Console that they use in their Solaris accounts. |
License certificates are issued when you purchase premium services.
Premium features that are available with the Sun StorageTek 6140 Array include:
Refer to your license certificate and the Sun License Center for license information. Go to http://www.sun.com/licensing for your local Sun License Center phone number.
To add a license to enable a premium feature:
1. Click the array for which you want to add a new license.
The Volume Summary page for that array is displayed.
2. In the navigation name, choose Administration > Licensing.
The Licensable Feature Summary page is displayed.
The Add License page is displayed.
4. Select the type of license you want to add.
5. Enter the information provided to you by the Sun Licensing Center and click OK.
The license is added to the Licensable Feature Summary page.
The Sun Storage Automated Diagnostic Environment software enables you to monitor and diagnose your arrays and storage environment, including all Sun storage area network (SAN) devices. See the Storage Automated Diagnostic Environment Enterprise Edition Release Notes for a list of supported devices.
1. From the Sun Java Web Console page, click Sun Storage Automated Diagnostic Environment.
2. Click Administration > General Setup > Setup.
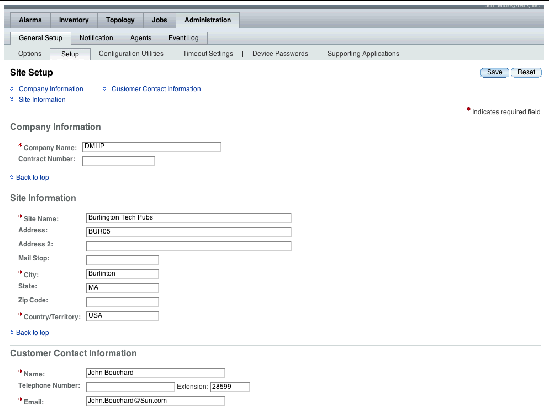
The Site Setup page is displayed:
|
Note - If this is your first time accessing the Sun Storage Automated Diagnostic Environment, the Site Setup page is displayed automatically. |
3. Complete the required company, site, and customer contact information and click OK.
Many parameters have default settings you can accept. If you need help on any of the fields, click the Help button.
4. Check the devices that have been discovered and their monitoring status.
The Devices page displays all of the devices that were discovered by the Sun StorageTek Configuration Service.
b. Verify that all of the expected hosts and devices are listed and that the monitoring status displays Monitored for each device.
5. Discover other supported devices such as SAN switches.
a. Click Discover on the Devices page.
The Discovery page is displayed.
b. Complete the fields on the Discovery page and click Start Discovery.
When the device discovery process is complete, the discovered devices are displayed on the Devices page.
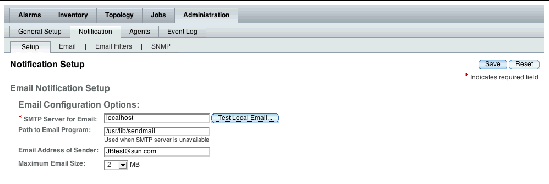
6. Click Administration > Notification.
The Notification Setup page is displayed.
a. Enter the name of the SMTP server.
If the host running this software has the sendmail daemon running, you can accept the default server, localhost, or the name of this host in the required field.
b. Specify the other optional parameters, as desired.
c. If you have changed or entered any parameters, click Save.
d. (Optional) Click Test Local Email to test your local email setup by sending a test email.
If you need help on any of the fields, click the Help button.
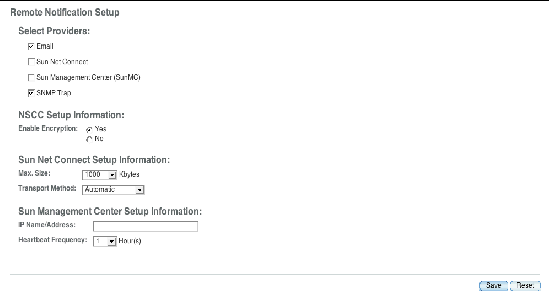
8. (Optional) Set up remote notifications to Sun Microsystems services or to an enterprise management application.
a. Scroll down the Notification Setup page to Remote Notification Setup.
b. Select one or more providers.
Email notification is enabled by default. Remote notification selections include Sun Net Connect, Sun Management Center (SunMC), SNMP, and NSCC. If you need information about any of these remote providers, click Help.
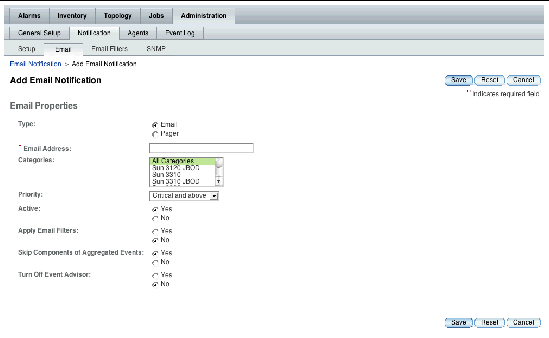
9. Set up local email notification recipients.
a. Click Administration > Notification > Email.
The Email Notification page is displayed.
The Add Email Notification page is displayed.
c. Enter an email address for local notification. At least one address is required to begin monitoring events. You can customize emails to specific severity, event type, or product type.
10. Check the devices that have been discovered and their monitoring status.
The Devices page displays all of the devices that were discovered by the Sun StorageTek Configuration Service.
b. Verify that all of the expected hosts and devices are listed and that the monitoring status displays Monitored for each device.
11. Discover other supported devices such as SAN switches.
a. Click Discover on the Devices page.
The Discovery page is displayed.
b. Complete the fields on the Discovery page and click Start Discovery.
When the device discovery process is complete, the discovered devices are displayed on the Devices page.
12. Perform optional setup tasks:
For information about these setup tasks, see the online help.
Now you are ready to install data host and remote management host software on hosts that are not running Solaris OS, as described in Chapter 8.
| Sun StorageTek 6140 Array Release 2.0 Getting Started Guide | 819-5045-11 |
Copyright © 2007, Sun Microsystems, Inc. All Rights Reserved.