|
|
| Sun ONE Web Proxy Server 3.6 SP2 Administrator's Guide - NT Version |
Chapter 2 Starting the Administration
and Proxy ServersSun ONE Web Proxy Server's installation process installs two servers, an administration server and a proxy server. This chapter explains the different methods for starting and stopping both of these servers. For information on installing the proxy server, see the Sun ONE Web Proxy Server Installation Guide.
Starting and Stopping the Administration Server
To start and configure your proxy server, you need to have an administration server running on your machine. For more information about the administration server, see Managing iPlanet Servers.
Starting the Administration Server
The administration server starts automatically when you finish installing the proxy server. However, there may be instances when you need to stop and start it. There are two ways to start the administration server:
- Click the Administer iPlanet Server icon in the iPlanet program group.
- Go to Control Panel|Services, select Netscape Administration Server 3.5, then click Start.
Once you have started the administration server, you need to connect to it. Using a browser that supports frames and JavaScript, such as Netscape Navigator 4.0, enter the following URL for the administration server:
http://servername.sub_domain.domain:port_number
In the above URL, use the administration server's port number (not the port number for the proxy server) that you specified during installation. You will be prompted for a user name and password. Type the administration server user name and password you specified during the installation. The Server Administration page appears. For more information on the Server Administration page, see Using the Server Administration Page.
Stopping the Administration Server
To stop the administration server,
- Open the Control Panel|Services applet.
- Choose iPlanet Administration Server 3.0.
- Click Stop.
Using the Server Administration Page
When you start the administration server, you see the Server Administration page screen, as shown in Figure 2-1.
Figure 2-1 Server Administration page
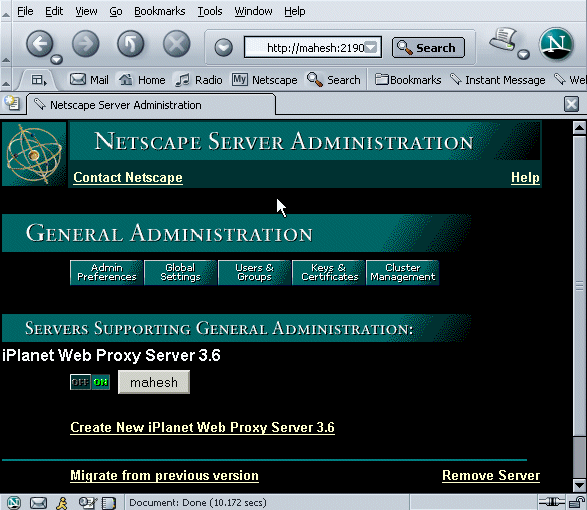
From the Server Administration page, you can perform the following tasks:
- Configure the administration server
- Choose a server to configure
- Start and stop a proxy server
- Create a new proxy server instance
- Migrate from an earlier version of the proxy server
- Remove a server
Starting and Stopping iPlanet Web Proxy Server
Once you have started the administration server, you can start your proxy server. There are several ways to start and stop the proxy server. The following sections discuss these methods.
Starting the Proxy Server
You can start the proxy server in one of the following ways:
Using the Server Administration Page
From the Server Administration page, you can start the proxy server by using one of the following options:
Option 1

Click the On/Off button next to the server you wish to start.Option 2
- Click the name of the proxy server you want to start.
- Choose System Settings|Start/Stop the server.
- Click Start.
Using the Control Panel
From the control panel:
- Open the Control Panel|Services applet from the NT main folder
- Choose the iPlanet Web Proxy Server that you want to start.
- Click Start.
Stopping the Proxy Server
You can stop a server in one of the following ways:
Using the Server Administration Page
From the Server Administration page screen, you can stop the proxy server by using one of the following options:
Option 1
Click the On/Off button next to the server you wish to stop.Option 2
- Click the name of the proxy server you want to stop.
- Choose System Settings|Start/Stop the server.
- Click Stop.
Using the Control Panel
- Choose Control Panel|Services applet from NT main folder.
- Choose the iPlanet Web Proxy Server that you want to stop.
- Click Stop.
Creating a New Proxy Server Instance
From the Server Administration page, you can create a new instance of proxy server . To do so, complete the following steps:
- Click Create New iPlanet Web Proxy Server 3.6 to launch the Web Proxy Server Installation page.
- In the Web Proxy Server Installation page, type the following information for your proxy server:
- Server Name: the host name where the proxy server is installed.
- Bind Address: the IP address.
- Server Port: the port that you want the proxy to listen to.
- Server Identifier: a name used in the Server Selector to identify the specific proxy server.
Note The name you specify for the Server Identifier can contain only letters, digits, hyphens and underscores, and must begin with a letter.
In addition, specify the following information:
- Choose how you want the proxy server to resolve IP addresses. For more details, see the online help.
- Choose the log format you want the proxy to use. For more details, see Working with Log Files.
- Check the protocols you want the proxy to handle.
- Choose whether or not you want to cache documents, and specify the caching-related configuration settings. For more details, see Chapter 10 "Caching" and the online help.