|
|
| Sun ONE Web Proxy Server 3.6 SP2 Administrator's Guide - UNIX Version |
Chapter 14 Understanding Encryption and SSL
iPlanet servers use an encryption system called Secure Sockets Layer (SSL) to ensure privacy when communicating with other SSL-enabled products, such as Netscape Navigator and Netscape Communicator.
For a complete discussion of encryption and SSL, see Managing Netscape Servers.
What is Encryption?
Encryption is the process of transforming information so it can't be decrypted or read by anyone except the intended recipient. This encrypted information is called ciphertext. It is the ciphertext that you send across the network. For example, say you have a financial report stored at your web site. If SSL is enabled on your server, your server encrypts the report and sends the ciphertext to a client, who then decrypts the ciphertext back into the financial report.
Decryption reverses the process, turning the ciphertext back into the original message. The recipient is the only one who can do this because only the recipient has a key to "unlock" a message.
Using Encryption in the Proxy Server
Before you can use encryption in your proxy server, you must first use the administration server to get and install a certificate. See Managing Netscape Servers for information on setting up certificates.
There are two scenarios in which the proxy server deals with encrypted data; it can tunnel encrypted data in a forward proxy scenario, or use encryption in a secure reverse proxy scenario. For more information on SSL tunneling, see Tunneling SSL through the Proxy Server. For more information on secure reverse proxying, see "Secure Reverse Proxying".
What is SSL?
SSL (Secure Sockets Layer) is a communication system that ensures privacy when communicating with other SSL-enabled products. Technically speaking, SSL is a protocol that runs above TCP/IP and below HTTP or other top-level protocols. It is symmetric encryption nested within public-key encryption, authenticated through the use of certificates. An SSL connection can only occur between an SSL-enabled client and an SSL-enabled server. In fact, when a server is running in SSL mode, it can only communicate through SSL. For more information on SSL, see Managing Netscape Servers.
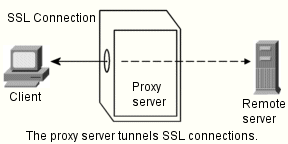
Tunneling SSL through the Proxy Server
When you are running a proxy in the forward direction and a client requests an SSL connection to a secure server through the proxy, the proxy opens a connection to the secure server and then simply copies data in both directions without intervening in the secure transaction. This process is known as SSL tunneling.
Figure 14-1 With an SSL connection, the proxy can't view the data it transfers.
To use SSL tunneling with HTTPS URLs, the client must support both SSL and HTTPS (such as the Netscape Navigator). HTTPS is implemented using SSL with normal HTTP. Clients without HTTPS support can still access HTTPS documents using Netscape Proxy's HTTPS proxying capability.
SSL tunneling is a lower-level activity that doesn't affect the application-level (HTTPS). SSL tunneling is just as secure as SSL without proxying; the existence of the proxy in between does not in any way compromise security or reduce the functionality of SSL.
With SSL, the data stream is encrypted, so the proxy has no access to the actual transaction. Consequently, the access log cannot list the status code or the header length received from the remote server. This also prevents the proxy, or any other third party, from eavesdropping on the transactions.
Note At a later date, when more protocols are enhanced with SSL, you can use the standard port numbers for those protocols.
Because the proxy never sees the data, it can't verify that the protocol spoken between the client and the remote server is SSL. This means the proxy also can't prevent other protocols from being passed through. You should restrict SSL connections to only well-known SSL ports, namely port number 443 for HTTPs and 563 for SNEWS, as assigned by the Internet Assigned Numbers Authority (IANA). If there are sites that run the secure server on some other port, you can make explicit exceptions to allow connections to other ports on certain hosts. You would do this using the connect://.* resource.
The SSL tunneling capability is actually a general, SOCKS-like capability that is protocol-independent, so you can use this feature for other services, too. Netscape Proxy Server can handle SSL tunneling for any application that has SSL support, not only the HTTPS and SNEWS protocols.
What is HTTPS?
HTTPS is normal HTTP wrapped in a secure SSL layer. If you use Netscape Navigator (or other SSL-enabled browsers) when accessing the proxy server, HTTPS URLs are handled by using the SSL tunneling feature, not using the HTTPS proxy feature.
Note Netscape Navigator doesn't use this proxy HTTPS option because it fully supports HTTPS and SSL proxying.
Clients without native HTTPS support or without SSL tunneling support can use Netscape Proxy Server's direct HTTPS proxying feature. HTTPS proxying is similar to proxying other protocols, such as HTTP or FTP. In the HTTPS case, the protocol spoken between the client and the proxy is always HTTP, but only the proxy establishes the secure connection to the remote server. That is, transactions between the proxy server and the remote server are encrypted, while the transactions between the client and the proxy are sent in the clear.
Figure 14-2 The proxy establishes the secure connection if the client doesn't support HTTPS.

This means that in order to achieve maximum security, the network between the client and the proxy must be secure (or trusted) because documents are passed unencrypted between the proxy and the client. For example, an organization's network behind a firewall could be considered secure because outsiders have no access to the internal network. And, transactions outside of the organization's network are encrypted.
Enabling HTTPS Proxying
If you are using the proxy server as a secure reverse proxy, you need to enable HTTPS proxying. To enable HTTPS proxying:
- In the Server Manager, choose Routing|Enable, Disable.
- Select the https://.* template from the list of existing templates. If you want to allow connections to other ports, you can use similar URL patterns in a template.
- Click Enable proxying of this resource.
- Click OK.
Enabling SSL on Your Server
By enabling SSL on your server, you are allowing your server to act as a secure reverse proxy. To enable SSL on your server, you must complete these steps:
- Generate your server's key pair (public and private keys). You can complete this step using the administration server forms. See Managing Netscape Servers for information on generating key pairs.
- Request a certificate from a CA. You can complete this step using the administration server forms. See Managing Netscape Servers for information on requesting certificates.
- Install the certificate the CA sends to you. You can complete this step using the administration server forms. See Managing Netscape Serversfor information on installing certificates.
- Activate SSL for your server. You can complete this step using the proxy server forms. See Activating SSL for more information on activating SSL.
Activating SSL
After your certificate is installed, you can activate SSL for your server.
- Shut down the proxy server.
- In the Server Manager, choose Server Preferences|Encryption On/Off. The Encryption On/Off form appears.
- Click the On button.
Note The only times you will want to enable the "Initialize certificates only" radio button are if you are running an unsecure reverse proxy where you have a secure connection to the content server and the content server authenticates the proxy, or if HTTPS proxying is enabled (as opposed to SSL tunneling). Initializing certificates is necessary in this instance so that the proxy will authenticate to the client even though incoming SSL is not enabled. For more information on secure reverse proxying, see "Secure Reverse Proxying". For more information on client authentication and the scenario listed above, see "Client authentication in a reverse proxy" in this chapter.
- Type the port number you want your server to use if it's different from the one you specified upon setup.
- From the Alias pull-down, select the alias you want to use for the encryption.
- Click OK. Save and apply your changes.
Now that SSL is enabled on your server, you can configure your overall SSL preferences (page 220), and specify different strengths of encryption for different parts of your server (page 222).
Setting Encryption Preferences
You can set a number of system-wide preferences for SSL. To do so, choose Server Preferences|Encryption Preferences in the Server Manager. After you make your changes, click OK and confirm your changes. You can configure settings for SSL version, client certificates, and ciphers.
SSL Version
You can specify which versions of SSL your server can communicate with. The latest and most secure version is SSL version 3, but many older clients use only SSL version 2. You will probably want to enable your server to use both versions.
Client Certificates
You can refuse any client that doesn't have a client certificate from a trusted CA. This differs from access control in that all requests must be through SSL connections and they must be from clients who have certificates from trusted CAs. If your server is running on an internal company intranet, you might have an internal CA, so all your clients would have certificates. In this case you would allow only people with client certificates to connect to your server. For more information on trusted CAs, see Managing Netscape Servers.
Ciphers
A cipher is an algorithm used in encryption. Some ciphers are more secure, or stronger, than others. Generally speaking, the more bits a cipher uses during encryption, the harder it is to decrypt the data. The list of available ciphers doesn't appear on the Encryption Preferences form unless you've enabled SSL.
When initiating an SSL connection with a server, a client lets the server know what ciphers it prefers for encrypting information. In any two-way encryption process, both parties must use the same ciphers. Because a number of ciphers are available, your server needs to be able to use the most popular ones.
You can choose ciphers from the SSL 2 protocol, as well as from SSL 3. To specify which ciphers your server can use, check them in the list. Unless you have a compelling reason not to use a specific cipher, you should check them all.
The SSL 2.0 ciphers are:
- RC4 cipher with 128-bit encryption and MD5 message authentication. RC4 ciphers are the fastest ciphers. This cipher, because it has 128-bit encryption, is the second strongest cipher next to Triple DES (Data Encryption Standard) with 168-bit encryption. It has approximately 3.4 * 1038 possible keys, making it very difficult to crack. As added security, all SSL 2.0 ciphers use MD5 (Message Digest 5) message authentication. MD5 message authentication detects attempts to modify data while it is in transit.
- RC4 cipher with 40-bit encryption and MD5 message authentication. This cipher is also an RC4 cipher, making it one of the fastest available ciphers. It has 40-bit encryption, which has approximately 1.1 * 1012 (a trillion) possible keys, making it easier to crack than encryption with more possible keys, such as 128-bit encryption. This cipher also uses MD5 message authentication to detect attempts to modify data in transit.
- RC2 cipher with 128-bit encryption and MD5 message authentication. The RC2 ciphers are slower than the RC4 ciphers. This RC2 cipher, because it has 128-bit encryption, is the second strongest cipher next to Triple DES with 168-bit. It has approximately 3.4 * 1038 possible keys, making it very difficult to crack. This cipher also uses MD5 message authentication to detect attempts to modify data in transit.
- RC2 cipher with 40-bit encryption and MD5 message authentication. This cipher is also an RC2 cipher, making it is slower than the RC4 cipher. It has 40-bit encryption, which is not as strong as 168-bit, 128-bit, or 56-bit encryption. 40-bit encryption has approximately 1.1 * 1012 (a trillion) possible keys. This cipher also uses MD5 message authentication to detect attempts to modify data in transit.
- DES with 56-bit encryption and MD5 message authentication. DES (Data Encryption Standard) is a U.S. government standard for data encryption. This cipher does not have as many possible keys as does 128-bit encryption, and therefore is not as strong. 56-bit encryption has approximately 7.2 * 1016 possible keys. This cipher also uses MD5 message authentication to detect attempts to modify data in transit.
- Triple DES with 168-bit encryption and MD5 message authentication. Triple DES is the strongest cipher available, but it is not as fast as RC4. Triple DES uses a key three times as long as the key for standard DES. Because the key size is so large, there are more possible keys than for any other cipher - approximately 3.7 * 1050. This cipher also uses MD5 message authentication to detect attempts to modify data in transit.
The SSL 3.0 ciphers are:
- RC4 with 128-bit encryption and MD5 message authentication. This cipher is the same as the SSL 2.0 version of RC4 with 128-bit encryption but uses a more secure implementation of MD5 message authentication to detect attempts to modify data in transit.
- RC4 with 40-bit encryption and MD5 message authentication. This cipher is the same as the SSL 2.0 version of RC4 with 40-bit encryption but uses a more secure implementation of MD5 message authentication to detect attempts to modify data in transit.
- Triple DES with 168-bit encryption and SHA message authentication. This cipher is the same as the SSL 2.0 version of Triple DES with 168-bit encryption, but uses SHA (Secure Hash Algorithm) message authentication instead of MD5 message authentication. SHA is a government standardized algorithm that is used to construct a message authentication code that detects attempts to modify data while it is in transit. SHA is slower than MD5, but it is stronger.
- DES with 56-bit encryption and SHA message authentication. This cipher is the same as the SSL 2.0 version of DES with 56-bit encryption but uses SHA message authentication instead of MD5 message authentication.
- RC2 with 40-bit encryption and MD5 message authentication. This cipher is the same as the SSL 2.0 version of RC2 with 40-bit encryption but uses a more secure implementation of MD5 message authentication to detect attempts to modify data in transit.
- No encryption, only MD5 message authentication. This cipher uses only MD5 message authentication to secure data. Any data sent using this cipher is not encrypted. The data is protected from modification, but it can be viewed by eavesdroppers.
Caution
You might not want to check "No Encryption, only MD5 message authentication". If no other ciphers are available on the client side, the server will use this, and no encryption will occur.
Keeping Clients from Caching SSL Files
Pre-encrypted files can be prevented from being cached by a client by adding the following line inside the head statement of a file in HTML:
<meta http-equiv="pragma" content="no-cache">
Configuring SSL Tunneling
To tunnel SSL, you need to configure your proxy server to do so. To configure SSL proxying,
- In the Server Manager, choose Routing|Enable, Disable.
- Select the connect://.*:443 resource from the list of existing templates. The connect:// method is an internal proxy notation and doesn't exist outside of the proxy. See the following sidebar text for more information on connect.
If you want to allow connections to other ports, you can use similar URL patterns in a template.
- Click "Enable proxying of this resource".
- Click OK, and then restart the proxy.
Increasing Server Security
There are other security risks besides someone trying to break your encryption. The modern network faces risk from external and internal hackers, using a variety of tactics to gain access to your server and the information on it.
So in addition to enabling SSL on your server, you should take extra security precautions. The following list describes the most important things you can do to make your server more secure. For more information on server security see Managing Netscape Servers.
- Limit physical access. Keep the server machine in a locked room that only authorized people can enter. This prevents anyone from hacking the server machine itself.
- Limit administration access. If you plan on remotely configuring your server, be sure to use your administration server's access control to allow administration from a very small number of locations. You should also make the administrative connection a mandatory SSL connection.
- Choose good passwords. It's important to choose passwords that are difficult to guess and never to reveal them to anyone. Your most important passwords should not contain words from any language because numerous password-cracking programs exist that can run through millions of possible word combinations in seconds. Your important passwords also should be at least eight characters long, and contain a mix of uppercase and lowercase letters, punctuation marks, mathematical symbols, or numerals.
- Secure your private key. Make sure your private key file is protected. Store the key file in a directory that only you or authorized administrators have access to. It's also important to know whether the file is stored on backup tapes or is otherwise available for someone to intercept. If so, you must protect your backups as much as you protect your server.
- Limit other applications on the server. It's possible to circumvent your server's security by exploiting holes in other programs running on your server. Therefore, it is wise to disable all unnecessary programs and services. Some applications that you should be cautious of are telnet, rlogin, and rdist. Also be careful about which CGI, Java, and JavaScript programs are on your server.
- Limit ports. Disable extraneous services operating on ports for the machine. Use routers or firewall configurations to prevent incoming connections from accessing services available on different ports.
- Know your server's limits. A server can't control the security of information once it reaches the client, nor can it control which individuals have access to directories and files on the server. Therefore, it is your responsibility to secure any information clients send to you through SSL.
What is Client Authentication?
To establish identity over the Internet or intranet, clients and servers use a digital file known as a certificate. Certificates are exchanged between parties prior to communication to ensure that both parties are actually who they claim to be. When a client sends a certificate to a server, the process is called client authentication. Client authentication is not essential to an SSL connection, but it does give extra assurance to both parties that they are sending encrypted information to the correct parties. You can use client authentication in a reverse proxy to make sure that your content server does not share information with unauthorized proxies or clients.
Client Authentication in a Reverse Proxy
In a reverse proxy, you can set up client authentication according to any one of the following scenarios:
- Proxy authenticates client - This scenario enables you to allow access to all clients with acceptable certificates or to allow access to only those clients who have acceptable certificates and are recognized users on the access control list for your proxy.
- Content server authenticates proxy - This scenario enables you to make sure that your content server is actually connecting with your proxy and not some other server.
- Proxy authenticates client and content server authenticates proxy -This scenario provides the maximum security and authentication for your reverse proxy.
For information on how to set up these scenarios, see Setting up Client Authentication in a Reverse Proxy of this chapter.
Setting up Client Authentication in a Reverse Proxy
Client authentication in a secure reverse proxy provides further insurance that your connections are secure. The following instructions explain how to set up client authentication according to the scenario you choose.
Note Each scenario assumes that you have both a secure client to proxy connection and a secure proxy to content server connection.
Proxy Authenticates Client
To set up this scenario:
- Follow the directions for setting up the secure client to proxy and secure proxy to content server scenario in the section entitled "Setting up a Secure Reverse Proxy".
- In the Server Manager, choose Server Preferences|Encryption Preferences. The Encryption Preferences form will appear.
If you want to permit access to all users with valid certificates:
- Click the Yes radio button for "require client certificates."
If you want to permit access to only those users who have both valid certificates and are specified as acceptable users in access control:
- Click the No radio button for "require client certificates."
- Go to the Server Manager and choose Server Preferences|Restrict Access.
- Turn on Access Control.
- Set your proxy to authenticate as a reverse proxy.
- Click the Permissions button for the first access type, which is GET, HEAD, POST, INDEX, CONNECT.
- List any permissions making sure that for all of them, you identify "Client Certificate" as the authentication method. For more information on setting up access control, see Chapter 5 "Controlling Access to Your Server."
- Save and apply your changes.
- Restart the proxy from the command line by going to the proxy directory and typing ./start.
Content Server Authenticates Proxy
To set up this scenario:
- Follow the directions for setting up the secure client to proxy and secure proxy to content server scenario in the section entitled "Setting up a Secure Reverse Proxy".
- On your content server, turn on client authentication.
To initialize certificates only:
- In the Server Manager, choose Server Preferences|Encryption On/Off. The Encryption On/Off form will appear.
- Click the Initialize Certificates Only radio button.
- Save and apply your changes.
- Restart the proxy from the command line. by going to the proxy directory and typing ./start.
Proxy Authenticates Client and Content Server Authenticates Proxy
To set up this scenario,
- Follow the above directions for setting up the proxy authenticates client scenario.
- On your content server, turn on client authentication.
Effects of an SSL-Enabled Server
This section describes what effects you need to know about while running an SSL-enabled server.
Secure URL Construction
URLs to an SSL-enabled server are constructed using https instead of simply http. URLs that point to documents on an SSL-enabled server have this format:
https://servername.domain.dom/pathname/document
Secure Server Document Root
After SSL is installed and enabled on a server, all communications between the server and SSL-enabled browsers (such as Netscape Navigator) are private, authenticated, and checked for message integrity. This means that any document sent to a user with an SSL-enabled browser is automatically encrypted. The only way around this is discussed in Setting Encryption Preferences.
The Secure Log
Once SSL is enabled, a new log file, (secure.log) is created in the normal log directory. Entries in the log look like:
198.93.92.99: [02/Nov/1994:23:51:46 -0800] using keysize 40
where the IP address is first, followed by the date and time of access, and then the key size. The key size represents a level of security. Generally, the bigger the key size, the higher the level of security. See page 221 for a list of supported key sizes.
Unprotected Server Document Directory
If you want to have both secure and unsecure servers, you should operate the unsecure server on a different machine from the secure server. If your resources are limited and you must run an unsecure server on the same machine as your secure server, do the following.
- Assign proper port numbers—Make sure that the secure server and the unsecure server are assigned different port numbers. For example, use 443 for the secure server and 80 for the unsecure one.
Note Use CHROOT on the document root directory—The unprotected server should have references to its document root redirected using the chroot command.
Changes to the magnus.conf File
With an SSL-enabled server installed, there are several changes to the magnus.conf file (the server's main configuration file). These new directives are briefly described in the following sections.
Security
The Security directive tells the server whether SSL is enabled or disabled.
Syntax
Security value
value specifies if SSL is on or off. Security on enables SSL; Security off disables SSL.
SSL2
The SSL2 directive tells the server that SSL2 is enabled or disabled.
Syntax
SSL2 value
value specifies if SSL version 2 is enabled or disabled. SSL2 on enables SSL 2. SSL2 off disables SSL 2.
SSL3
The SSL3 directive tells the server that SSL3 is enabled or disabled.
Syntax
SSL3 value
value specifies if SSL version 3 is enabled or disabled. SSL3 on enables SSL 3. SSL3 off disables SSL 3.
Keyfile
The Keyfile directive tells the server where the key file is located.
Syntax
Keyfile keyfile
keyfile is the server's key file, specified as a relative path from the server root or as an absolute path.
Certfile
The Certfile directive specifies where the certificate file is located.
Syntax
Certfile certfile
certfile is the server's certificate file, specified as a relative path from the server root or as an absolute path.
Ciphers
The Ciphers directive specifies the ciphers enabled for your server. For a discussion of these ciphers, refer to Setting Encryption Preferences.
Syntax
Ciphers +rc4 +rc4export -rc2 -rc2export +idea +des +desede3
A + means the cipher is active, and a - means the cipher is inactive. Any cipher with export as part of its name is not stronger than 40 bits.
SSL3Ciphers
The SSL3Ciphers directive specifies the SSL 3 ciphers enabled for your server. For a discussion of these ciphers, refer to Setting Encryption Preferences.
Syntax
SSL3Ciphers +rsa_rc4_128_md5 +rsa_3des_sha +rsa_des_sha +rsa_rc4_40_md5 +rsa_rc2_40_md5 -rsa_null_md5
A + means the cipher is active, and a - means the cipher is inactive. Any cipher with 40 as part of its name is 40 bits.
SSLClientAuth
The SSLClientAuth directive specifies whether a client must have a certificate in order to communicate with the server. Note that you don't need to turn this directive on to use client authentication with access control.
Syntax
SSLClientAuth value
value specifies if certificates are always required. SSLClientAuth on requires certificates. SSLClientAuth off specifies that certificates are not required.