|
|
| Sun ONE Web Proxy Server 3.6 SP2 Administrator's Guide - UNIX Version |
Chapter 1 Starting the Administration
and Proxy ServersThe proxy server's installation process installs two servers, an administration server and a proxy server. This chapter explains the different methods for starting and stopping both of these servers. For information on installing the proxy server, see the Sun ONE Web Proxy Server 3.6 Installation Guide.
Starting and Stopping the Administration Server
To start and configure your proxy server, you need to have an administration server running on your machine. For more information about the administration server, see Managing Netscape Servers.
Starting the Administration Server
The administration server starts automatically when you finish installing the proxy server. However, there may be instances when you need to stop and start it.
To start the administration server:
- At the command prompt, change to the server root directory.
- Type ./start-admin.
Once you have started the administration server, you need to connect to it. Using a browser that supports frames and JavaScript, such as Netscape Navigator 4.0, enter the following URL for the administration server:
http://servername.sub_domain.domain:port_number
In the above URL, use the administration server's port number (not the port number for the proxy server) that you specified during installation. You will be prompted for a user name and password. Type the administration server user name and password you specified during the installation. The Server Administration page appears. For more information on the Server Administration page, see Using the Server Administration Page.
Stopping the Administration Server
To stop the administration server:
- At the command prompt, change to the server root directory.
- Type ./stop-admin.
Using the Server Administration Page
When you start the administration server, you see the Server Administration page screen, as shown in Figure 1-1.
Figure 1-1 Server Administration page
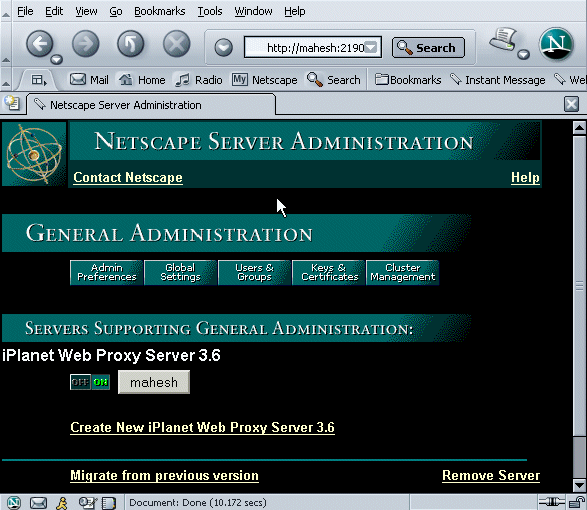
From the Server Administration page, you can perform the following tasks:
- Configure the administration server
- Choose a server to configure
- Start and stop a proxy server
- Create a new proxy server instance
- Migrate from an earlier version of the proxy server
- Remove a server
Starting and Stopping iPlanet Web Proxy Server
Once you have started the administration server, you can start your proxy server. There are several ways to start and stop the proxy server. The following sections discuss these methods.
Starting the Proxy Server
You can start the proxy server in one of the following ways:
Using the Server Administration Page
From the Server Administration page, you can start the proxy server by using one of the following options:
Option 1

Click the On/Off button next to the server you want to start.Option 2
- Click the name of the proxy server you want to start.
- Choose System Settings|Start/Stop the server.
- Click Start.
Manually
Note If your proxy server is installed on a port number less than 1024, you need to be running as root to start the server manually.
To restart the proxy server from the command line:
- If the proxy port number is less than 1024, log in as root or superuser. If the proxy port number is greater than 1024, log in with the proxy's user account.
- At the command line prompt, go to the proxy's root directory and type the following:
server root/proxy-id/start
server root is the directory where you installed the server. The above start script has two command line arguments:
- -p XX (where XX is a port number) starts the proxy on a specific port number. This overrides the setting in magnus.conf.
- -i runs the proxy in inittab mode, so that if the proxy process is ever killed or crashes, inittab restarts the proxy server for you. It also prevents the proxy from putting itself in a background process.
- Press Enter.
Restarting the Proxy Server
Once installed, the proxy server and its child processes run constantly, waiting and handling requests. If your computer crashes or is taken offline, the server processes are lost. There are several ways you can restart the server:
- Automatically restart it from inittab.
- Automatically restart it when the machine reboots with the system RC scripts. In other words, use other daemons in /etc/rc.local for BSD-based systems, or /ect/rc2.d/S99proxy directory for SVR4 systems. Because the installation forms cannot edit the /etc/rc.local, /etc/re2.d/S99proxy or /etc/inittab files, you have to edit these files yourself.
- Manually soft start it.
Restarting with inittab
To restart the proxy server with inittab, put the following text on one line in the /etc/inittab file. The syntax is:
proxy:2:respawn:server root/proxy-id/start -i
server root is the directory where you installed the server. You'll need to remove this line before you stop the server (see the Troubleshooting section of the Sun ONE Web Proxy Server 3.6 Installation Guide).
Note If you are using a version of Unix not derived from System V (such as SunOS 4.1.3), you won't be able to use the inittab option.
Restarting with the System RC Scripts
If you choose to use /etc/rc.local, or your system's equivalent, place the following line in that directory:
server root/proxy-id/start
server root is the directory where you installed the server.
Soft Starting the Proxy
If the proxy is running and you want to restart it so that it uses an updated configuration, type:
server root/proxy-id/restart
server root is the directory where you installed the server. This script finds the parent process ID (in the logs/pid file), and sends the hang-up (-HUP) signal with this process ID.
The Start-Up Process
The following events occur when you start your proxy server.
- The administrator starts the proxy server.
- The proxy reads the configuration files.
- The proxy calls the init functions.
- If caching is enabled for your proxy, the proxy calls the init-cache function. This function causes the proxy server to create an additional process, the cache monitor. This process will fork another process, the cache manager. Both processes have the name "ns-proxy."
- If the proxy server is running as root, the cache monitor and cache manager processes change their user id so that they don't have root privileges.
- The proxy server creates the listen socket to accept connections.
- The proxy changes the uid in the parent process.
- The proxy forks child processes. Because the server is not multithreaded inside processes, there are no worker threads.
Stopping the Proxy Server
You can stop a server in one of the following ways:
Using the Server Administration Page
From the Server Administration page screen, you can stop the proxy server by using one of the following options:
Option 1
Click the On/Off button next to the server you want to stop.Option 2
- Click the name of the proxy server you want to stop.
- Choose System Settings|Start/Stop the server.
- Click Stop.
Manually
If you used inittab to start the server, you need to remove the line from /etc/inittab before you stop the server. Otherwise, the server restarts automatically after it is stopped.
To stop the server manually, log in as root or become superuser, or if you started the proxy using the proxy's user account, log in as that user. Type the following at the command-line prompt:
server root/proxy-id/stop
server root is the directory where you installed the server.
Creating a New Proxy Server Instance
From the Server Administration page, you can create a new instance of proxy server . To do so, complete the following steps:
- Click Create New iPlanet Web Proxy Server 3.6 to launch the Web Proxy Server Installation page.
- In the Web Proxy Server Installation page, type the following information for your proxy server:
- Server Name: the host name where the proxy server is installed.
- Bind Address: the IP address.
- Server Port: the port that you want the proxy to listen to.
- Server Identifier: a name used in the Server Selector to identify the specific proxy server.
Note The name you specify for the Server Identifier can contain only letters, digits, hyphens and underscores, and must begin with a letter.
- Server User: the current user account you specified during installation.
- Processes: the number of processes the proxy spawns. The default is 32.
In addition, specify the following information:
- Choose how you want the proxy server to resolve IP addresses. For more details, see the online help.
- Choose the log format you want the proxy to use. For more information, see Working with Log Files.
- Check the protocols you want the proxy to handle.
- Choose whether or not you want to cache documents and specify the caching-related configuration settings. For more details, see Chapter 9 "Caching", and the online help.