|
| |
| Sun Java System Access Manager 6 2005Q1 Administration Guide | |
Chapter 7
Managing AuthenticationThe Authentication Service provides a web-based user interface for all out-of-the-box authentication modules installed in the Access Manager deployment. This interface provides a dynamic and customizable means for gathering authentication credentials by displaying the login requirement screens (based on the invoked authentication module) to a user requesting access. The interface is built using Sun Java System™ Application Framework (sometimes referred to as JATO), a Java 2 Enterprise Edition (J2EE) presentation framework used to help developers build functional web applications.
The User Interface Login URLThe Authentication Service user interface is accessed by entering a login URL into the Location Bar of a web browser. This URL is:
http://identity_server_host.domain_name:port/service_deploy_uri/UI/Login
Note
During installation, the service_deploy_uri is configured as amserver. This default service deployment URI will be used throughout this document.
The user interface login URL can also be appended with Login URL Parameters to define specific authentication methods or successful/failed authentication redirection URLs. Additional information on redirection URLs can be found in Authentication Types.
Login URL Parameters
A URL parameter is a name/value pair appended to the end of a URL. The parameter starts with a question mark (?) and takes the form name=value. A number of parameters can be combined in one login URL, for example:
http://server_name.domain_name:port/amserver/UI/Login?module=LDAP&locale=j a&goto=http://www.sun.com
If more than one parameter exists, they are separated by an ampersand (&). The combinations though must adhere to the following guidelines:
- Each parameter can occur only once in one URL. For example, module=LDAP&module=NT is not computable.
- Both the org parameter and the domain parameter determine the login organization. In this case, only one of the two parameters should be used in the login URL. If both are used and no precedence is specified, only one will take effect.
- The parameters user, role, service, module and authlevel are for defining authentication modules based on their respective criteria. Due to this, only one of them should be used in the login URL. If more than one is used and no precedence is specified, only one will take effect.
The following sections describe parameters that, when appended to the User Interface Login URL and typed in the Location bar of a web browser, achieve various authentication functionality.
goto Parameter
A goto=successful_authentication_URL parameter overrides the value defined in the Login Success URL of the Authentication Configuration service. It will link to the specified URL when a successful authentication has been achieved. A goto=logout_URL parameter can also be used to link to a specified URL when the user is logging out. For an example of a successful authentication URL:
http://server_name.domain_name:port/amserver/UI/Login?goto=http://www.sun. com/homepage.html
An example goto logout URL:
http://server_name.domain_name:port/amserver/UI/Logout?goto=http://www.sun .com/logout.html.
Note
There is an order of precedence in which Access Manager looks for successful authentication redirection URLs. Because these redirection URLs and their order are based on the method of authentication, this order (and related information) is detailed in Authentication Types.
gotoOnFail Parameter
A gotoOnFail=failed_authentication_URL parameter overrides the value defined in the Login Failed URL of the Authentication Configuration service. It will link to the specified URL if a user has failed authentication. An example gotoOnFail URL might be http://server_name.domain_name:port/amserver/UI/Login?gotoOnFail=http://www.sun.com/auth_fail.html.
Note
There is an order of precedence in which Access Manager looks for failed authentication redirection URLs. Because these redirection URLs and their order are based on the method of authentication, this order (and related information) is detailed in Authentication Types.
org Parameter
The org=orgName parameter allows a user to authenticate as a user in the specified organization.
From this parameter, the correct login page (based on the organization and its locale setting) will be displayed. If this parameter is not set, the default is the top-level organization. For example, an org URL might be:
http://server_name.domain_name:port/amserver/UI/Login?org=sun
user Parameter
The user=userName parameter forces authentication based on the module configured in User Authentication Configuration attribute of the user’s profile. For example, one user’s profile can be configured to authenticate using the Certification module while another user might be configured to authenticate using the LDAP module. Adding this parameter sends the user to their configured authentication process rather than the method configured for their organization. For example:
http://server_name.domain_name:port/amserver/UI/Login?user=jsmith
role Parameter
A role=roleName parameter sends the user to the authentication process configured for the specified role. A user who is not already a member of the specified role will receive an error message when they attempt to authenticate with this parameter. For example:
http://server_name.domain_name:port/amserver/UI/Login?role=manager.
locale Parameter
Access Manager has the capability to display localized screens (translated into languages other than English) for the authentication process as well as for the console itself. The locale=localeName parameter allows the specified locale to take precedence over any other defined locales. The login locale is displayed by the client after searching for the configuration in the following places, order-specific:
- Value of locale parameter in Login URL
The value of the locale=localeName parameter takes precedence over all other defined locales.
- Locale defined in user’s profile
If there is no URL parameter, the locale is displayed based on the value set in the User Preferred Language attribute of the user profile.
- Locale defined in the HTTP header
This locale is set by the web browser.
- Locale defined in Core Authentication Service
This is the value of the Default Auth Locale attribute in the Core Authentication module.
- Locale defined in Platform Service
This is the value of the Platform Locale attribute in the Platform service.
- Operating system locale
The locale derived from this pecking order is stored in the user’s session token and Access Manager uses it for loading the localized authentication module only. After successful authentication, the locale defined in the User Preferred Language attribute of the user’s profile is used. If none is set, the locale used for authentication will be carried over. For example:
http://server_name.domain_name:port/amserver/UI/Login?locale=ja.
Note
Information on how to localize the screen text and error messages can be found in the Access Manager Developer’s Guide
module Parameter
The module=moduleName parameter allows authentication via the specified authentication module. Any of the modules can be specified although they must first be registered under the organization to which the user belongs and selected as one of that organization’s authentication modules in the Core Authentication module. For example:
http://server_name.domain_name:port/amserver/UI/Login?module=Unix.
service Parameter
The service=serviceName parameter allows a user to authenticate via a service’s configured authentication scheme. Different authentication schemes can be configured for different services using the Authentication Configuration service. For example, an online paycheck application might require authentication using the more secure Certificate Authentication module while an organization’s employee directory application might require only the LDAP Authentication module. An authentication scheme can be configured, and named, for each of these services. For example:
http://server_name.domain_name:port/amserver/UI/Login?service=sv1.
Note
The Authentication Configuration service is used to define a scheme for service-based authentication.
arg Parameter
The arg=newsession parameter is used to end a user’s current session and begin a new one. The Authentication Service will destroy a user’s existing session token and perform a new login in one request. This option is typically used in the Anonymous Authentication module. The user first authenticates with an anonymous session, and then hits the register or login link. For example:
http://server_name.domain_name:port/amserver/UI/Login?arg=newsession.
authlevel Parameter
An authlevel=value parameter tells the Authentication Service to call a module with an authentication level equal to or greater than the specified authentication level value. Each authentication module is defined with a fixed integer authentication level. For example:
http://server_name.domain_name:port/amserver/UI/Login?authlevel=1.
Note
The Authentication Level is set in each module’s specific profile. More information on this module can be found in the Sun Java System Access Manager Administration Guide.
domain Parameter
This parameter allows a user to login to an organization identified as the specified domain. The specified domain must match the value defined in the Domain Name attribute of the organization’s profile. For example:
http://server_name.domain_name:port/amserver/UI/Login?domain=sun.com.
iPSPCookie Parameter
The iPSPCookie=yes parameter allows a user to login with a persistent cookie. A persistent cookie is one that continues to exist after the browser window is closed. In order to use this parameter, the organization to which the user is logging in must have Persistent Cookies enabled in their Core Authentication module. Once the user authenticates and the browser is closed, the user can login with a new browser session and will be directed to console without having to reauthenticate. This will work until the value of the Persistent Cookie Max Time attribute specified in the Core Service elapses. For example:
http://server_name.domain_name:port/amserver/UI/Login?org=example&iPSPCook ie=yes
IDTokenN Parameters
This parameter option to enables a user to pass authentication credentials using a URL or HTML forms. With the IDTokenN=value parameters, a user can be authenticated without accessing the Authentication Service User Interface. This process is called Zero Page Login. Zero page login works only for authentication modules that use one login page. The values of IDToken0, IDToken1, ..., IDTokenN map to the fields on the authentication module’s login page. For example, the LDAP authentication module might use IDToken1 for the userID information, and IDToken2 for password information. In this case, the LDAP module IDTokenN URL would be:
http://server_name.domain_name:port/amserver/UI/Login?module=LDAP&IDToken1 =userID&IDToken2=password
(module=LDAP can be omitted if LDAP is the default authentication module.)
For Anonymous authentication, the login URL parameter would be:
http://server_name.domain_name:port/amserver/UI/Login?module=Anonymous&IDT oken1=anonymousUserID.
Authentication TypesThe Authentication Service provides different ways in which authentication can be applied. These different authentication methods can be accessed by specifying Login URL parameters, or through the Authentication Programming Interfaces. Before an authentication module can be configured, the Core authentication service attribute Organization Authentication Modules must be modified to include the specific authentication module name.
The Authentication Configuration service is used to define authentication modules for any of the following authentication types:
Once an authentication module is defined for one of these authentication types, the module can be configured to supply redirect URLs, as well as a post-processing Java class specification, based on a successful or failed authentication process.
How Authentication Types Determine Access
For each of these methods, the user can either pass or fail the authentication. Once the determination has been made, each method follows this procedure. Step 1 through Step 3 follows a successful authentication; Step 4 follows both successful and failed authentication.
- Access Manager confirms whether the authenticated user(s) is defined in the Directory Server data store and whether the profile is active.
The User Profile attribute in the Core Authentication module can be defined as Required, Dynamic, Dynamic with User Alias, or Ignored. Following a successful authentication, Access Manager confirms whether the authenticated user(s) is defined in the Directory Server data store and, if the User Profile value is Required, confirms that the profile is active. (This is the default case.) If the User Profile is Dynamically Configured, the Authentication Service will create the user profile in the Directory Server data store. If the User Profile is set to Ignore, the user validation will not be done.
- Execution of the Authentication Post Processing SPI is accomplished.
The Core Authentication module contains an Authentication PostProcessing Class attribute which may contain the authentication post-processing class name as its value. AMPostAuthProcessInterface is the post-processing interface. It can be executed on either successful or failed authentication or on logout.
- The following properties are added to, or updated in, the session token and the user’s session is activated.
Organization. This is the DN of the organization to which the user belongs.
Principal. This is the DN of the user.
Principals. This is a list of names to which the user has authenticated. (This property may have more then one value defined as a pipe separated list.)
UserId. This is the user’s DN as returned by the module, or in the case of modules other than LDAP or Membership, the user name. (All Principals must map to the same user. The UserID is the user DN to which they map.)
UserToken. This is a user name. (All Principals must map to the same user. The UserToken is the user name to which they map.)
Host. This is the host name or IP address for the client.
authLevel. This is the highest level to which the user has authenticated.
AuthType. This is a pipe separated list of authentication modules to which the user has authenticated (for example, module1|module2|module3).
clientType. This is the device type of the client browser.
Locale. This is the locale of the client.
CharSet. This is the determined character set for the client.
Role. Applicable for role-based authentication only, this is the role to which the user belongs.
Service. Applicable for service-based authentication only, this is the service to which the user belongs.
loginURL. This is the client’s login URL.
- Access Manager looks for information on where to redirect the user after either a successful or failed authentication.
URL redirection can be to either an Access Manager page or a URL. The redirection is based on an order of precedence in which Access Manager looks for redirection based on the authentication method and whether the authentication has been successful or has failed. This order is detailed in the URL redirection portions of the following authentication methods sections.
URL Redirection
In the Authentication Configuration service, you can assign URL redirection for successful or unsuccessful authentication. The URLs, themselves, are defined in the Login Success URL and Login Failure URL attributes in this service. In order to enable URL redirection, you must add the Authentication Configuration service to your organization to make it available to configure for a role, organization, or user. Make sure that you add an authentication module, such as LDAP - REQUIRED, when adding the Authentication Configuration service. For more information, see Authentication Configuration.
Organization-based Authentication
This method of authentication allows a user to authenticate to an organization or sub-organization. It is the default method of authentication for Access Manager. The authentication method for an organization is set by registering the Core Authentication module to the organization and defining the Organization Authentication Configuration attribute.
Organization-based Authentication Login URLs
The organization for authentication can be specified in the User Interface Login URL by defining the org Parameter or the domain Parameter. The organization of a request for authentication is determined from the following, in order of precedence:
After calling the correct organization, the authentication module(s) to which the user will authenticate are retrieved from the Organization Authentication Configuration attribute in the Core Authentication Service. The login URLs used to specify and initiate organization-based authentication are:
http://server_name.domain_name:port/amserver/UI/Login
http://server_name.domain_name:port/amserver/UI/Login?domain=domain_name
http://server_name.domain_name:port/amserver/UI/Login?org=org_name
If there is no defined parameter, the organization will be determined from the server host and domain specified in the login URL.
Organization-based Authentication Redirection URLs
Upon a successful or failed organization-based authentication, Access Manager looks for information on where to redirect the user. Following is the order of precedence in which the application will look for this information.
Successful Organization-based Authentication Redirection URLs
The redirection URL for successful organization-based authentication is determined by checking the following places in order of precedence:
- A URL set by the authentication module.
- A URL set by a goto Login URL parameter.
- A URL set in the clientType custom files for the iplanet-am-user-success-url attribute of the user’s profile (amUser.xml).
- A URL set in the clientType custom files for the iplanet-am-auth-login-success-url attribute of the user’s role entry.
- A URL set in the clientType custom files for the iplanet-am-auth-login-success-url attribute of the user’s organization entry.
- A URL set in the clientType custom files for the iplanet-am-auth-login-success-url attribute as a global default.
- A URL set in the iplanet-am-user-success-url attribute of the user’s profile (amUser.xml).
- A URL set in the iplanet-am-auth-login-success-url attribute of the user’s role entry.
- A URL set in the iplanet-am-auth-login-success-url attribute of the user’s organization entry.
- A URL set in the iplanet-am-auth-login-success-url attribute as a global default.
Failed Organization-based Authentication Redirection URLs
The redirection URL for failed organization-based authentication is determined by checking the following places in the following order:
- A URL set by the authentication module.
- A URL set by a gotoOnFail Login URL parameter.
- A URL set in the clientType custom files for the iplanet-am-user-failure-url attribute of the user’s entry (amUser.xml).
- A URL set in the clientType custom files for the iplanet-am-auth-login-failure-url attribute of the user’s role entry.
- A URL set in the clientType custom files for the iplanet-am-auth-login-failure-url attribute of the user’s organization entry.
- A URL set in the clientType custom files for the iplanet-am-auth-login-failure-url attribute as a global default.
- A URL set for the iplanet-am-user-failure-url attribute in the user’s entry (amUser.xml).
- A URL set for the iplanet-am-auth-login-failure-url attribute of the user’s role entry.
- A URL set for the iplanet-am-auth-login-failure-url attribute of the user’s organization entry.
- A URL set for the iplanet-am-auth-login-failure-url attribute as the global default.
To Configure Organization-Based Authentication
Authentication modules are set for an organization by first adding the Core Authentication service to the organization.
To configure the organization’s authentication attributes:
- Navigate to the organization for which you will configure the authentication attributes.
- Select Services from the View menu.
- Click the Core Properties arrow in the service listing.
The Core authentication attributes are displayed in the Data pane.
- Click Edit next to the Admin Authenticator attribute. This allows you to define the authentication services for administrators only. This attribute can be used if the authentication module for administrators needs to be different from the module for end users. The default authentication module is LDAP.
Once you have defined the authentication services, click Save to save the changes, and click Close to return to the Core Authentication attributes for organizations.
- Click the Edit link next to the Organization Authentication Configuration attribute. This allows you to define authentication modules for all users within the organization. The default authentication module is LDAP.
- Once you have defined the authentication services, click Save to save the changes, and click Close to return to the Core Authentication attributes for organizations.
Role-based Authentication
This method of authentication allows a user to authenticate to a role (either static or filtered) within an organization or sub-organization.
Note
The Authentication Configuration Service must first be registered to the organization before it can be registered as an instance to the role.
For authentication to be successful, the user must belong to the role and they must authenticate to each module defined in the Authentication Configuration Service instance configured for that role. For each instance of role-based authentication, the following attributes can be specified:
Conflict Resolution Level. This sets a priority level for the Authentication Configuration Service instance defined for different roles that both may contain the same user. For example, if User1 is assigned to both Role1 and Role2, a higher conflict resolution level can be set for Role1 so when the user attempts authentication, Role1 will have the higher priority for success or failure redirects and post-authentication processes.
Authentication Configuration. This defines the authentication modules configured for the role’s authentication process.
Login Success URL. This defines the URL to which a user is redirected on successful authentication.
Login Failed URL. This defines the URL to which a user is redirected on failed authentication.
Authentication Post Processing Classes. This defines the post-authentication interface.
Role-based Authentication Login URLs
Role-based authentication can be specified in the The User Interface Login URL by defining a role Parameter. After calling the correct role, the authentication module(s) to which the user will authenticate are retrieved from the Authentication Configuration Service instance defined for the role.
The login URLs used to specify and initiate this role-based authentication are:
http://server_name.domain_name:port/amserver/UI/Login?role=role_name
http://server_name.domain_name:port/amserver/UI/Login?org=org_name&role=ro le_name
If the org Parameter is not configured, the organization to which the role belongs is determined from the server host and domain specified in the login URL itself.
Role-based Authentication Redirection URLs
Upon a successful or failed role-based authentication, Access Manager looks for information on where to redirect the user. Following is the order of precedence in which the application will look for this information.
Successful Role-based Authentication Redirection URLs
The redirection URL for successful role-based authentication is determined by checking the following places in the following order:
- A URL set by the authentication module.
- A URL set by a goto Login URL parameter.
- A URL set in the clientType custom files for the iplanet-am-user-success-url attribute of the user’s profile (amUser.xml).
- A URL set in the clientType custom files for the iplanet-am-auth-login-success-url attribute of the role to which the user has authenticated.
- A URL set in the clientType custom files for the iplanet-am-auth-login-success-url attribute of another role entry of the authenticated user. (This option is a fallback if the previous redirection URL fails.)
- A URL set in the clientType custom files for the iplanet-am-auth-login-success-url attribute of the user’s organization entry.
- A URL set in the clientType custom files for the iplanet-am-auth-login-success-url attribute as a global default.
- A URL set in the iplanet-am-user-success-url attribute of the user’s profile (amUser.xml).
- A URL set in the iplanet-am-auth-login-success-url attribute of the role to which the user has authenticated.
- A URL set in the iplanet-am-auth-login-success-url attribute of another role entry of the authenticated user. (This option is a fallback if the previous redirection URL fails.)
- A URL set in the iplanet-am-auth-login-success-url attribute of the user’s organization entry.
- A URL set in the iplanet-am-auth-login-success-url attribute as a global default.
Failed Role-based Authentication Redirection URLs
The redirection URL for failed role-based authentication is determined by checking the following places in the following order:
- A URL set by the authentication module.
- A URL set by a goto Login URL parameter.
- A URL set in the clientType custom files for the iplanet-am-user-failure-url attribute of the user’s profile (amUser.xml).
- A URL set in the clientType custom files for the iplanet-am-auth-login-failure-url attribute of the role to which the user has authenticated.
- A URL set in the clientType custom files for the iplanet-am-auth-login-failure-url attribute of another role entry of the authenticated user. (This option is a fallback if the previous redirection URL fails.)
- A URL set in the clientType custom files for the iplanet-am-auth-login-failure-url attribute of the user’s organization entry.
- A URL set in the clientType custom files for the iplanet-am-auth-login-failure-url attribute as a global default.
- A URL set in the iplanet-am-user-failure-url attribute of the user’s profile (amUser.xml).
- A URL set in the iplanet-am-auth-login-failure-url attribute of the role to which the user has authenticated.
- A URL set in the iplanet-am-auth-login-failure-url attribute of another role entry of the authenticated user. (This option is a fallback if the previous redirection URL fails.)
- A URL set in the iplanet-am-auth-login-failure-url attribute of the user’s organization entry.
- A URL set in the iplanet-am-auth-login-failure-url attribute as a global default.
To Configure Role-Based Authentication
Authentication modules are set for roles after adding the Authentication Configuration service at the role level.
- Navigate to the organization for which you will configure the authentication attributes.
- Choose Roles from the View menu.
- Select the role for which to set the authentication configuration and click on the Properties arrow.
The role’s properties are displayed in the Data pane.
- Select Services from the View menu in the Data pane.
- Modify the Authentication Configuration attributes as necessary. An explanation of these attributes can be found in Chapter 34, "Authentication Configuration Service Attributes", or by clicking the Help link in the upper right corner of the console.
- Click Save.
.
Service-based Authentication
This method of authentication allows a user to authenticate to a specific service or application registered to an organization or sub-organization. The service is configured as a Service Instance within the Authentication Configuration Service and is associated with an Instance Name. For authentication to be successful, the user must authenticate to each module defined in the Authentication Configuration service instance configured for the service. For each instance of service-based authentication, the following attributes can be specified:
Authentication Configuration. This defines the authentication modules configured for the service’s authentication process.
Login Success URL. This defines the URL to which a user is redirected on successful authentication.
Login Failed URL. This defines the URL to which a user is redirected on failed authentication.
Authentication Post Processing Classes. This defines the post-authentication interface.
Service-based Authentication Login URLs
Service-based authentication can be specified in the User Interface Login URL by defining a service Parameter. After calling the service, the authentication module(s) to which the user will authenticate are retrieved from the Authentication Configuration service instance defined for the service.
The login URLs used to specify and initiate this service-based authentication are:
http://server_name.domain_name:port/amserver/UI/Login?service=service_name
and
http://server_name.domain_name:port/amserver/UI/Login?org=org_name&service =service_name
If there is no configured org parameter, the organization will be determined from the server host and domain specified in the login URL itself.
Service-based Authentication Redirection URLs
Upon a successful or failed service-based authentication, Access Manager looks for information on where to redirect the user. Following is the order of precedence in which the application will look for this information.
Successful Service-based Authentication Redirection URLs
The redirection URL for successful service-based authentication is determined by checking the following places in the following order:
- A URL set by the authentication module.
- A URL set by a goto Login URL parameter.
- A URL set in the clientType custom files for the iplanet-am-user-success-url attribute of the user’s profile (amUser.xml).
- A URL set in the clientType custom files for the iplanet-am-auth-login-success-url attribute of the service to which the user has authenticated.
- A URL set in the clientType custom files for the iplanet-am-auth-login-success-url attribute of the user’s role entry.
- A URL set in the clientType custom files for the iplanet-am-auth-login-success-url attribute of the user’s organization entry.
- A URL set in the clientType custom files for the iplanet-am-auth-login-success-url attribute as a global default.
- A URL set in the iplanet-am-user-success-url attribute of the user’s profile (amUser.xml).
- A URL set in the iplanet-am-auth-login-success-url attribute of the service to which the user has authenticated.
- A URL set in the iplanet-am-auth-login-success-url attribute of the user’s role entry.
- A URL set in the iplanet-am-auth-login-success-url attribute of the user’s organization entry.
- A URL set in the iplanet-am-auth-login-success-url attribute as a global default.
Failed Service-based Authentication Redirection URLs
The redirection URL for failed service-based authentication is determined by checking the following places in the following order:
- A URL set by the authentication module.
- A URL set by a goto Login URL parameter.
- A URL set in the clientType custom files for the iplanet-am-user-failure-url attribute of the user’s profile (amUser.xml).
- A URL set in the clientType custom files for the iplanet-am-auth-login-failure-url attribute of the service to which the user has authenticated.
- A URL set in the clientType custom files for the iplanet-am-auth-login-failure-url attribute of the user’s role entry.
- A URL set in the clientType custom files for the iplanet-am-auth-login-failure-url attribute of the user’s organization entry.
- A URL set in the clientType custom files for the iplanet-am-auth-login-failure-url attribute as a global default.
- A URL set in the iplanet-am-user-failure-url attribute of the user’s profile (amUser.xml).
- A URL set in the iplanet-am-auth-login-failure-url attribute of the service to which the user has authenticated.
- A URL set in the iplanet-am-auth-login-failure-url attribute of the user’s role entry.
- A URL set in the iplanet-am-auth-login-failure-url attribute of the user’s organization entry.
- A URL set in the iplanet-am-auth-login-failure-url attribute as a global default.
To Configure Service-Based Authentication
Authentication modules are set for services after adding the Authentication Configuration service. To do so:
- Choose Services from the View menu in the Identity Management module.
The list of added services are displayed. If the Authentication Configuration service is not added, continue with the steps below. If the service is added, skip to step 4.
- Click Add in the Navigation pane.
A list of available services is displayed in the Data pane.
- Select the checkbox for Authentication Configuration and click Add.
The Authentication Configuration service will appear in the Navigation pane assuring the administrator that it has been added.
- Click the Authentication Configuration Properties arrow.
The Service Instance List is displayed in the in the Data pane.
- Click on the service instance for which to configure the authentication modules.
- Modify the authentication configuration attributes and click Save. An explanation of these attributes can be found in Chapter 34, "Authentication Configuration Service Attributes", or by clicking the Help link in the upper right corner of the console.
User-based Authentication
This method of authentication allows a user to authenticate to an authentication process configured specifically for them. The process is configured as a value of the User Authentication Configuration attribute in the user’s profile. For authentication to be successful, the user must authenticate to each module defined.
User-based Authentication Login URLs
User-based authentication can be specified in the User Interface Login URL by defining a user Parameter. After calling the correct user, the authentication module(s) to which the user will authenticate are retrieved from the User Authentication Configuration instance defined for them.
The login URLs used to specify and initiate this role-based authentication are:
http://server_name.domain_name:port/amserver/UI/Login?user=user_name
http://server_name.domain_name:port/amserver/UI/Login?org=org_name&user=us er_name
If there is no configured org Parameter, the organization to which the role belongs will be determined from the server host and domain specified in the login URL itself.
User Alias List Attribute
On receiving a request for user-based authentication, the Authentication service first verifies that the user is a valid user and then retrieves the Authentication Configuration data for them. In the case where there is more then one valid user profile associated with the value of the user Login URL parameter, all profiles must map to the specified user. The User Alias Attribute (iplanet-am-user-alias-list) in the User profile is where other profiles belonging to the user can be defined. If mapping fails, the user is denied a valid session. The exception would be if one of the users is a top-level admin whereby the user mapping validation is not done and the user is given Super Admin rights.
User-based Authentication Redirection URLs
Upon a successful or failed user-based authentication, Access Manager looks for information on where to redirect the user. Following is the order of precedence in which the application will look for this information.
Successful User-based Authentication Redirection URLs
The redirection URL for successful user-based authentication is determined by checking the following places in order of precedence:
- A URL set by the authentication module.
- A URL set by a goto Login URL parameter.
- A URL set in the clientType custom files for the iplanet-am-user-success-url attribute of the user’s profile (amUser.xml).
- A URL set in the clientType custom files for the iplanet-am-auth-login-success-url attribute of the user’s role entry.
- A URL set in the clientType custom files for the iplanet-am-auth-login-success-url attribute of the user’s organization entry.
- A URL set in the clientType custom files for the iplanet-am-auth-login-success-url attribute as a global default.
- A URL set in the iplanet-am-user-success-url attribute of the user’s profile (amUser.xml).
- A URL set in the iplanet-am-auth-login-success-url attribute of the user’s role entry.
- A URL set in the iplanet-am-auth-login-success-url attribute of the user’s organization entry.
- A URL set in the iplanet-am-auth-login-success-url attribute as a global default.
Failed User-based Authentication Redirection URLs
The redirection URL for failed user-based authentication is determined by checking the following places in the following order:
- A URL set by the authentication module.
- A URL set by a gotoOnFail Login URL parameter.
- A URL set in the clientType custom files for the iplanet-am-user-failure-url attribute of the user’s entry (amUser.xml).
- A URL set in the clientType custom files for the iplanet-am-auth-login-failure-url attribute of the user’s role entry.
- A URL set in the clientType custom files for the iplanet-am-auth-login-failure-url attribute of the user’s organization entry.
- A URL set in the clientType custom files for the iplanet-am-auth-login-failure-url attribute as a global default.
- A URL set for the iplanet-am-user-failure-url attribute in the user’s entry (amUser.xml).
- A URL set for the iplanet-am-auth-login-failure-url attribute of the user’s role entry.
- A URL set for the iplanet-am-auth-login-failure-url attribute of the user’s organization entry.
- A URL set for the iplanet-am-auth-login-failure-url attribute as the global default.
To Configure User-Based Authentication
- Choose Users from the View menu in the Identity Management module.
The list of users is displayed in the Navigation pane.
- Select the user you wish to modify and click the Properties arrow.
The User Profile is displayed in the data pane.
.
- To ensure that the Authentication Configuration service is assigned to the user, Select Services from the View menu. If assigned, the Authentication Configuration service will be listed as an assigned service.
- Select User from the View menu in the Data pane.
- Click on the Edit link next to the User Authentication Configuration attribute to define the authentication modules for the user.
- Click Save.
Authentication Level-based Authentication
Each authentication module can be associated with an integer value for its authentication level. Authentication levels can be assigned by clicking the authentication module’s Properties arrow in Service Configuration, and changing the corresponding value for the module’s Authentication Level attribute. Higher authentication levels define a higher level of trust for the user once that user has authenticated to one or more authentication modules.
The authentication level will be set on a user's SSO token after the user has successfully authenticated to the module. If the user is required to authenticate to multiple authentication modules, and does so successfully, the highest authentication level value will be set in user's SSO token.
If a user attempts to access a service, the service can determine if the user is allowed access by checking the authentication level in user's SSO token. It then redirects the user to go through the authentication modules with a set authentication level.
Users can also access authentication modules with specific authentication level. For example, a user performs a login with the following syntax:
http://hostname:port/deploy_URI/UI/Login?authlevel=auth_level_value
All modules whose authentication level is larger or equal to auth_level_value will be displayed as an authentication menu for the user to choose. If only one matching module is found, then the login page for that authentication module will be directly displayed.
This method of authentication allows an administrator to specify the security level of the modules to which identities can authenticate. Each authentication module has a separate Authentication Level attribute and the value of this attribute can be defined as any valid integer. With Authentication Level-based authentication, the Authentication Service displays a module login page with a menu containing the authentication modules that have authentication levels equal to or greater then the value specified in the Login URL parameter. Users can select a module from the presented list. Once the user selects a module, the remaining process is based on Module-based Authentication.
Authentication Level-based Authentication Login URLs
Authentication level-based authentication can be specified in the User Interface Login URL by defining the authlevel Parameter. After calling the login screen with the relevant list of modules, the user must choose one with which to authenticate. The login URLs used to specify and initiate authentication level-based authentication are:
http://server_name.domain_name:port/amserver/UI/Login?authlevel=authentica tion_level
and
http://server_name.domain_name:port/amserver/UI/Login?org=org_name&authlev el=authentication_level
If there is no configured org parameter, the organization to which the user belongs will be determined from the server host and domain specified in the login URL itself.
Authentication Level-based Authentication Redirection URLs
Upon a successful or failed authentication level-based authentication, Access Manager looks for information on where to redirect the user. Following is the order of precedence in which the application will look for this information.
Successful Authentication Level-based Authentication Redirection URLs
The redirection URL for successful authentication level-based authentication is determined by checking the following places in order of precedence:
- A URL set by the authentication module.
- A URL set by a goto Login URL parameter.
- A URL set in the clientType custom files for the iplanet-am-user-success-url attribute of the user’s profile (amUser.xml).
- A URL set in the clientType custom files for the iplanet-am-auth-login-success-url attribute of the user’s role entry.
- A URL set in the clientType custom files for the iplanet-am-auth-login-success-url attribute of the user’s organization entry.
- A URL set in the clientType custom files for the iplanet-am-auth-login-success-url attribute as a global default.
- A URL set in the iplanet-am-user-success-url attribute of the user’s profile (amUser.xml).
- A URL set in the iplanet-am-auth-login-success-url attribute of the user’s role entry.
- A URL set in the iplanet-am-auth-login-success-url attribute of the user’s organization entry.
- A URL set in the iplanet-am-auth-login-success-url attribute as a global default.
Failed Authentication Level-based Authentication Redirection URLs
The redirection URL for failed authentication level-based authentication is determined by checking the following places in the following order:
- A URL set by the authentication module.
- A URL set by a gotoOnFail Login URL parameter.
- A URL set in the clientType custom files for the iplanet-am-user-failure-url attribute of the user’s entry (amUser.xml).
- A URL set in the clientType custom files for the iplanet-am-auth-login-failure-url attribute of the user’s role entry.
- A URL set in the clientType custom files for the iplanet-am-auth-login-failure-url attribute of the user’s organization entry.
- A URL set in the clientType custom files for the iplanet-am-auth-login-failure-url attribute as a global default.
- A URL set for the iplanet-am-user-failure-url attribute in the user’s entry (amUser.xml).
- A URL set for the iplanet-am-auth-login-failure-url attribute of the user’s role entry.
- A URL set for the iplanet-am-auth-login-failure-url attribute of the user’s organization entry.
- A URL set for the iplanet-am-auth-login-failure-url attribute as the global default.
Module Based Authentication
Users can access a specific authentication module using the following syntax:
http://hostname:port/deploy_URI/UI/Login?module=module_name
Before the authentication module can be accessed, the Core authentication service attribute Organization Authentication Modules must be modified to include the authentication module name. If the authentication module name is not included in this attribute, the “authentication module denied” page will be displayed when the user attempts to authenticate.
This method of authentication allows a user to specify the module to which they will authenticate. The specified module must be registered to the organization or sub-organization that the user is accessing. This is configured in the Organization Authentication Modules attribute of the organization’s Core Authentication Service. On receiving this request for module-based authentication, the Authentication Service verifies that the module is correctly configured as noted, and if the module is not defined, the user is denied access.
Note
See Chapter 8, “Authentication Options” for more information on how to register the authentication modules using the Access Manager console.
Module-based Authentication Login URLs
Module-based authentication can be specified in the User Interface Login URL by defining a module Parameter. The login URLs used to specify and initiate module-based authentication are:
http://server_name.domain_name:port/amserver/UI/Login?module=authenticatio n_module_name
http://server_name.domain_name:port/amserver/UI/Login?org=org_name&module= authentication_module_name
If there is no configured org parameter, the organization to which the user belongs will be determined from the server host and domain specified in the login URL itself.
Module-based Authentication Redirection URLs
Upon a successful or failed module-based authentication, Access Manager looks for information on where to redirect the user. Following is the order of precedence in which the application will look for this information.
Successful Module-based Authentication Redirection URLs
The redirection URL for successful module-based authentication is determined by checking the following places in order of precedence:
- A URL set by the authentication module.
- A URL set by a goto Login URL parameter.
- A URL set in the clientType custom files for the iplanet-am-user-success-url attribute of the user’s profile (amUser.xml).
- A URL set in the clientType custom files for the iplanet-am-auth-login-success-url attribute of the user’s role entry.
- A URL set in the clientType custom files for the iplanet-am-auth-login-success-url attribute of the user’s organization entry.
- A URL set in the clientType custom files for the iplanet-am-auth-login-success-url attribute as a global default.
- A URL set in the iplanet-am-user-success-url attribute of the user’s profile (amUser.xml).
- A URL set in the iplanet-am-auth-login-success-url attribute of the user’s role entry.
- A URL set in the iplanet-am-auth-login-success-url attribute of the user’s organization entry.
- A URL set in the iplanet-am-auth-login-success-url attribute as a global default.
Failed Module-based Authentication Redirection URLs
The redirection URL for failed module-based authentication is determined by checking the following places in the following order:
- A URL set by the authentication module.
- A URL set by a gotoOnFail Login URL parameter.
- A URL set in the clientType custom files for the iplanet-am-user-failure-url attribute of the user’s entry (amUser.xml).
- A URL set in the clientType custom files for the iplanet-am-auth-login-failure-url attribute of the user’s role entry.
- A URL set in the clientType custom files for the iplanet-am-auth-login-failure-url attribute of the user’s organization entry.
- A URL set in the clientType custom files for the iplanet-am-auth-login-failure-url attribute as a global default.
- A URL set for the iplanet-am-user-failure-url attribute in the user’s entry (amUser.xml).
- A URL set for the iplanet-am-auth-login-failure-url attribute of the user’s role entry.
- A URL set for the iplanet-am-auth-login-failure-url attribute of the user’s organization entry.
- A URL set for the iplanet-am-auth-login-failure-url attribute as the global default.
Authentication ConfigurationThe Authentication Configuration service is used to define authentication modules for any of the following authentication types:
Once an authentication module is defined for one of these authentication types, the module can be configured to supply redirect URLs, as well as a post-processing Java class specification, based on a successful or failed authentication process.
Before an authentication module can be configured, the Core authentication service attribute Organization Authentication Modules must be modified to include the specific authentication module name.
Authentication Configuration User Interface
The Authentication Configuration services allows you to define one or more authentication services (or modules) that a user must pass before being allowed access to the console or any secured resource within Access Manager. Organization, role, service, and user-based authentication use a common user interface to define the authentication modules. (Instructions for access the Authentication Configuration interface for specific object types are described in subsequent sections).
- Click on the Edit link next to the object’s Authentication Configuration attribute to display the Module List window.
- This window lists the authentication modules that have been assigned to the object. If no modules exist, click Add to display the Add Module window.
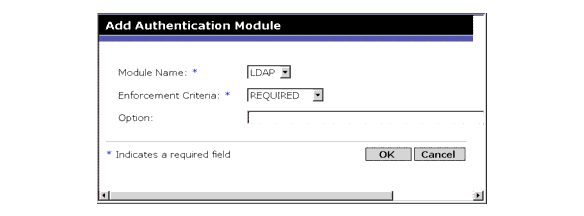
The Add Module Window contains three files to define:
Module Name. This pull-down list allows you to select the authentication modules (including custom modules that may be added) that have been enabled in the Organization Authentication Modules attribute of the Core Authentication module.
Flag. This pull-down menu allows you specify the authentication module requirements. It can be one of:
- REQUIRED - The authentication module is required to succeed. If it succeeds or fails, authentication continues to proceed down the authentication module list.
- REQUISITE - The authentication module is required to succeed. If it succeeds, authentication continues down the authentication module list. If it fails, control returns to the application (authentication does not proceed down the authentication module list.)
- SUFFICIENT - The authentication module is not required to succeed. If it does succeed, control immediately returns to the application (authentication does not proceed down the authentication module list.). If it fails, authentication continues down the list.
- OPTIONAL - The authentication module is not required to succeed. If it succeeds or fails, authentication still continues to proceed down the list.
These flags establish an enforcement criteria for the authentication module for which they are defined. There is hierarchy for enforcement, with REQUIRED being the highest, and OPTION being the lowest.
For example, if an administrator defines an LDAP module with the REQUIRED flag, then the user’s credential must pass the LDAP authentication requirements to access a given resource.
If you add multiple authentication modules and for each module the Flag is set to REQUIRED, the user must pass all authentication requirements before being granted access.
For more information on the flag definitions, refer to the JAAS (Java Authentication and Authorization Service) located at:
http://java.sun.com/security/jaas/doc/module.html
Option. Allows for additional options for the for the module as a key=value pair. Multiple options are separated by a space.
Figure 7-1 Add Module List Window For A User
- Once the fields are selected, click OK to return to the Module List window. The authentication modules you have defined are listed in this window. Click Save.
You can add as many authentication modules to this list as you wish. Adding multiple authentication modules is called authentication chaining. If you are chaining authentication modules, note that the order in which they are listed defines the order of hierarchy of enforcement. For more information on authentication chaining, see Authentication Module Chaining.
To change the order of the authentication modules:
- To remove any authentication module from the list, select the checkbox next to the authentication module and click Delete.
Authentication Module Chaining
One or more authentication modules can be configured so a user must pass authentication credentials to all of them. This is referred to as authentication chaining. Authentication chaining in Access Manager is achieved using the JAAS framework integrated in the Authentication Service. Module chaining is configured under the Authentication Configuration service. Each registered module is assigned one of the following four values:
Once authentication to the modules, as defined by the flags, in the chain is successful, control is returned to the Authentication Service (from the JAAS framework) which validates all the user IDs used to authenticate and maps them to one user. The mapping is achieved by configuring the User Alias List attribute in the user’s profile. A valid session token is issued to the user if all the maps are correct; if not, the user is denied a valid session token. The following properties would represent the single authenticated user to which the other users are aliased:
With Dynamic Profile creation enabled if all user IDs do not map to the same user and if one of the user IDs exists in the local directory server then other user IDs will be added to the user alias list attribute of the existing user.
Authentication Configuration for Organizations
Authentication modules are set for an organization by first adding the Core Authentication service to the organization.
To configure the organization’s authentication attributes:
- Navigate to the organization for which you will configure the authentication attributes.
- Select Services from the View menu.
- Click the Core Properties arrow in the service listing.
The Core authentication attributes are displayed in the Data pane.
- Click the edit link next to the Admin Authenticator attribute. This allows you to define the authentication services for administrators only. This attribute can be used if the authentication module for administrators needs to be different from the module for end users. The default authentication module is LDAP.
Once you have defined the authentication services, click Save to save the changes, and click Close to return to the Core Authentication attributes for organizations.
- Click the Edit link next to the Organization Authentication Configuration attribute. This allows you to define authentication modules for all users within the organization. The default authentication module is LDAP.
- Once you have defined the authentication services, click Save to save the changes, and click Close to return to the Core Authentication attributes for organizations.
Authentication Configuration for Roles
Authentication modules are set for roles after adding the Authentication Configuration service at the role level.
- Navigate to the organization for which you will configure the authentication attributes.
- Choose Roles from the View menu.
- Select the role for which to set the authentication configuration and click on the Properties arrow.
The role’s properties are displayed in the Data pane.
- Select Services from the View menu in the Data pane.
- Modify the Authentication Configuration attributes as necessary. An explanation of these attributes can be found inChapter 34, "Authentication Configuration Service Attributes" or by clicking the Help link in the upper right corner of the console.
- Click Save.
.
Authentication Configuration for Services
Authentication modules are set for services after adding the Authentication Configuration service. To do so:
- Choose Services from the View menu in the Identity Management module.
The list of added services are displayed. If the Authentication Configuration service is not added, continue with the steps below. If the service is added, skip to Step 4.
- Click Add in the Navigation pane.
A list of available services is displayed in the Data pane.
- Select the checkbox for Authentication Configuration and click Add.
The Authentication Configuration service will appear in the Navigation pane assuring the administrator that it has been added.
- Click the Authentication Configuration Properties arrow.
The Service Instance List is displayed in the in the Data pane.
- Click on the service instance for which to configure the authentication modules.
- Modify the authentication configuration attributes and click Save. An explanation of these attributes can be found in Chapter 34, "Authentication Configuration Service Attributes" or by clicking the Help link in the upper right corner of the console.
Authentication Configuration for Users
- Choose Users from the View menu in the Identity Management module.
The list of users is displayed in the Navigation pane.
- Select the user you wish to modify and click the Properties arrow.
The User Profile is displayed in the data pane.
.
- To ensure that the Authentication Configuration service is assigned to the user, Select Services from the View menu. If assigned, the Authentication Configuration service will be listed as an assigned service.
- Select General from the View menu in the Data pane.
- Click on the Edit link next to the User Authentication Configuration attribute to define the authentication modules for the user.
- Click Save.
Account LockingThe Authentication Service provides a feature where a user will be locked out from authenticating after n failures. This feature is turned off by default, but can be enabled using the Access Manager console.
Note
Only modules that throw an Invalid Password Exception can leverage the Account Locking feature.
The Core Authentication service contains attributes for enabling and customizing this feature including (but not limited to):
- Login Failure Lockout Mode which enables account locking.
- Login Failure Lockout Count which defines the number of tries that a user may attempt to authenticate before being locked out. This count is valid per user ID only; the same user ID needs to fail for the given count after which that user ID would be locked out.
- Login Failure Lockout Interval defines (in minutes) the amount of time in which the Login Failure Lockout Count value must be completed before a user is locked out.
- Email Address to Send Lockout Notification specifies an email address to which user lockout notifications will be sent.
- Warn User After N Failure specifies the number of authentication failures that can occur before a warning message will be displayed to the user. This allows an administrator to set additional login attempts after the user is warned about an impending lockout.
- Login Failure Lockout Duration defines (in minutes) how long the user will have to wait before attempting to authenticate again after lockout.
- Lockout Attribute Name defines which LDAP attribute in the user’s profile will be set to inactive for Physical Locking.
- Lockout Attribute Value defines to what the LDAP attribute specified in Lockout Attribute Name will be set: inactive or active.
Email notifications are sent to administrators regarding any account lockouts. (Account locking activities are also logged.) For more information on the account locking attributes, see Chapter 21, “Core Authentication Attributes”.
Access Manager supports two types of account locking are supported: Physical Locking and Memory Locking, defined in the following sections.
Physical Locking
This is the default locking behavior for Access Manager. The locking is initiated by changing the status of a LDAP attribute in the user’s profile to inactive. The Lockout Attribute Name attribute defines the LDAP attribute used for locking purposes. See the Sun Java System Access Manager Administration Guide for more information on configuring physical locking.
Memory Locking
Memory locking is enabled by changing the Login Failure Lockout Duration attribute to a value greater then 0. The user’s account is then locked in memory for the number of minutes specified. The account will be unlocked after the time period has passed. Following are some special considerations when using the memory locking feature:
- If Access Manager is restarted, all accounts locked in memory are unlocked.
- If a user’s account is locked in memory and the administrator changes the account locking mechanism to physical locking (by setting the lockout duration back to 0), the user’s account will be unlocked in memory and the lock count reset.
- After memory lockout, when using authentication modules other than LDAP and Membership, if the user attempts to login with the correct password, a User does not have profile in this organization error. is returned rather than a User is not active. error.
Authentication Service FailoverAuthentication service failover automatically redirects an authentication request request to a secondary server if the primary server fails because of a hardware or software problem or if the server is temporarily shut down.
An authentication context must first be created on an instance of Access Manager where the authentication service is available. If this instance of Access Manager is not available, an authentication context can then be created on a different instance of Access Manager through the authentication failover mechanism. The authentication context will check for server availability in the following order:
- The authentication service URL is passed to the AuthContext API. For example:
AuthContext(orgName, url)
If this API is used, it will only use the server referenced by the URL. No failover will occur even if the authentication service is available on that server.
- The authentication context will check the server defined in the com.iplanet.am.server* attribute of the AMConfig.properties file.
- If step 2 fails, then the authentication context queries the platform list from a server where the Naming service is available This platform list is automatically created when multiple instances of Access Manager are installed (generally, for failover purposes) sharing a one instance of Directory Server.
For example, if the platform list contains URLs for Server1, Server2 and Server3, then the authentication context will loop through Server1, Server2 and Server3 until authentication succeeds on one of them.
The platform list may not always be obtained from the same server, as it depends on the availability of the Naming service. Furthermore, Naming service failover may occur first. Multiple Naming service URLs are specified in the com.iplanet.am.naming.url property (in AMConfing.properties). The first available Naming service URL will be used to identify the server, which will contain the list of servers (in its platform server list) on which authentication failover will occur.
Fully Qualified Domain Name MappingFully Qualified Domain Name (FQDN) mapping enables the Authentication Service to take corrective action in the case where a user may have typed in an incorrect URL (such as specifying a partial host name or IP address to access protected resources). FQDN mapping is enabled by modifying the com.sun.identity.server.fqdnMap attribute in the AMConfig.properties file. The format for specifying this property is:
com.sun.identity.server.fqdnMap[invalid-name]=valid-name
The value invalid-name would be a possible invalid FQDN host name that may be typed by the user, and valid-name would be the actual host name to which the filter will redirect the user. Any number of mappings can be specified (as illustrated in Code Example 1-1) as long as they conform to the stated requirements. If this property is not set, the user would be sent to the default server name configured in the com.iplanet.am.server.host=server_name property also found in the AMConfig.properties file.
:
Possible Uses For FQDN Mapping
This property can be used for creating a mapping for more than one host name which may be the case if applications hosted on a server are accessible by more than one host name. This property can also be used to configure Access Manager to not take corrective action for certain URLs. For example, if no redirect is required for users who access applications by using an IP address, this feature can be implemented by specifying a map entry such as:
com.sun.identity.server.fqdnMap[IP address]=IP address.
Caution
If more than one mapping is defined, ensure that there are no overlapping values in the invalid FQDN name. Failing to do so may result in the application becoming inaccessible.
Persistent CookieA persistent cookie is one that continues to exist after the web browser is closed, allowing a user to login with a new browser session without having to reauthenticate. The name of the cookie is defined by the com.iplanet.am.pcookie.name property in AMConfig.properties; the default value is DProPCookie. The cookie value is a 3DES-encrypted string containing the userDN, organization name, authentication module name, maximum session time, idle time, and cache time. To enable persistent cookies:
- Turn on the Persistent Cookie Mode in the Core Authentication module.
- Configure a time value for the Persistent Cookie Maximum Time attribute in the Core Authentication module.
- Append the iPSPCookie Parameter with a value of yes to the User Interface Login URL.
Once the user authenticates using this URL, if the browser is closed, they can open a new browser window and will be redirected to the console without reauthentication. This will work until the time defined in Step 2 elapses.
Persistent Cookie Mode can be turned on using the Authentication SPI method:
AMLoginModule.setPersistentCookieOn().
Multi-LDAP Authentication Module ConfigurationAs a form of failover or to configure multiple values for an attribute when the Access Manager console only provides one value field, an administrator can define multiple LDAP authentication module configurations under one organization. Although these additional configurations are not visible from the console, they work in conjunction with the primary configuration if an initial search for the requesting user’s authorization is not found. For example, one organization can define a search through LDAP servers for authentication in two different domains or it can configure multiple user naming attributes in one domain. For the latter, which has only one text field in the console, if a user is not found using the primary search criteria, the LDAP module will then search using the second scope. Following are the steps to configure additional LDAP configurations.
To Add An Additional LDAP Configuration
- Write an XML file including the complete set of attributes and new values needed for second (or third) LDAP authentication configuration.
The available attributes can be referenced by viewing the amAuthLDAP.xml located in etc/opt/SUNWam/config/xml. This XML file created in this step though, unlike the amAuthLDAP.xml, is based on the structure of the amadmin.dtd. Any or all attributes can be defined for this file. Code Example 1-2 is an example of a subconfiguration file that includes values for all attributes available to the LDAP authentication configuration.
Code Example 7-2 Sample XML File To Add An LDAP SubConfiguration
<?xml version="1.0" encoding="ISO-8859-1"?>
<!--
Copyright (c) 2002 Sun Microsystems, Inc. All rights reserved.
Use is subject to license terms.
-->
<!DOCTYPE Requests
PUBLIC "-//iPlanet//Sun ONE Identity Server 6.0 Admin CLI DTD//EN"
"jar://com/iplanet/am/admin/cli/amAdmin.dtd"
>
<!--
Before adding subConfiguration load the schema with
GlobalConfiguration defined and replace corresponding
serviceName and subConfigID in this sample file OR load
serviceConfigurationRequests.xml before loading this sample
-->
<Requests>
<OrganizationRequests DN="dc=iplanet,dc=com">
<AddSubConfiguration subConfigName = "ssc"
subConfigId = "serverconfig"
priority = "0" serviceName="iPlanetAMAuthLDAPService">
<AttributeValuePair>
<Attribute name="iplanet-am-auth-ldap-server"/>
<Value>newvalue</Value>
</AttributeValuePair>
<AttributeValuePair>
<Attribute name="iplanet-am-auth-ldap-server"/>
<Value>vbrao.red.iplanet.com:389</Value>
</AttributeValuePair>
<AttributeValuePair>
<Attribute name="iplanet-am-auth-ldap-base-dn"/>
<Value>dc=iplanet,dc=com</Value>
</AttributeValuePair>
<AttributeValuePair>
<Attribute name="planet-am-auth-ldap-bind-dn"/>
<Value>cn=amldapuser,ou=DSAME Users,dc=iplanet,dc=com</Value>
</AttributeValuePair>
<AttributeValuePair>
<Attribute name="iplanet-am-auth-ldap-bind-passwd"/>
<Value>plain text password</Value>
</AttributeValuePair>
<AttributeValuePair>
<Attribute name="iplanet-am-auth-ldap-user-naming-attribute"/>
<Value>uid</Value>
</AttributeValuePair>
<AttributeValuePair>
<Attribute name="iplanet-am-auth-ldap-user-search-attributes"/>
<Value>uid</Value>
</AttributeValuePair>
<AttributeValuePair>
<Attribute name="iplanet-am-auth-ldap-search-scope"/>
<Value>SUBTREE</Value>
</AttributeValuePair>
<AttributeValuePair>
<Attribute name="iplanet-am-auth-ldap-ssl-enabled"/>
<Value>false</Value>
</AttributeValuePair>
<AttributeValuePair>
<Attribute name="iplanet-am-auth-ldap-return-user-dn"/>
<Value>true</Value>
</AttributeValuePair>
<AttributeValuePair>
<Attribute name="iplanet-am-auth-ldap-auth-level"/>
<Value>0</Value>
</AttributeValuePair>
<AttributeValuePair>
<Attribute name="iplanet-am-auth-ldap-server-check"/>
<Value>15</Value>
</AttributeValuePair>
</AddSubConfiguration>
</OrganizationRequests>
</Requests>
- Copy the plain text password as the value for the iplanet-am-auth-ldap-bind-passwd in the XML file created in Step 1.
The value of this attribute is formatted in bold in Code Example 1-2 on page 41.
- Load the XML file using the amadmin command line tool.
./amadmin -u amadmin -w administrator_password -v -t name_of_XML_file.
Note that this second LDAP configuration can not be seen or modified using the Access Manager console.
Tip
There is a sample available for multi-LDAP configuration. See the serviceAddMultipleLDAPConfigurationRequests.xml command line template in /AcessManager-base/SUNWam/samples/admin/cli/bulk-ops/. Instructions can be found in Readme.html at /AcessManager-base/SUNWam/samples/admin/cli/.
Session UpgradeThe Authentication Service allows for the upgrading of a valid session token based on a second, successful authentication performed by the same user to one organization. If a user with a valid session token attempts to authenticate to a resource secured by his current organization and this second authentication request is successful, the session is updated with the new properties based on the new authentication. If the authentication fails, the user’s current session is returned without an upgrade. If the user with a valid session attempts to authenticate to a resource secured by a different organization, the user will receive a message asking whether they would like to authenticate to the new organization. The user can, at this point, maintain the current session or attempt to authenticate to the new organization. Successful authentication will result in the old session being destroyed and a new one being created.
During session upgrade, if a login page times out, redirection to the original success URL will occur. Timeout values are determined based on:
The values of com.iplanet.am.invalidMaxSessionTimeout and iplanet-am-max-session-time should be greater than the page timeout value, or the valid session information during session upgrade will be lost and URL redirection to the previous successful URL will fail.
Validation Plug-in InterfaceAn Administrator can write username or password validation logic suitable to their organization, and plug this into the Authentication Service. (This functionality is supported only by the LDAP and Membership authentication modules.) Before authenticating the user or changing the password, Access Manager will invoke this plugin. If the validation is successful, authentication continues; if it fails, an authentication failed page will be thrown. The plugin extends the com.iplanet.am.sdk.AMUserPasswordValidation class which is part of the Service Management SDK. Information on this SDK can be found in the com.iplanet.am.sdk package in the Access Manager Javadocs. The steps below document how to write and configure a validation plugin for Access Manager.
- The new plugin class will extend the com.iplanet.am.sdk.AMUserPasswordValidation class and implement the validateUserID() and validatePassword() methods. AMException should be thrown if validation fails.
- Compile the plugin class and place the .class file in the desired location. Update the classpath so that it is accessible by the Access Manager during runtime.
- Login to the Access Manager console as top-level administrator. Click on the Service Management tab, and get to the attributes for the Administration Service. Type the name of the plugin class (including the package name) in the UserID & Password Validation Plugin Class field.
- Logout and login.
JAAS Shared StateThe JAAS shared state provides sharing of both user ID and password between authentication modules. Options are defined for each authentication module for:
Upon failure, the module prompts for its required credentials. After failed authentication, the module stops running, or the logout shared state clears.
Enabling JAAS Shared State
To configure the JAAS shared state:
Upon failure, the authentication module will prompt for the required credentials as per the tryFirstPass option behavior suggested in the JAAS specification.
JAAS Shared State Store Option
To configure the JAAS shared state store option:
After a commit, an abort or a logout, the shared state will be cleared.