|
| |
| Sun Java System Application Server Enterprise Edition 8.1 2005Q1 | |
Quick Start Guide
Welcome to the Sun Java™ System Application Server Enterprise Edition 8.1 2005Q1 Quick Start Guide. This guide is for developers, system administrators, and Application Server administrators who are interested in learning about the capabilities of the Sun Java™ System Application Server Enterprise Edition 8.1 2005Q1 software.
This guide describes basic and advanced steps for using Application Server. The steps are presented in the order that you should complete them. The basic steps, which usually require less than 45 minutes to complete, are in these sections:
The advanced steps, which usually require about 45 minutes to complete, are in these sections:
The final sections of this guide include instructions for Cleaning Up and information abut Where to Go Next.
The following table describes what the variable names and default paths are for the directories used in this guide. Variable names are in the first column, and default paths are in the second column.
About Application Server AdministrationTo enable administrators to manage server instances and clusters running on multiple hosts, Application Server provides these tools:
These tools connect to a server called the Domain Administration Server, a specially designated Application Server instance that intermediates in all administrative tasks. The Domain Administration Server provides a single secure interface for validating and executing administrative commands regardless of which interface is used.
A domain is a collection of configuration data, deployed applications, and machines with a designated administrator. The domain definition describes and can control the operation of several applications, stand-alone application server instances, and clusters, potentially spread over multiple machines. When Domain Administration Server is installed, a default domain called domain1 is always installed. You work with the default domain in this guide.
To complete most of the steps presented in this guide, you will use the Admin Console.
Starting the Domain Administration ServerThis topic, the first of three basic topics, provides the following steps:
Starting the Admin Server
To start the admin server, follow the procedure below.
- Add the install_dir/bin/ directory to the PATH environment variable:
C Shell:
setenv PATH install_dir/bin:$PATH
Bourne Shell:
PATH=install_dir/bin:$PATH
export PATH- Set the admin user environment variable so that you do not need to type it for every command:
C Shell:
setenv AS_ADMIN_USER admin_user
Bourne Shell:
AS_ADMIN_USER=admin_user
export AS_ADMIN_USER- Start the server by entering this command from the install_dir:
asadmin start-domain domain1
When you are prompted for the admin password and the master password, enter the passwords that you provided during installation.
- A message appears telling you that the Domain Administration Server is starting:
Starting Domain domain1, please wait. Log redirected to domain_dir/domain1/logs/server.log...- When the startup process has completed, you see an additional message:
Domain domain1 started
Logging in to the Admin Console
The Admin Console is a browser interface that simplifies a variety of administration and configuration tasks. It is commonly used to:
For further information about using the Admin Console, consult the online help or the Sun Java System Application Server Enterprise Edition 8.1 2005Q1 Administration Guide.
To log in to the Admin Console:
- Type this URL in your browser:
https://localhost:4849/asadmin
Because the Admin Console is a secure web application, you must use https instead of http.
Replace the localhost variable with the name of the system that the Domain Admin Server is running on.
4849 is the Admin Console’s default port number. If you changed the port number during the installation, use that number instead.
- When the log in window appears, enter the admin user name and password.
- Click Log In.
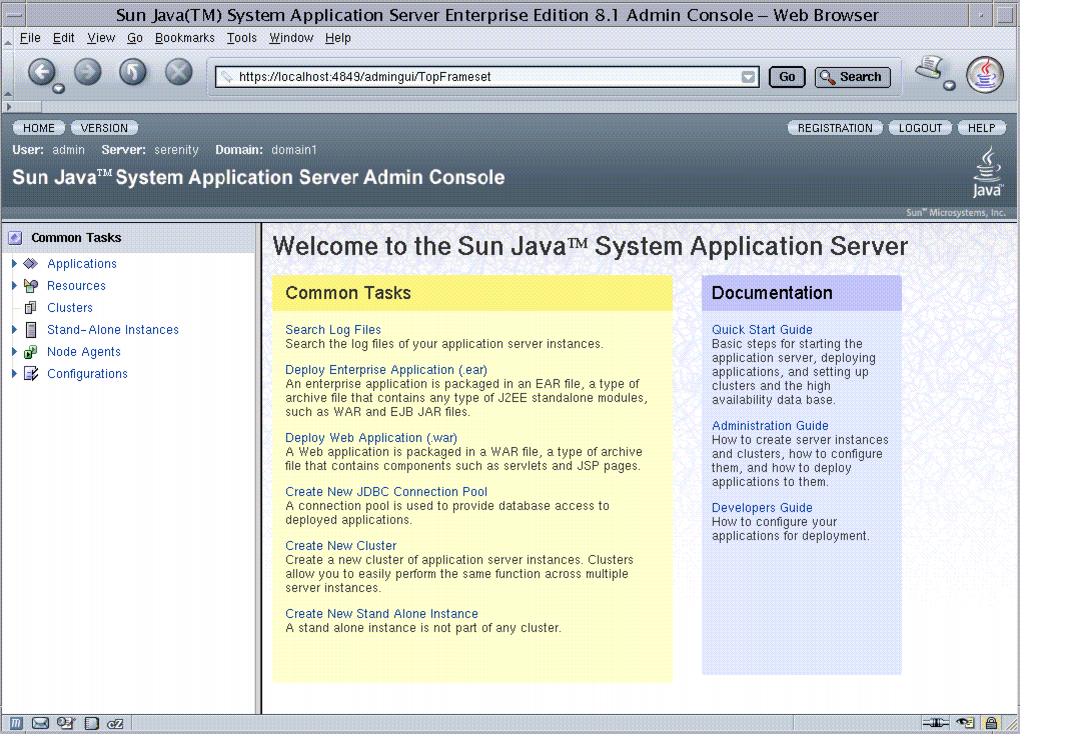
When the Admin Console appears, it looks like this:
In the left pane, you can select what you want to manage from the tree provided. In the right pane, various administrative tasks are listed under the “Common Tasks” heading.
Examining the Log File
Application Server instances and the Domain Admin Server produce annotated logs on the file system. By default, all errors, warnings or useful informative messages are logged. To look at the Admin Server Log File:
- From the “Common Tasks” list in the right pane, click “Search Log Files” to launch a new browser window for Log Viewer.
- In the Log Viewer window, select the server from the “Instance Name” drop-down list, and click Search. The Domain Administration Server’s recent log file entries are displayed.
- Scan the messages and look for any WARNING or SEVERE messages indicating that problems were encountered during server start-up.
You can close Log Viewer at any time. After you create clusters and deploy applications, you should examine log files, if any of the operations failed. Log Viewer can be used to view the log files of any running Application Server instance in the domain.
For more information about the log file, see the Sun Java System Application Server Enterprise Edition 8.1 2005Q1 Administration Guide.
In this section you started the Domain Administration Server and confirmed that it is running. You also logged in to the Admin Console and used the Log Viewer. You can stop the Quick Start trail here if you do not wish to continue.
Creating a ClusterThis section, the second of three basic topics, explains how to create a cluster that contains two Application Server instances. For simplicity, the cluster runs completely within one machine. This topic provides the following steps:
Starting the Node Agent
A node agent is a lightweight process running on each machine that participates in Application Server administrative domain. The node agent is responsible for starting and stopping server instances on the host. It also collaborates with the Domain Administration Server to create new Application Server instances.
One node agent is needed on a machine, for each Application Server administrative domain that the machine belongs to. If you chose the Node Agent Component during installation, a default node agent called hostname was created.
To start the default node agent:
- In a terminal window, type this command:
asadmin start-node-agent hostname
Replace the variable hostname with the name of the host where the Application Server is running.
- When you are prompted, provide the master password.
The node agent starts and connects with the Domain Administration Server. If the Domain Admin Server is not running, the node agent might fail to start.
Defining the Cluster
A cluster is a group of server instances (typically on multiple hosts) that share the same configurations, resources, and applications. A cluster facilitates load balancing across server instances and high availability through failover. You can create clusters spanning multiple machines and manage them with the help of the Node Agent process on each machine. In this guide, for simplicity, our sample cluster will be on one host, the same one where the Domain Administration Server is running.
You must have already started the Node Agent process on each machine, as described in previous section. When you specify instances during cluster creation, you must associate the instance with a running Node Agent for the machine on which you want the instance to run. Node Agent and instance names must be unique across clusters that are created in a domain.
To create a cluster:
- Log in to the Administration Console at https://localhost:4849 if you have not already done so.
Replace the localhost variable with the name of the system that the Domain Admin Server is running on.
4849 is the Admin Console’s default port number. If you changed the port number during the installation, use that number instead.
- On the right pane, under Common Tasks, click Create New Cluster to display the Create Cluster input page.
- Type FirstCluster as the Name of the new cluster.
- From the drop-down list of available configuration templates, select the default-config configuration and choose Make a copy of the selected Configuration.
- Click the Add button twice, to create two entries to specify two instances for the cluster.
- Type i1 and i2 as instance names. The node agent name is automatically populated with the name of the local machine.
You see a screen like this:
- Click OK. The create process can take a few minutes.
Note
This exercise requires automatically assigned port numbers for HTTP, HTTPS, IIOP and IIOPS. You can change them later, if desired.
When the create process is completed, the Cluster Created Successfully page appears, and FirstCluster appears in the tree in the left pane. A copy of the configuration template default-config was made for this cluster, and the name FirstCluster-config was assigned to it.
- In the left pane, expand Clusters and click FirstCluster to display the General Information page for clusters.
- Click the Instances tab to display i1 and i2, the instances that you created.
In this section you have created a simple cluster on a single machine. You can also create clusters spanning multiple machines using the same basic steps (as long as you have the software installed and the Node Agent running on each machine).
You can stop the Quick Start trail here if you do not wish to continue.
Deploying an ApplicationThis section, the third of three basic topics, presents the following steps:
Deploying the Sample Application
This guide uses the clusterjsp sample application to demonstrate web path load balancing capabilities.
- Click the Home button to go to the Common Tasks page, if you are not there already.
- On the right pane, under Common Tasks, click Deploy Enterprise Application.
- In the File to Upload text box, click Browse, and navigate to install_dir/samples/ee-samples/highavailability/apps/clusterjsp/clusterjsp.ear.
- Click Next to display the Deploy Enterprise Application page.
- Scroll down to the Targets section of the page.
- Select FirstCluster from the Available list, and click Add to move it to the Selected list.
- Click OK.
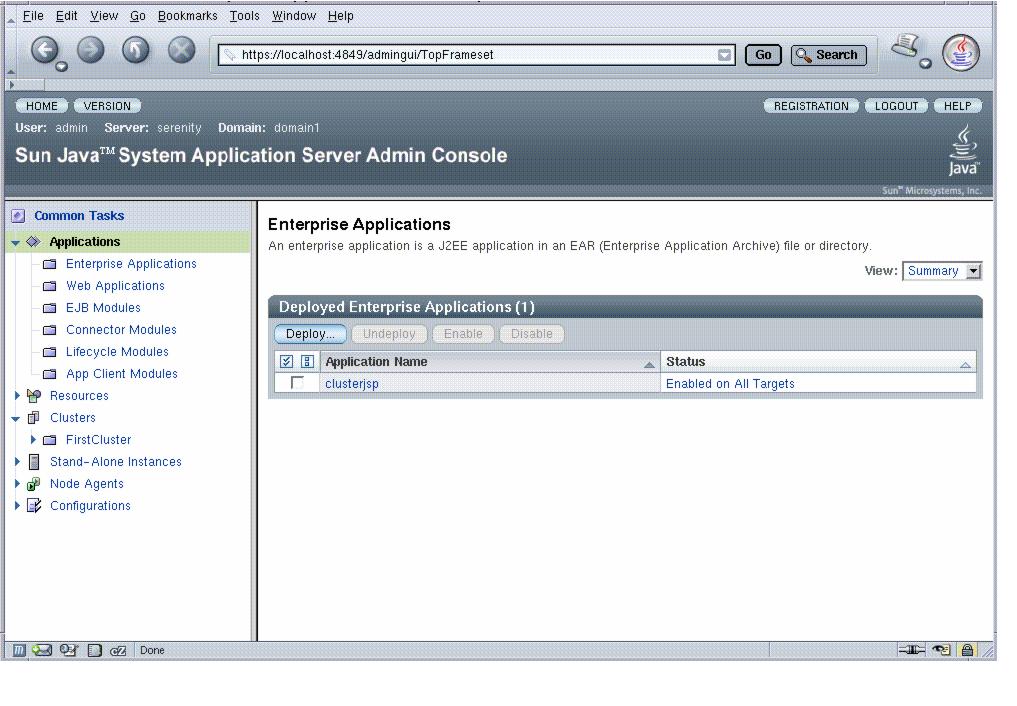
The clusterjsp application is now deployed to FirstCluster.
This screen confirms that the clusterjsp application is now deployed to FirstCluster.
Verifying the Clustered Application
In this step, you start the cluster and check whether the application is accessible on both the instances.
To start the cluster:
- In the tree on the left pane, click the FirstCluster node under Clusters.
- In the right pane, click the General tab if it is not already active.
- Click the Start Instances button to start the cluster.
- Verify that it has started by checking that the Status field changes to indicates that what instances are running.
To access the application on each instance:
- Type this URL in your browser:
http://localhost:port/clusterjsp
Replace the localhost variable with the name of the system that the Domain Admin Server is running on.
Replace the port variable with the value of HTTP-LISTENER-PORT for i1. This example uses http://localhost:38081/clusterjsp.
- Add some session attribute data.
- Examine the Session and Host information displayed. For example:
- Add some session data and click the Add to Session button.
- Repeat this for instance i2 by typing this URL in your browser:
http://localhost:38080/clusterjsp
In this section you deployed an application to a cluster and tested that the application is available on all instances in the cluster.
Congratulations! You have completed the basic steps in this Quick Start Guide. You can stop the Quick Start trail here if you do not wish to proceed to the advanced steps.
Setting up Load BalancingA load balancer is typically deployed in front of a cluster. It:
- Allows an application or service to be scaled horizontally across multiple physical (or logical) hosts yet still presents the user with a single URL
- Insulates the user from host failures or server crashes, when it is used with session replication
- Enhances security by hiding the internal network from the user
Application Server includes load balancing plugins for popular web servers like Apache, and Sun Java™ System Web Server.
This section provides instructions on how to download and set up the Sun Java System Web Server software to act as a load balancer to the cluster of Application Servers. To complete this section, you must have sufficient memory to run a Web Server on your system in addition to the Domain Administration Server and the two Application server instances you have created so far in this guide. A system with 512 Mbytes to 1024 Mbytes of memory is recommended to complete this section.
This topic presents the following steps:
Installing Web Server Software
If you already have Web Server software installed, and if you can identify a Web Server instance to serve as the load balancer, note the location of this instance in the file system and skip to Installing the Load Balancer Plugin.
If you are using Sun Java Enterprise System software, the Web Server is selected for installation automatically when you choose to install the Load Balancer Plugin. However, you can also install Web Server software using these steps:
If you are using a stand-alone Sun Java System Application Server, or if you do not have access to the Sun Java Enterprise System installer, install Web Server software using these steps:
- Go to http://www.sun.com/downloads. Scroll down to the Web & Proxy Servers heading and click Web Servers.
- Download Web Server 6.1 Service Pack 2 or higher for the locale and platform of your choice.
To download, you must log in with username and password registered with MySunSM, Sun StoreSM, SunSolveSM, or the Online Support Center. If you do not have a login account, you can register online.
- Follow the instructions to install Web Server software. You must:
- The Web Server installation process configures the Administration Server for Web Server and prompts you to define a default Web Server instance.
Installing the Load Balancer Plugin
To install the load balancer plugin:
- Run the installer for the software distribution you are using—Sun Java Enterprise System software or the stand-alone Sun Java System Application Server software.
- When you are asked which components you want to install, select Load Balancing Plugin.
On the Sun Java Enterprise System installer, you must expand the Application Server item to see the Load Balancing Plugin. It is not selected for installation by default.
Creating a Load Balancer Configuration
Now return to interacting with the Application Server’s Domain Admin Server. You need a shell execution environment for this section.
- Create a load balancer configuration called MyLbConfig targeted to the cluster FirstCluster:
asadmin create-http-lb-config --target FirstCluster MyLbConfig
- Enable the FirstCluster cluster and the clusterjsp application deployed in it for HTTP load balancing:
asadmin enable-http-lb-server FirstCluster
asadmin enable-http-lb-application --name clusterjsp FirstCluster
- Create a health checker for the load balancer, which signals when an instance that goes down recovers.
asadmin create-http-health-checker --interval 10 --config MyLbConfig FirstCluster
The interval is the number of seconds the health checker waits between checks of an unhealthy instance.
- Export the configuration to a file loadbalancer.xml
asadmin export-http-lb-config --config MyLbConfig loadbalancer.xml
- Copy loadbalancer.xml to web_server_install_dir/https-hostname/config/loadbalancer.xml
Starting the Load Balancer
If the Web Server instance serving as load balancer is not already running, start the Web Server software by executing this command:
If the Web Server instance serving as load balancer is not already running, restart the Web Server software by executing this command
Verifying Load Balancing
- To display the first page of the clusterjsp application, type this URL in your browser:
http://localhost:web_server_port/clusterjsp
Replace the localhost variable with the name of the system that the Web Server is running on.
Replace the web_server_port variable with the value of the port attribute of the LS element in web_server_install_dir/https-hostname/config/server.xml. For this example, port 38000 is used.
A page similar to what you saw in the Verifying the Clustered Application. section appears.
- Examine the Session and Host information displayed. For example:
- The Server Port Number is 38000, the Web Server’s port. The load balancer has forwarded the request on the two instances in the cluster.
- Using different browser software, or a browser on a different machine, create a new session. Requests from the same browser are “sticky” and go to the same instance.
These sessions should be distributed to the two instances in the cluster. You can verify this by looking at the server access log files located here:
- Solaris Java Enterprise System installation:
/var/opt/SUNWappserver/nodeagents/nodeagent_name/i1/logs/access/server_access_log
/var/opt/SUNWappserver/nodeagents/nodeagent_name/i2/logs/access/server_access_log- Linux Java Enterprise System installation:
/var/opt/sun/appserver/nodeagents/nodeagent_name/i1/logs/access/server_access_log
/var/opt/sun/appserver/nodeagents/nodeagent_name/i2/logs/access/server_access_log- Standalone Application Server installations:
install_dir/nodeagents/nodeagent_name/i1/logs/access/server_access_log
install_dir/nodeagents/nodeagent_name/i2/logs/access/server_access_log- Add a name and value pair (Name=Name Value=Duke) for storing in HttpSession.
- Click the “Add to Session Data” button.
- Verify that the session data was added
In this section you created an instance to use as a load balancer and set up a load balancing configuration. You also verified load balancing.
To configure and verify HTTP session failover, continue to Setting Up High Availability Failover.
Cleaning UpTo clean up, you can uninstall the Application Server installation by completing the steps in Option 1: Uninstalling Your Installation, or you can simply delete the sample cluster you have just created by completing the steps in Option 2: Removing the Sample Cluster.
Caution
If you plan to complete the About High Availability Clusters and HADB section, do not clean up the installation now. Instead, start the About High Availability Clusters and HADB section, and when you are done clean up using the procedures you’ll find there.
Option 1: Uninstalling Your Installation
To uninstall completely:
- Stop the Application Server processes using these commands:
asadmin stop-cluster FirstCluster
asadmin stop-node-agent hostname
asadmin stop-domain domain1
At this point all processes related to Application Server are stopped.
- Uninstall the Application Server.
In a Java Enterprise System installation, run var/sadm/prod/entsys/uninstall and follow the steps in the uninstallation wizard.
In a standalone Application Server installation, run install_dir/uninstall and follow the steps in the uninstallation wizard.
- If you installed Web Server for this exercise, stop the web server instance acting as load balancer and uninstall the Web Server product. You can stop the instance as follows:
web_server_install_dir/https-hostname/stop
- If you wish to unsinstall the Web Server product, run the uninstall program from the web_server_install_dir.
Option 2: Removing the Sample Cluster
To remove only the FirstCluster (the sample highly available cluster) and the sample application used during this exercise:
- Stop the Application Server processes and clean up configuration:
asadmin stop-cluster FirstCluster
asadmin disable-http-lb-server FirstCluster
asadmin delete-http-lb-ref --config MyLbConfig FirstCluster
asadmin delete-http-lb-config MyLbConfig
asadmin delete-instance i1
asadmin delete-instance i2
asadmin delete-cluster FirstCluster
asadmin undeploy clusterjsp
- Stop the web server instance acting as load balancer:
web_server_install_dir/https-hostname/stop
- Rename the loadbalancer.xml file in web_server_install_dir/https-hostname/config to loadbalancer.xml.sav
Congratulations! You have now completed the Quick Start for Application Server.
Where to Go NextOther resources for learning about and using Application Server are available. They include: