Sun™ ONE Certificate Server 4.7
Configuring FIPS-140 Level 3 Support
Updated July 25, 2002
This document provide details for configuring Sun™ ONE Certificate Server 4.7 to work with Hardware Security Modules (HSM) such as those manufactured by Ncipher and Chrysalis. Topics included in this document are:
- Overview of Configuration Steps
- Part 1: Install the HSM
- Part 2: Install and Configure Certificate Server
For detailed information about FIPS 140-2 levels of support, see http://csrc.nist.gov/publications/fips/fips140-2/fips1402.pdf.
Overview of Configuration Steps
Configuring support for FIPS 140-1 Level 3 security is a two-part process. For Part 1, see the documentation that comes with the HSM. For Part 2, this document provides detailed instructions.
Part 1: Install the HSM.
Part 2: Install and Configure Certificate Server.
Part 1: Install the HSM
For detailed instructions, see the documentation that comes with HSM, or visit the manufacturer's website.
For detailed information about Ncipher HSM products, go to the Ncipher website at http://www.ncipher.com/safebuilder/codesafe_specs.html
For detailed information about Chysalis HSM products, go to the Chrysalis website at http://www.chrysalis-its.com/trusted_systems/luna_ca3.htm.
Part 2: Install and Configure Certificate Server
In this part, you run the Certificate Server setup program, and then you run the Installation Wizard to create the first administrator.
2a. Install Certificate Server.
-
Run the Certificate Server installation script.
- To run the installation script in Windows, open the distribution directory for the system software you are using and double-click the file setup.exe.
-
To run the installation script in Solaris, change to the distribution directory (where you have downloaded the distribution files) and execute the file setup.
-
Proceed through the Setup program following the instructions in the Installation and Setup Guide. When you reach the end of the program, the first phase of the installation is complete.

2b. Link the HSM library to Certificate Server.
In this step, you create the security module database and then add the HSM to that database. The following instructions assume you're using tsch (Solaris) or cmd (Windows).
-
Go to the admin server config directory of the CMS installation.
-
Set the LD_LIBRARY_PATH equivalent:
-
Create the Certificate Server db.
-
#> ../../shared/bin/modutil -dbdir . -nocertdb -create
D:\> ..\..\shared\bin\modutil -dbdir . -nocertdb -create
-
-
Link the HSM library to the Certificate Server db.
-
#> ../../shared/bin/modutil -dbdir . -nocertdb -add <HSM-manufacturer> -libfile <libraries>/<library>.so
where <libraries> is the location of the manufacturer's libraries and <library> is the name of the manufacturer's library file.
D:\> ..\..\shared\bin\modutil -dbdir . -nocertdb -add Chrysalis -libfile <libraries\library>.dll
where <libraries> is the location of the manufacturer's dll libraries and <library> is the name of the manufacturer's dll file.
-
-
Verify that the HSM tokens are now available:
2c. Configure the Cryptographic Tokens.
In this step, you run the Installation Wizard to configure the cryptographic tokens.
-
To begin running the Installation Wizard, follow these steps:
- If iPlanet Console is not running, start it.
-
On a Windows NT system, click
Start>Programs>iPlanet Server Products> iPlanet Console-
Alternatively, click the iPlanet Console shortcut in the iPlanet Server Products directory that opens on your desktop after setup completes.
-
- On a Unix system, open a command shell, change to the directory /usr/iPlanet/servers, and execute the file startconsole.
-
Log in as admin, giving the password <admin password>.
- In the navigation tree at the left, open your computer, then open Server Group.
-
Select Certificate Server and double-click it; alternatively, you can also click the Open button on the Certificate Server panel on the right.

-
After a few moments, the Installation Wizard appears. You use the wizard to get the initial certificates and set the initial configuration for this instance of Certificate Server.
-
-
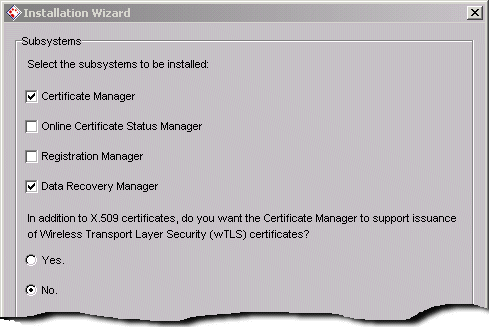
Proceed through the Installation Wizard using the instructions in the Installation and Setup Guide until you get to the following screen:
- Determine whether you want to install a Data Recovery Manager subsystem. A Data Recovery Manager performs the long-term archival and recovery of private encryption keys for end entities. If you plan to store keys so that you can recover them in the event a key becomes lost, corrupt, or compromised, then check this box. This is highly recommended. If you do not plan to store keys, then leave the box unchecked.
- If you want to co-locate the Certificate Manager and Data Recovery Manager (install instances of both on the same host), then check both of their checkboxes.
-
If you want to install the Data Recovery Manager as a stand-alone instance, you can uncheck the Certificate Manager.
-
Continue with the Setup program following instructions in the Installation and Setup Guide until you get to a Key-Pair Information screen. Each time you are prompted for Key-Pair Information (see Figure 0-2), repeat this step. Provide the following information, and then click Next:

A Key-Pair Information window.
-
Proceed through Installation Wizard using the instructions in the Setup and Installation Guide until you get to the Storate Key Creation window (see Figure 0-3). Provide the following information, and then click Next:

The Storage Key Creation window.
- Proceed through the Installation Wizard using the instructions in the Setup and Installation Guide until you reach the end.
Keys stored in the HSM will now be used for issuing End Entity certificates.
Last Updated August 09, 2002


