|
|
| iPlanet Certificate Management System Installation and Setup Guide |
Appendix B Using SSL with iPlanet Web Server, Enterprise Edition 4.x
This appendix explains how to get client certificate authentication working with iPlanet Web Server, Enterprise Edition 4.x. When you have finished following these steps, you will have a web server that requires a user to present a valid client SSL certificate (issued by iPlanet Certificate Management Server) in order to access the restricted areas on the server. The certificate that the user presents must match the certificate that was published to the LDAP directory when it was issued.
To use SSL with iPlanet Web Server, you must either have an existing instance of iPlanet Web Server 4.x that you want to be an SSL server or create a new instance to be an SSL server. To create a new instance, see Creating a New Server.
To enable SSL for a particular server instance, you must obtain a server SSL certificate for the server, then configure the server to require client authentication and to check users' client certificates against certificate information that iPlanet Certificate Management Server has published to the LDAP directory.
This appendix has the following sections:
Creating a New Server
Creating a New Server
If you have an existing instance of iPlanet Web Server that you want to simply convert to be an SSL server, you can skip this step and go to Obtaining a Server Certificate. Otherwise, create a new instance of iPlanet Web Server and follow the remaining procedures to configure the new instance for SSL and client authentication.
To create a new instance of the server, follow these steps:
Log into iPlanet Web Server Administration Server using your administrator's ID and password.
A Manage Servers window appears. In this figure, there is already one server running called example, on port 8000. 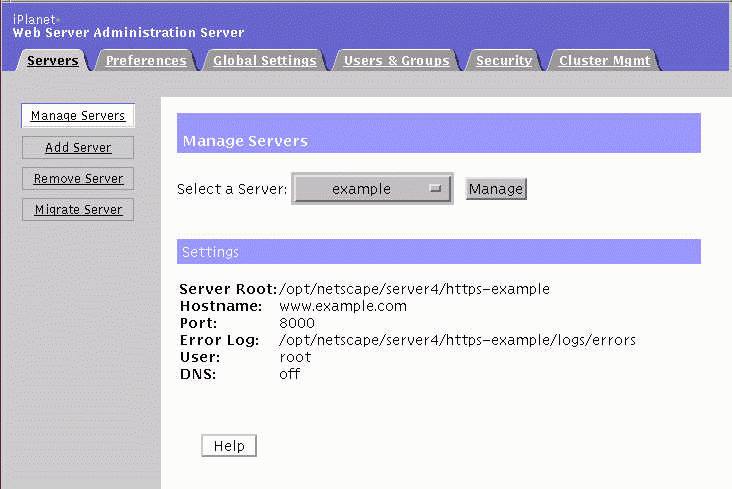
Click Add Server. In the screen that appears, most of the fields have default values.
Verify and update any settings as necessary. Sample server settings are:
Server Name: myhost.example.com
Server Port: (typically 443, but can be any unused port)
Server Identifier: myhost-ssl
Server User: nobody
For details about these fields, click Help to see the iPlanet Web Server documentation.
Submit the form.
A notification for a new server is created.
When you are ready to configure the new server to enable SSL, click "Configure your new server."
See Enabling SSL on the Server.
Obtaining a Server Certificate
You must obtain a server SSL certificate and import it into iPlanet Web Server before you can configure the server to use SSL. To obtain the server SSL certificate for an existing instance of iPlanet Web Server, follow the steps in the following sections:
Creating a Trust Database
Creating a Trust Database
To support SSL, you first create a Trust Database that will contain all of the keys and certificates used by the server (including many pre-installed root certificates from public Certificate Authorities).
Open the Server Manager page for the server you want to configure.
The default page on the Security Tab is the Create a Trust Database page; an example is shown in the following figure. 
Type in a password to protect the Trust Database in the password fields.
This password will protect the certificates the server uses, including its SSL server certificate. The password must contain at least 8 characters and have at least one non-alphabetic character.
Whenever you start an SSL-enabled HTTP server, you will be asked for this password to access the certificate database.
Click OK to submit the form.
Submitting a Certificate Signing Request
Once you have a Trust Database, you can create a PKCS #10 certificate request and submit it to iPlanet Certificate Management Server to obtain your server SSL certificate.
To generate the PKCS #10 certificate request, follow these steps:
Open the Server Manager page for the server you want to configure.
Click Request a Certificate in the Security tab menu.
This figure shows an example of the Request a Server Certificate page that appears. 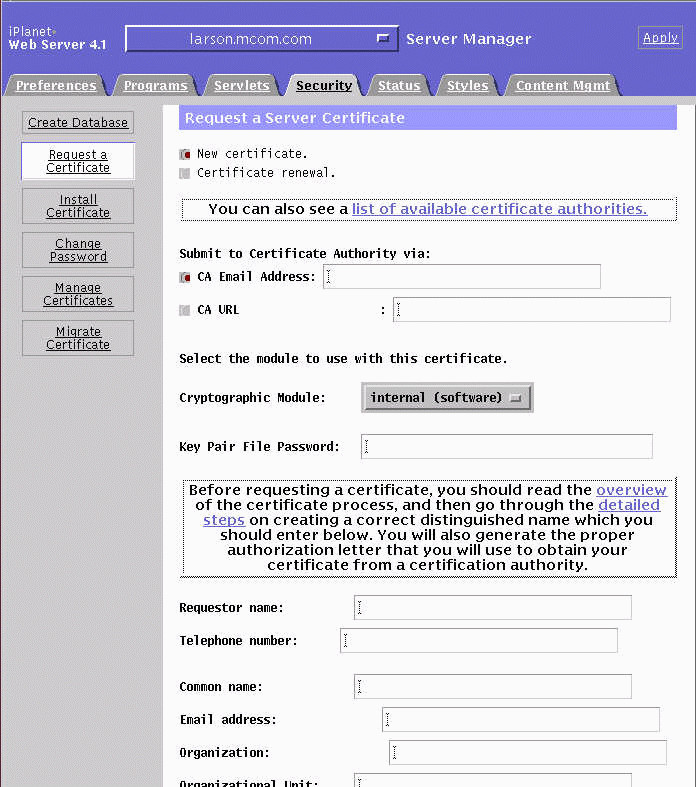
Select the New certificate checkbox.
In the "Submit to Certificate Authority via" area, select the CA URL checkbox.
In the CA URL text field, enter the URL for the end-entity enrollment interface of a CMS Certificate or Registration Manager.
Simply append /enrollment to the URL for the end-entity gateway. For example, https://demoCA.siroe.com:443/enrollment.
Type the Trust Database password in the Key Pair File Password field.
The remaining fields request identifying information about the server. Use the fully qualified domain name of the server for Common Name.
A confirmation window appears, showing the information you entered and the PKCS#10 request. Back up the PKCS#10 data by copying it with the browser's copy command and pasting it into a file using a text editor.
Double check the information about the server, then click OK to submit the form.
A message from the CMS server appears to tell you that the request is pending. Note the request ID number; it can be used to retrieve the certificate from the CMS end-entity gateway when the certificate is issued.
Importing the Certificate
A CMS agent will process your certificate request. When the certificate is issued, you will receive an email containing the certificate or a URL where the certificate can be retrieved. Once you have been issued a server certificate, you must import it into your server. (This is different from importing a personal certificate into your browser.)
To import the server certificate into the server, follow these steps:
In your browser or mail reader, go to the page or message containing the certificate.
Scroll down to the part of the page that contains the base-64 encoded certificate. It looks like this:
Select and copy the base-64 encoded certificate, using Copy from the Edit menu in the browser or mail reader.
Go back to your iPlanet Web Server's Administration page, and open the Server Manager page for the server where you are installing this certificate.
Click Install Certificate in the Security tab menu.
This page appears. 
Verify that the certificate is for "This Server."
Type the Trust Database password in the Key Pair File Password field.
Select "Message text (with headers)."
Paste the encoded certificate information into the text box.
A confirmation page appears, showing the contents of the certificate to be added.
Click Add Server Certificate.
A dialog box tells you to restart the iPlanet Web Server for the changes to take effect.
Complete the instructions in Enabling SSL on the Server before you restart the server.
Enabling SSL on the Server
To enable SSL on the server, you must follow the steps in Enabling Encryption on the Server. This procedure is all that is required if you will not be using SSL client authentication.
If you plan to use SSL client authentication, you can enable it either for all connections or only for requests for resources protected by an access control list (ACL).
In both cases, you must import and trust the certificate of the CA that signs the client certificates you will trust. The instructions for this step are in Trusting the Root CA Certificate.
To enable SSL client authentication on all requests, perform only the task in Enabling Client Authentication for All Requests.
To enable SSL client authentication for ACL-protected resources, you must use an LDAP directory where end-entity's certificates are published, tell the web server how to map certificates to directory entries, and configure ACLs to look up users in the directory. To accomplish these tasks, perform the procedures in the following sections:
Specifying the Authentication Directory
Enabling Encryption on the Server
This procedure explains how to turn SSL on for the server.
To enable the general use of SSL for server communications, follow these steps.
Open the Server Manager page for the server that you want to use SSL
Click the Preferences tab if it is not showing.
In the left frame, click Encryption On/Off.
The Encryption On/Off page appears.
For the Encryption checkbox, select On.
In the Port Number box, enter the port number you want to use for the SSL service. (The default for HTTPS is 443.)
Verify that the correct alias is selected.
Follow the directions to Save and Apply the changes.
You can Save to save the changes to the configuration file, or Save and Apply to save the changes and restart the server. If you plan to continue configuring SSL, you can just Save now and restart the server later.
Trusting the Root CA Certificate
For the server to accept SSL client certificates issued by your root CA, you must import the certificate chain from your root CA into the server and establish it as a trusted CA.
Use the secure end-entity pages to import the certificate chain, as follows:
Go to the URL for the secure end-entity port of the Certificate Manager that is to act as your root CA, using HTTPS.
For example: https://demoCA.siroe.com:443/
Select the Retrieval tab.
Click Import CA Certificate Chain.
In the Import CA Certificate Chain form, select "Display the CA certificate chain in PKCS#7 for importing into a server."
The certificate chain appears in your browser window in an encoded format.
Copy the encoded certificate chain, using Copy from the browser's Edit menu.
Open the iPlanet Web Server Server Manager page for the server where you want to import the CA certificate chain.
Select Install Certificate from the Security tab menu on the left.
Select "Trusted Certificate Authority."
Type the Trust Database password into the Key Pair File Password field.
Select "Message text (with headers)," and paste the encoded certificate chain into the text box. After you have made the remaining configuration changes described next, restart the server for the changes to take effect.
Enabling Client Authentication for All Requests
To require SSL client authentication for all requests on a server:
Open the Server Manager page for the server that uses SSL
Click the Preferences tab if it is not showing.
In the left frame, click Encryption Preferences.
For the "Require client certificate (regardless of access control)" checkbox, select Yes.
Choose Save if you want to configure more about the server or Save and Apply to save changes and restart the server.
Specifying the Authentication Directory
You must specify a particular LDAP directory for iPlanet Web Server to use for authentication. This must be the same directory to which CMS publishes certificate information.
Note iPlanet Certificate Management Server must be configured to publish certificate information to a directory in order for the web server to verify the client certificate.
To specify an authentication directory, follow these steps:
Open the Web Server Administration Server page, and select the Global Settings tab.
Select Configure Directory Service.
This screen appears. 
Supply the host name, port number, and base DN for the LDAP directory to be used for authentication.
If you want, click Yes to specify an SSL connection for authentication communications between iPlanet Web Server and Directory Server. (You must also enable the SSL connection in Directory Server.)
Specify the Base DN to use for searching for user entries.
Specify the distinguished name (DN) to use to bind to the directory for searching.
The Bind DN can be the DN of a directory administrator or any DN that has permission to search the directory.
Specify the password used with the Bind DN to bind to the directory.
When you have finished filling out the form, save the changes to the iPlanet Web Server configuration.
Note for CGI Programmers
When you have set up your iPlanet Web Server to use the LDAP server as shown, you also get access to the following environment variables from within CGI scripts:
REMOTE_USER is set to the UID of the user, such as jsmith. This is the most useful variable. For example, you can use it to check the LDAP directory for the user's manager, phone number, and so on, or you can customize the information presented to different users.
CLIENT_CERT contains an encoded copy of the user's certificate.
AUTH_TYPE is set to ssl when appropriate.
HTTPS is set to on when appropriate.
HTTPS_KEYSIZE is the number of bits in the encryption key, for example, 128.
HTTPS_SECRETKEYSIZE is the number of bits in the secret key, usually 40 for export and 128 for the US.
Modifying the Configuration File
The iPlanet Web Server does not automatically check each certificate against the certificate revocation list (CRL), and so cannot detect a revoked certificate. However, if iPlanet Certificate Management Server is configured to remove revoked certificates from the LDAP directory, you can tell iPlanet Web Server to verify each client certificate against the LDAP directory, thus protecting against the presentation of revoked certificates.
For more information on the certmap.conf file, see "Editing the certmap.conf file" in Chapter 5, "Using SSL," in Managing Servers with iPlanet Console.
The certmap.conf file tells iPlanet Web Server how to map a client certificate to the LDAP server to make a valid LDAP query. The file is located in <web_server_root>/userdb/certmap.conf.
Note The formatting of this file is extremely important. Extra spaces or linefeeds, for example, can cause certificate authorization to fail.
In this example of a certmap.conf file, we have issued certificates that have a UID field and then specified that field as the key field for the LDAP search.
certmap example CN=Certificate Manager, OU=Information Systems, O=Example, C=US
example:DNComps O, C
example:FilterComps UID
example:verifycert on
certmap <token> <issuerDN>
The certmap line establishes a token to identify rules corresponding to certificates whose issuer DN matches the DN provided. Subsequent lines in the certmap.conf file that begin with the token specify rules to map the SSL client certificate to an entry in the LDAP directory.
DNComps
The DNComps line tells the server to glean the given attributes from the user's certificate to figure out where to start looking for the user in the LDAP tree. The example uses O and C: if a user's certificate has attributes "O=Sun Microsystems" and "C=US," the web server uses that DN when it looks for the user in LDAP. You can include the entry but leave the value blank; in this case, the server searches the entire LDAP tree for entries matching the filter.
FilterComps
The FilterComps line tells the server to search based on the UID field in the certificate. If you configure all certificates issued by your root CA to have a UID field, this kind of search will always succeed.
verifycert
The fourth line tells the server to verify that the certificate which the user has presented is in fact the certificate currently in the usercertificate attribute on the LDAP server. If you do not include this line, the server will check that the user is a legal user (that is, has access privileges to some particular part of the document root), but it will not check whether the user is using the right certificate.
If the user tries to present a revoked certificate to iPlanet Web Server, the server returns a 404 error. This error also occurs if the user does not have a certificate in the LDAP directory for any other reason, for example, if the certificate was issued at a time when the directory was unavailable for update.
Modifying the Access Control Lists
You can configure the access control lists (ACLs) on iPlanet Web Server to allow only those who hold a valid certificate issued by your root CA to access the parts of the site that you designate as private.
To require client authentication for access to all or part of your site, follow these steps:
Open the Server Manager page for the server that you want to use SSL
Click the Preferences tab if it is not showing.
In the left frame, click Restrict Access.
In the right panel, select Entire Server, or a subdirectory to which you want to restrict access.
This page appears. 
In the top pane under Users/Groups, select All.
In the bottom pane, select the following:
Authenticated people only
Select either "All in the authentication database" or "Only the following people." If you restrict access, select authorized users from the lists of specific users and groups
Under Authentication Method, select SSL
Under Authentication Database, select Default LDAP
Click Update. If you choose to require SSL authentication for particular users or groups, those users must obtain a client SSL certificate from your root CA and present it when they try to access the parts of the site you have chosen to protect.
Testing Client Authentication
To test the configuration, you must start the server for which you have enabled SSL and attempt to access a page that you have protected.
To test the configuration, follow these steps:
Start the server, either from the iPlanet Web Server Administration Server or from the command line.
To start the server from the iPlanet Web Server Administration Server, go to the server's Server Administration page, select the Preferences tab, enter the Trust Database password, and click On. Note that if you have not enabled SSL on Administration Server (as you just did for iPlanet Web Server), your password will go across the network unencrypted.
To start the server from the command line, open a command shell window, go to the installation directory, and run the start script for the new server instance. You must supply the key database password to unlock the certificate and start up the new SSL server. Note that if you do not have a secure connection, your password will go across the network unencrypted. The script interaction looks like the following:
> pwd
/opt/netscape/suitespot/https-example-ssl
> ls
agents-db conf_bk db restart start
catalog config logs rotate stop
> ./start
Please enter password for Internal (software) token: <password>
iPlanet-WebServer-Enterprise/4.1 BB1
startup: listening to https://www.example.com, port 443 as nobody
Use your browser to access a page on the server that is part of a subdirectory to which you have restricted access. (See Modifying the Access Control Lists.)
If you are on the list of restricted users and if SSL has been successfully enabled, you will be asked to present your client SSL certificate from your root CA. If you have problems, look at the error log files for Administration Server and iPlanet Web Server to determine what the problem might be.
Previous Contents Index Next
Copyright © 2002 Sun Microsystems, Inc. All rights reserved.
Last Updated October 07, 2002