|
|
| iPlanet Certificate Management System Installation and Setup Guide |
Chapter 21 Setting Up an OCSP Responder
iPlanet Certificate Management Server (CMS) provides a customizable publishing framework for the Certificate Manager, enabling it to publish certificates and certificate revocation lists (CRLs) to any of the supported repositories—an LDAP-compliant directory, a flat file, and an online validation authority—using the appropriate protocol. This chapter provides an overview of an Online Certificate Status Protocol (OCSP)-compliant PKI setup, and explains how you can use the OCSP service built into the Certificate Manager for real-time verification of certificates issued by the Certificate Manager. The chapter also explains how to configure one or more Certificate Managers to publish CRLs to the OCSP responder, called Online Certificate Status Manager, provided with Certificate Management System.
Note that configuring the Certificate Manager to publish CRLs is optional—you can turn this feature off without affecting any of the certificate issuance and management operations handled by the server.
The chapter has the following sections:
What's an OCSP-Compliant PKI Setup?
What's an OCSP-Compliant PKI Setup?
Certificate Management System supports the Online Certificate Status Protocol (OCSP) as defined in the PKIX standard RFC 2560 (see http://www.ietf.org/rfc/rfc2560.txt ). The OCSP protocol enables OCSP-compliant applications to determine the state of a certificate, including the revocation status, without having to directly check a CRL published by a CA to the validation authority. The validation authority, which is also called an OCSP responder, does the checking for the application.
An OCSP-compliant PKI setup generally includes the following, which work together to verify the revocation status of a certificate:
A CA, which issues and revokes certificates, and periodically publishes the CRL to the OCSP responder.
An OCSP responder, which maintains the CRL it receives periodically from the CA and, when queried by an OCSP-compliant client about the status of a certificate, sends a digitally signed response.
OCSP-compliant applications, which, when trying to validate a certificate, query the appropriate OCSP responder (using the OCSP protocol) for the status of the certificate. The applications determine the location of the OCSP responder by using the Authority Information Access Extension in the certificate being validated. (Certificate Management System enables you to add this extension to certificates. For details, see Configuring Policy Rules for a Subsystem.) The revocation-status-verification process has two parts:
When a certificate's status needs to be verified, the OCSP client (an OCSP-compliant application) sends a request to the OCSP responder for verification and waits for a response from the responder.
The OCSP request that the client submits generally contains all the information required by the responder to identify the certificate whose status it needs to determine.
(Consider this process is similar to a cashier scanning your credit card and waiting for a response from the credit-card processing unit. The scanning unit sends identifying information, such as the credit card number, its type, validity period, and so on.)
Upon receipt of the request, the OCSP responder determines if the request contains all the information required by the responder to process it.
If the request lacks any information required by the responder to process it or if the responder is not configured to provide the requested service to the client, the responder sends a rejection notification to the client. The responder also writes an appropriate error message to its log file.
If the request meets all the criteria, the responder returns a response to the client that requested it: it checks its list of revoked certificates for the one whose status is being requested, verifies its status, composes a report, signs the report, and sends the report to the client.
Note that every response that the client receives, including a rejection notification, is digitally signed by the responder; the client is expected to verify the signature to ensure that the response came from the responder to which it submitted the request. The key the responder uses to sign the message depends on how the OCSP responder is deployed in a PKI setup. RFC 2560 recommends that the key used to sign the response belong to one of the following:
The CA that issued the certificate and whose status is being verified by the responder.
A responder whose public key, which corresponds to the private key it uses to sign responses, is trusted by the client. Such a responder is called a trusted responder.
A responder that holds a specially marked certificate issued to it directly by the CA that revokes the certificates and publishes the CRL. Possession of this certificate by a responder indicates that the CA has authorized the responder to issue OCSP responses for certificates revoked by the CA. Such a responder is called a CA-designated responder or a CA-authorized responder.
Certificate Management System has a built-in OCSP responder and allows you to request OCSP responder certificates. The end-entity interface of both Registration Manager and Certificate Manager includes a form that allows you to manually request a certificate for the OCSP responder. The default enrollment form includes all the attributes (for example, HTTP_PARAMS.certType==ocspResponder) that identify the certificate as an OCSP responder certificate. The required extensions, such as OCSPNoCheck and OCSPSigning, can be added to the certificate when the certificate request is subjected to policy checking; see Configuring Policy Rules for a Subsystem.
The OCSP response that the client receives indicates the current status of the certificate as determined by the OCSP responder. The response could be any of the following:
Good or Verified—specifying a positive response to the status inquiry. At a minimum, this positive response indicates that the certificate has not been revoked, but it does not necessarily mean that the certificate was ever issued or that the time at which the response was produced is within the certificate's validity interval. Response extensions may be used to convey additional information on assertions made by the responder regarding the status of the certificate such as positive statement about issuance, validity, etc.
Revoked—specifying that the certificate has been revoked, either permanently or temporarily.
Unknown—specifying that the OCSP responder doesn't know about the certificate whose status is being requested by the client. Based on the status, the client decides whether to validate the certificate.
How to Get an OCSP Responder?
To aid you in the process of setting up a OCSP-compliant PKI setup, Certificate Management System provides two options:
Use the OCSP-service feature built into the Certificate Manager
Use the CMS OCSP responder, named Online Certificate Status Manager Read the sections that follow and decide which method is suitable for your PKI setup.
How Certificate Manager's OCSP-Service Feature Works
The Certificate Manager has a built-in OCSP-service feature, which when configured, can be used by OCSP-compliant clients to directly query the Certificate Manager about the revocation status of the certificate being validated.
When queried for the revocation status of a certificate, the Certificate Manager looks up its internal database for the certificate, checks its status, and accordingly responds to the client. Since the Certificate Manager has real-time status of all certificates it has issued, this method of revocation checking is most accurate. However, because the Certificate Manager can only check its own internal database, revocation checking is limited to certificates issued by that Certificate Manager. That is, clients can verify only those certificates that are issued by the Certificate Manager. In addition, you also need to keep the Certificate Manager's nonSSL end-entity port enabled because the server can service OCSP requests only via its HTTP port.
If your PKI setup is large, containing a hierarchy of multiple Certificate Managers (root/subordinate CAs), using the Certificate Manager for validating certificates may not be suitable for you. However, if your PKI setup large, but is made up of cloned CAs, you should be able to use the Certificate Manager's built-in OCSP service feature. For information about cloning Certificate Managers, see Cloning a Certificate Manager.
For step-by-step instructions to set up an OCSP-compliant PKI setup using the Certificate Manager, see Setting Up a Certificate Manager with OCSP Service.
How Online Certificate Status Manager Works
In addition to the built-in OCSP service feature, the Certificate Manager can also publish CRLs to an OCSP-compliant online validation authority (or server). If you install the CMS OCSP responder, Online Certificate Status Manager, you can configure one or more Certificate Managers to publish their CRLs to the Online Certificate Status Manager. The Online Certificate Status Manager stores each Certificate Manager's CRL in its internal database and uses the appropriate CRL to verify the revocation status of a certificate when queried by an OCSP-compliant client. This enables you to issue all client certificates in your PKI with the Authority Information Access extension pointing to one location, the location at which the Online Certificate Status Manager is waiting to service OCSP requests; to validate a certificate, irrespective of which Certificate Manager has issued the certificate, an OCSP-complaint client need to just query one server.
You can configure the Certificate Manager to generate and publish CRLs whenever a certificate is revoked and at specified intervals, say every 20 minutes. Because the purpose of setting up an OCSP responder is to facilitate real-time verification of certificates, you should configure the Certificate Manager to generate and publish the CRL to the Online Certificate Status Manager every time a certificate is revoked—configuring the Certificate Manager to publish CRLs at specific intervals would negate the very purpose for which it's being done because the CRL the Online Certificate Status Manager would look up during verification would always be outdated. It's important to note that if the CRL is large, the Certificate Manager could take a considerable amount of time to publish the CRL.
As explained earlier, the Online Certificate Status Manager stores each Certificate Manager's CRL in its internal database and uses it as the default CRL store for verifying certificates. You can also configure the Online Certificate Status Manager to use the CRL published to an LDAP directory. If you do so, the Online Certificate Status Manager uses the CRL published to the LDAP directory, instead of the CRL in its internal database.
For step-by-step instructions to set up an OCSP-compliant PKI setup using the Online Certificate Status Manager, see Setting Up a Remote OCSP Responder.
How to Get OCSP-Compliant Clients?
As mentioned in the preceding section, in addition to a CA and an OSCP responder, you also need OCSP-compliant clients if you want to set up an OCSP-compliant PKI setup. For this purpose, you can use clients such as Netscape 6 or Netscape Communicator with Netscape Personal Security Manager.
Personal Security Manager is an OCSP-compliant security plug-in module for Communicator 4.7x versions. The module, in addition to many other features, enables Communicator to check certificate validity in real time using the OCSP protocol: it enables the client to read the Authority Information Access extension in a certificate, locate the OCSP responder specified by the extension, request the revocation status of the certificate from the OCSP responder, and use the response to validate the certificate. For a brief introduction to Personal Security Manager, see page 39.
Note If you're using Netscape 6 as your client, you don't need to install Personal Security Manager; it's integrated into Netscape 6 as its default security component. In other words, OCSP is a built-in feature in Netscape 6. For more information about Netscape 6, check this site: http://home.netscape.com/browsers/
Setting Up a Certificate Manager with OCSP Service
The Certificate Manager has a built-in OCSP service feature that can be used by OCSP-compliant clients to do real-time verification of certificates issued by the Certificate Manager. This section explains how to setup an OCSP-compliant PKI setup using the Certificate Manager's OCSP-service feature.
Step 1. Before You Begin
Step 2. Install OCSP-Compliant Client
Step 3. Enable Certificate Manager's HTTP Port
Step 4. Enable Certificate Manager's OCSP Service
Step 5. Configure Certificate Manager for Extensions
Step 1. Before You Begin
Before you start setting up a Certificate Manager to service OCSP requests, do this:
If you are unfamiliar with Online Certificate Status Protocol (OCSP), read the PKIX draft RFC 2560 available at this web site: http://www.ietf.org/rfc/rfc2560.txt
Read section What's an OCSP-Compliant PKI Setup?. Decide whether you want to use the OCSP-compliant security plug-in module for Netscape Communicator, Personal Security Manager; this plug-in enables Netscape Communicator 4.7x to query the Online Certificate Status Manager using the OCSP protocol. Netscape 6 has Personal Security Manager built into it.
Check whether you've installed the Certificate Manager, a CMS CA. If you haven't, first identify a host machine for installing it and then follow the installation instructions in Chapter 6 "Installing Certificate Management System" to install it. During installation, note the port numbers you assign to the Certificate Manager.
Make sure the Certificate Manager is started. Also keep the iPlanet Console login information for the Certificate Manager handy; you'll need this to verify or make changes to their configuration.
Read Publishing of CRLs. Determine whether you want the Certificate Manager to publish version 1 or version 2 CRLs to the directory. If you decide to publish version 2 CRLs, read Chapter 4, "Certificate Extension Plug-in Modules" of CMS Plug-Ins Guide and determine the CRL extensions you want the Certificate Manager to set; you will be required to configure the server to set these extensions.
Step 2. Install OCSP-Compliant Client
If you don't want to install Personal Security Manager, skip to the next step, Step 5. Configure Certificate Manager for Required Extension Policies.
If you decided to install Personal Security Manager:
Download the latest version of Personal Security Manager from the web site (http://www.netscape.com ) to the machine on which you have Netscape Communicator, version 4.7x, installed.
Locate the Release Notes (release_notes.html). It explains how to install the product and lists known issues and restrictions. You must read this first for installation instructions.
Make sure you also have the cmcjavascriptapi.html file handy. It describes a JavaScript API for performing user certificate management operations within a client. The JavaScript runs in the context of an enrollment page served by a Certificate Manager or Registration Manager, enabling it to instruct the client to perform PKI operations, such as key generation, certificate-request generation, key archival, import of user certificates, key recovery, and revocation requests. You'll need to refer to this when setting up a Data Recovery Manager for key archival and recovery, which is covered in Chapter 22 "Setting Up Key Archival and Recovery."
Follow the instructions in the release notes and install the product.
For example, in a Windows NT system, you can install Personal Security Manager by entering the path to the psm14_win32.jar file in the browser's URL area. On a Solaris system, you can unzip the file by running gunzip psm_14_solaris2.6.tar.gz, untar the file by running tar xvf psm14_solaris2.6.tar, and then install Personal Security Manager by running psm-install.
Verify that Personal Security Manager is installed.
In the menu bar, click Communicator, and from the Tools menu, select Security Info. You should see the Personal Security Manager interface. 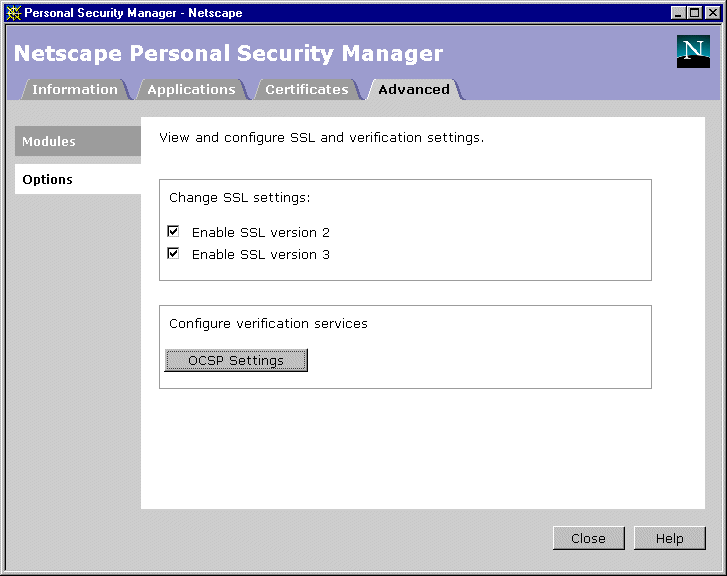
Configure Personal Security Manager to verify certificates by using the OCSP service URL identified by the Authority Information Access extension in certificates.
Step 3. Enable Certificate Manager's HTTP Port
The Certificate Manager services OCSP requests via its nonSSL (HTTP) end-entity port; see End-Entity Ports. If you've disabled the port, you must enable it so that OCSP-compliant clients can successfully query the Certificate Manager for the revocation status of a certificate.
To enable the end-entity port used by the Certificate Manager for non-SSL communications:
Log in to the CMS window for the Certificate Manager (see Logging In to the CMS Window).
The Network tab appears. 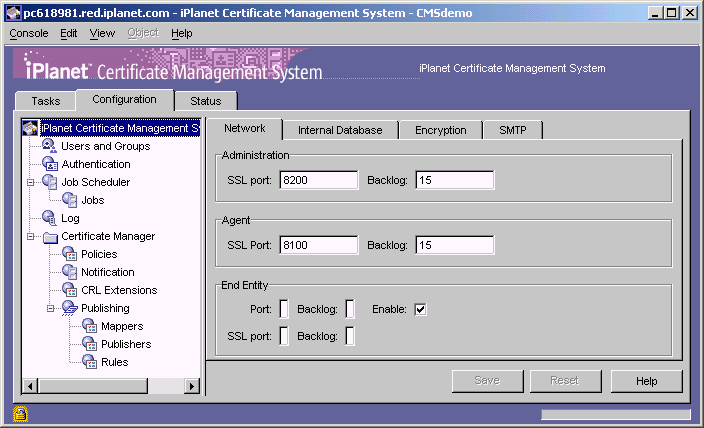
In the End Entity section, select the "Enable" option, and in the adjoining field, type a TCP/IP port number that is unique on the host system. Leave all the other options as they are.
To save your changes, click Save.
The CMS configuration is modified. If the changes you made require you to restart the server, you will be prompted accordingly. Don't restart the server yet; you can do that after you've made all the changes.
Step 4. Enable Certificate Manager's OCSP Service
During the installation of a Certificate Manager, you are given an opportunity to specify whether you want to enable Certificate Manager's OCSP service. If you chose to enable it, you just need to verify that the OCSP service is still on. If you chose to keep the service disabled, you need to follow the instructions below and enable the service.
To enable a Certificate Manager's OCSP service:
In the navigation tree, select Certificate Manager.
The General Setting tab appears. 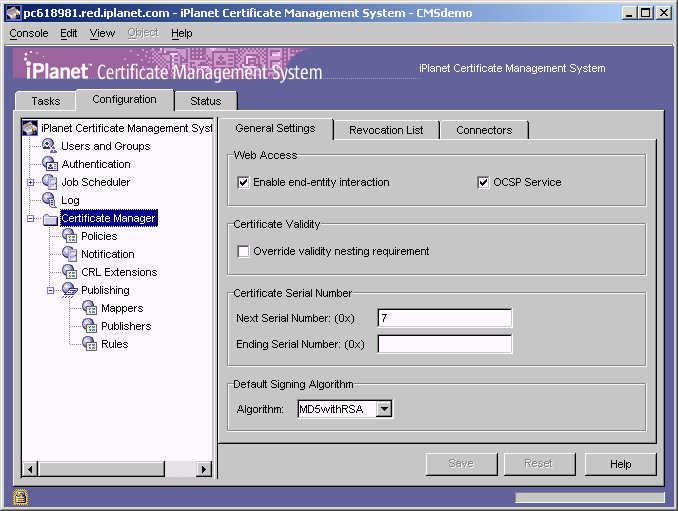
In the Web Access section, select the "OCSP Service" option. Leave all the other selections as they are or make changes that you deem necessary; see Step 6. Enable End-Entity Interaction.
To save your changes, click Save.
The CMS configuration is modified. If the changes you made require you to restart the server, you will be prompted accordingly. Don't restart the server yet; you can do that after you've made all the changes.
Step 5. Configure Certificate Manager for Extensions
In order for OCSP-compliant clients to query the Certificate Manager about the revocation status of a certificate, the certificate being validated must contain the Authority Information Access extension pointing to the location at which the Certificate Manager listens for OCSP service requests. For details about the Authority Information Access extension, see section "AuthInfoAccessExt Plug-in Module" of CMS Plug-Ins Guide.
The Certificate Manager can add an extension to a certificate it issues only if the corresponding policy is enabled and configured properly. Hence, before issuing the OCSP-compliant client certificate, you must verify that the Certificate Manager is configured with the appropriate policy rules to add the required extensions to these certificates.
During the installation of a Certificate Manager, if you chose to enable its OCSP service, a default policy rule (named AuthInfoAccessExt) is created with correct attributes for adding the Authority Information Access extension to certificates the Certificate Manager will issue following installation. If you didn't make any changes to the policy configuration of the Certificate Manager, you probably don't need to do anything.
If you installed the Certificate Manager's with its OCSP service feature disabled, a default policy rule (named AuthInfoAccessExt) is created, but it may not have the correct attributes for adding the Authority Information Access extension to certificates. In either case, it's advisable that you check the status of the said policy rule, and update it if required. Also, for testing whether your OCSP-compliant clients can verify revocation status of certificates by querying the OCSP responder, you will be issuing a client certificate containing the Authority Information Access extension to Personal Security Manager you installed.
To verify the status of policy rules that enable the Certificate Manager to add the extensions required in an OCSP-compliant client certificate:
In the navigation tree, select Certificate Manager, and then select Policies.
The Policy Rules Management tab appears. It lists configured policy rules. 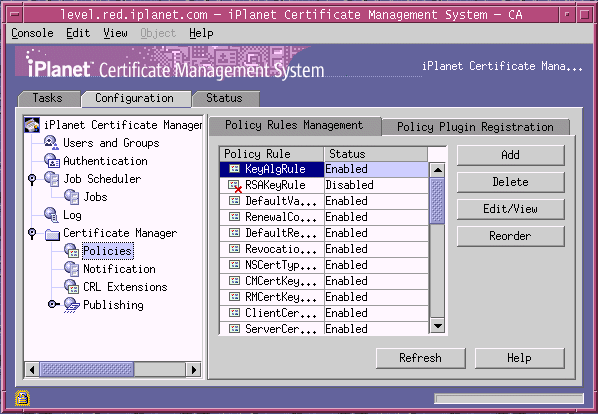
In the Policy Rule list, select the rule named AuthInfoAccessExt and click Edit; this rule was created by default during installation. 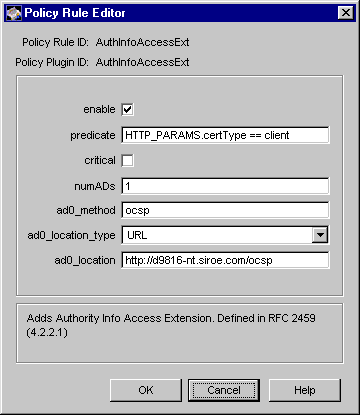
Make sure the following values are assigned:
Enable. Checked or selected.
predicate. Shows HTTP_PARAMS.certType==client.
critical. Unchecked.
numADs. Shows 1.
ad0_method. Shows ocsp or 1.3.6.1.5.5.7.48.1.
ad0_location_type. Shows URL.
ad0_location. Shows the complete path to the location where the Certificate Manager listens to calls from OCSP-compliant clients. The path should be in this format: http://<hostname>:<nonSSL_end_entity_port>/ocsp
If the end-entity port number is 80, you need not specify it in the URL. For example, if the hostname of your Certificate Manager is demoCA.siroe.com and the end-entity port number is 8000, the URL to type in the field would be:
http://demoCA.siroe.com:8000/ocsp
If you need details about any of the configuration parameters, click the Help button.
Click OK.
You are returned to the Policy Rules Management tab.
Make any other policy changes, if necessary.
The Certificate Manager is ready to request client certificates with Authority Information Access extension.
Step 6. Restart the Certificate Manager
For all your changes to take effect, you must restart the Certificate Manager. You can use the CMS window to restart the Certificate Manager.
Select the Tasks tab.
When you restart Certificate Management System, you are prompted to supply the single sign-on password for the server.
Type the single sign-on password you specified during installation and click OK.
Certificate Management System won't restart until you provide this password. For more information, see Required Start-up Information.
Step 7. Test Your CA's OCSP Service Setup
To test whether the Certificate Manager can service OCSP requests properly, follow these steps:
Step A. Turn On Revocation Checking in the Browser
Step D. Download the Certificate to the Browser
Step E. Make Sure the CA is Trusted by the Browser
Step F. Verify the Certificate in the Browser
Step G. Check the Status of Certificate Manager's OCSP Service
Step H. Revoke the Certificate
Step I. Verify the Certificate in the Browser
Step J. Check the Certificate Manager's OCSP Service Status Again
Step A. Turn On Revocation Checking in the Browser
To ensure that Personal Security Manager (the OCSP-compliant client) is configured to verify the revocation status of certificates using the OCSP protocol:
Open a web browser window.
Open the Personal Security Manager interface.
In Communicator version 4.7, you can open this window by clicking the Security button in the navigation bar. Alternatively, you can also open this window by selecting Communicator from the main menu, selecting Tools, and then selecting Security Info.
Select the Advanced tab, and then in left pane, select Options.
Click the OCSP Settings button.
The OCSP Setting window appears.
Select the "Use OCSP to verify only certificates that specify an OCSP service URL" option, and click OK.
Step B. Request a Certificate
The steps outlined below explain how to request a client certificate from the Certificate Manager using the manual enrollment method. If you've configured the Certificate Manager for automated certificate issuance, for example for directory-based enrollment, you may use the appropriate form and request a certificate.
To request a client or personal certificate from the Certificate Manager:
Go to the end-entity interface of the Certificate Manager you configured (or to the Registration Manager that's connected to this Certificate Manager).
The URL is in this form: https://<hostname>:<end_entity_HTTPS_port> or http://<hostname>:<end_entity_HTTP_port>
In the left frame, under Browser, click Manual.
This opens the manual enrollment form.
Fill in all the values and submit the request.
The client prompts you to enter the password for your key database.
When you enter the correct password, the client generates the key pairs.
Do not interrupt the key-generation process.
Step C. Approve the Request
Skip this step if you requested the certificate using any of the automated enrollment methods. Complete this step if you used the manual enrollment form for requesting the certificate; the request you submitted is waiting in the agent queue for approval by an agent.
Go to the Certificate Manager's Agent Services interface.
The URL is in this format: https://<hostname>:<agent_port>
In the left frame, click List Requests.
In the form that appears, select the "Show pending requests" option and click Find.
In the list of pending requests, identify the request you submitted and click Details.
Check the request to make sure that it has all the required attributes of a client certificate, including the Authority Information Access extension.
Scroll to the bottom of the request form, and approve the request.
You should see a confirmation page indicating that the certificate has been issued. Don't close the page until after you complete the next step.
Step D. Download the Certificate to the Browser
To download the certificate into the certificate database of Personal Security Manager:
In the confirmation page, scroll down to the section that says "Installing this certificate in a client."
Check the certificate details for the required extensions.
Follow the on-screen instructions and download the certificate to your browser's certificate database.
(An alternative way to download the certificate is to go to the Retrieval tab of the end-entity services interface, search for the certificate, and download the certificate.)
Step E. Make Sure the CA is Trusted by the Browser
When you downloaded the client certificate to the browser, the Certificate Manager's certificate chain also was downloaded to the browser's certificate database. Make sure that the Certificate Manager's CA signing certificate is trusted in the browser's certificate database; this is required for proper chaining during certificate validation.
In the browser, open the Personal Security Manager interface.
In Communicator version 4.7, you can open this window by selecting Communicator from the main menu, selecting Tools, and then selecting Security Info.
Select the Certificates tab and, in the left pane, click Authorities.
The list of CA certificates currently stored in the browser's certificate database appears.
Locate the Certificate Manager's CA signing certificate, select it, and click Edit.
The Edit Security Certificate Settings window appears.
Make sure all the three options are selected and click OK.
Step F. Verify the Certificate in the Browser
To verify that the certificate has been downloaded into the certificate database of Personal Security Manager:
Click the Certificates tab and, in the left pane, click Mine.
You should see the names of all the client certificates, including the one you just downloaded, stored in the browser's certificate database.
Select the name of the certificate you just downloaded and click View.
In the View Security Certificate dialog box that appears, look for a message that says that the certificate is verified; generally, it's at the top.
Step G. Check the Status of Certificate Manager's OCSP Service
The Certificate Manager's Agent interface contains a form that enables you to check the Certificate Manager's OCSP-service status, such as how many request its received and so on. To go to the Certificate Manager's status page and verify the number of requests it has processed so far:
Go to the web browser window and enter the URL for the Certificate Manager's Agent interface.
The URL is in this format: https://<hostname>:<port>. The Certificate Manager Agent Services interface appears.
In the left frame, click OCSP Service.
The resulting form should show information about the Certificate Manager's OCSP service-related activity since it was last started.
Note the value assigned to the "OCSP Requests Since Startup" field. It should show a value of one (1), a proof that the OCSP-compliant client, Personal Security Manager, queried the Certificate Manager for revocation status of a certificate.
Step H. Revoke the Certificate
To revoke the certificate you issued:
Go to the end-entity interface for the Certificate Manager you configured (or to the Registration Manager that's connected to this Certificate Manager).
Be sure to go to the HTTPS interface. The URL is in this form: https://<hostname>:<end_entity_HTTPS_port>
Select the Revocation tab.
In the left frame, click User Certificate.
The User Certificate Revocation form appears.
In the Revocation Reason section, select Unspecified and click Submit.
The client shows the "Select a Certificate" dialog box and prompts you to choose the certificate you want to revoke.
Select the certificate you downloaded and click OK.
The Certificate Manager revokes the certificate and updates the certificate status in its internal database.
Step I. Verify the Certificate in the Browser
To verify that the certificate has been revoked:
Open the Personal Security Manager interface.
Select the Certificates tab and then click Mine.
Select the certificate you revoked and click View.
In the View Security Certificate dialog box that appears, look for a message that says that the certificate could not be verified.
Step J. Check the Certificate Manager's OCSP Service Status Again
Check the Certificate Manager's OCSP-service status again to verify that these things happened:
The browser sent an OCSP query to the Certificate Manager (this response was initiated when you clicked the View button).
The Certificate Manager sent an OCSP response to the browser.
The browser used that response to validate the certificate and informed you of its status (that the certificate could not be verified). To check the Certificate Manager's OCSP-service status for verification:
Go to the Certificate Manager's status page.
Reload the page (hold down the Shift key and click on the browser's Reload icon.)
Compare the information to the one you noted in Step G above.
The updated statistics should indicate that Personal Security Manager queried the Certificate Manager about the status of the certificate and in response, the Certificate Manager informed Personal Security Manager that the certificate is revoked.
Setting Up a Remote OCSP Responder
You can configure a Certificate Manager to publish CRLs to an online certificate validation authority, such as the one included with Certificate Management System, and then issue end-entity certificates with Authority Information Access extension pointing to the location at which the OCSP responder waits for queries about revocation status of certificates.
This section explains how to set up a Certificate Manager functioning as a root CA to publish CRLs to a remote Online Certificate Status Manager and configure OCSP-compliant clients to query the Online Certificate Status Manager for revocation status of certificates being validated.
The procedure for setting up a Certificate Manager functioning as a subordinate CA to publish CRLs to a remote Online Certificate Status Manager would be the same, except that you would have to perform extra steps to make sure the that CA chain verification takes place smoothly. For example:
If the Online Certificate Status Manager's SSL server certificate is signed by the same root CA that signed the subordinate Certificate Manager's certificates, then you need to mark the root CA as a trusted CA in the subordinate Certificate Manager's certificate database.
If the Online Certificate Status Manager's SSL server certificate is signed by a different root CA, then you need to import the root CA certificate into the subordinate Certificate Manager's certificate database and mark it as a trusted CA. To import a CA certificate into the certificate database of a subordinate Certificate Manager, you can use the Certificate Setup Wizard. For instructions, see Using the Wizard to Install a Certificate or Certificate Chain. After you install the certificate, you can follow the instructions in see Changing the Trust Settings of a CA Certificateto trust the CA certificate you imported.
Step 1. Before You Begin
Step 2. Install an OCSP-Compliant Client
Step 3. Identify the CA to the OCSP Responder
Step 4. Configure the Certificate Manager to Publish CRLs
Step 5. Configure Certificate Manager for Required Extension Policies
Step 6. Configure the Online Certificate Status Manager
Step 7. Restart the Certificate Manager
Step 8. Restart the Online Certificate Status Manager
Step 9. Verify Certificate Manager and Online Certificate Status Manager Connection Note that the Online Certificate Status Manager can be configured to receive CRLs from more than one Certificate Manager. If your deployment has many CAs and you want all of them to publish CRLs to the same Online Certificate Status Manager, you should repeat the above steps for each Certificate Manager.
Step 1. Before You Begin
Before you configure a Certificate Manager (CA) to publish CRLs to an OCSP responder, do the following:
If you are unfamiliar with Online Certificate Status Protocol (OCSP), read the PKIX draft RFC 2560 available at this site: http://www.ietf.org/rfc/rfc2560.txt
Read section What's an OCSP-Compliant PKI Setup?.
Check whether you've installed the Online Certificate Status Manager, the OCSP responder provided with Certificate Management System. If you haven't, first identify a host machine for installing it and then follow the installation instructions in Chapter 6 "Installing Certificate Management System" to install it. During installation, note the port numbers you assign to the Online Certificate Status Manager.
Check whether you have deployed any OCSP-compliant clients. If you haven't, determine whether you want to use the OCSP-compliant security plug-in module for Netscape Communicator, Netscape Personal Security Manager. For details, see How to Get OCSP-Compliant Clients?
Keep the iPlanet Console login information for the Certificate Manager and Online Certificate Status Manager handy; you'll need this to verify or make changes to their configuration.
Read section "OCSPPublisher Plug-in Module" in Chapter 6, "Publisher Plug-in Modules" of CMS Plug-Ins Guide.
Read Publishing of CRLs. Determine whether you want the Certificate Manager to publish version 1 or version 2 CRLs to the directory. If you decide to publish version 2 CRLs, read Chapter 4, "Certificate Extension Plug-in Modules" of CMS Plug-Ins Guide and determine the CRL extensions you want the Certificate Manager to set; you will be required to configure the server to set these extensions.
Decide whether you want to configure your Online Certificate Status Manager to use it's default database for CRLs or to use an LDAP directory. If you want the Online Certificate Status Manager to use the CRL published to the directory, make sure that the Certificate Manager is configured to publish CRLs to an LDAP directory. For details, see Chapter 19 "Setting Up LDAP Publishing."
Note the following information for the directory: the host name, port number, and port type—whether it's an SSL or nonSSL port. The Online Certificate Status Manager can communicate with the directory via SSL or nonSSL port.
Step 2. Install an OCSP-Compliant Client
Follow the instructions as appropriate.
If you don't want to install Personal Security Manager, skip to the next step, Step 3. Identify the CA to the OCSP Responder.
If you decided to install Personal Security Manager, follow the instructions in section Step 2. Install OCSP-Compliant Client to install it.
Step 3. Identify the CA to the OCSP Responder
Before you configure a Certificate Manager to publish CRLs to the Online Certificate Status Manager, you must identify the Certificate Manager to the Online Certificate Status Manager. You do this by storing the Certificate Manager's CA signing certificate in the internal database of the Online Certificate Status Manager.
To locate the Certificate Manager's CA signing certificate, it might be useful to know whether it's self-signed or signed by another CA.
If the certificate is self-signed, you can locate the certificate by searching for it in the Retrieval tab of Certificate Manager's end-entity interface.
If the Certificate Manager is a subordinate CA, you can locate its signing certificate by listing the certificates in the CA certificate chain; you can download the CA chain from the Retrieval tab of a Certificate Manager's end-entity interface. The steps below explain how to store the Certificate Manager's CA signing certificate in the internal database of the Online Certificate Status Manager:
Locate the Certificate Manager's CA signing certificate.
If the certificate is self-signed:
Open a web browser window.
Go the Certificate Manager's end-entity interface. The URL is in https://<hostname>:<SSL_port> or http://<hostname>:<port> format.
Select the Retrieval tab, and in the left frame, click List Certificates.
In the resulting form, click List.
A list of certificates appear.
Locate the Certificate Manager's CA signing certificate by looking at the subject name of the certificate.
Typically, the CA signing certificate is the first certificate the Certificate Manager issues.
Click Details.
In the resulting page, scroll to the section that says "Base 64 encoded certificate" and shows the CA signing certificate in its base-64 encoded format.
Copy the base-64 encoded certificate, including the -----BEGIN CERTIFICATE----- and -----END CERTIFICATE----- marker lines, to the clipboard or a text file.
The copied information should look similar to the following example:
-----BEGIN CERTIFICATE-----
MIICJzCCAZCgAwIBAgIBAzANBgkqhkiG9w0BAQQFADBCMSAwHgYDVQQKExdOZ
XRzY2FwZSBDb21tdW5pYF0aW9uczngjhnMVQ2VydGlmaWNhdGUgQXV0aG9yaX
R5MB4XDTk4MDgyNzE5MDAwMFoXDTk5MDIyMzE5MDAwMnbjdgngYoxIDAeBgNV
BAoTF05ldHNjYXBlIENvbW11bmljYXRpb25zMQ8wDQYDVQQLEwZQZW9wbGUxF
zAVBgoJkiaJkIsZAEBEwdzdXByaXlhMRcwFQYDVQQDEw5TdXByaXlhIFNoZXR
0eTEjMCEGCSqGSIb3DbndgJA
-----END CERTIFICATE-----
If the certificate is signed by another CA:
Open a web browser window.
Go the Certificate Manager's end-entity interface. The URL is in https://<hostname>:<SSL_port> or http://<hostname>:<port> format.
Select the Retrieval tab, and in the left frame, click Import CA Certificate Chain.
In the resulting form, select the "Display certificates in the CA certificate chain for importing individually into a server" option.
A list of certificates appear.
Locate the Certificate Manager's CA signing certificate in its base-64 encoded format.
Copy the base-64 encoded certificate, including the -----BEGIN CERTIFICATE----- and -----END CERTIFICATE----- marker lines, to the clipboard or a text file.
The copied information should look similar to the following example:
-----BEGIN CERTIFICATE-----
MIICJzCCAZCgAwIBAgIBAzANBgkqhkiG9w0BAQQFADBCMSAwHgYDVQQKExdOZ
XRzY2FwZSBDb21tdW5pYF0aW9uczngjhnMVQ2VydGlmaWNhdGUgQXV0aG9yaX
R5MB4XDTk4MDgyNzE5MDAwMFoXDTk5MDIyMzE5MDAwMnbjdgngYoxIDAeBgNV
BAoTF05ldHNjYXBlIENvbW11bmljYXRpb25zMQ8wDQYDVQQLEwZQZW9wbGUxF
zAVBgoJkiaJkIsZAEBEwdzdXByaXlhMRcwFQYDVQQDEw5TdXByaXlhIFNoZXR
0eTEjMCEGCSqGSIb3DbndgJARYU
-----END CERTIFICATE-----
Go to the Online Certificate Status Manager's Agent interface. The URL is in this format: https://<hostname>:<port>.
The Online Certificate Status Manager Agent Services interface appears.
In the left frame, click Add Certificate Authority.
In the resulting form, paste the encoded CA signing certificate inside the text area labeled "Base 64 encoded certificate (including header and footer)."
The certificate is added to the internal database of the Online Certificate Status Manager.
To verify that the certificate is added successfully, in the left frame, click List Certificate Authorities.
The resulting form should show information about the Certificate Manager (CA) you just added. Note the values assigned to the "This Update," "Next Update," and "Requests Served Since Startup" fields. All three fields should show a value of zero (0).
Keep the web browser window open. You'll need to use the same form later for verifying that the Certificate Manager can communicate with the Online Certificate Status Manager.
Step 4. Configure the Certificate Manager to Publish CRLs
In this step, you configure the Certificate Manager to publish CRLs to the Online Certificate Status Manager. Note that a configured Certificate Manager will publish the CRL to the Online Certificate Status Manager, replacing the old CRL with the new one; the old CRL is not saved.
To configure a Certificate Manager to publish CRLs to the directory, follow these steps:
Step A. Specify CRL Format and Publishing Interval
Step B. Set the CRL Extensions
Step C. Create a Publisher for the CRL
Step A. Specify CRL Format and Publishing Interval
You can specify information, such as the publishing interval, the CRL version (whether to include CRL extensions), and the signing algorithm the Certificate Manager should use for signing the CRL object.
Log in to the CMS window for the Certificate Manager (see Logging In to the CMS Window).
In the navigation tree, select Certificate Manager, and then in the right pane, select the Revocation List tab. 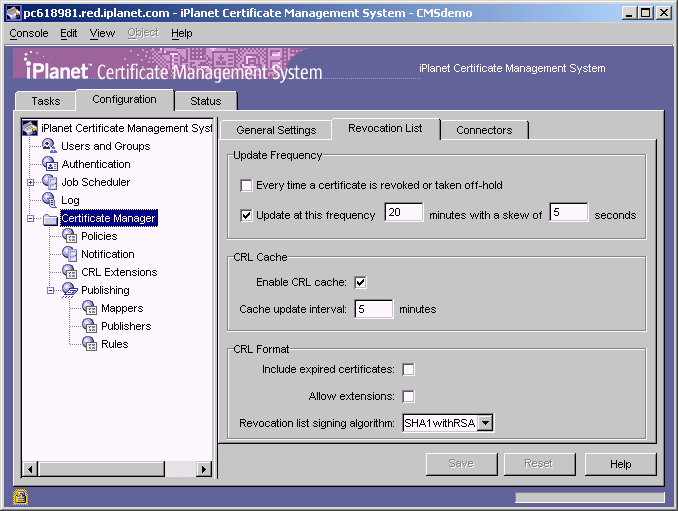
In the Update Frequency section, select the "Every time a certificate is revoked or taken off-hold" option. This option enables the Certificate Manager to generate the CRL every time it revokes a certificate.
Keep in mind that the Certificate Manager attempts to publish the CRL to the configured Online Certificate Status Manager whenever the CRL is generated, in this case, every time a certificate is revoked. Publishing a CRL can be time consuming if the CRL is large. Configuring the Certificate Manager to publish CRLs every time a certificate is revoked may engage the server for a considerable amount of time.
In the CRL Cache section, specify whether to enable CRL caching:
Enable cache. Check this box to enable CRL caching. Leave the box unchecked if you don't want the server to maintain a cache.
Update interval. If you enabled caching, type the interval for updating the cache.
In the CRL Format section, specify the format for publishing the CRL:
Include expired certificates. Check this box if you want the server to include revoked certificates that have expired in the CRL.
Allow extensions. Check this box if you want to allow extensions in the CRL. If you enable this option, the server generates and publishes CRLs conforming to X.509 version 2 standard. If you disable this option, the server generates and publishes CRLs conforming to X.509 version 1 standard. By default, the server publishes version 1 CRLs. If you enable this option, be sure to set the required CRL extensions as described in Step B. Set the CRL Extensions.
Revocation list signing algorithm. Select the algorithm the server should use to sign the CRL. If the Certificate Manager's signing key type is RSA, select MD2 with RSA, MD5 with RSA, or SHA-1 with RSA. If the Certificate Manager's signing key type is DSA, select SHA-1 with DSA.
To save your changes, click Save.
If the changes you made require you to restart the server, you are prompted accordingly. However, don't restart the server yet; you can restart it after you've made all the required changes.
Step B. Set the CRL Extensions
Complete this step only if you configured the Certificate Manager to publish version 2 CRLs—that is, you selected the "Allow extensions" option in Step A. Specify CRL Format and Publishing Interval.
During installation, the Certificate Manager creates default CRL extension rules; these are documented in CMS Plug-Ins Guide. Note that the server is configured to add the CRL Reason extension only; all the other rules are in the disabled state. In this step, you modify the default CRL extension rules to add the required CRL extensions.
To specify the CRL extensions the Certificate Manager should set:
In the navigation tree, under Certificate Manager, select CRL Extensions.
The right pane shows the CRL Extensions Management tab, which lists configured extensions. 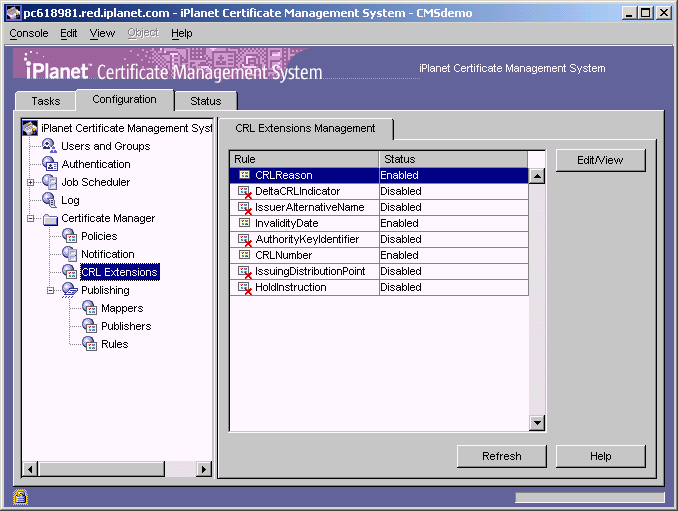
To modify a rule, select it and then click Edit/View.
Change the information as appropriate.
Be sure to supply all the required values. Click the Help button for detailed information on individual parameters.
Click OK.
You are returned to the CRL Extensions Management tab.
To modify other rules, repeat steps 2 through 4.
Step C. Create a Publisher for the CRL
Creating a publisher for the CRL involves creating an instance of the publisher module that enables the Certificate Manager to publish the CRL to the Online Certificate Status Manager. In the next step, described in Step D. Create a Publishing Rule for the CRL, you specify the publisher you create here.
To create a publisher for the CRL:
In the navigation tree, click Publishers.
The right pane shows the Publishers Management tab, which lists configured publisher instances.
Click Add.
The Select Publisher Plugin Implementation window appears. It lists registered publisher modules. 
Select the module named OCSPPublisher.
Only this publisher module enables the Certificate Manager to publish the CRL to the Online Certificate Status Manager. (If you have registered any custom publisher modules, they too will be available for selection.)
Click Next.
The Publisher Editor window appears. 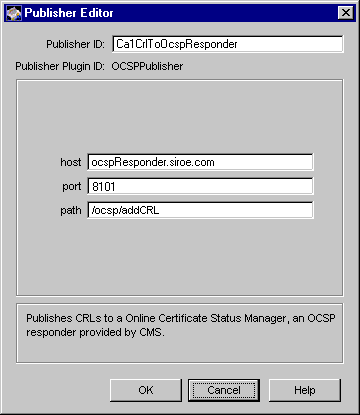
Enter the appropriate information:
Publisher ID. Type a name for the rule; use an alphanumeric string with no spaces. For example, Ca1CrlToOcspResponder.
host. Type the fully-qualified host name of the Online Certificate Status Manager. The name must be in the form <machine_name>.<your_domain>.<domain>. For example, ocspResponder.siroe.com.
port. Type the Online Certificate Status Manager's agent port number. For example, 8101.
path. Make sure this field shows the default path, /ocsp/addCRL. If necessary, type it in.
Click OK.
The Publishers Management tab appears, listing the new publisher.
Step D. Create a Publishing Rule for the CRL
Creating a publishing rule for the CRL involves creating a rule that uses the publisher instance that you created in the previous step. To create a publishing rule:
In the navigation tree, click Rules.
The right pane shows the Rules Management tab, which lists any currently configured publishing rules.
Click Add.
The Select Rule Plugin Implementation window appears. It lists registered modules that enable creating of publishing rules. 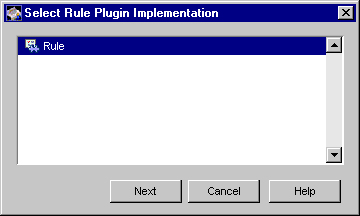
Select the module named Rule.
This is the default module. (If you have registered any custom modules, they too will be available for selection.)
Click Next.
The Rule Editor window appears.
Enter the appropriate information: 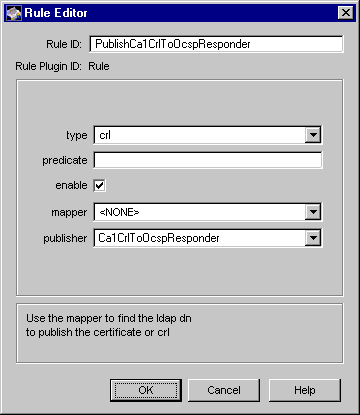
Rule ID. Type a name for the rule; be sure to use an alphanumeric string with no spaces. For example, PublishCa1CrlToOcspResponder.
type. Select crl.
predicate. Leave this field blank.
enable. Select this option.
mapper. Select <NONE>.
publisher. Select the publisher you added for publishing the CRL to the Online Certificate Status Manager. For example, Ca1CrlToOcspResponder.
Click OK.
The Rules Management tab appears, listing the new rule.
Step E. Make Sure Publishing is Enabled
To make sure that the Certificate Manager is configured for publishing:
In the navigation tree, select Certificate Manager, then select Publishing.
The right pane shows the publishing details necessary for the server to publish to an LDAP-compliant directory, to files, or to an online validation authority. 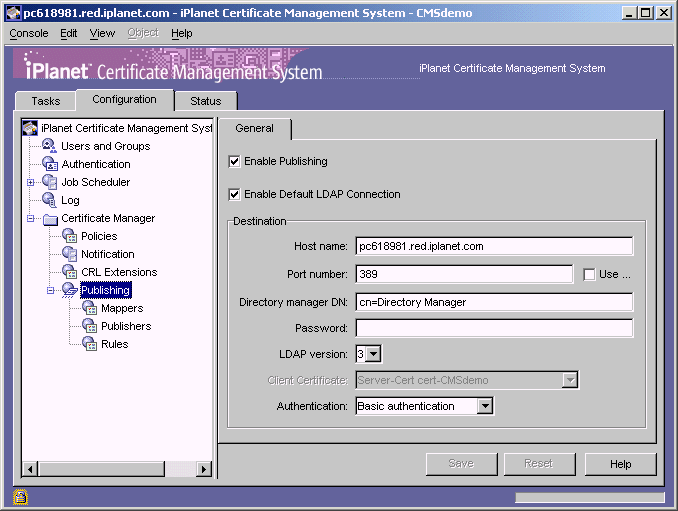
Make sure that the Enable Publishing option is selected. If it is already selected, leave it as it is. If it isn't, select it.
(Leave the "Enable default LDAP connection" option as it is; it specifies that the Certificate Manager is configured to publish certificates and CRLs to an LDAP directory.)
If you changed anything, click Save to save the changes.
If the changes you made require you to restart the server, you are prompted accordingly. Don't restart the server yet. You can do that after you've made all the required changes.
Step 5. Configure Certificate Manager for Required Extension Policies
In order for OCSP-compliant clients to query the Online Certificate Status Manager about the revocation status of a certificate, the certificate being validated must contain the Authority Information Access extension pointing to the location at which the Online Certificate Status Manager listens for OCSP service requests. For details about the Authority Information Access extension, see section "AuthInfoAccessExt Plug-in Module" of CMS Plug-Ins Guide.
The Certificate Manager can add an extension to a certificate it issues only if the corresponding policy is enabled and configured properly. Hence, before issuing the OCSP-compliant client certificate, you must verify that the Certificate Manager is configured with the appropriate policy rules to add the required extensions to these certificates.
Also, for testing whether your OCSP-compliant clients can verify revocation status of certificates by querying the OCSP responder, you will be issuing a client certificate containing the Authority Information Access extension to Personal Security Manager you installed.
To verify the status of policy rules that enable the Certificate Manager to add the extensions required in an OCSP-compliant client certificate:
In the navigation tree, select Certificate Manager, and then select Policies.
The Policy Rules Management tab appears. It lists configured policy rules. 
In the Policy Rule list, select the rule named AuthInfoAccessExt and click Edit; this rule was created by default during installation.
The Policy Rule Editor window appears, showing how this rule is currently configured. 
Assign the following values:
Enable. Check this box.
predicate. Type HTTP_PARAMS.certType==client.
critical. Leave this option unchecked.
numADs. Type 1.
ad0_method. Type ocsp or 1.3.6.1.5.5.7.48.1.
ad0_location_type. Select URL.
ad0_location. Type the complete path to the location where the Online Certificate Status Manager listens to calls from OCSP-compliant clients. The path should be in this format:
http://<hostname>:<end_entity_HTTP_port>/ocsp
For example, if the host name of your Online Certificate Status Manager is ocspResponder.siroe.com and the port number assigned to the non SSL end-entity port is 8000, the URL to type in the field would be:
http://ocspResponder.siroe.com:8000/ocsp
If you need details about any of the configuration parameters, click the Help button.
Click OK.
You are returned to the Policy Rules Management tab.
Make any other changes, if necessary.
The Certificate Manager is ready to request client certificates with Authority Information Access extension.
Step 6. Configure the Online Certificate Status Manager
The Online Certificate Status Manager stores each Certificate Manager's CRL in its internal database and uses it as the default CRL store for verifying the revocation status of certificates. You can also configure the Online Certificate Status Manager to use the CRL published to an LDAP directory, instead of the CRL in its internal database. For example, if you've configured Certificate Managers to publish CRLs to LDAP directories (see Chapter 19 "Setting Up LDAP Publishing"), you can configure the Online Certificate Status Manager to use the CRLs published to these directories.
To configure the Online Certificate Status Manager to use the CRLs in its internal database or an LDAP directory for verifying revocation status of certificate:
Log in to the CMS window for the Online Certificate Status Manager (see Logging In to the CMS Window).
In the navigation tree, select Online Certificate Status Manager, and then select Revocation Info Stores.
The right pane shows the two repositories the Online Certificate Status Manager can use; by default, it uses the CRL in its internal database. 
Select the appropriate option:
If you want to configure the Online Certificate Status Manager to use the CRLs in its internal database, select defStore and click Edit/View.
If you want to configure the Online Certificate Status Manager to use the CRLs in one or more directories, first click Set Default to enable the ldapStore option, select ldapStore, and click Edit/View. (Clicking the Set Default button toggles the selection between the two repositories.)
The Revocation Info Store Editor for the selected store appears.
Fill in the appropriate values.
If you selected defStore, fill in values as below: 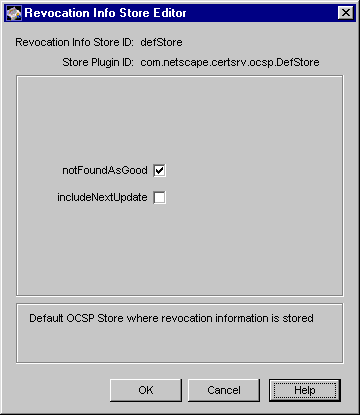
notFoundAsGood. A certificate's status can typically be indicated by three possible OCSP responses, namely GOOD, REVOKED, and UNKNOWN. Select this option if you want the Online Certificate Status Manager to return an OCSP response of GOOD if the certificate in question cannot be found in the certificate repository. If you deselect the option, the response will be UNKNOWN, which when encountered by Netscape Personal Security Manager (an OCSP-compliant client) results in an error message.
includeNextUpdate. The Online Certificate Status Manager can include the time stamp of next CRL update—a future update time for the CRL or the revocation information—in the OCSP response that it sends to OCSP-compliant clients. (According to the OCSP protocol, it is optional to include the time stamp of next CRL update in an OCSP response.) Select this option if you want the OCSP response to contain information about the next CRL update. Leave the option deselected if you don't want the OCSP response to contain this information.
If you selected ldapStore, fill in values as below: 
numConns. Type the total number of LDAP directories the Online Certificate Status Manager should check. By default, this is set to 0. If you change the value to a postive integer, for example 1, 2, or 3, you will see that many sets of host, port, baseDN, and refreshInSec fields. (Change the value, click OK, and reopen the window to see the updated fields.)
host<n>. Type the fully-qualified hostname of the LDAP directory. The name must be in the <machine_name>.<your_domain>.<domain> form. For example, corpDir1.siroe.com.
port<n>. Type the nonSSL port of the LDAP directory. For example, 389.
baseDN<n>. Type the DN to start searching for the CRL. For example, O=siroe.com.
refreshInSec<n>. Type how often the connection be refreshed. The default is 86400 seconds (that is, refresh every day).
caCertAttr. Leave the default value, cACertificate;binary, as it is. (It's the attribute to which the Certificate Manager publishes its CA signing certificate.)
crlAttr. Leave the default value, certificateRevocationList;binary, as it is. (It's the attribute to which the Certificate Manager publishes CRLs.)
notFoundAsGood. A certificate's status can typically be indicated by three possible OCSP responses, namely GOOD, REVOKED, and UNKNOWN. Select this option if you want the Online Certificate Status Manager to return an OCSP response of GOOD if the certificate in question cannot be found in the certificate repository. If you deselect the option, the response will be UNKNOWN, which when encountered by Netscape Personal Security Manager (an OCSP-compliant client) results in an error message.
includeNextUpdate. The Online Certificate Status Manager can include the time stamp of next CRL update—a future update time for the CRL or the revocation information—in the OCSP response that it sends to OCSP-compliant clients. (According to the OCSP protocol, it is optional to include the time stamp of next CRL update in an OCSP response.) Select this option if you want the OCSP response to contain information about the next CRL update. Leave the option deselected if you don't want the OCSP response to contain this information.
Click OK.
You're returned to the Revocation Store Info Management tab
Click Refresh.
Step 7. Restart the Certificate Manager
For all your changes to take effect, you must restart the Certificate Manager. You can use the CMS window to restart the Certificate Manager. To restart Certificate Manager from the CMS window:
Select the Tasks tab.
When you restart the Certificate Manager, you are prompted to supply the single sign-on password for the server.
Type the single sign-on password you specified during installation and click OK. The Certificate Manager won't restart until you provide this password. For more information, see Required Start-up Information.
Step 8. Restart the Online Certificate Status Manager
For all your changes to take effect, you must restart the Online Certificate Status Manager. You can use the CMS window to restart the Online Certificate Status Manager:
Select the Tasks tab.
When you restart the Online Certificate Status Manager, you are prompted to supply the single sign-on password for the server.
Type the single sign-on password you specified during installation and click OK. The Online Certificate Status Manager won't restart until you provide this password. For more information, see Required Start-up Information.
Step 9. Verify Certificate Manager and Online Certificate Status Manager Connection
When you restart the Certificate Manager, it tries to connect to the Online Certificate Status Manager's agent port (you specified this in Step C. Create a Publisher for the CRL). To verify that the Certificate Manager did indeed communicate with the Online Certificate Status Manager:
Go to the web browser window and enter the URL for the Online Certificate Status Manager's Agent interface. The URL is in this format: https://<hostname>:<port>.
The Online Certificate Status Manager Agent Services interface appears.
In the left frame, click List Certificate Authorities.
The resulting form should show information about the Certificate Manager (CA) you configured to publish CRls to the Online Certificate Status Manager. Note the timestamp:
The "This Update" and "Next Update" fields should now be updated with the appropriate timestamps, indicating that the Certificate Manager did communicate with the Online Certificate Status Manager.
The "Requests Served Since Startup" field should show a value of zero (0), indicating that no OCSP-compliant client has queried the Online Certificate Status Manager yet for revocation status of a certificate.
Step 10. Test Your OCSP Responder Setup
To test whether the Certificate Manager is publishing to the Online Certificate Status Manager properly and to test that the online validation of certificates is taking place, follow these steps:
Step A. Turn On Revocation Checking
Step D. Download the Certificate to the Browser
Step E. Make Sure the CA is Trusted by the Browser
Step F. Verify the Certificate in the Browser
Step G. Check the Status of Online Certificate Status Manager
Step H. Revoke the Certificate
Step I. Verify the Certificate in the Browser
Step J. Check the Online Certificate Status Manager Status Again
Step A. Turn On Revocation Checking
To ensure that Personal Security Manager (the OCSP-compliant client) is configured to verify the revocation status of certificates using the OCSP protocol:
Open a web browser window.
Open the Personal Security Manager interface.
In Communicator version 4.7, you can open this window by clicking the Security button in the navigation bar. Alternatively, you can also open this window by selecting Communicator from the main menu, selecting Tools, and then selecting Security Info.
Select the Advanced tab, and then in left pane, select Options.
Click the OCSP Settings button.
The OCSP Setting window appears.
Select the "Use OCSP to verify only certificates that specify an OCSP service URL" option, and click OK.
Step B. Request a Certificate
The steps outlined below explain how to request a client certificate from the Certificate Manager using the manual enrollment method. If you've configured the Certificate Manager for automated certificate issuance, for example for directory-based enrollment, you may use the appropriate form and request a certificate.
To request a client or personal certificate from the Certificate Manager:
Go to the end-entity interface of the Certificate Manager you configured (or to the Registration Manager that's connected to this Certificate Manager). The URL is in this form:
https://<hostname>:<end_entity_HTTPS_port> or http://<hostname>:<end_entity_HTTP_port>
In the left frame, under Browser, click Manual.
This opens the manual enrollment form.
Fill in all the values and submit the request.
The client prompts you to enter the password for your key database.
When you enter the correct password, the client generates the key pairs.
Do not interrupt the key-generation process.
Step C. Approve the Request
Skip this step if you requested the certificate using any of the automated enrollment methods. Complete this step if you used the manual enrollment form for requesting the certificate; the request you submitted is waiting in the agent queue for approval by an agent.
Go to the Certificate Manager's Agent Services interface.
The URL is in this format: https://<hostname>:<agent_port>
In the left frame, click List Requests.
In the form that appears, select the "Show pending requests" option and click Find.
In the list of pending requests, identify the request you submitted and click Details.
Check the request to make sure that it has all the required attributes of a client certificate, including the Authority Information Access extension.
Scroll to the bottom of the request form, and approve the request.
You should see a confirmation page indicating that the certificate has been issued. Don't close the page until after you complete the next step.
Step D. Download the Certificate to the Browser
To download the certificate into the certificate database of Personal Security Manager:
In the confirmation page, scroll down to the section that says "Installing this certificate in a client."
Check the certificate details for the required extensions.
Follow the on-screen instructions and download the certificate to your browser's certificate database.
(An alternative way to download the certificate is to go to the Retrieval tab of the end-entity services interface, search for the certificate, and download the certificate.)
Step E. Make Sure the CA is Trusted by the Browser
When you downloaded the client certificate to the browser, the Certificate Manager's certificate chain also was downloaded to the browser's certificate database. Make sure that the Certificate Manager's CA signing certificate is trusted in the browser's certificate database; this is required for proper chaining during certificate validation.
In the browser, open the Personal Security Manager interface.
In Communicator version 4.7, you can open this window by selecting Communicator from the main menu, selecting Tools, and then selecting Security Info.
Select the Certificates tab and, in the left pane, click Authorities.
The list of CA certificates currently stored in the browser's certificate database appears.
Locate the Certificate Manager's CA signing certificate, select it, and click Edit.
The Edit Security Certificate Settings window appears.
Make sure all the three options are selected and click OK.
Step F. Verify the Certificate in the Browser
To verify that the certificate has been downloaded into the certificate database of Personal Security Manager:
Click the Certificates tab and, in the left pane, click Mine.
You should see the names of all the client certificates, including the one you just downloaded, stored in the browser's certificate database.
Select the name of the certificate you just downloaded and click View.
In the View Security Certificate dialog box that appears, look for a message that says that the certificate is verified; generally, it's at the top.
Step G. Check the Status of Online Certificate Status Manager
To go to the Online Certificate Status Manager's status page and verify the number of requests it has processed so far:
Go to the web browser window and enter the URL for the Online Certificate Status Manager's Agent interface. The URL is in this format: https://<hostname>:<port>.
The Online Certificate Status Manager Agent Services interface appears.
In the left frame, click List Certificate Authorities.
The resulting form should show information about the Certificate Manager (CA) you configured to publish CRls to the Online Certificate Status Manager. The page also summarizes the Online Certificate Status Manager's activity since it was last started.
Note the value assigned to the "Requests Served Since Startup" field. It should show a value of one (1), a proof that the OCSP-compliant client, Personal Security Manager, queried the Online Certificate Status Manager for revocation status of a certificate.
Step H. Revoke the Certificate
To revoke the certificate you issued so that the Certificate Manager publishes the CRL to the Online Certificate Status Manager:
Go to the end-entity interface for the Certificate Manager you configured (or to the Registration Manager that's connected to this Certificate Manager). Be sure to go to the HTTPS interface. The URL is in this form:
https://<hostname>:<end_entity_HTTPS_port>
Select the Revocation tab.
In the left frame, click User Certificate.
The User Certificate Revocation form appears.
In the Revocation Reason section, select Unspecified and click Submit.
The client shows the "Select a Certificate" dialog box and prompts you to choose the certificate you want to revoke.
Select the certificate you downloaded and click OK.
The Certificate Manager revokes the certificate, constructs the CRL, and publishes the CRL to the Online Certificate Status Manager.
Step I. Verify the Certificate in the Browser
To verify that the certificate has been revoked:
Open the Personal Security Manager interface.
Select the Certificates tab and then click Mine.
Select the certificate you revoked and click View.
In the View Security Certificate dialog box that appears, look for a message that says that the certificate could not be verified.
Step J. Check the Online Certificate Status Manager Status Again
You check the Online Certificate Status Manager status again to verify that these things happened:
The Certificate Manager published the CRL (the revoked certificate) to the Online Certificate Status Manager.
The browser sent an OCSP response to the Online Certificate Status Manager (this response was initiated when you clicked the View button).
The Online Certificate Status Manager sent an OCSP response to the browser.
The browser used that response to validate the certificate and informed you of its status (that the certificate could not be verified). To check the Online Certificate Status Manager status for verification:
Go to the Online Certificate Status Manager's status page.
Reload the page (hold down the Shift key and click on the browser's Reload icon.)
Compare the information to the one you noted in Step G.
Note the updated statistics. It should indicate that Personal Security Manager queried the Online Certificate Status Manager about the status of the certificate and in response, the Online Certificate Status Manager sent a status.
Previous Contents Index Next
Copyright © 2002 Sun Microsystems, Inc. All rights reserved.
Last Updated October 07, 2002