eXchange Deployment Project
This section explains how to set up, build, and deploy Atlanta and Berlin Deployment Profiles in the eXchange Deployment Project. This Project makes all of the core B2B services and processing available to the application .ear files built from the Deployment Profiles.
To complete this operation, you must set up a Connectivity Map for HIPAA OTD validation and Deployment Profiles for both Atlanta and Berlin. You must map, build, and deploy both Deployment Profiles.
Creating the Validation Connectivity Map
To complete this operation, you must deploy OTD validation BPs using a Connectivity Map, to allow you to configure the Trading Partner Profiles to specify the custom validation handlers. You must then map, build, and deploy two Deployment Profiles, one each for Atlanta and Berlin.
 To Create the OTD Validations Connectivity Map
-
Create a Connectivity Map using Project Explorer, under eXchange ⇒ Deployment, named, for example, cmHIPAAValidation (or a convenient name for your system, with fewer characters).
-
From Project Explorer, drag Sun SeeBeyond ⇒ eXchange ⇒ User Components ⇒ OTD Validations ⇒ HIPAA ⇒ 2000_Addenda ⇒ addenda_hipaa_270_Full_UniqueIDHandler onto the Connectivity Map canvas.
-
From the same Project Explorer location, drag the addenda_hipaa_271_Full_UniqueIDHandler component onto the Connectivity Map canvas.
-
Drag one eXchangeService from the eXchange ⇒ Deployment folder onto the canvas.
-
Connect eXchangeService to each of the other components.
-
Locate the files in the Project Explorer based on the validation service you want to use and drag it onto the Connectivity Map.
-
Drag the respective JCD file onto the Connectivity Map.
-
EDIFECS ⇒ JCDs⇒jcdEX_HIPAA_ValidationService
-
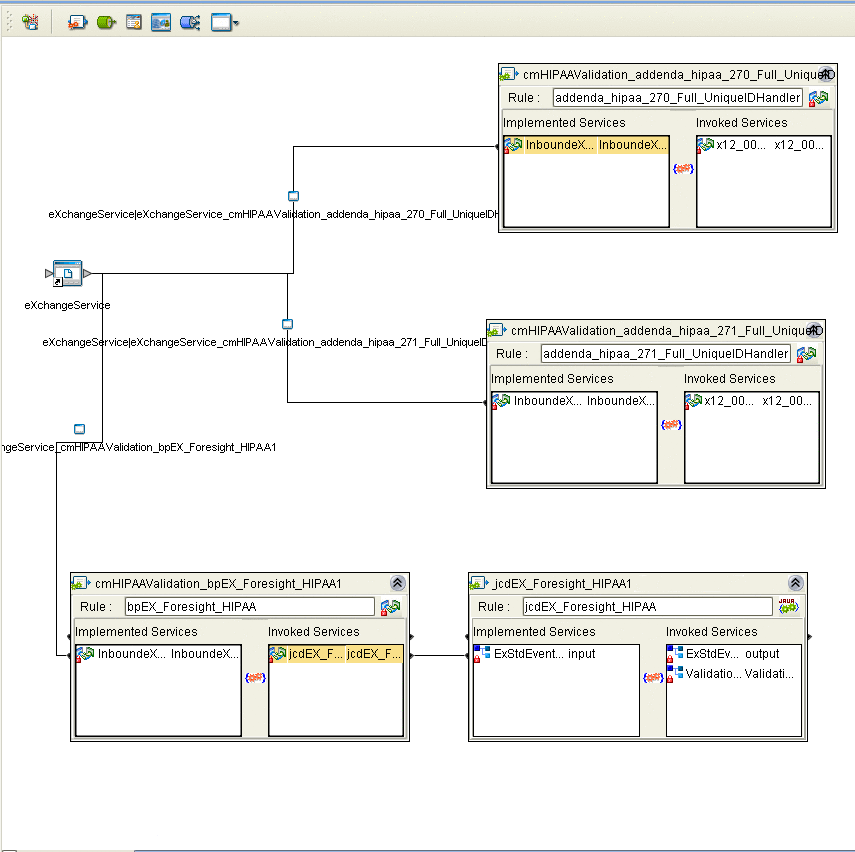
FORESIGHT ⇒ JCDs⇒jcdEX_Foresight_HIPAA as shown in Figure 6–8
-
-
Rename the respective JCD component in the Connectivity Map by removing the cmHIPAAValidation prefix.
-
Connect all of the components as shown in Figure 6–8.
Figure 6–8 OTD Validation Connectivity Map Linking

-
Open and save all the default properties for the eWays on the Connectivity Map.
-
Update the instreamapi.jar file with the correct version of the jar file from the Foresight engine.
-
Click Save All then close the Connectivity Map.
Building and Deploying the Deployment Profiles
When you are finished, you must create Deployment Profiles for both Atlanta and Berlin. These Deployment Profiles are for the eXchange Deployment Project.
 To Build and Deploy the eXchange Deployment Project’s Deployment Profile for Atlanta
-
On Enterprise Designer’s Project Explorer tree, right-click Deployment and, on the context menu, point at New and click Deployment Profile.
-
In the resulting dialog box, name the new Deployment Profile dpA, point it at envA, make sure it is using all the checked Connectivity Maps, and click OK.
-
On Deployment Editor, click Automap to map the components.
-
Click Build to build the Deployment Profile for Atlanta.
-
Click Deploy to deploy the Deployment Profile.
Note –After each of the operations, map, build, and deploy, you receive a status message. If you receive any errors, troubleshoot your previous procedures, as necessary. Deploying Deployment Profiles may take as long or longer than building them.
-
When you are finished, click Save All and close all canvases.
 To Build and Deploy the eXchange Deployment Project’s Deployment Profiles for Berlin
-
On Enterprise Designer’s Project Explorer tree, right-click Deployment and, on the context menu, point at New and click Deployment Profile.
-
In the resulting dialog box, name the new Deployment Profile dpB, point it at envB, make sure it is using all the checked Connectivity Maps, and click OK.
-
On Deployment Editor, click Automap to map the components.
-
Click Build to build the Deployment Profile for Berlin.
-
Click Deploy to deploy the Deployment Profile.
-
When you are finished, click Save All and close all canvases.
Result: You have now finished constructing the eXchange Deployment Project, including creating, mapping, building, and deploying Deployment Profiles for Atlanta and Berlin.
- © 2010, Oracle Corporation and/or its affiliates
