Uploading B2B Suite Product Files to the Repository
 To upload product files to the Repository
Before You Begin
Before you begin installing the B2B Suite, make sure you have done the following:
-
You have checked the Sun B2B Suite Release Notes document for any late-breaking installation notes.
-
You have verified that a Repository server is running on the machine where you will be uploading the product files.
A Repository server must be running on the machine where you will be uploading the product files and the following .sar files must have already been uploaded to this Repository:
-
eGate Enterprise Designer (eGate.sar) Release 5.1.3
-
eInsight Business Process Manager (eInsight.sar) Release 5.1.3
-
Batch eWay (BatcheWay.sar) Release 5.1.3
-
File eWay (FileeWay.sar) Release 5.1.3
-
LDAP eWay (LDAPeWay.sar) Release 5.1.3
-
HTTPS eWay (HTTPeWay.sar) Release 5.1.3
-
Oracle eWay (OracleeWay.sar) Release 5.1.3
Note –You need not install eInsight and eWays as a completely separate process; in other words, you can stage them in combination with eXchange Integrator.
-
On a Windows machine, start a Web browser and point it at the machine and port (usually 12000) where the Repository server is running:
http://hostname:port
where
-
hostname is the name of the machine running the Repository server.
-
port is the starting port number assigned when the Repository was installed.
For example, the URL you enter might look like either of the following:
http://localhost:12000
http://serv1234.company.com:22000
-
-
On the Suite Installer’s Java CAPS Login page, enter your username and password.
Note –The following steps assume you have already uploaded eGate 5.1.3.
-
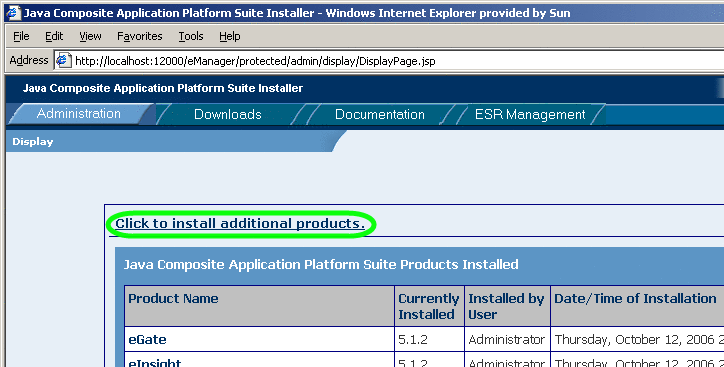
When the Suite Installer displays the Administration tab, click the link to install additional products.
See Figure 2–1.
Figure 2–1 Suite Installer: Installing Additional Products

-
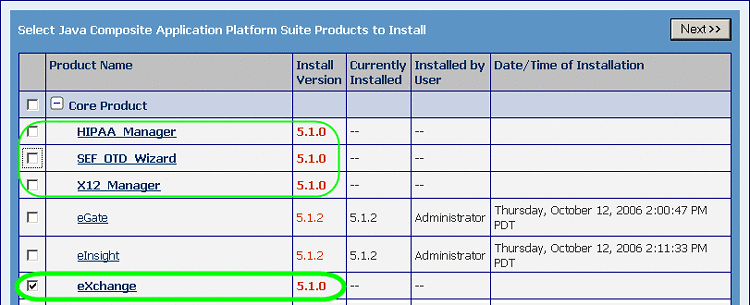
In the Display” >> Select page, open the Core Products category
See Figure 2–2. Depending on the previous installation, eXchange Integrator might not appear in the Core Products list; if it is not shown, use the controls near the top of the page to browse to the correct Product_List.sar file and submit it.
Figure 2–2 Suite Installer: Opening the List of Core Products

-
In the list of core products, select eXchange.
See Figure 2–3.
Figure 2–3 Suite Installer: List of Core Products Showing eXchange

-
Select other core B2B products you want to install, and protocol managers for which you are licensed. Optionally, you can also open other categories to select non-core products. For example:
-
OTD libraries and protocol managers are often installed along with eXchange Integrator.
-
If you have not previously installed a required eWay or a Logical Host, you can do so now.
-
To access the documentation and sample Projects for eXchange Integrator and other products, select the appropriate items under the Documentation tab.
-
-
When you have selected all the products you want to install, click the Next button.
-
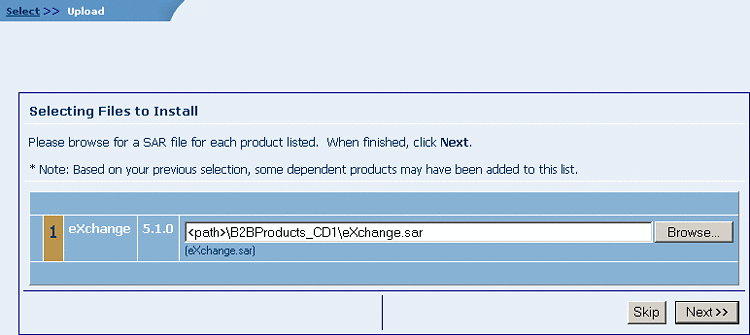
In the Select >> Upload page, browse to and select eXchange.sar. Repeat with each of the other SAR files you want to install.
See Figure 2–4.
-
When done, click Next.
Figure 2–4 Suite Installer: Selecting Files to Install

Note –eXchange.sar may take some time to install.
The .sar files are uploaded to the Repository. To install additional products, click the install additional productslink. The Select >> Upload >> Install page allows you to select other products. See Figure 2–5 .
Figure 2–5 Suite Installer: Successful Installation of eXchange.sar

While the Suite Installer is running, you can now do any of the following, as needed:
-
Use the Administration tab to install additional products and documentation.
-
Use the Downloads tab to download additional components. For example, all core design work requires Enterprise Designer, and all runtime requires a Logical Host. The sample assumes you have also downloaded Enterprise Manager.
-
Use the Documentation tab to access documentation files and samples you have installed.
-
- © 2010, Oracle Corporation and/or its affiliates
