Creating and Configuring Trading Partners
Ultimately, the parameters settings that are actually used when business messages are delivered to/from trading partners are determined by a trading partner transaction profile. For example:
-
For outgoing messages, the choice of transaction profile is determined by the name of the trading partner, action group, and action.
-
For incoming messages, the choice of transaction profile is determined by the endpoint where the message is picked up.
A particular trading partner can contain many transaction profiles based on several different B2B Hosts, but each TP transaction profile is based on exactly one host transaction profile. However, individual parameters settings in the host transaction profile can be overridden — either within the TP transaction itself, or anywhere in the TP inheritance chain: TP action, TP action group, and TP business/delivery protocol. For details, see Inheriting and Overriding Parameter Settings.
Basic Operations for Trading Partners
This section covers creating, finding, selecting, and adding a B2B Host to a Trading Partner.
 To create a new trading partner
-
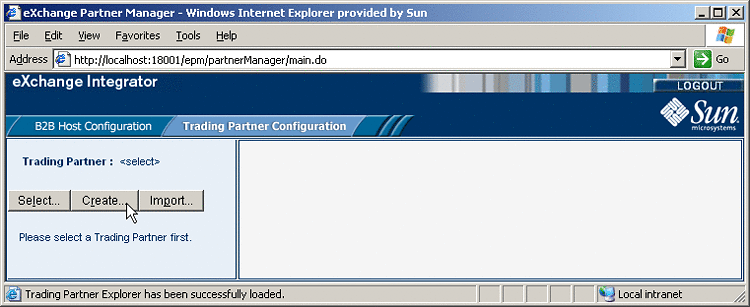
With the Trading Partner Configuration tab active, in the explorer pane, click Create.
See Figure 5–29.
Figure 5–29 Creating a New Trading Partner
-
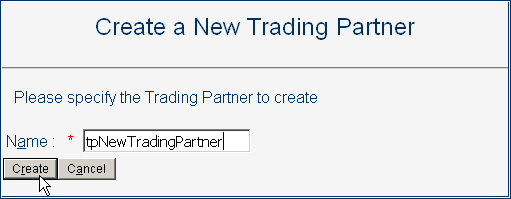
In the canvas (Create a New Trading Partner), enter a name for the new trading partner.
See Figure 5–30.
Figure 5–30 Naming a New Trading Partner
-
Click the Create button at the bottom of the canvas.
The new trading partner appears in the explorer tree in the left pane.
 To find and select an existing trading partner
-
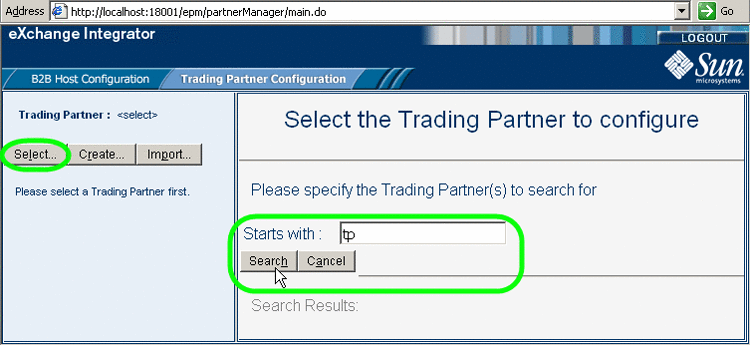
With the Trading Partner Configuration tab active, in the explorer pane, click Select.
-
In the canvas, optionally after entering the first few characters of a possible name, click Search.
See Figure 5–31.
Figure 5–31 Searching for a Trading Partner
-
From the Search Results list, select the trading partner you want.
See Figure 5–32.
Figure 5–32 Selecting a Trading Partner
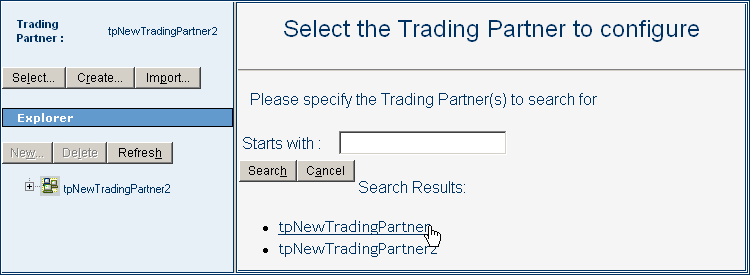
The new trading partner appears in the TP explorer tree in the left pane.
 To add a B2B Host to a trading partner
-
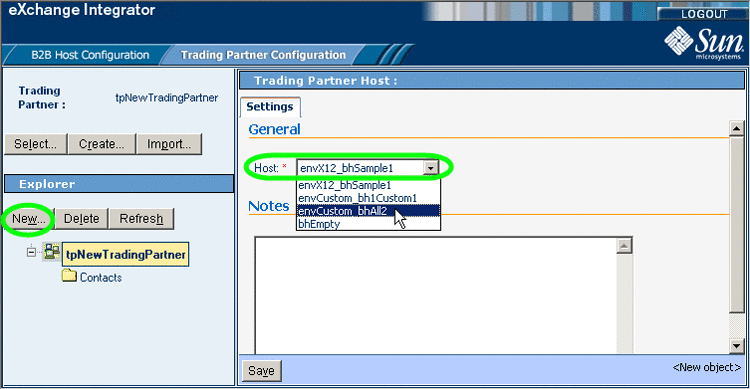
In the TP explorer tree, select the trading partner and click New.
-
Then, in the canvas (under the Settings tab), select a B2B Host from the pull-down list.
See Figure 5–33.
Figure 5–33 Configuring a Trading Partner With a New B2B Host
-
Click Save.
The new TP host appears in the TP tree in the left pane. All of its parameter settings apply to the trading partner unless overridden.
Configuring Trading Partners
Configuring a trading partner consists mainly of creating/configuring TP transaction profiles; each TP transaction profile inherits from the host transaction profile. You can then, optionally, override parameter settings at any level of the TP inheritance chain. You can also add one or more contacts that are specific to the TP.
 To create and configure a TP transaction profile
-
With the Trading Partner Configuration tab active, in the TP explorer tree, open the TP and the host to display its five folders: Business Protocols, Delivery Protocols, Transports, Transaction Profiles, and Contacts.
-
Click the host’s Transaction Profiles folder, make a selection from the B2B Host Transaction Profiles pull-down list, and click Save.
The new TP transaction profile appears in the TP tree in the left pane.
Note –If the TP tree does not display the new TP transaction profile, click Refresh.
-
Optional. You can configure one or more TP transaction profiles by following the steps below, repeating this step as needed for additional TP transaction profiles.
-
In the TP explorer tree, open the TP transaction profile and select the inbound TP transaction profile.
-
Use the canvas to override TP transaction profile parameter settings as needed, and click Save.
-
Within the same TP transaction profile, select the outbound TP transaction profile.
-
Use the canvas to override TP transaction profile parameter settings as needed, and click Save.
-
Repeat the procedure as needed for additional TP transaction profiles.
-
Optional. If you want to override settings at a higher level than the TP transaction profile, you can configure one or more of the TP protocols, action groups, actions, and transports.
Note –Although you must create at least TP transaction profile for every trading partner, you need not create TP protocols, action groups, actions, or transports; all these are created automatically when you create a TP transaction profile. As needed, you can configure any of the items in the TP inheritance chain.
 To configure TP protocols, action groups, actions, transports,
and contacts
-
Optional. To create a new TP business protocol:
-
If you want to configure a TP business protocol, follow these steps:
-
In the TP explorer tree, select the TP business protocol.
-
Use the canvas to override TP business protocol parameter settings as needed, and click Save.
-
With the TP business protocol selected, click New.
-
To create a new TP business action group, select a host business action group and click Save.
-
In the TP explorer tree, select the TP business action group.
-
Use the canvas to override TP action group parameter settings as needed, and click Save
-
With the TP business action group selected, click New.
-
To create a new TP business action, select a host business action and click Save.
-
In the TP explorer tree, select the TP business action.
-
Use the canvas to override TP business action parameter settings as needed, and click Save.
-
Optional. To create a new TP delivery protocol:
-
In the TP explorer tree, select the TP delivery protocol.
-
Use the canvas to override TP delivery protocol parameter settings as needed, and click Save
-
With the TP delivery protocol selected, click New.
-
To create e a new TP delivery action group, select a host delivery action group and click Save.
-
In the TP explorer tree, select the TP delivery action group.
-
Use the canvas to override TP action group parameter settings as needed, and click Save.
-
With the TP delivery action group selected, click New.
-
To create a new TP delivery action, select a host delivery action and click Save.
-
In the TP explorer tree, select the TP delivery action.
-
Use the canvas to override TP delivery action parameter settings as needed, and click Save
-
Optional. To create a new TP transport:
-
Optional. To configure a TP transport:
-
Optional. To create a new TP contact based on a host contact:
 To create and configure a TP-specific contact
-
With the Trading Partner Configuration tab active, in the TP explorer tree, open the TP to display its host(s) and its Contacts folder.
-
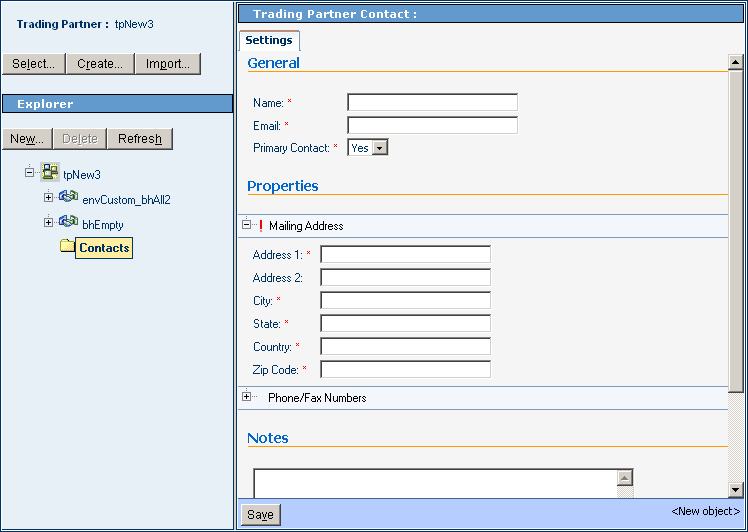
Click the TP-level Contacts folder, and then click New.
See Figure 5–34.
Figure 5–34 Creating a New TP-Specific Contact
-
Supply information for all required fields and, as needed, any optional fields, and click Save.
The name of the new contact appears in the TP tree, under the TP’s Contacts folder.
- © 2010, Oracle Corporation and/or its affiliates
