Chapter 5 Using B2B Web Facilities
This chapter provides concepts, terminology, and step-by-step procedures for using the B2B Web-based facilities: eXchange Partner Manager (ePM) and Message Tracker.
Note –
Before you can use these facilities, you must have already built and deployed valid GUI projects in Enterprise Designer. If necessary, see Building and Deploying the GUI Projects .
What’s in This Chapter
This chapter covers the following information:
General Topics
Topics Specific to eXchange Partner Manager (ePM)
Topics Specific to Message Tracker
Providing Access to B2B Web Facilities
Access to ePM and Message Tracker is controlled by the Group List privileges set in SeeBeyond Integration Server Security Gateway. The applicable steps are provided below; for in-depth information, see the eGate Integrator System Administration Guide.
 To add or set up user access to B2B web facilities
Before You Begin
The associated GUI project or projects (for epm and/or tracker) must already be built and deployed, and the B2B Host’s external servers — domain, LDAP, and Oracle — must already be running. (Note that you do not need to be running a Repository.
-
Open a new browser window and point it a URL that has the following form:
http://machine-name:admin-port
Thus, for a domain running on localhost port 18000, the URL would be as follows:
http://localhost:18000
-
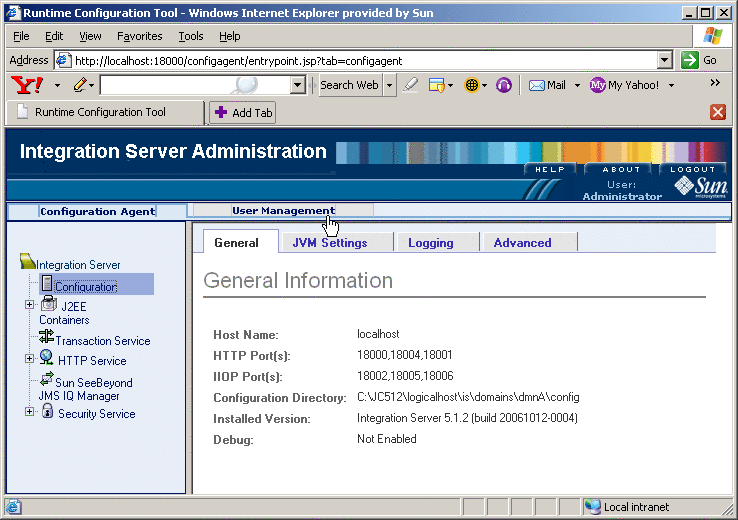
Log in with Administrator privileges and, in the Integration Server Administration panel, click the User Management tab.
See Figure 5–1.
Figure 5–1 Integration Server Administration: User Management
-
In the User Management screen, either add a new user or edit an existing user.
-
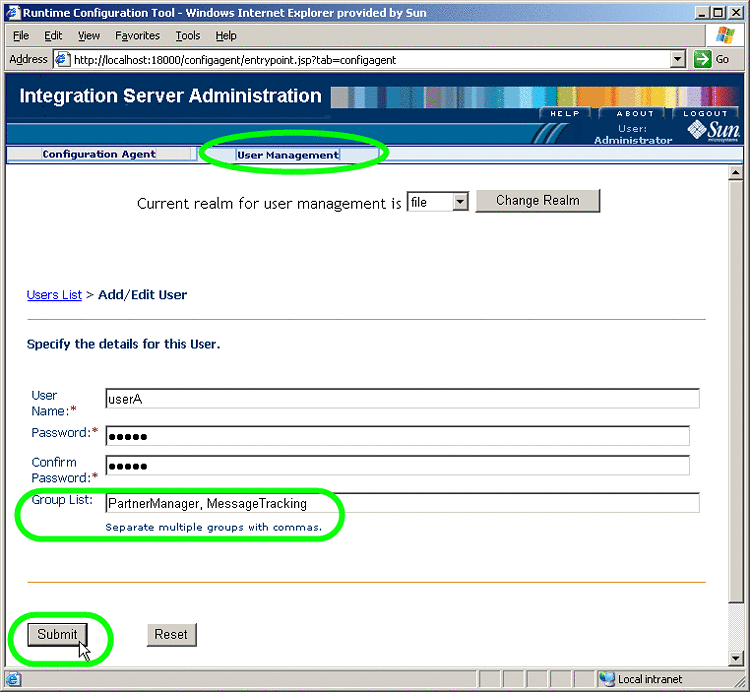
In the Add/Edit User screen ), do the following:
-
For Group List, in addition to any other group privileges for this user, enter either or both of the following
-
PartnerManager
-
MessageTracking
-
-
When you are finished, click Submit.
See Figure 5–2.
Figure 5–2 Specifying PartnerManager and MessageTracking Privileges
-
Repeat this procedure for any other users who need access to ePM or Message Tracker for this domain.
eXchange Partner Manager (ePM) Overview
The purpose of ePM is to help you manage the parameters associated with your trading partners. Specific combinations of parameter setting are bound into a transaction profile. A transaction profile consists of well-configured outbound and inbound business actions, associated with well-configured outbound and inbound delivery actions, such that each delivery action is tied to a well-configured transport.
The GUI provides a cascading series of defaults that can be inherited or overridden at various levels.
Operational Overview of the ePM GUI
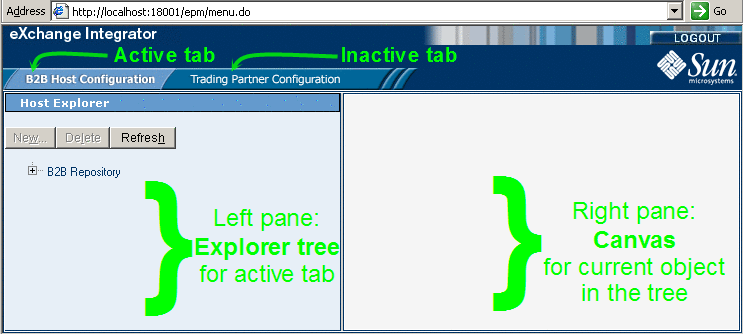
After you sign in, ePM presents you with a layout comprising two tabs across the top, a tree view on the left, and a canvas on the right, where you view and modify settings. See Figure 5–3.
Figure 5–3 eXchange Partner Manager (ePM) — Initial State
-
Tabs are modal: The display of the panes beneath depends on which tab is active.
-
Tabs are not “sticky”: When you change modes to a new tab, all unsaved changes in the previous tab are discarded.
-
The explorer pane on the left displays a hierarchical tree of containers and contents:
-
When the B2B Host Configuration tab is active, the Host Explorer tree displays B2B Hosts and their contents.
-
When the Trading Partner Configuration tab is active, the Trading Partner Explorer tree shows Trading Partners and their contents.
-
There is only topmost node (also called the root node). This is always named “B2B Repository” irrespective of the Repository name.
In the explorer pane, the operation of the New button depends on the currently selected item in the tree: The button is available if and only if you can create a new child object of the currently selected item.
-
-
The Delete button deletes the selected object and its children (if any).
-
The Refresh button discards any unsaved changes and then displays an updated snapshot of the objects in the Repository.
Note –Because many actions in ePM cause unsaved changes to be discarded, any time you add or change a value, it is good practice to verify the change and then click Save.
Structural Overview of the ePM GUI
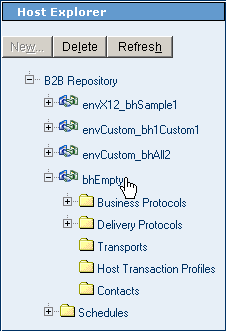
The hierarchy of the Host Explorer tree in the left pane is structure as shown in Figure 5–4.
Figure 5–4 ePM Structure of the Host Explorer
Root
There is exactly one root, always named B2B Repository. It cannot be deleted. The root contains a special Schedules folder as well as one or more B2B Hosts.
B2B Hosts
B2B Hosts are the second-highest object type. They can be created, imported, renamed, exported, and deleted. Each B2B Host contains the following:
-
A Business Protocols folder, containing one or more business protocols. Each business protocol contains one or more business action groups. Each business action group contains at least two business actions — at least one outbound business action and at least one inbound business action.
-
A Delivery Protocols folder, containing one or more delivery protocols. Each delivery protocol contains one or more delivery action groups. Each delivery action group contains at least two delivery actions — at least one outbound delivery action and at least one inbound delivery action.
-
A Transports folder, containing one or more external transports.
-
A Host Transaction Profiles folder, containing zero or more transaction profiles. Each transaction profile contains an outbound transaction profile and and an inbound transaction profile.
-
A Contacts folder, containing zero or more contacts.
Schedules
The special Schedules folder contains zero or more schedules that can be referenced by other objects in the B2B Repository. A schedule can be regularly periodic, or it can be specified according to a daily, weekly, or monthly arrangement. Each schedule can be created, renamed, and deleted, and schedules can be imported or exported in aggregate.
Notes section
For each item that can be modified, the canvas provides a Notes area where you can provide free text. (For an illustration, see Basic B2B Host Operations in ePM). Best practice is to use this area to the describe the item, and also to log every important change made to it.
Basic Operations in ePM
This section covers the following topics basic operations in ePM such as accessing, locating a B2B Host in the explorer tree, renaming, importing, and exporting a B2B Host or Trading Partner, and working with schedules:
Accessing ePM
This section describes how to access the eXchange Partner Manager.
 To access ePM
Before You Begin
In Enterprise Designer:
-
You must have already set up at least one B2B Host and built it to create an eXchangeService. See Building a B2B Host.
-
You must have already built and deployed the ePM GUI project. See Building and Deploying the GUI Projects.
-
The Integration Server (domain) and the LDAP server for the associated eXchangeService must already be running.
Note –
the Repository does not need to be running.
-
Open a new browser window and point it a URL that has the following form:
http://domain_machinename:baseport+1/epm
The http port is 1 greater than the base administrative port. Thus, for a domain running on localhost port 18000, the URL would be as follows:
http://localhost:18001/epm
Note –This URL is case-sensitive. If the you receive a status 404 with the warning “Requested resource not available,” ensure that in the final four characters of the URL — /epm — you entered the three letters “epm” in all-lowercase.
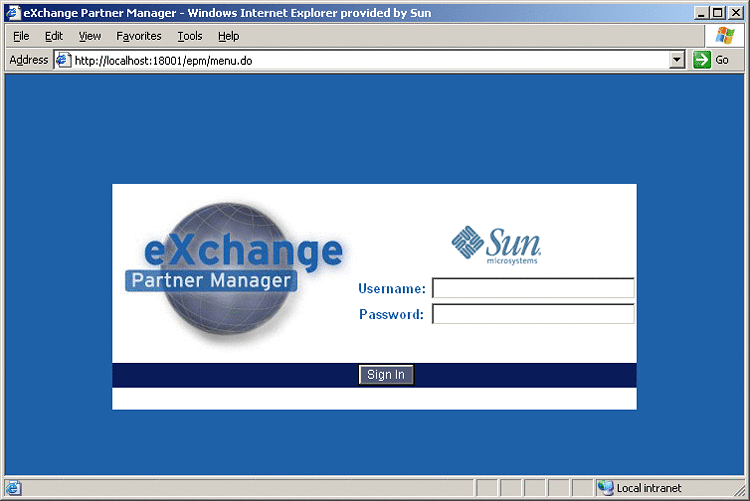
After a pause, the browser displays the eXchange Partner Manager sign-in screen. See Figure 5–5.
Figure 5–5 Sign-In Screen for eXchange Partner Manager (ePM)
-
Enter the appropriate user name and password and click Sign In.
Note –Username/password combinations are set up in Integration Server Administration; see Providing Access to B2B Web Facilities. The only users authorized to access ePM are those that have a “PartnerManager” entry in their Group List.
After a pause, the window displays eXchange Partner Manager (ePM), a two-pane window with an explorer tree and a canvas. See Figure 5–6.
Figure 5–6 eXchange Partner Manager (ePM) — Initial State

Basic B2B Host Operations in ePM
Some operations in ePM are not tied to any particular B2B Host or Trading Partner, for example, navigating the explorer tree, renaming a Host or TP, exporting and importing Hosts and TPs, and setting up schedules. This section contains procedures for each of these tasks.
 To locate a B2B Host in the explorer
tree
-
Expand the root folder, B2B Repository, to see all the B2B Hosts it contains.
See Figure 5–7.
Figure 5–7 ePM Repository Showing B2B Hosts

You can rename any B2B Host from its default name (formed by concatenating the Environment with the B2B Host instance as it appears on the Connectivity Map) to a name that is meaningful to you. You can also rename any Trading Partner.
 To rename a B2B Host or Trading Partner
-
Select the Host or TP.
-
In the right pane, under the Settings tab, in the General parameters section, edit the value of Name.
-
When you are finished, click Save.
Note –Because many actions in ePM cause unsaved changes to be discarded, any time you add or change a value, it is good practice to verify the change and then click Save.
 To export a B2B Host or Trading Partner
-
In the explorer tree on the left, select the Host or TP you want to export.
-
In the canvas on the right, at the bottom of the pane, click Export.
-
In the File Download dialog box, click Save.
-
In the Save As dialog box, provide a location and filename and then click Save.
An XML file of filetype .exp is saved to the specified location.
 To import/overwrite a B2B Host or
Trading Partner
-
In the explorer tree on the left, select the Host or TP you want to overwrite.
-
In the canvas on the right, at the bottom of the pane, click Import.
-
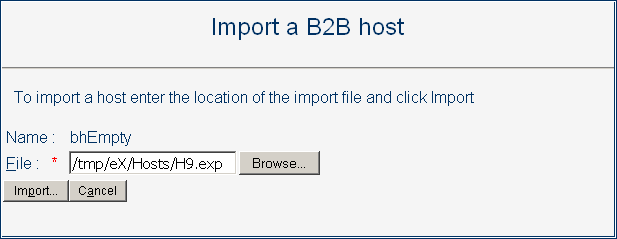
In the Import a B2B Host [Trading Partner] pane, click Browse.
-
Navigate to and open the .exp file you want to import, and then click Import.
See Figure 5–8
Figure 5–8 Importing a B2B Host
-
When you are finished, click Save.
Note –Because many actions in ePM cause unsaved changes to be discarded, any time you add or change a value, it is good practice to verify the change and then click Save.
 To create, view, or configure a schedule
-
In the B2B Host Configuration tab, in the Host Explorer tree, select the Schedules folder at the bottom of the tree and do one of the following:
-
To create a new schedule: Click New and, in the canvas on the right, enter a name and provide values for Type, Frequency, Start Date, and Time.
-
To view or configure an existing schedule: Open the Schedules folder and click the schedule you want to display or modify.
-
-
Configure the schedule’s type and frequency as follows:
See Figure 5–8
-
For several-times-a-day schedule: Set Type to Periodically and, for Frequency, specify how many seconds, (or minutes, or hours) elapse between events.
-
For a per-day schedule: Set Type to Daily and, for Frequency, specify whether the event occurs every few days, every day, or every weekday.
-
To configure a per-week schedule: Set Type to Weekly and, for Frequency, specify either that the event occurs on the day(s) in the list (use [SHIFT]-click to select a range of days and [CTRL]-click to include or exclude a particular day); or, alternatively, that it occurs weekends only, weekdays only, or every day.
-
To configure a per-month schedule: Set Type to Monthly and, for Frequency, specify whether the event occurs on a particular date or day within the month(s) specified in the list. In the list of months, use [SHIFT]-click to select a range of months and [CTRL]-click to include or exclude a particular month.
-
-
Specify an appropriate start date and time for the schedule.
-
When you are finished, click Save.
Viewing and Setting Business Protocol Parameters
Each B2B Host in ePM is automatically presupplied with the PassThrough business protocol. The PassThrough protocol provides no parameter settings beyond the minimum required to pass business data through without operating on it.
In addition to the Passthrough protocol, each B2B Host may contain one or more other business protocols, whose parameter types and possible settings depend on the way in which their business protocol attribute definitions (BPADs) were set up in Enterprise Designer:
-
Parameters for Protocol Manager products, such as the X12 Protocol Manager or the HIPAA Protocol Manager, are described in the corresponding Protocol Manager user’s guide.
-
Parameters for custom business protocols are determined by the custom BPADs defined in Enterprise Manager.
Presupplied business protocol parameter settings divide into the following groupings:
-
Protocol-Outbound and ACK - Protocol-Outbound. Parameters determined by business attribute definitions (BADs) whose direction is ToPartner or Both. See Protocol-Outbound (ToPartner) Parameter and ACK Settings.
-
Protocol-Inbound and ACK - Protocol-Inbound. Parameters determined by business attribute definitions (BADs) whose direction is FromPartner or Both. See Protocol-Inbound (FromPartner) Parameter and ACK Settings.
-
Batch - Outbound and ACK - Batch-Outbound. Parameters determined by enveloping attribute definitions (EADs) whose direction is ToPartner or Both. See Batch-Outbound (ToPartner) Parameter and ACK Settings.
-
Batch - Inbound and ACK - Batch-Inbound. Parameters determined by enveloping attribute definitions (EADs) whose direction is FromPartner or Both.
Note –Although the PassThrough business protocol does not supply any batch-inbound parameters, other business protocols might do so.
Configuring Business Action Groups and Business Actions
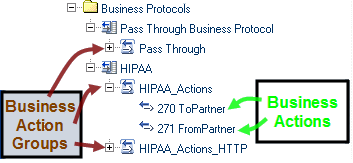
A business action is a particular business message type, such as an X12 850 (purchase order request) or a HIPAA 270 (eligibility coverage / benefit inquiry). A business action group is a collection of business actions that you want to choreograph. For example, one action group might contain simply an outbound notification message; another might contain a request message in both inbound and outbound directions, along with all possible forms of reply messages in both directions. See Figure 5–9.
Figure 5–9 Business Action Groups and Business Actions
 To create and configure a business action group
-
In the Host Explorer tree, click the business protocol under which you want to create an action group.
This could be the Pass Through Business Protocol, a business protocol supplied with a Protocol Manager, or a custom business protocol, depending on the attribute definitions you want to use.
-
Click New.
-
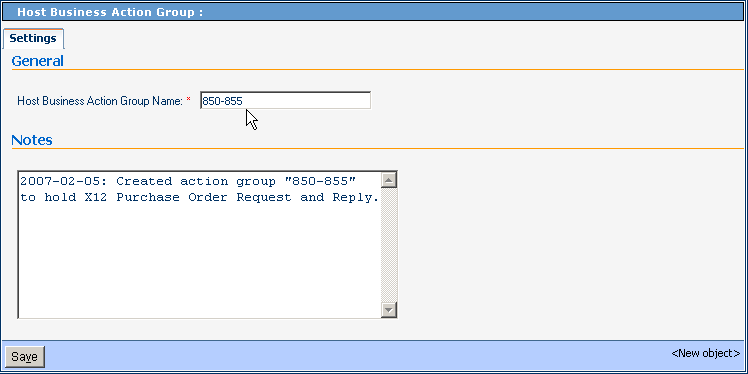
In the Host Business Action Group pane on the right, enter a name for the action group.
See Figure 5–10.
Figure 5–10 Creating a New Business Action Group
-
Click Save.
The new business action group appears in the explorer tree on the left and, in the right pane, a confirmation message is displayed in a new tab: Overrides.
-
As required by the nature of the business messages, modify parameter settings as needed by overriding the default values shown.
Any modifications you make are inherited by business actions and transaction profiles that use this action group.
-
Click Save.
-
Repeat as needed to create additional action groups for the same business protocol.
 To create and configure a business action
-
In the Host Explorer tree, click the business action group under which you want to create a business action group.
-
Click New.
-
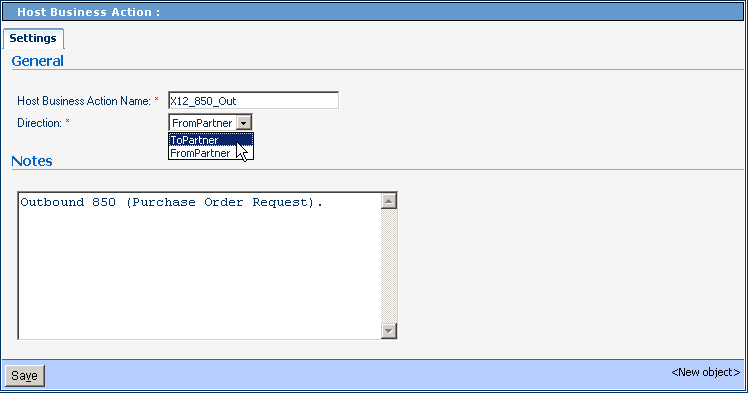
In the Host Business Action Group pane on the right, enter a name for the action group and, for Direction, choose either FromPartner or ToPartner.
See Figure 5–11.
Figure 5–11 Creating a New Business Action
-
Click Save.
The new business action appears in the explorer tree on the left and, in the right pane, a confirmation message is displayed in a new tab: Overrides.
-
As required by the nature of the business message, modify parameter settings as needed by overriding the default values shown.
Any modifications that you make are inherited by transaction profiles that use this business action.
-
Click Save.
-
Repeat as needed to create additional business actions in the same action group.
Protocol-Outbound (ToPartner) Parameter and ACK Settings
This section lists and describes business protocol-outbound=ToPartner parameter settings and corresponding acknowledgment settings. See Figure 5–12.
Figure 5–12 Protocol-Outbound (ToPartner) Parameter and ACK Settings
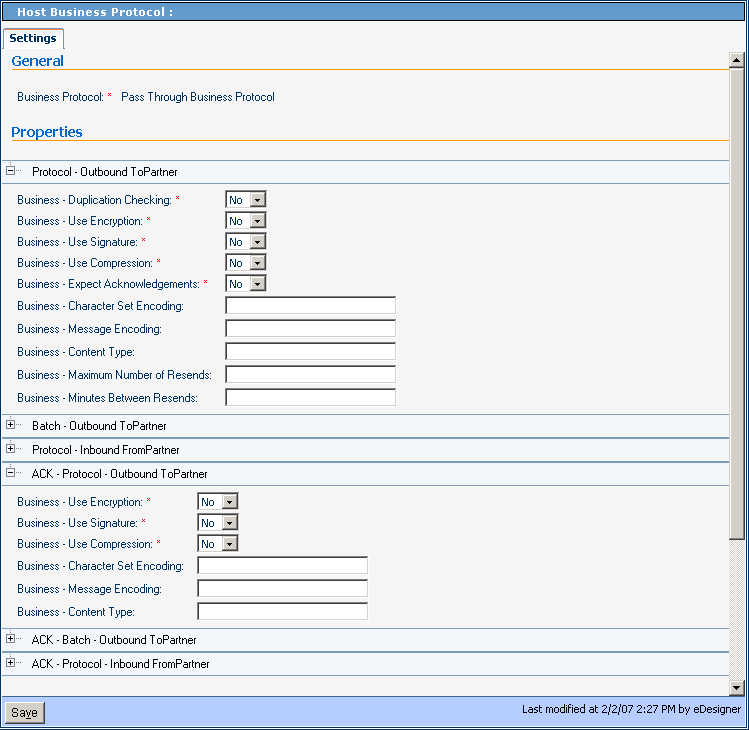 Table 5–1 Business-Duplication Checking
|
Description |
Settings |
Default |
|---|---|---|
|
Whether or not outbound messages are checked for duplication. |
Yes or No |
No |
Table 5–2 Business-Use Encryption
|
Description |
Settings |
Default |
|---|---|---|
|
Whether or not outbound messages are encrypted |
Yes or No |
No |
Table 5–3 Business-Use Signature
|
Description |
Settings |
Default |
|---|---|---|
|
Whether or not outbound messages are electronically signed for authentication |
Yes or No |
No |
Table 5–4 Business-Use Compression
|
Description |
Settings |
Default |
|---|---|---|
|
Whether or not outbound messages are compressed |
Yes or No |
No |
Table 5–5 Business-Expect Acknowledgments
|
Description |
Settings |
Default |
|---|---|---|
|
Whether or not the host is expecting acknowledgement for the request/response |
Yes or No |
No |
Table 5–6 Business - Character Set Encoding
|
Description |
Settings |
Default |
|---|---|---|
|
The character set used to encode the text of the outgoing message; optional Leave blank to use the default encoding |
A string representing a valid character set encoding, such as ASCII or UTF-8) (or empty) |
(empty) |
Table 5–7 Business - Content Type
|
Business - Content Type |
||
|---|---|---|
|
Description |
Settings |
Default |
|
(reserved) |
(reserved) |
(empty) |
Table 5–8 Business - Maximum Number of Resends
|
Description |
Settings |
Default |
|---|---|---|
|
The maximum number of resend tries permitted (optional ) Does not apply to acknowledgments |
Nonnegative integer; however, if you are expecting a response or acknowledgment, set this to a positive value If this parameter and the following one are both set to 0, then no correlation will be started on the message; consequently, in this case, an incoming response or acknowledgment causes an exception to be thrown To turn off business responses only, make sure the acknowledgement value is set to any nonnegative integer, then set the reply time out to 0. |
(empty) |
Table 5–9 Business - Minutes Between Resends
|
Description |
Settings |
Default |
|---|---|---|
|
Number of minutes to wait between resends (optional) Does not apply to acknowledgments |
Nonnegative integer; however, if you are expecting a response or acknowledgment, set this to a positive value If this parameter and the following one are both set to 0, then no correlation will be started on the message; consequently, in this case, an incoming response or acknowledgment causes an exception to be thrown |
(empty) |
Protocol-Inbound (FromPartner) Parameter and ACK Settings
This section lists and describes business protocol-inbound FromPartner parameter settings and corresponding acknowledgment settings. See Figure 5–13.
Figure 5–13 Protocol-Inbound (FromPartner) Parameter and ACK Settings
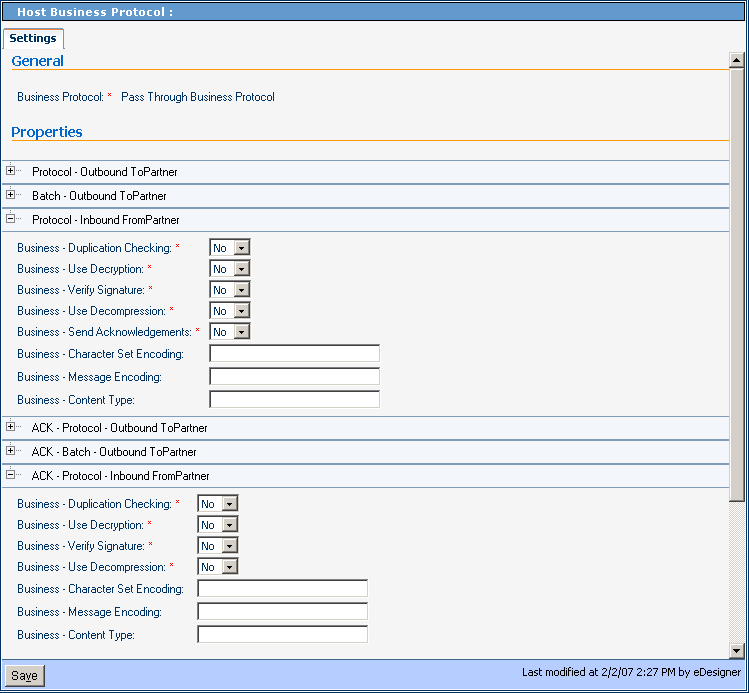 Table 5–10 Business-Duplication Checking
|
Description |
Settings |
Default |
|---|---|---|
|
Whether or not inbound messages are checked for duplication. |
Yes or No |
No |
Table 5–11 Business-Use Decryption
|
Description |
Settings |
Default |
|---|---|---|
|
Whether or not inbound messages are decrypted |
Yes or No |
No |
Table 5–12 Business-Verify Signature
|
Description |
Settings |
Default |
|---|---|---|
|
Whether or not inbound messages are authenticated for a valid electronic signature |
Yes or No |
No |
Table 5–13 Business-Use Decompression
|
Description |
Settings |
Default |
|---|---|---|
|
Whether or not inbound messages are decompressed |
Yes or No |
No |
Table 5–14 Business-Expect Acknowledgments
|
Description |
Settings |
Default |
|---|---|---|
|
Whether or not inbound messages are acknowledged |
Yes or No |
No |
Table 5–15 Business-Character Set Encoding
|
Description |
Settings |
Default |
|---|---|---|
|
The character set used to encode the text of the incoming message (optional) Leave blank to use the default encoding |
A string representing a valid character set encoding (such as ASCII or UTF-8), or empty |
(empty) |
Table 5–16 Business - Content Type
|
Description |
Settings |
Default |
|---|---|---|
|
(reserved) |
(reserved) |
(empty) |
Batch-Outbound (ToPartner) Parameter and ACK Settings
This section lists and describes business batch-outbound ToPartner parameter settings and corresponding acknowledgment settings. See Figure 5–14.
Figure 5–14 Batch-Outbound (ToPartner) Parameter and ACK Settings
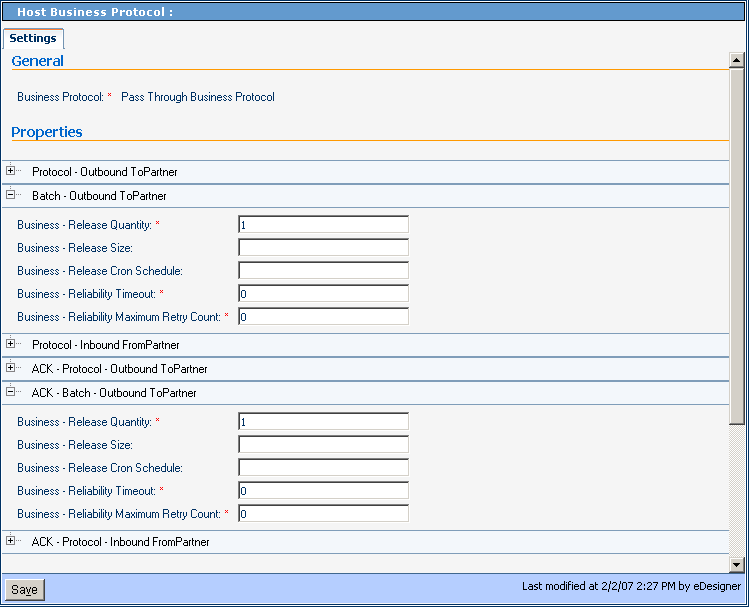 Table 5–17 Business-Release Quantity
|
Description |
Settings |
Default |
|---|---|---|
|
Specifies the threshold beyond which a batch send is triggered (required) If you want to send messages on a schedule using Release Scheduler String, set Release Quantity to a very high value (for example, 99999999) |
Nonnegative integer |
1 |
Table 5–18 Business-Release Size
|
Description |
Settings |
Default |
|---|---|---|
|
(reserved) |
(reserved) |
(empty) |
Table 5–19 Business-Cron Schedule
|
Description |
Settings |
Default |
|---|---|---|
|
An expression specifying when and how often to run (optional) The expression uses cron syntax and consists of six (or optionally seven) arguments, separated by spaces, to specify: second, minute, hour, day-of-month, month, day-of-week (and optionally year; see About cron expressions. |
Either a valid cron expression, or empty |
(empty) |
Table 5–20 Business-Reliability Timeout
|
Description |
Settings |
Default |
|---|---|---|
|
Specifies the maximum number of minutes to wait for a reply before attempting a re-send (required) |
Nonnegative integer |
0 |
Table 5–21 Business-Reliability Maximum Retry Count
|
Description |
Settings |
Default |
|---|---|---|
|
Specifies maximum number of times to retry sending before giving up; required |
Nonnegative integer |
0 |
About cron expressions
A cron expression specifies when and how often to run. It consists of six (or optionally seven) arguments, separated by spaces:
-
Arg#1: Second. An integer in the range 0-59.
-
Arg#2: Minute. An integer in the range 0-59.
-
Arg#3: Hour. An integer in the range 0-23.
-
Arg#4: Day-of-month. An integer in the range 1-31.
-
Arg#5: Month. Either an integer in the range 1-12, or a case-insensitive three-character string, from: {Jan, Feb, Mar, Apr, May, Jun, Jul, Aug, Sep, Oct, Nov, Dec}.
-
Arg#6: Day-of-week. Either an integer in the range 1-7, or a case-insensitive three-character string, from: {Sun, Mon, Tue, Wed, Thu, Fri, Sat}.
-
Arg#7 (optional): Year. Either empty, or an integer in the range 1970-2099.
Be careful not to supply real numbers (such as 0.5) if an integer is required; doing so causes misparsing and misprocessing to occur, but does not issue an error. Although the “.” (period) character is not permitted, the following special characters are allowed:
-
* (asterisk): Can be used in any of the seven fields to signify “all values”. For example, “*” as the fourth argument means “every day.”
-
, (comma): Can be used in any of the seven fields to separate items in a discrete list. For example, “MON,THU” in the sixth field means “on Monday and Thursday”.
-
- (hyphen): Can be used in any of the seven fields to indicate minimum-maximum of a range. For example, “Nov-Feb” in the fifth field means “in November, December, January, and February”.
-
/ (slash): Can be used in any of the seven fields to specify increments. For example, “7/20” in the first field means “on seconds 7, 27, and 47”.
-
? (query): Can be used in field 4 or field 6 (but no other field, and not simultaneously) to avoid collision or ambiguity.
-
L can be used in field 4 or field 6 or both (but not in combination with lists or ranges) to specify “the last”. For example, “L” in the fourth field means “the last day of the month” and “1L” in the sixth field means “the last Sunday of the month”.
Examples of valid cron expressions
-
“0 0 12 * * ?” means “At noon every day”.
-
“0 30 21 ? * *” means “At 9:30pm every day”.
-
“0 0 2 ? * Mon-Fri” means “Weekdays at 2:00am”.
-
“0 10/30 1,22 L * ?” means “At 1:10 and 1:40am and 10:10 and 10:40pm the last day of every month”.
Viewing and Setting Delivery Protocol Parameters
Each B2B Host in ePM is automatically presupplied with the PassThrough delivery protocol. The PassThrough protocol provides no parameter settings beyond the minimum required to deliver and receive message packets without operating on them.
In addition to the Passthrough protocol, each B2B Host may contain one or more other delivery protocols, whose parameter types and possible settings depend on the way in which their delivery protocol attribute definitions (DPADs) were set up in Enterprise Designer:
-
Parameters for each Protocol Manager product are described in the corresponding Protocol Manager user’s guide.
-
Parameters for custom delivery protocols are determined by the custom DPADs defined in Enterprise Manager.
-
Other parameters and their possible settings are determined the delivery protocol’s messaging attribute definitions (MADs) and packaging attribute definitions (PADs). See Parameter and ACK Settings for Delivery Protocols.
Configuring Delivery Action Groups and Delivery Actions
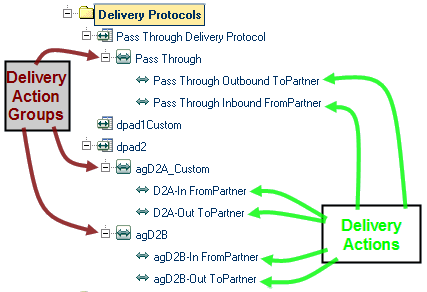
A delivery action is a particular messaging format specification, such as the type of encryption used for message payload and signature. A delivery action group is a collection of delivery actions that logically belong in the same group. See Figure 5–15.
Figure 5–15 Delivery Action Groups and Delivery Actions
 To create and configure a delivery action group
-
In the Host Explorer tree, click the delivery protocol under which you want to create an action group.
This could be the Pass Through Delivery Protocol, a business protocol supplied with a Protocol Manager, or a custom delivery protocol, depending on the attribute definitions you want to use.
-
Click New.
-
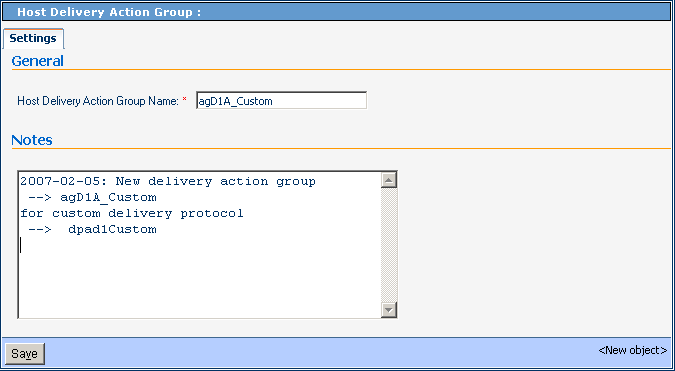
In the Host Delivery Action Group pane on the right, enter a name for the action group.
See Figure 5–16.
Figure 5–16 Creating a New Delivery Action Group
-
Click Save.
The new delivery action group appears in the explorer tree on the left and, in the right pane, a confirmation message is displayed in a new tab: Overrides.
-
As required by the nature of the delivery formats, modify parameter settings as needed by overriding the default values shown.
Any modifications you make are inherited by delivery actions and transaction profiles that use this action group.
-
Click Save.
-
Repeat as needed to create additional action groups for the same delivery protocol.
 To create and configure a delivery action
-
In the Host Explorer tree, click the delivery action group under which you want to create a delivery action group.
-
Click New.
-
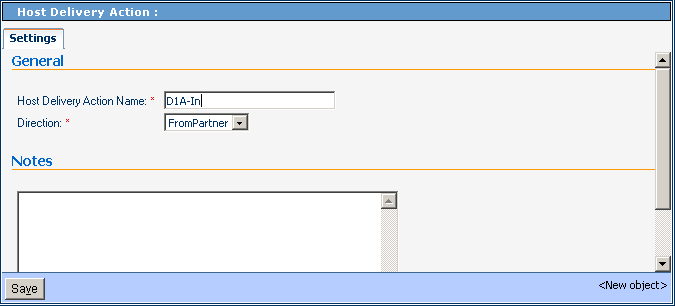
In the Host Delivery Action Group pane on the right, enter a name for the action group.
-
For Direction, choose either FromPartner or ToPartner.
See Figure 5–17.
Figure 5–17 Creating a New Delivery Action
-
Click Save.
The new delivery action appears in the explorer tree on the left and, in the right pane, a confirmation message is displayed in a new tab: Overrides.
-
As required by the nature of the delivery format, modify parameter settings as needed by overriding the default values shown.
Any modifications that you make are inherited by transaction profiles that use this delivery action.
-
Click Save.
-
Repeat as needed to create additional delivery actions in the same action group.
Parameter and ACK Settings for Delivery Protocols
With only a few exceptions, the parameter settings and acknowledgment settings for delivery protocols are the same as for business protocols. For details, see the following:
Table 5–22 Delivery - Batch Tracking Code|
Description |
Settings |
Default |
|---|---|---|
|
List of options for tracking message batches; tsure tracking of outbound and inbound batches, retain the default setting |
No Tracking or Header Only or Header and Message |
Header and Message |
Creating and Configuring Transaction Profiles
A Transaction Profile consists of well-configured outbound and inbound business actions, associated with well-configured outbound and inbound delivery actions, such that each delivery action is tied to a well-configured transport. Actions from the PassThrough action group can be used for either or both business actions and/or either or both delivery actions.
Transaction profiles are created in groups containing individual outbound (to-partner) and inbound (from-partner) profiles.
 To create a new transaction profile
-
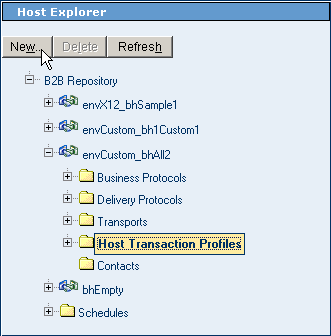
In the Host Explorer tree, open the Host for the transaction profile, click the Host Transaction Profiles folder and click New.
See Figure 5–18.
Figure 5–18 Creating a New Transaction Profile
-
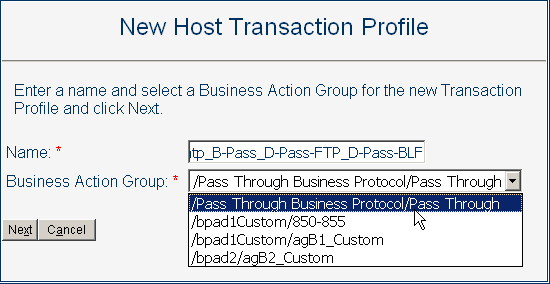
In the New Host Business Transaction Profile pane on the right, enter a name for the transaction profile and select a business action group from the pull-down list.
See Figure 5–19.
Figure 5–19 New Transaction Profile - Name and Business Action Group
-
Click Next.
-
For the inbound business action, and then again for the outbound business action, select a corresponding inbound delivery action and external transport from the pull-down lists.
See Figure 5–20.
Figure 5–20 New Transaction Profile - Delivery Actions and Transports
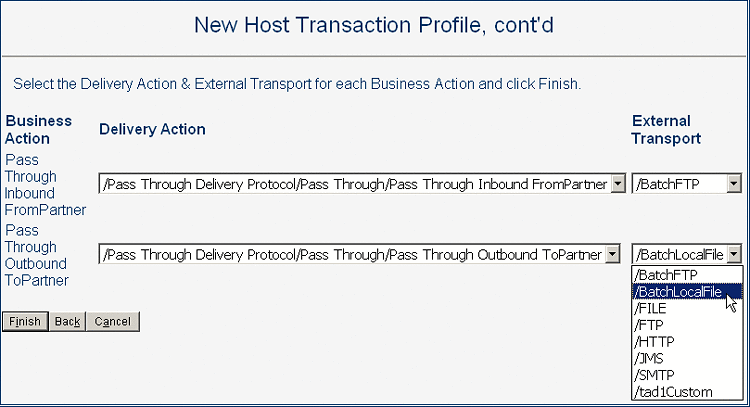
Note –You can click Back to change any choices previously made.
-
When you are satisfied with your choices, click Finish.
After a pause, the new transaction profile appears in the explorer tree.
-
Click Save.
Note –You can the group to see the inbound and outbound transaction profiles that were created within the group, and you can use the Overrides tab to modify default values of any settings. Any modifications made to a Host transaction profile are inherited by all trading partner transaction profiles that reference it.
-
Repeat as needed to create additional transaction profiles for the same host.
Inheriting and Overriding Parameter Settings
Parameter settings can be overridden at several levels both for the B2B Host and, below the level of B2B Host, for each individual trading partner.
The following applies to all levels below the Host Protocol/Transport, including all trading partners levels:
-
A parameter can have its value set explicitly. If it has an explicit setting at this level, the setting overrides any default values that were set for this parameter higher in the inheritance chain.
-
A parameter can be set to inherit from the next-higher level. If so, the parameter’s current value at any time is inherited from the first explicit setting higher in its inheritance chain.
To explicitly override a parameter setting at a particular level, access the Overrides tab for that level, locate the parameter, check its Override box, explicitly set the parameter to the value you want, and click Save. When you do this, all of the same parameters lower in the inheritance chain (except for those affected by an explicit setting lower in the chain) are updated to the new value.
Quick Summary of Inheritance
Inheritance of ePM parameter settings follows these rules, where “<- “ means “inherits from”:
-
Host transaction profile <- host action <- host action group<- host protocol (<- Enterprise Designer attribute definitions)
-
TP transaction profile <- TP action<- TP action group <- TP protocol; but if not explicitly overridden anywhere in the TP chain<- host transaction profile
-
TP action<- TP action group<- TP protocol; but if not explicitly overridden anywhere in the TP chain:<- host action
-
TP action group<- TP protocol; but if not explicitly overridden anywhere in the TP chain:<- host action group
-
TP protocol<- host protocol
Inheritance and Overrides in B2B Host Configuration
On the Host side, inheritance and overrides are involved but straightforward:
-
If a host transaction profile parameter setting is not explicitly overridden, then: settings for its business parameters are inherited from the host business action; settings for its delivery parameters are inherited from the host delivery action; and settings for its transport parameters are inherited directly from the host transport.
-
If a host business or delivery action setting is not explicitly overridden, then settings for its parameters are inherited from its host action group.
-
If a host business or delivery action group setting is not explicitly overridden, then settings for its parameters are inherited from its host business or delivery protocol.
-
If a host transport/business/delivery protocol setting is not explicitly overridden, then settings for its parameters are determined by the attribute definitions built into B2B Host in Enterprise Designer.
-
Host transport settings inherited from the B2B Host built in Enterprise Designer are also affected by eWay configuration settings. If an eWay configuration parameter is not set, its value is determined by the configuration settings for the corresponding external system in the Environment.
Inheritance and Overrides in Trading Partner Configuration
On the TP side, inheritance and overrides can be affected by Host settings:
-
If a TP transaction profile parameter setting is not explicitly overridden, then: settings for its business parameters are inherited from the TP business action; settings for its delivery parameters are inherited from the TP delivery action; and settings for its transport parameters are inherited directly from the TP transport; however, if there are no explicit overrides in the TP chain, it inherits from the corresponding host transaction profile.
-
If a TP business or delivery action setting is not explicitly overridden, then it inherits any explicit overrides in its TP action group and above; however, if there are no explicit overrides in the TP chain, it inherits from the corresponding host action.
-
If a TP business or delivery action group setting is not explicitly overridden, then itinherits any explicit overrides in its TP business/delivery protocol; however, if there are no explicit overrides in the TP protocol, it inherits from the corresponding host action group.
-
If a TP transport or business/delivery protocol setting is not explicitly overridden, then it inherits from any explicit overrides in the corresponding host protocol.
Example of Multiple Inheritance and Overrides
In this example, a B2B Host was created that included a custom delivery protocol named dpad2 that included three custom messaging attribute definitions (MADs). In ePM, various of the outbound parameter settings were modified at every possible level. (This is poor practice, and employed here simply to illustrate the principles.)
Figure 5–21 and Figure 5–22 show parameters at the highest level in ePM — the protocol level itself. In the example, three parameters in the host protocol are overridden by the TP protocol.
Figure 5–21 Host Parameters at the Protocol Level
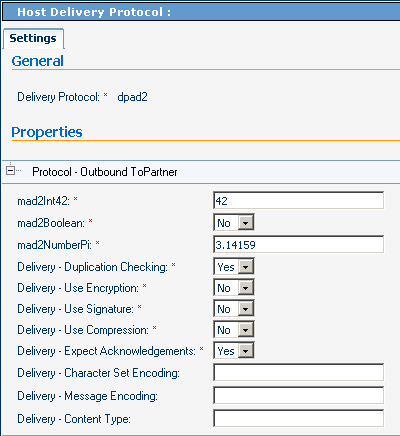
Figure 5–22 TP Parameters at the Protocol Level
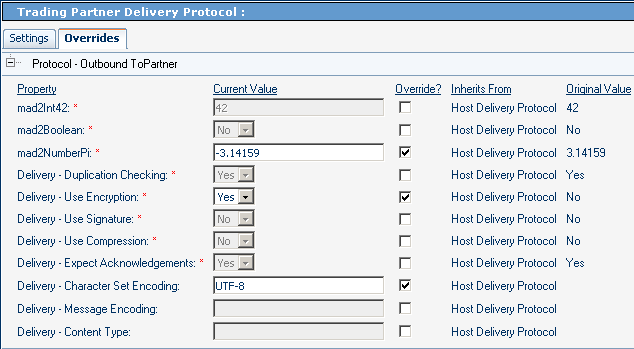
Figure 5–23 and Figure 5–24 show parameters at the second-highest ePM level — the action group level. In the example, the host action group overrides two parameter settings inherited from the host protocol, and the TP action group overrides two different parameter settings inherited from the host action group. In this example, the TP action group setting for Duplication Checking is inherited from its parallel host action group (because there is no explicit override at TP protocol level), and that the settings for mad2NumberPi, Encryption, and Character Set Encoding are inherited from its immediate parent, the TP protocol level.
Figure 5–23 Host Parameters at the Action Group Level
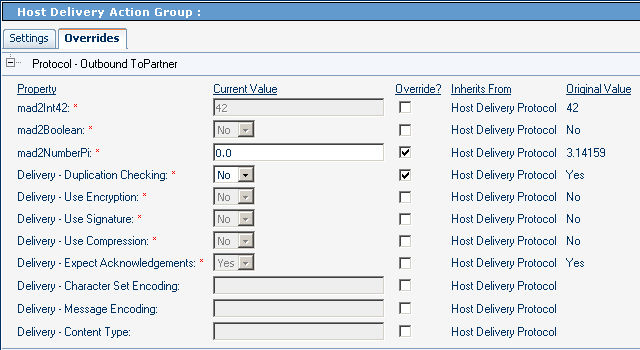
Figure 5–24 TP Parameters at the Action Group Level
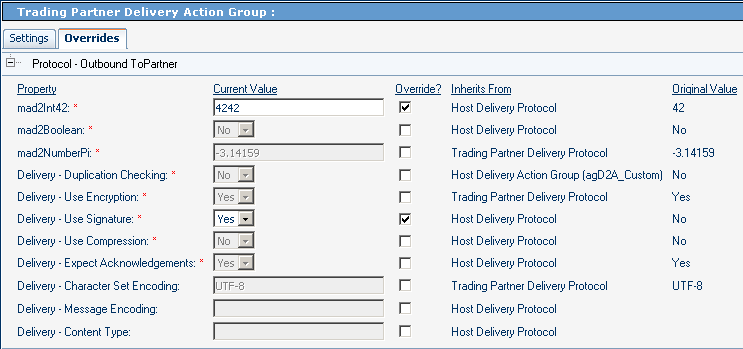
Figure 5–25 and Figure 5–26 show parameters at the third-highest level in ePM — the action level. In the example, the host action overrides two parameter settings inherited from the protocol and one inherited from the action group. The TP action overrides one parameter setting inherited from the TP action group, one inherited from the TP protocol, and one inherited from the host protocol. In this example, the TP action setting for mad2Boolean is inherited from its parallel host action (because there is no explicit override in the TP inheritance chain, either at the TP protocol or the TP action group level), and that the setting for Use Signature is inherited from its immediate parent, the TP action group level.
Figure 5–25 Host Parameters at the Action Level
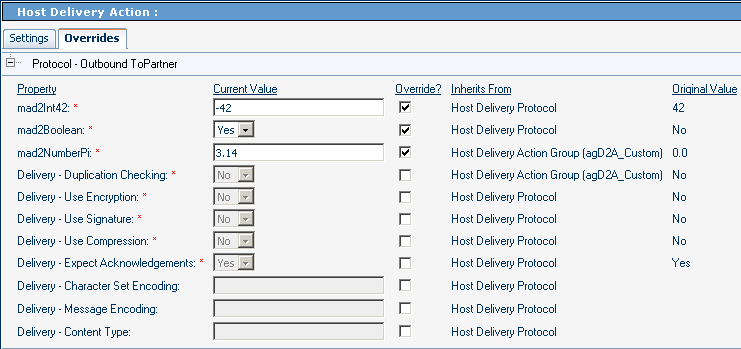
Figure 5–26 TP Parameters at the Action Level

Figure 5–27 and Figure 5–28 show parameters at the bottom level in ePM — the transaction profile level. In the example, the host transaction profile overrides one parameter settings inherited from the protocol, one inherited from the action group, and one inherited from the action. The TP transaction profile overrides two parameter settings, both inherited from the host protocol, but one of them deserves special attention: The parameter setting for Expect Acknowledgments, which was set to Yes in the host protocol , is overridden and set to Yes — the same value (see Figure 5–21). The effect of this is to break the inheritance but keep the value: Even if the setting in the host protocol should change in the future, the parameter setting in the TP transaction profile does not change.
Figure 5–27 Host Parameters at the Transaction Profile Level
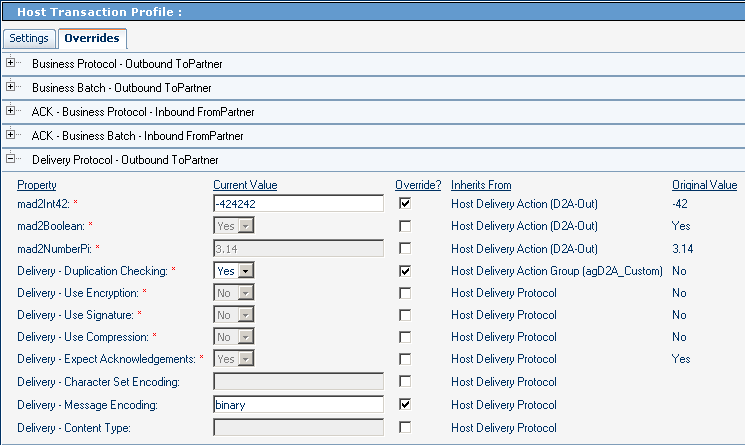
Figure 5–28 TP Parameters at the Transaction Profile Level

Creating and Configuring Trading Partners
Ultimately, the parameters settings that are actually used when business messages are delivered to/from trading partners are determined by a trading partner transaction profile. For example:
-
For outgoing messages, the choice of transaction profile is determined by the name of the trading partner, action group, and action.
-
For incoming messages, the choice of transaction profile is determined by the endpoint where the message is picked up.
A particular trading partner can contain many transaction profiles based on several different B2B Hosts, but each TP transaction profile is based on exactly one host transaction profile. However, individual parameters settings in the host transaction profile can be overridden — either within the TP transaction itself, or anywhere in the TP inheritance chain: TP action, TP action group, and TP business/delivery protocol. For details, see Inheriting and Overriding Parameter Settings.
Basic Operations for Trading Partners
This section covers creating, finding, selecting, and adding a B2B Host to a Trading Partner.
 To create a new trading partner
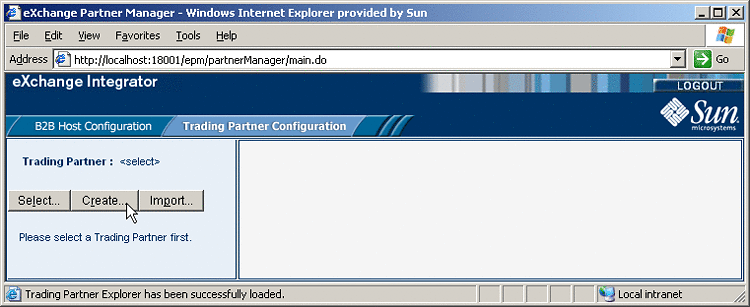
-
With the Trading Partner Configuration tab active, in the explorer pane, click Create.
See Figure 5–29.
Figure 5–29 Creating a New Trading Partner
-
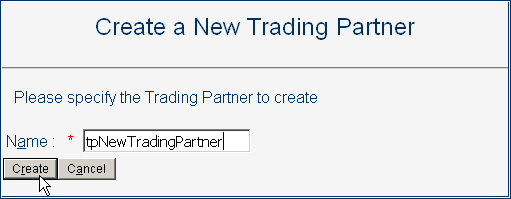
In the canvas (Create a New Trading Partner), enter a name for the new trading partner.
See Figure 5–30.
Figure 5–30 Naming a New Trading Partner
-
Click the Create button at the bottom of the canvas.
The new trading partner appears in the explorer tree in the left pane.
 To find and select an existing trading partner
-
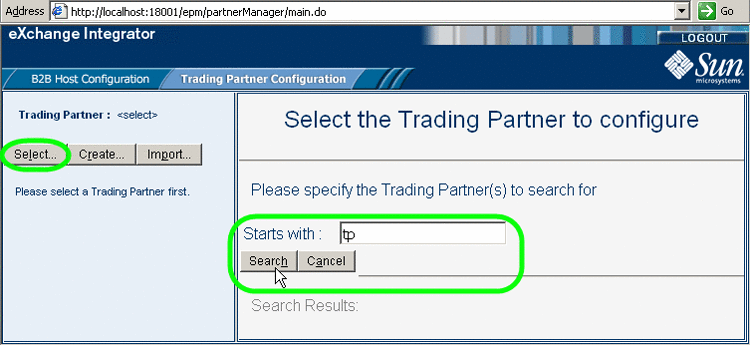
With the Trading Partner Configuration tab active, in the explorer pane, click Select.
-
In the canvas, optionally after entering the first few characters of a possible name, click Search.
See Figure 5–31.
Figure 5–31 Searching for a Trading Partner
-
From the Search Results list, select the trading partner you want.
See Figure 5–32.
Figure 5–32 Selecting a Trading Partner
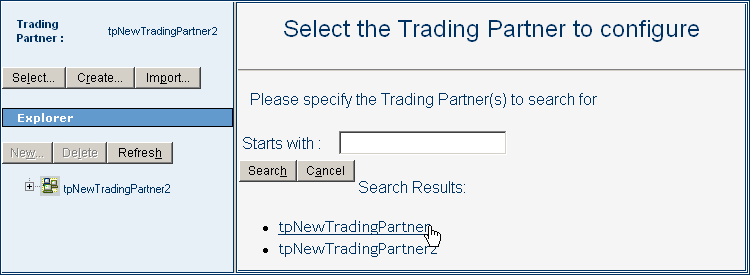
The new trading partner appears in the TP explorer tree in the left pane.
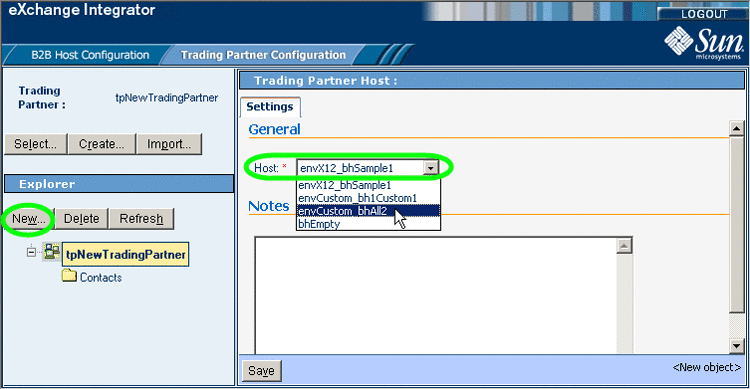
 To add a B2B Host to a trading partner
-
In the TP explorer tree, select the trading partner and click New.
-
Then, in the canvas (under the Settings tab), select a B2B Host from the pull-down list.
See Figure 5–33.
Figure 5–33 Configuring a Trading Partner With a New B2B Host
-
Click Save.
The new TP host appears in the TP tree in the left pane. All of its parameter settings apply to the trading partner unless overridden.
Configuring Trading Partners
Configuring a trading partner consists mainly of creating/configuring TP transaction profiles; each TP transaction profile inherits from the host transaction profile. You can then, optionally, override parameter settings at any level of the TP inheritance chain. You can also add one or more contacts that are specific to the TP.
 To create and configure a TP transaction profile
-
With the Trading Partner Configuration tab active, in the TP explorer tree, open the TP and the host to display its five folders: Business Protocols, Delivery Protocols, Transports, Transaction Profiles, and Contacts.
-
Click the host’s Transaction Profiles folder, make a selection from the B2B Host Transaction Profiles pull-down list, and click Save.
The new TP transaction profile appears in the TP tree in the left pane.
Note –If the TP tree does not display the new TP transaction profile, click Refresh.
-
Optional. You can configure one or more TP transaction profiles by following the steps below, repeating this step as needed for additional TP transaction profiles.
-
In the TP explorer tree, open the TP transaction profile and select the inbound TP transaction profile.
-
Use the canvas to override TP transaction profile parameter settings as needed, and click Save.
-
Within the same TP transaction profile, select the outbound TP transaction profile.
-
Use the canvas to override TP transaction profile parameter settings as needed, and click Save.
-
Repeat the procedure as needed for additional TP transaction profiles.
-
Optional. If you want to override settings at a higher level than the TP transaction profile, you can configure one or more of the TP protocols, action groups, actions, and transports.
Note –Although you must create at least TP transaction profile for every trading partner, you need not create TP protocols, action groups, actions, or transports; all these are created automatically when you create a TP transaction profile. As needed, you can configure any of the items in the TP inheritance chain.
 To configure TP protocols, action groups, actions, transports,
and contacts
-
Optional. To create a new TP business protocol:
-
If you want to configure a TP business protocol, follow these steps:
-
In the TP explorer tree, select the TP business protocol.
-
Use the canvas to override TP business protocol parameter settings as needed, and click Save.
-
With the TP business protocol selected, click New.
-
To create a new TP business action group, select a host business action group and click Save.
-
In the TP explorer tree, select the TP business action group.
-
Use the canvas to override TP action group parameter settings as needed, and click Save
-
With the TP business action group selected, click New.
-
To create a new TP business action, select a host business action and click Save.
-
In the TP explorer tree, select the TP business action.
-
Use the canvas to override TP business action parameter settings as needed, and click Save.
-
Optional. To create a new TP delivery protocol:
-
In the TP explorer tree, select the TP delivery protocol.
-
Use the canvas to override TP delivery protocol parameter settings as needed, and click Save
-
With the TP delivery protocol selected, click New.
-
To create e a new TP delivery action group, select a host delivery action group and click Save.
-
In the TP explorer tree, select the TP delivery action group.
-
Use the canvas to override TP action group parameter settings as needed, and click Save.
-
With the TP delivery action group selected, click New.
-
To create a new TP delivery action, select a host delivery action and click Save.
-
In the TP explorer tree, select the TP delivery action.
-
Use the canvas to override TP delivery action parameter settings as needed, and click Save
-
Optional. To create a new TP transport:
-
Optional. To configure a TP transport:
-
Optional. To create a new TP contact based on a host contact:
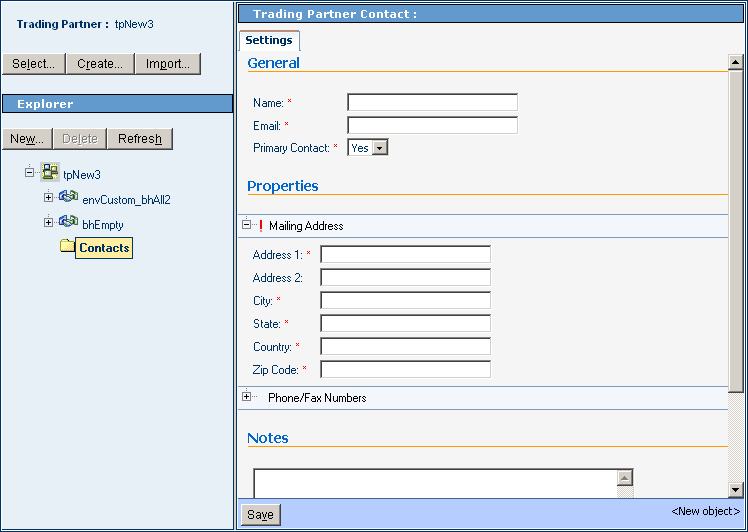
 To create and configure a TP-specific contact
-
With the Trading Partner Configuration tab active, in the TP explorer tree, open the TP to display its host(s) and its Contacts folder.
-
Click the TP-level Contacts folder, and then click New.
See Figure 5–34.
Figure 5–34 Creating a New TP-Specific Contact
-
Supply information for all required fields and, as needed, any optional fields, and click Save.
The name of the new contact appears in the TP tree, under the TP’s Contacts folder.
Message Tracker
Included with eXchange Integrator is a special application named Tracker. After it is connected to an Oracle database and deployed to a domain, it keeps track of all messages sent and received. The corresponding Web-based tool is named Message Tracker. It allows you to monitor the status of messages as they are received and processed through the B2B Suite.
This section explains how to access and use Message Tracker.
Accessing Message Tracker
 To access Message Tracker
Before You Begin
-
Your domain (Logical Host) must already be running, as well as your Oracle and LDAP external systems.
-
You must already have deployed the appropriate Projects.
-
For Message Tracker to be useful, there must be one or more messages that have already been picked up by the current domain’s Integration Server.
-
Start a browser session.
-
Point your browser at the following URL:
http://logicalhost:port+1/objname
Where:
-
logicalhost is the hostname or IP address of the machine where your Project is deployed; the machine name of the Logical Host.
-
port+1 is the port number, typically 18001, 19001, 28001, or the like. The Web server connector port configured in your Integration Server. To discover this information: In Environment Explorer, right-click the current Logical Host and view its properties. Open Configuration ⇒ Sections⇒Web Container⇒Web Server⇒Default Web Server; port is the value set for Connector Port. If you have several Web server configurations, check them also.
-
objname is the name of the Message Tracker instance as it appears on the Connectivity Map. By default, the name that appears in cmTracker is tracker.
Example: To access Message Tracker for a typical scenario, use the following URL:
http://localhost:18001/tracker/msgTrack/
-
Using Message Tracker
When you first run Message Tracker, the Message Tracker window appears, with no data. The controls in the left pane allow you to search and filter data. As messages are found that meet the search criteria, results are populated in the right pane. See Figure 5–35.
Figure 5–35 Message Tracker Window
 To search by B2B Host, trading partner, and protocol
-
Under Search Criteria, use the Host drop-down list to choose the B2B Host whose messages you want to examine, and then click GO.
-
Under Trading Partner, either click ALL or choose a particular trading partner from the drop-down list.
-
Under Protocols, either click ALL or choose a protocol from the drop-down list.
-
At the lower left of the window, click SEARCH.
The canvas (right side), under Search Results, displays a page containing the Package IDs of the latest ten tracked messages fitting the criteria you specified. The navigation links (Previous, Next, and Go to Page) allow you to see other pages of ten results each.
 To search by B2B host, trading partner, and protocol
-
Under Search Criteria, use the Host drop-down list to choose the B2B host whose messages you want to examine, and then click GO.
-
For Protocols, either click ALL or choose a particular protocol from the list.
-
For Package Type, either click ALL or choose a particular packaging protocol from the drop-down list.
-
For ID, enter a string for matching the message ID.
-
At the lower left of the window, click SEARCH.
The canvas displays a page containing the Package IDs of the latest ten tracked messages fitting the criteria you specified.
 To filter results by error type, direction, and/or date
After performing a search, or after setting up a search using either of the two previous procedures, you can specify one or more further criteria.
-
Near the bottom of the left pane, under Filters, specify one or more of the following:
-
For Error Type: If you do not choose ALL, you can restrict your search either to display error messages only, or to display non-error messages only.
-
For Direction: If you do not choose ALL, you can restrict your search either to display inbound messages only, or to display outbound messages only.
-
For Date: You can choose to include only those messages whose processing date lies within a range you specify, or only those messages whose acknowledgment date lies within the range.
-
-
At the lower left of the window, click SEARCH.
The canvas displays a page containing the Package IDs of the latest ten tracked messages fitting the criteria you specified.
 To obtain details of a specified package
On a package-by-package basis, you can examine the message text.
-
After obtaining results from a search using any of the procedures mentioned earlier, click the package ID for any of the returned results.
-
In the “Details for package package-ID” pane, click Open to see the contents (possibly encrypted) of the original message.
The text is displayed. You can use cut/copy/paste on any text in the window.
- © 2010, Oracle Corporation and/or its affiliates
