Building a B2B Host
The B2B host plays a dual role: It functions both as an object — that is, a project-level (logical) component in the project tree that can be dragged into a Connectivity Map —, and also as a server — that is, an environment (physical) component, called eXchangeService.
Each B2B Host project joins a particular B2B Host instance to a particular Environment. The name of the created eXchangeService reflects this: For example, if the B2B Host instance is named cm1myHost123, and the Environment is named envA, the name of the new external added to the Environment is envA_cm1myHost123 eXchange Service.
Creating an Environment
These steps below set up the minimal environment required for building a B2B Host that can be used by eXchange Partner Manager (ePM).
 To create and populate the environment
-
In Enterprise Designer with the Environment Explorer tab active, right-click the Repository.
The explorer tree displays a new environment, and the Environment Editor opens. Optionally, you can rename the environment to something meaningful.
-
On the context menu, click New Environment.
-
In the environment explorer tree, right-click the new environment.
-
On the context menu, point to New and click Logical Host.
The explorer tree and editor canvas display the new Logical Host. Optionally, you can use the tree to rename the Logical Host to something meaningful.
-
In the environment explorer tree, right-click the new Logical Host.
-
On the context menu, point to New and click Sun SeeBeyond Integration Server.
The explorer tree displays the new Integration Server, and the canvas displays it inside the Logical Host. Optionally, you can rename it to something meaningful.
-
If appropriate, right-click the Integration Server, click Properties, and configure its parameters as needed for use at your site.
-
In the environment explorer tree, right-click the new Logical Host.
-
On the context menu, point to New and click Sun SeeBeyond JMS IQ Manager.
The explorer tree displays the new JMS IQ Manager, and the canvas displays it inside the Logical Host. Optionally, you can rename it to something meaningful.
-
If appropriate, right-click the JMS IQ Manager, click Properties, and configure its parameters as needed for use at your site.
 Creating and configuring the Oracle external
-
In the environment explorer tree, right-click the environment.
-
On the context menu, point to New and click Oracle External System.
-
In the Create an External System dialog, enter a meaningful name, set the system type to Outbound Oracle eWay, and click OK.
-
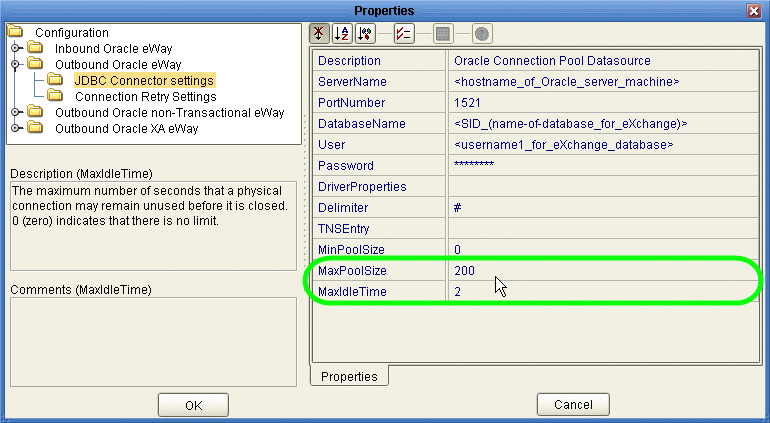
Configure the Oracle external with the values for your eXchange database instance.
For details on configuring the Oracle external, see the Oracle eWay User’s Guide. For sample settings typical of an eXchange database, see Figure 4–12.
Figure 4–12 Environment Configuration for Oracle External System
-
In the environment explorer tree, right-click the environment.
-
On the context menu, point to New and click B2BServiceConfigurator External System.
-
In the Please input the name dialog, enter a meaningful name and click OK.
-
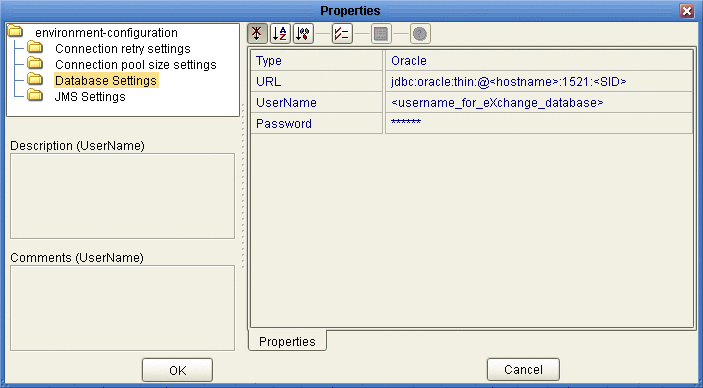
Open the properties of the B2BService Configurator and, for Database Settings, supply values for URL, UserName, and Password that match the values you supplied for the Oracle external.
See Figure 4–13.
Figure 4–13 Environment Configuration for Oracle External System
 Creating and configuring LDAP
and other externals
-
In similar fashion, create an external system for LDAP, name it appropriately, and configure it appropriately for your operating environment.
-
Also create external systems for BatchFTP, BatchLocalFile, File, and HTTP (as well as any other external systems corresponding to other transport protocols used by your B2B Host), and configure them appropriately for your operating environment.
Once you finish these steps, the environment now has all you need to build a B2B Host as well as the GUI, Tracker, and error-handling projects.
To create the eXchange Service, you create a connectivity map that links the B2B Host to an Oracle eWay and then build the corresponding Deployment Profile. See Connecting the B2B Host to Oracle and LDAP Externals.
Optional: Configuring an Environment to Use HTTPS
HTTPS means “HTTP over SSL” (secure sockets layer). If you want to use the HTTPS transport attributes definition, you must take additional steps to enable HTTPS.
-
To enable an HTTP external to use SSL, it must have its SSL configuration settings edited appropriately. For more information, See the eWay HTTPS Adapter User’s Guide. For an example of settings specific to eXchange Integrator, see the To configure the HTTP external to use SSL.
-
To enable the Integration Server to communicate using HTTPS, it needs to be associated with appropriate configuration settings. fore more information, see the eGate Integrator System Administration Guide.
 To configure the HTTP external to use SSL
-
In the Environment Explorer tree, right-click the HTTP external and, on the popup context menu, click Properties.
-
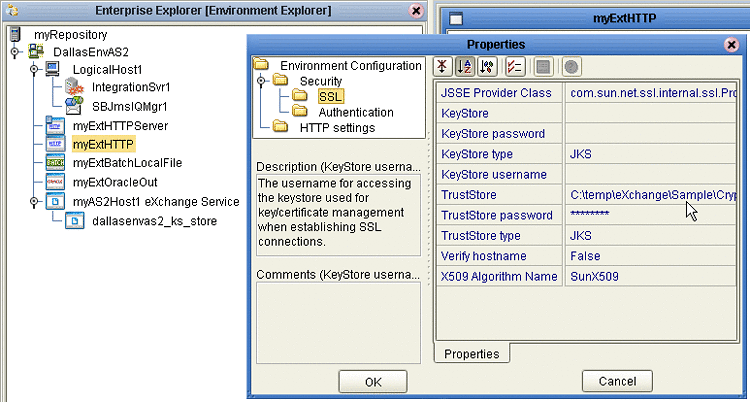
In the Properties sheet, open Security and click SSL.
-
For TrustStore, provide the path and filename of the default truststore to be used when establishing SSL connections; for example:
C:\temp\eXchange\Crypto\companyb.ssl.keystore
-
For TrustStore password, provide the correct password for this truststore; for example: companyb.
For TrustStoreType, keep the default: JKS. See Figure 4–14.
Figure 4–14 Configuring the SSL Properties of the HTTP External
-
AIX only. Make the following additional changes for Logical Hosts running on AIX.
-
Change JSSE Provider Class from com.sun.net.ssl.internal.ssl.Provider to: com.ibm.jsse.IBMJSSEProvider
-
Change X509 Algorithm Name from SunX509 to (case-sensitive): IbmX509
-
Also make other configuration changes as needed. For more information, see the eWay HTTPS Adapter User’s Guide.
-
When you are finished, click OK.
Note –Before you start the domain, ensure that its ...\keystore\ directory contains the correct .keystore file and that its alias (unless you edit server.xml otherwise) is tomcat. For an example, copy jc512-repository \server\sbyn.keystore to your jc512-logicalhost\keystore\ directory and rename it from sbyn.keystore to yourIntegrationServername .keystore. The keystore file must be of type JKS.
-
-
Connecting the B2B Host to Oracle and LDAP Externals
These steps create a map that establishes a connection between the B2B Host and the two externals the B2BService communicates with: Oracle and LDAP.
 To create and populate the B2B Host Connectivity
Map
-
With the Project Explorer tab active, in the project tree, right-click the project.
-
On the context menu, point to click New and click Connectivity Map.
The project tree displays a new map, and the Connectivity Map Editor opens. Optionally, you can rename the map to something meaningful.
-
In the toolbar along the top of the canvas, click the External Applications tool and, from the drop-down list, select the checkboxes for Oracle External Application and for LDAP External Application.
-
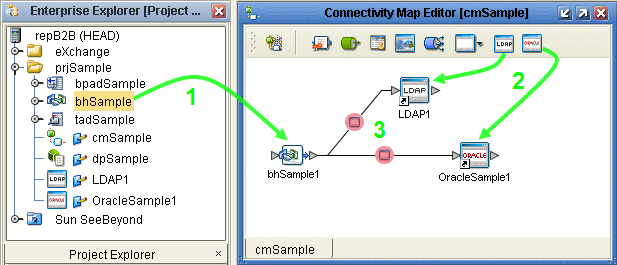
From the project tree, drag your B2B Host onto the left side of the canvas
-
From the toolbar, do the following:
-
Drag an Oracle external onto the right side of the canvas.
-
Drag and LDAP external onto the right side of the canvas.
Optionally, you can rename components to something meaningful, and then connect them. See Figure 4–15.
Figure 4–15 Connectivity Map Showing B2B Host Connected to Externals
-
-
For the B2B-LDAP connection: double-click the pink dot.
-
When the Properties dialog box appears, make no changes, but click OK to set the default configuration.
-
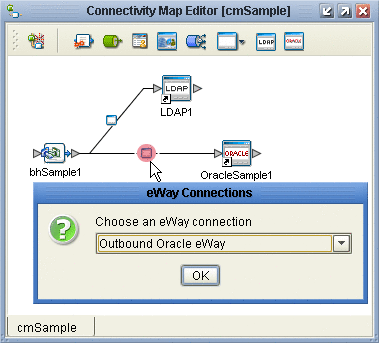
For the B2B-Oracle connection: double-click the pink dot and configure the Oracle eWay as outbound.
See Figure 4–16.
Figure 4–16 Configuring the Oracle External as Outbound
-
When the Properties dialog box appears, make no changes, but click OK to set the default configuration.
Now that the map is populated and configured, you are ready to build the B2B Host.
Building the B2B Host
These steps create, populate, and build a Deployment Profile that maps the resources named in the Connectivity Map to the resources provided in an Environment.
 To create and build the Deployment Profile for the B2B
Host
-
With the Project Explorer tab active, in the project tree, right-click the project.
-
On the context menu, point to New and click Deployment Profile.
-
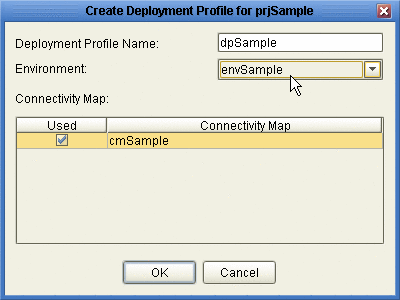
In the Create Deployment Profile dialog box, rename the deployment profile to something meaningful, point it at the correct Environment.
Make sure that it is referencing the Connectivity Map that contains the B2B Host. See Figure 4–17.
Figure 4–17 Creating the Deployment Profile for the B2B Host Project
-
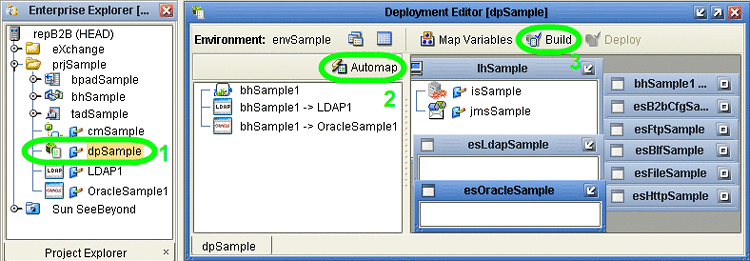
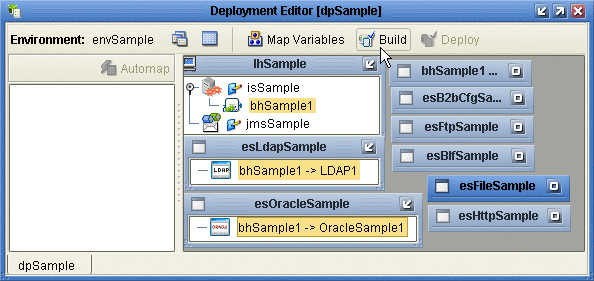
In the Deployment Editor, click Automap to map the three components to their respective external systems.
See Figure 4–18.
Figure 4–18 Deployment Profile Before Components Are Mapped to Externals
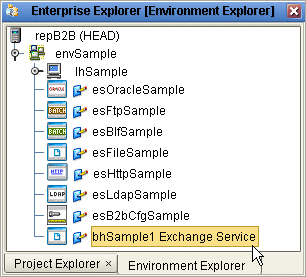
In the Environment targeted by the Deployment Profile, an eXchangeService is added that contains all the metadata of the B2B Host. See Figure 4–19.
Figure 4–19 Environment with Newly Created eXchangeService
-
Click Build.
See Figure 4–20.
Figure 4–20 Deployment Profile Build in Progress
- © 2010, Oracle Corporation and/or its affiliates
