Setting Up Attribute Definitions
This section explains how to create and configure custom attribute definitions:
Creating and Configuring TADs
In general, a protocol is a code of behavior: a framework for interpretation and communication that is agreed upon by all parties. It specifies rules for interacting with others who are using the same protocol.
A transport protocol provides a way of specifying how data is to be delivered from one system to another. For example, FTP (file transfer protocol) requires the client to specify a transfer mode (such as ASCII or binary), a target directory, a target filename or file pattern, and so forth. In eXchange Integrator, these parameters are specified by the standard transport attributions definition for FTP. eXchange Integrator supplies attribute definitions for the following standard transport protocols: BatchFTP, BatchLocalFile, File, FTP, HTTP, HTTPS, JMS, and SMTP.
In addition to the attribute definitions for the standard transport protocols noted above, you can use custom transport attribute definitions that specify custom modifications or extensions of the standard transport protocols.
 To create a custom transport attributes definition
-
In Enterprise Designer with the Project Explorer tab active, in the project tree, right-click the project or subproject where the transport attributes definition will reside.
-
On the context menu, point to New, and click B2B Transport Attributes Definition.
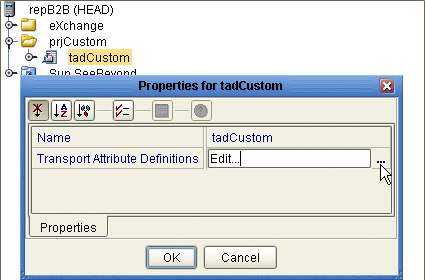
The project tree displays the new component, and a properties dialog allows you to edit the attribute definitions. See Figure 4–4. It is good practice to rename it from B2BTransportAttributesDefinition n to a meaningful short name beginning with tad to indicate that the component is a Transport Attributes Definition.
Figure 4–4 Custom Transport Attributes Definition
This new component is useful only by virtue of its configuration — you need to add and define attributes that govern the nodes in the OTD that are generated from it. Once attributes are defined, they can be exposed to eXchange Partner Manager (ePM) for delivery channel configuration.
 To configure a custom transport attributes
definition
-
In the project tree, right-click the transport attributes definition you want to modify, and click Properties, and then click Edit.
Note –If the component is locked, you must check it out before you can modify it.
-
In the properties dialog, to the far right of the value for Transport Attribute Definitions, click the ellipsis [...] button
The Attributes dialog appears. Figure 4–5 shows attributes for a sample bidirectional transport attributes definition that is a modification of the basic File TAD.
Figure 4–5 Custom Attribute Definitions
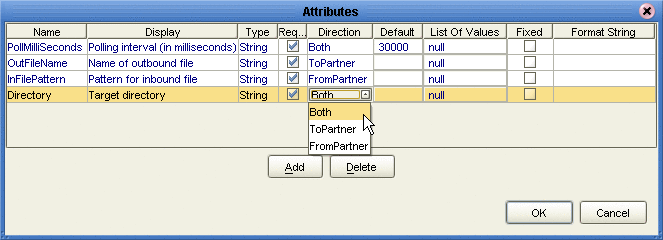
You use this dialog to create and set attributes. These values govern the appearance and behavior of the parameters displayed in ePM when configuring external delivery channels for a trading partner profile, in the ToPartner Transport and FromPartner Transport subtabs.
-
Click the Add button as many times as needed and then, for each row created:
-
Change Name to a meaningful node name for the OTD you will generate.
-
Change Display to the text you want to display as a prompt or label for the parameter in ePM.
-
For Type, select the data type for this attribute:
-
String (the default) allows the ePM user to enter any character data
-
Password accepts any ePM input, and masks the input
-
Integer accepts positive or negative whole numbers only
-
Number extends this to also accept decimal numbers (floating-point numbers)
-
Boolean requires the ePM user to make a yes-or-no choice
-
List of Values presents the ePM user with a drop-down list restricted to the items you have set up
-
DateTime prompts the ePM user to supply a date and/or time value, based on the formatting you provide
-
-
For Required, select or clear the box according to whether you want the parameter to be a required or optional entry. (In the ePM GUI, parameters that have been designated as required are flagged with a red asterisk.)
-
For Direction, choose ToPartner, FromPartner, or Both according to whether you want the parameter to appear with the ToPartner parameters, FromPartner parameters, or both.
-
For Default, you can optionally enter a default value to appear in ePM before the user enters data or makes a selection. This is the value that is used if it is not overridden by the ePM user.
-
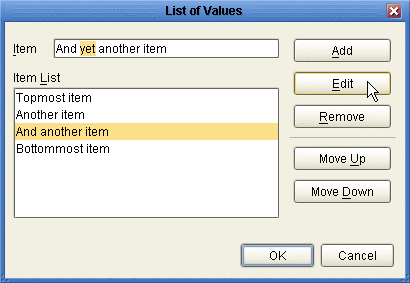
For List of Values, which is available only for an attribute whose data type is “List of Values”, double-click the ellipsis [...] button to the far right and use the List of Values dialog box to add entries to the drop-down list that is seen by the end user:
-
Add appends a new item to the end of the list
-
Edit allows you to modify the currently selected item
-
Move Up and Move Down move it higher or lower in the list. See Figure 4–6.
-
Figure 4–6 Attributes Definition - List of Values
-
Format String allows you to use special characters as shorthand for certain often-used information; for example, %f is the working filename, %M is the current month, %d the current day, and so forth. For more information, see the eWay Batch Adapter User’s Guide. The chapter on understanding OTDs has a section on using special characters.
-
-
When you have finished adding and modifying attributes, click OK.
-
Click OK to close the properties dialog.
The completed TAD can be dragged into the B2B Host. After other steps are also completed, the metadata in its attribute definitions are stored on the LDAP server, and the parameters it defines appear in eXchange Partner Manager (ePM).
Creating and Configuring DPADs
Delivery protocol attribute definitions, or DPADs, are used by delivery protocols such as AS2 and ebXML. DPADs consist of messaging attribute definitions (MADs) and packaging attribute definitions (PADs). If you do not use delivery protocols, your B2B Host does not need to define any DPADs.
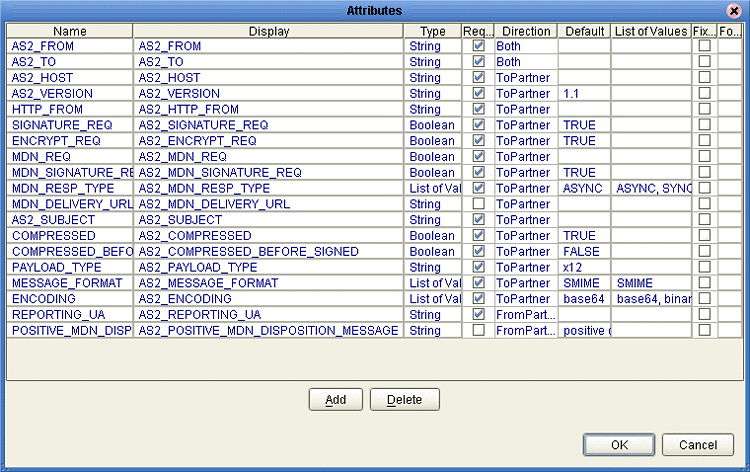
Generally, DPADs provide a way of specifying how data is bundled and unbundled — for example, in AS2 and ebXML, it is at this level that encryption, acknowledgment, and nonrepudiation are addressed. Figure 4–7 provides an example of the MAD for AS2 version 1.1.
Figure 4–7 Default Messaging Attributes Definition (MAD) for AS2 v1.1
 To create a new DPAD
-
In Enterprise Designer with the Project Explorer tab active, in the project tree, right-click the project or subproject where the DPAD will reside.
-
On the popup context menu, point to New, and click B2B Delivery Protocol Attributes Definition.
-
In the properties, enter a name (good practice is to enter a short name beginning with “dpad”, such as dpadCustom1) and click OK.
The project tree displays the new component.
This new component is useful only by virtue of its configuration — you need to add name/value pairs for the parameters you want it to define.
 To configure a DPAD
-
In Enterprise Designer, with the Project Explorer tab active, right-click the DPAD you want to modify, and then click Properties⇒Edit.
Note –If the component is locked, you must check it out before you can modify it.
-
To the far right of the value for Messaging Attribute Definitions, click the ellipsis [...] button.
The Messaging Attribute Definitions dialog appears. You use this dialog to create and set the messaging attributes.
-
Click the Add button as many times as needed and then, for each row created:
-
Change Name to a meaningful node name for the OTD you will generate.
-
Change Display to the text you want to display as a prompt or label for the parameter in ePM.
-
For Type, select the data type for this attribute:
-
String (the default) allows the ePM user to enter any character data
-
Password accepts any ePM input, and masks the input
-
Integer accepts positive or negative whole numbers only
-
Number extends this to also accept decimal numbers (floating-point numbers)
-
Boolean requires the ePM user to make a yes-or-no choice
-
List of Values presents the ePM user with a drop-down list restricted to the items you have set up
-
DateTime prompts the ePM user to supply a date and/or time value, based on the formatting you provide
-
Format String allows you to use special characters as shorthand for certain often-used information; for example, %f is the working filename, %M is the current month, %d the current day, and so forth. For more information, see the eWay Batch Adapter User’s Guide. The chapter on understanding OTDs has a section on using special characters.
-
-
For Required, select or clear the box according to whether you want the parameter to be a required or optional entry. (In the ePM GUI, parameters that have been designated as required are flagged with a red asterisk.)
-
For Direction, choose ToPartner, FromPartner, or Both according to whether you want the parameter to appear with the ToPartner parameters, FromPartner parameters, or both.
-
For Default, you can optionally enter a default value to appear in ePM before the user enters data or makes a selection. This is the value that is used if it is not overridden by the ePM user.
-
For List of Values, which is available only for an attribute whose data type is “List of Values”, double-click the ellipsis [...] button to the far right and use the List of Values dialog box to add entries to the drop-down list that is seen by the end user:
-
a new item to the end of the list
-
Edit modifies the currently selected item
-
Up and Down move it higher or lower in the list
-
-
-
When you have finished adding and modifying attributes, click OK.
-
Repeat the corresponding steps for the packaging attributes definition (PAD).
-
Click OK to close the properties dialog.
The DPAD can now be used to generate an OTD.
After you have completed these steps, the DPAD appears as a choice in the drop-down list of DPADs when you configure the delivery protocols of your B2B Host.
Creating and Configuring BPADs
Business protocol attribute definitions (BPADs) consist of business attribute definitions (BADs) and enveloping attribute definitions (EADs). BPADs are used by business protocols, such as X12, HIPAA, and EDIFACT. If you do not use business protocols, your B2B Host does not need to define any BPADs.
Generally, BADs specify business protocol parameters at the group level (that is, the inner envelope), and EADs specify business protocol parameters at the interchange level (that is, the outer envelope).
Figure 4–8 provides examples of a BAD for X12 (named “X12”) and a BAD for EDIFACT (named “EDIFACT-UNG”). The attributes in the BAD specify the label, type, and so forth of parameters that are displayed in ePM.
Figure 4–8 Default Business Attribute Definitions (BADs) for X12 and EDIFACT
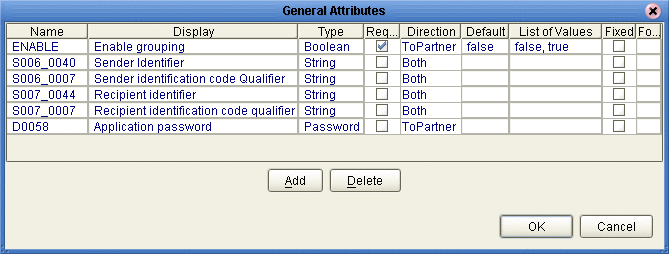
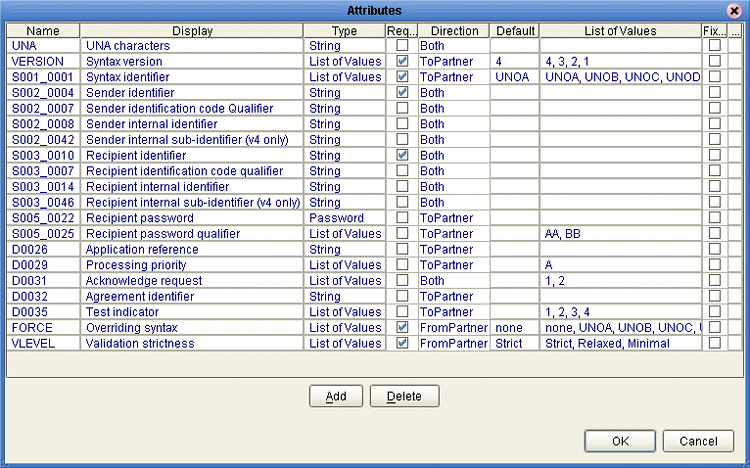
Figure 4–9 provides examples of an EAD for X12 (named “Envelope”) and an EAD for EDIFACT (named “EDIFACT-UNB”). The attributes in the EAD specify the label, type, and so forth for parameters that are displayed in ePM.
Figure 4–9 Default Enveloping Attribute Definitions (EADs) for X12 and EDIFACT
You can also create custom BPADs, either from scratch or by modifying/extending the versions shipped with X12 or HIPAA protocol managers.
 To create a BPAD
-
In Enterprise Designer with the Project Explorer tab active, in the project tree, right-click the project or subproject where the BPAD will reside.
-
On the context menu, point to New, and click B2B Business Protocol Attributes Definition.
-
In the properties, enter a name (good practice is to enter a short name beginning with “bpad”, such as bpadCustom1) and click OK.
The project tree displays the new component.
This new component is useful only by virtue of its configuration — you need to add name/value pairs for the parameters you want it to define.
 To configure a BPAD
-
In Enterprise Designer, with the Project Explorer tab active, right-click the BPAD you want to modify.
Note –If the component is locked, you must check it out before you can modify it.
-
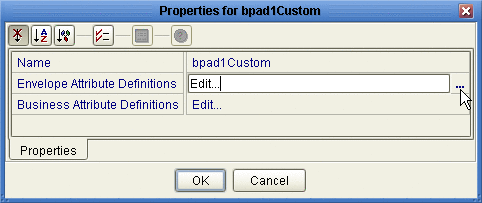
To the far right of the value for Envelope Attribute Definitions, click the ellipsis [...] button to display the Envelope Attribute Definitions dialog box.
See Figure 4–10.
Figure 4–10 Accessing a BPAD’s Envelope Attribute Definitions (EAD)
You use this dialog box to create and set the envelope attribute definitions (EAD) of the current BPAD.
-
Click the Add button as many times as needed (a four-row EAD is illustrated in Figure 4–11) and then, for each row created:
-
Change Name to a meaningful node name for the OTD you will generate.
-
Change Display to the text you want to display as a prompt or label for the parameter in ePM.
-
For Type, select the data type for this attribute:
-
String (the default) allows the ePM user to enter any character data
-
Password accepts any ePM input, and masks the input
-
Integer accepts positive or negative whole numbers only
-
Number extends this to also accept decimal numbers (floating-point numbers)
-
Boolean requires the ePM user to make a yes-or-no choice
-
List of Values presents the ePM user with a drop-down list restricted to the items you have set up
-
DateTime prompts the ePM user to supply a date and/or time value, based on the formatting you provide
-
-
For Required, select or clear the box according to whether you want the parameter to be a required or optional entry. (In the ePM GUI, parameters that have been designated as required are flagged with a red asterisk.)
-
For Direction, choose ToPartner, FromPartner, or Both according to whether you want the parameter to appear with the ToPartner parameters, FromPartner parameters, or both.
-
For Default, you can optionally enter a default value to appear in ePM before the user enters data or makes a selection. This is the value that is used if it is not overridden by the ePM user.
-
For List of Values, which is available only for an attribute whose data type is “List of Values”, double-click the ellipsis [...] button to the far right and use the List of Values dialog box to add entries to the drop-down list that is seen by the end user:
-
Add appends a new item to the end of the list
-
Edit modifies the currently selected item
-
Up and Down move it higher or lower in the list
-
-
Format String allows you to use special characters as shorthand for certain often-used information; for example, %f is the working filename, %M is the current month, %d the current day, and so forth. For more information, see the eWay Batch Adapter User’s Guide. The chapter on understanding OTDs has a section on using special characters.
-
Figure 4–11 Custom Envelope Attribute Definitions (EAD)

-
-
When you have finished adding and modifying envelope attributes, click OK.
-
Repeat the corresponding steps for the business attributes definition (BAD).
-
Click OK to close the properties dialog.
The BPAD can now be used to generate an OTD.
After you have completed these steps, the BPAD appears as a choice in the drop-down list of BPADs when you configure the delivery protocols of your B2B Host.
After you have completed these steps, activation of the B2B Host causes the BPAD parameters (that is, the ones you defined for the EAD and the BAD) to appear in ePM.
- © 2010, Oracle Corporation and/or its affiliates
