| Sun Fire X2270 Server Linux, VMware, OpenSolaris, and Solaris Operating Systems Installation Guide |
| C H A P T E R 5 |
|
Installing Solaris 10 |
This chapter provides information about installing the Solaris 10 10/08 Operating System (Solaris 10 OS) on a Sun Fire X2270 Server.
This chapter includes the following topics:
For information describing how to configure the preinstalled Solaris 10 OS image, see the Sun Fire X2270 Server Installation Guide (820-5604) for setup instructions.
Use TABLE 5-1 to preview the installation process defined as a series of tasks. The table identifies and describes the tasks required, and provides pointers to the instructions for performing that task.
|
Verify that all applicable requirements are met for installing an operating system to a Sun Fire X2270 Server. |
|||
|
Evaluate and select an installation method that meets the needs of your infrastructure. |
|||
|
Verify that the factory default settings in the BIOS are set prior to performing the operating system installation. |
|||
|
The Solaris 10 OS is shipped with the CD and DVD media and documentation that you will need to install the Solaris OS for both SPARC and x86 platforms. For a Sun Fire X2270 Server, use the media for x86 platforms. |
|
||
|
The install instructions in this chapter explain the initial steps for booting the install media and launching the Solaris installation program. For further information about installing Solaris 10 10/08, refer to the Solaris 10 Installation Guide: Basic Installations
|
|||
|
After performing the operating system installation, if applicable, install the required operating system device drivers for your system. |
The following procedure describes how to boot the Solaris Operating System installation from local or remote media. It assumes that you are booting the installation media from one of the following sources:
| Note - If you are booting the installation media from a PXE environment, refer to Installing Solaris 10 OS Using PXE Network Environment for instructions. |
Prior to performing the installation, the following requirements must be met:
Note that the following procedure explains the initial steps for booting the install media and launching the Solaris installation program. For further details about installing Solaris 10, see the Solaris 10 Installation Guide: Basic Installations
(817-0544).
After completing this procedure, you should review and perform the required post installation tasks described later in this chapter. For more details, see Post Solaris Installation Configuration.
|
1. Ensure that the install media is available to boot.
For additional information about how to set up the install media, see TABLE 1-4 Installation Boot Media.
2. Reset the power on the server.

| Note - The next events occur very quickly; therefore, focused attention is needed for the following steps. Please watch carefully for these messages as they appear on the screen for a brief time. |
3. In the BIOS power-on self-test screen, press F8 to specify a temporary boot device for the Solaris installation.
The Please Select Boot Device menu appears.

4. In the Boot Device menu, select either the external or virtual CD/ DVD device as the first (temporary) boot device, then press Enter.
In the previous sample figure, the virtual CD/DVD device is specified as the first boot device.
The device strings listed on Boot Device menu are in the format of: device type, slot indicator, and product ID string.
| Note - If you are performing the Solaris installation from the ILOM Remote Console application, you need to select (in the Boot Device menu) the AMI Virtual CDROM. |

5. In the GRUB menu, select Solaris, then press Enter.
| Note - In the GRUB menu, if you want to redirect the install output to a serial console, press “e” to edit the GRUB menu to support a serial console
(-B console=ttya). |
The system loads the Solaris disk image into memory. This process can take several minutes. When it completes, the Install Type menu appears.

6. In the Install Type menu, choose the type of interface that you want to use to perform the installation.
The system discovers and configures the devices and interfaces. If the system discovers a keyboard, the Configure Keyboard Layout menu appears.
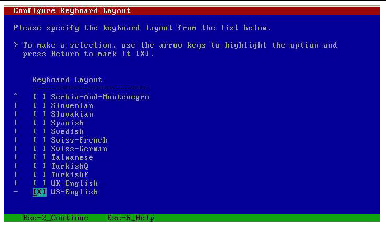
7. In the Configure Keyboard Layout menu, select the appropriate keyboard layout, then press F2 to continue.
The system configures the keyboard layout selection and searches for configuration files.
If you selected a GUI installation in the earlier steps, the next two steps (Step 8 and Step 9) confirm that the GUI is functioning. If you did not select a GUI interface earlier, skip to Step 10.
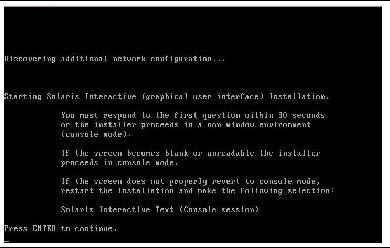
8. In the Discovering Network Configurations and Starting Solaris Interactive Installation screen, press Enter.
A second screen appears to confirm that the GUI is functioning.

9. In the screen that is confirming the text shown is legible, press Enter.
The Language Selection menu appears.
10. In the Language Selection menu, type the selected language ID number (0-9), then press Enter.
After a few moments the Solaris Welcome screen appears.
| Note - The sample screen shown below reflects the GUI installation program. If you are running a text-based installation interface, the text-based Solaris Welcome screen (not shown) will appear. |

11. In the Solaris Welcome screen, click Next to begin the installation.
The Solaris installation program will display several configuration screens.
12. Continue the normal Solaris installation and, if necessary, refer to the Solaris documentation for additional details.
After the installation completes, the system will automatically reboot (if you previously selected this option during the configuration screens) and displays the Solaris login prompt.
| Note - If you did not configure the system to automatically reboot when the installation completes, you must manually reboot the system. |
13. Proceed to the Post Solaris Installation Configuration to perform the post Solaris configuration tasks.
The following procedure describes how to boot the Solaris Operating System installation from a PXE network environment. It assumes that you are booting the installation media from one of the following sources:
 image (network repository)
The following requirements must be met prior to performing the Solaris 10 PXE installation:
For further information about setting up and installing Solaris 10 from the network, see the Solaris 10 Installation Guide: Network Installations (817-0544).
For details about creating a Solaris JumpStart image, see the Solaris 10 Installation Guide: Custom JumpStart and Advanced Installations (817-5506).
After completing the following procedure, you should review and perform the required post installation tasks described later in this chapter. For more details, see Post Solaris Installation Configuration.
|
1. Ensure that the PXE network environment is properly set up and the Solaris installation media is available for PXE boot.
For details, see the “Planning to Install From Network” sections in the Solaris 10 Installation Guide: Network Installations (817-0544).
2. Reset the power on the server:
| Note - The next events occur very quickly; therefore, focused attention is needed for the following steps. Watch carefully for these messages as they appear on the screen for a brief time. |
3. In the BIOS power-on self-test (POST) screen, press F8 to specify a temporary boot device.
The Please Select Boot Device menu appears.
4. In the Boot Device menu, select the appropriate PXE boot port, then press Enter.
The PXE boot port is the physical network port configured to communicate with your network install server.
Note that the options listed on the following sample Boot Device menu might differ from the options shown on your Boot Device menu.

5. In the GRUB menu, select Solaris, then press Enter.
| Note - In the GRUB menu, if you want to redirect the install output to a serial console, press “e” to edit the GRUB menu to support a serial console
(-B console=ttya). |
The system loads the Solaris disk image into memory. This process might take several minutes. When it completes, the Install Type menu appears.

6. In the Install Type menu, choose the type of interface that you want to use to perform the installation.
The system discovers and configures the devices and interfaces. If the system discovers a keyboard, the Configure Keyboard Layout menu appears.

7. In the Configure Keyboard Layout menu, select the appropriate keyboard layout, then press F2 to continue.
The system configures the keyboard layout selection and searches for configuration files.
If you selected a GUI installation in the earlier steps, the next two steps (Step 8 and Step 9) confirm that the GUI is functioning. If you did not select a GUI interface earlier, skip to Step 10.

8. In the Discovering Network Configurations and Starting Solaris Interactive Installation screen, press Enter.
A second screen appears to confirm that the GUI is functioning.

9. In the screen that is confirming the text shown is legible, press Enter.
The Language Selection menu appears.
10. In the Language Selection menu, type the selected language ID number (0-9), then press Enter.
After a few moments the Solaris Welcome screen appears.
| Note - The sample screen shown below reflects the GUI installation program. If you are running a text-based installation interface, the text-based Solaris Welcome screen (not shown) will appear. |

11. In the Solaris Welcome screen, click Next to begin the installation.
If you preconfigured all of the system information, the installation program does not prompt you to enter any configuration information. If you did not preconfigure all the system information, the installation program prompts you for this information on several configuration screens.
12. Continue the normal Solaris installation and, if necessary, refer to the Solaris documentation for additional details.
After the installation completes, the system will automatically reboot (if you previously selected this option during the configuration screens) and displays the Solaris login prompt.
| Note - If you did not configure the system to automatically reboot when the installation completes, you must manually reboot the system. |
13. Proceed to the Post Solaris Installation Configuration to perform the post Solaris configuration tasks.
After completing the Solaris installation and rebooting the Solaris Operating System, you should perform the following tasks:
TABLE 5-2 identifies system device drivers that are available for you to install on your system. Review this table to determine which driver, if any, are currently required for installation on your system.
The following requirements must be met prior to installing the driver(s) on your system.
The Sun Fire X2270 Server Tools & Drivers CD is provided in the Documentation and Media Kit, which is a customer orderable option. If necessary, you can also download an ISO image of the Tools & Drivers CD at: http://www.sun.com/servers/x64/x2270/downloads.jsp.
| Note - This installation method includes directing the server output to the local console or to the Sun ILOM Remote Console when a local or remote CD/DVD drive is used. For more information about redirecting devices to the Sun ILOM Remote Console, see Installation Boot Media. |
|
If your server has an on-board CD/DVD drive or an attached CD/DVD drive, you can install the drivers directly, using the Tools & Drivers CD.
2. Change to the mounted CD/DVD directory by typing the following command:
# cd <mount_point>/drivers/solaris/sx86
3. Run the install script by typing the following command:
The system device driver(s) are now installed. The script prompts you to reboot the system for changes to take effect.
4. Reboot the Sun Fire X2270 Server.
|
Alternately, if your server does not contain an SP, you can install device drivers from a shared network location or from a locally attached USB device. To install the device drivers, perform the following steps:
1. If you have not already downloaded the file, download the sx86.zip file from the Sun download web site.
Download and unzip the contents of the sx86.zip file to a USB flash device or shared network location that will be accessible during the installation.
2. Change to the mounted USB device or shared network location by typing the following command:
3. Run the install script by typing the following command:
The system device driver(s) are now installed. The script prompts you to reboot the system for changes to take effect.
4. Reboot the Sun Fire X2270 Server.
TABLE 5-3 identifies the critical Solaris patches available to install on your system. You should review this table to determine which patch, if any, are currently required for installation on your system.
| Sun Fire X2270 Server Linux, VMware, OpenSolaris, and Solaris Operating Systems Installation Guide | 820-5606-12 |
Copyright © 2009 Sun Microsystems, Inc. All rights reserved.
 I
I