|
| |
| Sun Java System Web Proxy Server 4 Administrator's Guide | |
Chapter 12
CachingThis chapter describes how Proxy Server caches documents. It also describes how you can configure the cache by using the online pages.
This chapter contains the following sections:
How Caching WorksCaching reduces network traffic and offers faster response time for clients who are using the proxy server instead of going directly to remote servers.
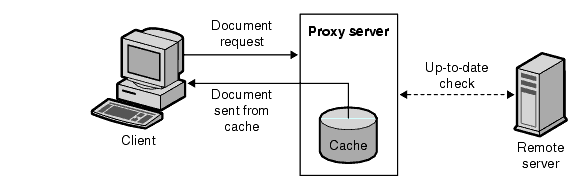
When a client requests a web page or document from the proxy server, the proxy server copies the document from the remote server to its local cache directory structure while sending the document to the client.
When a client requests a document that was previously requested and copied into the proxy cache, the proxy returns the document from the cache instead of retrieving the document from the remote server again (see Figure 12-1). If the proxy determines the file is not up to date, it refreshes the document from the remote server and updates its cache before sending it to the client.
Figure 12-1 Proxy Document Retrieval
Files in the cache are automatically maintained by the Proxy Server garbage collection utility (CacheGC). The CacheGC automatically cleans the cache on a regular basis to ensure that the cache does not get cluttered with out-of-date documents.
Understanding the Cache StructureA cache consists of one or more partitions. Conceptually, a partition is a storage area on a disk that you set aside for caching. If you wish to have your cache span several disks, you need to configure at least one cache partition for each disk. Each partition can be independently administered. In other words, you can enable, disable, and configure a partition independently of all other partitions.
Storing a large number of cached files in a single location can slow performance; therefore, it is a good idea to create several directories, or sections, in each partition. Sections are the next level under partitions in the cache structure. You can have up to 256 sections in your cache across all partitions. The number of cache sections must be a power of 2 (for example, 1, 2, 4, 8, 16, ..., 256).
The final level in the cache structure hierarchy is the subsection. Subsections are directories within sections. Each section has 64 subsections. Cached files are stored in the subsections which is the lowest level in your cache.
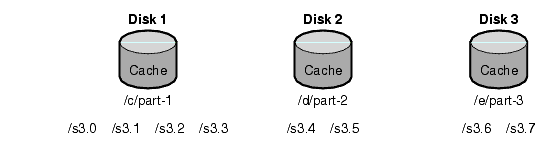
Figure 12-2 shows an example cache structure with partitions and sections. In this figure, the cache directory structure divides the total cache into three partitions. The first partition contains four cache sections, and the second two partitions each contain two sections.
Each cache section is noted by s for section, and then a section number. For the section shown as s3.4, the 3 indicates the power of 2 for the number of cache sections (23 = 8), and the 4 means the number for the section (for the 8 sections labeled 0 through 7). Therefore, s3.4 means section 5 of 8.
Figure 12-2 Example of a Cache Structure
Distributing Files in the CacheThe Proxy Server uses a specific algorithm to determine the directory where a document should be stored. This algorithm ensures equal distribution of documents in the directories. Equal distribution is important because directories with large numbers of documents tend to cause performance problems.
The Proxy Server uses the RSA MD5 algorithm (Message Digest 5) to reduce the URL to 16 bytes of binary data and uses 8 bytes of this data to calculate a 16-character hexadecimal file name that is used to store the document in the cache.
Setting Cache SpecificsYou can enable caching and control which types of protocols your Proxy Server will cache by setting the cache specifics. Cache specifics include the following items:
- Whether your cache is enabled or disabled
- The working directory where it stores its temporary files
- The name of the directory in which you will record the cached URLs
- The size of the cache
- The capacity of the cache
- What types of protocols will be cached
- When to refresh a cached document
- Whether the proxy should track the number of times a document is accessed and report it back to the remote server
To set cache specifics
- Access the Server Manager, and click the Caching tab.
- Click the Set Cache Specifics link. The Set Cache Specifics page displays.
- You can enable or disable the cache by selecting the appropriate option. The cache is enabled by default. For more information, see Enabling the Cache.
- Enter the working directory. By default the working directory is present under the proxy instance. This can be changed if you want the cache directory in a different location. For more information, see Creating a Cache Working Directory.
- Click the partition configuration link . The Add/Edit Cache Partitions page displays. You can add a new cache partition or edit existing cache paritions. Cache size is the maximum size the cache is allowed to grow. The maximum cache size is 32GB. For more information, see Setting Cache Size.
- Click the cache capacity configuration link. The Set Cache Capacity page displays. You can set the cache capacity on the Set Cache Capacity page. For more information, see Editing Cache Capacity.
- Select the Cache HTTP check box to enable caching of HTTP documents. If you decide that you want your proxy server to cache HTTP documents, you need to determine whether it should always do an up -to-date check for the documents in the cache or if it should check based on an interval. You can also enable or disable the Proxy Server from reporting cache hits to the remote server. For more information, see Caching HTTP Documents. The options include the following:
- Select the Always Check That The Document Is Up To Date option to ensure that the HTTP document is always up-to- date.
- Select the number of hours from the Check Only If Last Check More Than drop-down list to specify the refresh interval for the proxy server. The up-to-date check is performed using any one of the following options:
- Select the Never Report Accesses To Remote Server option to prevent the proxy server from reporting the number of accesses to the remote server.
- Select the Report Cache Hits To Remote Server option to track the number of times a document was accessed and report it back to the remote server.
- You can set the refresh interval for cached FTP documents. Select the Yes; Reload If Older Than checkbox and also set the time interval by selecting the value from the drop-down list. For more information, see Caching FTP and Gopher Documents.
- You can set the refresh interval for cached Gopher documents. Select the Yes; Reload If Older Than checkbox and also set the time interval by selecting the value from the drop-down list. For more information, see Caching FTP and Gopher Documents.
- Click OK.
- Click Restart required. The Apply Changes page displays.
- Click the Restart Proxy Server button to apply the changes.
The following sections provide more information about the elements listed on the Set Cache Specifics page and will help you determine which settings will best suit your needs.
Enabling the Cache
Caching is an effective way to reduce network traffic for users of the proxy server. Caching also offers a faster response time for clients by eliminating the need to retrieve a document from a remote server. Your proxy server will function most effectively whenever caching is enabled.
Creating a Cache Working Directory
The cache files are under cache partitions. The working directory you specify on the Set Cache Specifics page is often the parent directory for the cache. All cached files appear in an organized directory structure under the caching directory. If you change the cache directory name or move it to another location, you have to tell the proxy the new location.
You can extend the cache directory structure to multiple file systems so that you can have a large cache structure divided on multiple smaller disks instead of keeping it all on one large disk. Each proxy server must have its own cache directory structure—that is, cache directories cannot be concurrently shared by multiple proxy servers.
Setting Cache Size
The cache size indicates the partition size. Cache size should always be lesser than the cache capacity as it is the maximum size to which the cache can grow. The sum of all the partition sizes must be less than or equal to the cache size.
The amount of disk space available for the proxy cache has a considerable effect on cache performance. If the cache is too small, the Cache GC must remove cached documents to make room on the disk more often, and documents must be retrieved from content servers more often; therefore slowing performance.
Large cache sizes are best because the more cached documents, the less the network traffic load and the faster the response time the proxy provides. Also, the GC removes cached documents if users no longer need them. Barring any file system limitations, cache size can never be too large; the excess space simply remains unused.
You can also have the cache split on multiple disk partitions.
Editing Cache Capacity
You can edit the cache capacity through the Set Cache Specifics page as well as on the Set Cache Capacity page. For more information on editing the cache capacity, see Setting Cache Capacity.
Caching HTTP Documents
Internally, caching HTTP documents differs from caching FTP and Gopher documents. HTTP documents offer caching features that documents of the other protocols do not. However, by setting up and configuring the cache properly, you can ensure that your Proxy Server will cache HTTP, FTP, and Gopher documents effectively.
All HTTP documents have a descriptive header section that the Proxy Server uses to compare and evaluate the document in the proxy cache and the document on the remote server. When the proxy does an up-to-date check on an HTTP document, the proxy sends one request to the server that tells the server to return the document if the version in the cache is out of date. Often, the document has not changed since the last request and therefore is not transferred. This method of checking to see if an HTTP document is up-to-date saves bandwidth and decreases latency.
To reduce transactions with remote servers, the Proxy Server allows you to set a Cache Expiration setting for HTTP documents. The Cache Expiration setting tells the proxy to estimate if the HTTP document needs an up-to-date check before sending the request to the server. The proxy makes this estimate based on the HTTP document’s Last-Modified date found in the header.
With HTTP documents, you can also use a Cache Refresh setting. This option specifies whether the proxy always does an up-to-date check (which would override an Expiration setting) or if the proxy waits a specific period of time before doing a check. Table # shows what the proxy does if both an Expiration setting and a Refresh setting are specified. Using the Refresh setting decreases latency and saves bandwidth considerably.
* Using the smaller value guards against getting stale data from the cache for documents that change frequently.
Setting the HTTP Cache Refresh Interval
If you decide that you want your Proxy Server to cache HTTP documents, you need to determine whether it should always do an up-to-date check for documents in the cache or if it should check based on a Cache Refresh setting (up-to-date check interval). For HTTP documents, a reasonable refresh interval would be four to eight hours, for example. The longer the refresh interval, the fewer the number of times the proxy connects with remote servers. Even though the proxy does not do up-to-date checking during the refresh interval, users can force a refresh by clicking the Reload button in the client; this action makes the proxy force an up-to-date check with the remote server.
You can set the refresh interval for HTTP documents on either the Set Cache Specifics page or the Set Caching Configuration page. The Set Cache Specifics page allows you to configure global caching procedures, and the Set Caching Configuration page allows you to control caching procedures for specific URLs and resources.
Setting the HTTP Cache Expiration Policy
You can also set up your server to check if the cached document is up-to-date by using a last-modified factor or explicit expiration information only.
Explicit expiration information is a header found in some HTTP documents that specifies the date and time when that file will become outdated. Not many HTTP documents use explicit Expires headers, so it is better to estimate based on the Last-modified header.
If you decide to have your HTTP documents cached based upon the Last-modified header, you need to select a fraction to use in the expiration estimation. This fraction, known as the LM factor, is multiplied by the interval between the last modification and the time that the last up-to-date check was performed on the document. The resulting number is compared with the time since the last up-to-date check. If the number is smaller than the time interval, the document is not expired. Smaller fractions make the proxy check documents more often. For example, suppose you have a document that was last changed ten days ago. If you set the last-modified factor to 0.1, the proxy interprets the factor to mean that the document is probably going to remain unchanged for one day (10 * 0.1 = 1). The proxy would, in that case, return the document from the cache if the document was checked less than a day ago.
In this same example, if the cache refresh setting for HTTP documents is set to less than one day, the proxy does the up-to-date check more than once a day. The proxy always uses the value (cache refresh or cache expiration) that requires that it update the files more frequently.
You can set the expiration setting for HTTP documents on either the Set Cache Specifics page or the Set Caching Configuration page. The Set Cache Specifics page allows you to configure global caching procedures and the Set Caching Configuration page allows you to control caching procedures, for specific URLs and resources.
Reporting HTTP Accesses to the Remote Server
When a document is cached by Proxy Server, it can be accessed many times before it is refreshed again. For the remote server, sending one copy to the proxy that will cache it represents only one access, or “hit.” Proxy Server can count how many times a given document is accessed from the proxy cache between up-to-date checks and then send that hit count back to the remote server in an additional HTTP request header (Cache-Info) the next time the document is refreshed. This way, if the remote server is configured to recognize this type of header, it receives a more accurate account of how many times a document is accessed.
Caching FTP and Gopher Documents
FTP and Gopher do not include a method for checking to see if a document is up-to-date. Therefore, the only way to optimize caching for FTP and Gopher documents is to set a Cache Refresh interval. The Cache Refresh interval is the amount of time the Proxy Server waits before retrieving the latest version of the document from the remote server. If you do not set a Cache Refresh interval, the proxy will retrieve these documents even if the versions in the cache are up-to-date.
Setting FTP and Gopher Cache Refresh Intervals
If you are setting a cache refresh interval for FTP and Gopher, choose one that you consider safe for the documents the proxy gets. For example, if you store information that rarely changes, use a high number (several days). If the data changes constantly, you will want the files to be retrieved at least every few hours. During the refresh time, you risk sending an out-of-date file to the client. If the interval is short enough (a few hours), you eliminate most of this risk while getting noticeably faster response time.
You can set the cache refresh interval for FTP and Gopher documents on either the Set Cache Specifics page or the Set Caching Configuration page. The Set Cache Specifics page allows you to configure global caching procedures, and the Set Caching Configuration page allows you to control caching procedures for specific URLs and resources. For more information on using the Set Cache Specifics page, see Setting Cache Specifics, and for more information on using the Set Caching Configuration page, see Configuring the Cache.
Creating and Modifying a CacheCache partitions are reserved parts of disks or memory that are set aside for caching purposes. If your caching capacity changes, you may want to change or add partitions using the Add/Edit Cache Partitions page. From this page, you can edit a partition’s location, mnemonic name, and maximum and minimum sizes. You can also view the cache section table for that partition.
To add cache partitions
- Access the Server Manager, and click the Caching tab.
- Click the Add/Edit Cache Partitions link. ThAdd/Edit Cache Partitions page displays.
- Click the Add Cache Partition button. The Cache Partition Configuration page displays.
- Enter the appropriate values for the new partition.
- Click OK.
- Click Restart Required. The Apply changes page displays.
- Click Restart Proxy Server button to apply the changes
To modify cache partitions
- Access the Server Manager, and click the Caching tab.
- Click the Add/Edit Cache Partitions link. ThAdd/Edit Cache Partitions page displays.
- Click on the name of the partition that you would like to change.
- Edit the information.
- Click OK.
- Click Restart Required. The Apply Changes page displays.
- Click the Restart Proxy Server button to apply the changes.
Setting Cache CapacityCache capacity value is used to derive the cache directory structure. The number of sections that can be in the cache directory is derived from the cache capacity. Cache capacity is directly related to the cache hierarchy in the cache directories. The bigger the capacity, the larger the hierarchy. The cache capacity should be equal to or greater than the cache size. Setting the capacity larger than the cache size can be helpful if you know that you plan to increase the cache size later (such as by adding an external disk). The cache capacity can be of maximum 32 GB which will create 256 sections.
To set the cache capacity
- Access the Server Manager, and click the Caching tab.
- Click the Set Cache Capacity link. The Set Cache Capacity page displays.
- Choose a capacity from the New Capacity Range drop-down list.
- Click OK.
- Click Restart Required. The Apply Changes page displays.
- Click the Restart Proxy Server button to apply the changes.
Managing Cache SectionsThe proxy cache is separated into one or more cache sections. You can have up to 256 sections. The number of cache sections must be a power of two (for example, 1, 2, 4, 8, 16, ..., 256). The largest capacity is 32GB (optimum) with 256 cache sections.
If you pick a cache capacity of 500MB, the installer will create 4 cache sections (500 ÷ 125 = 4); if you choose a cache capacity of 2GB, the installer creates 16 sections (2000 ÷ 125 = 16). 125MB is chosen as an optimum value for each section to get the number of sections. More the number of sections larger the number of URLs stored and distributed across.
To manage cache sections
- Access the Server Manager, and click the Caching tab.
- Click the Manage Sections link. The Manage Sections page displays.
- Change the information in the table. The sections can be moved among existing partitions.
- Click OK.
- Click Restart Required. The Apply Changes page displays.
- Click the Restart Proxy Server button to apply the changes.
Setting the Garbage Collection PreferencesThe Set Garbage Collection Preferences page is used to set the garbage collection mode.
You can use the cache garbage collector to deletes files from the cache. Garbage collection can be done in either the automatic mode or the explicit mode. The explicit mode is externally scheduled by the administrator using the Schedule Garbage Collection page. Select one of the modes and click OK. Click Restart Required. The Apply Changes page displays. Click the Restart Proxy Server button to apply the changes.
Scheduling Garbage CollectionThe Schedule Garbage Collection page allows you to specify the days and time when garbage collection will take place.
To schedule garbage collection:
- Access the Server Manager, and click the Caching tab.
- Click the Schedule Garbage Collection link. The Schedule Garbage Collection displays.
- Select the time at which garbage collection will occur from the Schedule Garbage Collection At list.
- Specify the day of the week on which garbage collection will occur.
- Click OK.
- Click Restart Required. The Apply Changes page displays.
- Click the Restart Proxy Server button to apply the changes.
Configuring the CacheYou can configure the kind of caching you want for specific resources, using the Set Caching Configuration page. You can specify several configuration parameter values for URLs matching the regular expression pattern that you specify. This feature gives you fine control of the proxy cache, based on the type of document cached. Configuring the cache can include identifying the following items:
- The cache default
- How to cache pages that require authentication
- How to cache queries
- The minimum and maximum cache file sizes
- When to refresh a cached document
- The cache expiration policy
- The caching behavior for client interruptions
- The caching behavior for failed connections to origin servers
To configure the cache
- Access the Server Manager, and click the Caching tab.
- Click the Set Caching Configuration page. The Set Caching Configuration page displays.
- Select the resource from the drop-down list or click the Regular Expression button, enter a regular expression, and click OK.
- Change the configuration information.
- Click OK.
- Click Restart Required. The Apply Changes page displays.
- Click the Restart Proxy Server button to apply the changes.
Caching Configuration Elements
The following sections describe the items listed on the Set Caching Configuration page. These sections include information that will help you to determine which configuration will best suit your needs.
Setting the Cache Default
The proxy server allows you to identify a cache default for specific resources. A resource is a type of file that matches certain criteria that you specify. For instance, you may want your server to automatically cache all documents from the domain company.com. If so, click the Regular Expression button on the top of the Set Caching Configuration page and, in the field that appears, enter
[a-z] *://[^/:]\.company\.com.*.
By default, the Cache option is selected. Your server automatically caches all cacheable documents from that domain. For more information on regular expressions, see Understanding Regular Expressions.
Note
If you set the cache default for a particular resource to either Derived configuration or Don’t cache, it is not necessary to configure the cache for that resource. However, if you choose a cache default of Cache for a resource, you can specify several other configuration items. For a list of these items, see Configuring the Cache.
The cache default for HTTP, FTP, and Gopher can also be set on the Set Cache Specifics page.
Caching Pages That Require Authentication
You can have your server cache files that require user authentication. If you choose to have your Proxy Server cache these files, it tags the files in the cache so that if a user asks for them, it knows that the files require authentication from the remote server.
Because the proxy server does not know how remote servers authenticate and it does not know users’ IDs or passwords, it will simply force an up-to-date check with the remote server each time a request is made for a document that requires authentication. The user therefore must enter an ID and password to gain access to the file. If the user has already accessed that server earlier in the Navigator session, Navigator automatically sends the authentication information without prompting the user for it.
If you do not enable the caching of pages that require authentication, the proxy assumes the default, which is to not cache them.
Caching Queries
Cached queries only work with HTTP documents. You can limit the length of queries that are cached, or you can completely inhibit caching of queries. The longer the query, the less likely it is to be repeated, and the less useful it is to cache.
These caching restrictions apply for queries: the access method has to be GET, the document must not be protected (unless caching of authenticated pages is enabled), and the response must have at least a Last-modified header. This requires the query engine to indicate that the query result document can be cached. If the Last-modified header is present, the query engine should support a conditional GET method (with an If-modified-since header) in order to make caching effective; otherwise it should return an Expires header.
Setting Minimum and Maximum Cache File Sizes
You can set the minimum and maximum sizes for files cached by your Proxy Server. You may want to set a minimum size if you have a fast network connection. If your connection is fast, small files may be retrieved so quickly that it is not necessary for the server to cache them. In this instance, you would want to cache only larger files. You may want to set a maximum file size to make sure that large files do not occupy too much of your proxy’s disk space.
Setting the Up-to-date Checking Policy
You can use this option to ensure that the HTTP document is always up-to- date. You can also specify the refresh interval for the Proxy Server.
Setting Expiration Policy
You can set the Expiration Policy using the last modified factor or the explicit expiration information.
Setting Cache Behavior for Client Interruptions
If a document is only partly retrieved and the client interrupts the data transfer, the proxy has the ability to finish retrieving the document for the purpose of caching it. The proxy’s default is to finish retrieving a document for caching if at least 25 percent of it has already been retrieved. Otherwise, the proxy terminates the remote server connection and removes the partial file. You can raise or lower the client interruption percentage.
Behaviour On Failure To Connect To Server
If an up-to-date check on a stale document fails because the origin server is unreachable, you can specify whether the proxy sends the stale document from the cache.
Caching Local HostsIf a URL requested from a local host lacks a domain name, the Proxy Server will not cache it in order to avoid duplicate caching. For example, if a user requests http://machine/filename.html and http://machine.example.com/filename.html from a local server, both URLs might appear in the cache. Because these files are from a local server, they may be retrieved so quickly that it is not necessary to cache them anyway.
However, if your company has servers in many remote locations, you may want to cache documents from all hosts to reduce network traffic and decrease the time needed to access the files.
To enable the caching of local hosts
- Access the Server Manager, and click the Caching tab.
- Click the Cache Local Hosts link. The Cache Local Hosts page displays.
- Select the resource from the drop-down list or click the Regular Expression button, enter a regular expression, and click OK.For more information on regular expressions, see .Managing Templates and Resources..
- Click the enabled button.
- Click OK.
- Click Restart Required. The Apply Changes page displays.
- Click the Restart Proxy Server button to apply the changes.
Configuring the File CacheThe file cache is turned on by default. The file cache settings are contained in the server.xml file. You can use the Server Manager to change the file cache settings.
Note
The Configure File Cache page displays in the user interface but is not implemented in this release of Proxy Server 4
To configure the file cache
- From the Server Manager, click the Preferences tab.
- Click the File Cache Configuration link. The File Cache Configuration page displays.
- Select Enable File Cache, if not already selected.
- Choose whether to transmit files.
When you enable Transmit File, the server caches open file descriptors for files in the file cache, rather than the file contents, and PR_TransmitFile is used to send the file contents to a client. When Transmit File is enabled, the distinction normally made by the file cache between small, medium, and large files no longer applies, since only the open file descriptor is being cached. By default, Transmit File is enabled on Windows, and disabled on UNIX. On UNIX, only enable Transmit File for platforms that have native OS support for PR_TransmitFile, which currently includes HP-UX and AIX. It is not recommended for other UNIX/Linux platforms.
- Enter a size for the hash table.The default size is twice the maximum number of files plus 1. For example, if your maximum number of files is set to 1024, the default hash table size is 2049.
- Enter a maximum age in seconds for a valid cache entry. By default, this is set to 30. This setting controls how long cached information will continue to be used once a file has been cached. An entry older than MaxAge is replaced by a new entry for the same file, if the same file is referenced through the cache. Set the maximum age based on whether the content is updated (existing files are modified) on a regular schedule. For example, if content is updated four times a day at regular intervals, you could set the maximum age to 21600 seconds (6 hours). Otherwise, consider setting the maximum age to the longest time you are willing to serve the previous version of a content file after the file has been modified.
- Enter the Maximum Number of Files to be cached. By default, this is set to 1024.
- Enter medium and small file size limits in bytes. By default, the Medium File Size Limit is set to 537600. By default, the Small File Size Limit is set to 2048.
The cache treats small, medium, and large files differently. The contents of medium files are cached by mapping the file into virtual memory (currently only on UNIX/Linux platforms). The contents of small files are cached by allocating heap space and reading the file into it. The contents of large files (larger than medium) are not cached, although information about large files is cached. The advantage of distinguishing between small files and medium files is to avoid wasting part of many pages of virtual memory when there are lots of small files. So the Small File Size Limit is typically a slightly lower value than the VM page size.
- Set the medium and small file space. The medium file space is the size in bytes of the virtual memory used to map all medium sized files. By default, this is set to 10485760. The small file space is the size of heap space in bytes used for the cache, including heap space used to cache small files. By default, this is set to 1048576 for UNIX/Linux.
- Click OK.
- Click Restart Required. The Apply Changes page displays.
- Click the Restart Proxy Server button to apply the changes.
Viewing the URL DatabaseYou can view the names and attributes of all recorded cached URLs. The URL information displayed is a list of cached documents grouped by access protocol and site name. You can limit the URLs you view in the list by typing a domain name into the Search field. By accessing this information, you can perform various cache management functions such as expiring and removing documents from the cache.
To view the URLs in the database
- Access the Server Manager, and click the Caching tab.
- Click the View URL Database link. The View URL Database page displays.
- Click the Regenerate button to generate a current list of cached URLs. If you would like to view the information for a specific URL, enter a URL or regular expression in the Search field and click the Search button.
- If you would like to view cache database information grouped by domain name and host, select a domain name from the list. A list of hosts in that domain appears. Click the name of a host and a list of URLs appears.
- Click on the name of a URL. Detailed information about that URL appears.
Expiring and Removing Files from the Cache
From the View URL Database page you can expire and remove documents from the cache.
To expire or remove cached URLs
- Access the Server Manager, and click the Caching tab.
- Click the View URL Database link. The View URL Database page displays.
- Click the Regenerate button. It generates a snapshot of the cache database. This snapshot forms the basis for the remaining steps.
- If you know of a specific URL that you would like to expire or remove, enter that URL or a regular expression that matches that URL in the Search field and click the Search button. If you would like to work with URLs grouped by domain name and host, select a domain name from the list. A list of hosts in that domain appears. Click on the name of a host and a list of URLs appears.
- To expire individual files, select the Ex option next to the URLs for those files and click the Exp/Rem Marked button. To expire all of the files in the list, click the Exp All button on the bottom of the form. To remove individual files from the cache, select the Rm option next to the URLs for those files and click the Exp/Rem Marked button. To remove all of the files in the list, click the Rem All button.
Using Cache Batch UpdatesThe Cache Batch Update feature allows you to pre-load files in a specified web site or do an up-to-date check on documents already in the cache whenever the proxy server is not busy. From the Set Cache Batch Updates page, you can create, edit, and delete batches of URLs and enable and disable batch updating.
Creating Batch Updates
You can actively (as opposed to on-demand) cache files by specifying files to be batch updated. The proxy server allows you to perform an up-to-date check on several files currently in the cache or pre-load multiple files in a particular web site.
To create a batch update
- Access the Server Manager, and click the Caching tab.
- Click the Set Cache Batch Updates link. The Set Cache Batch Updates page displays.
- Select New and Create from the drop-down lists next to Create/Select a Batch Update Configuration.
- Click OK. The Set Cache Batch Updates page displays.
- In the Name section, enter a name for the new batch update entry.
- In the Source section of the page, click the radio button for the type of batch update that you want to create. Click the first radio button if you want to perform an up-to-date check on all documents in the cache. Click the second radio button if you want to cache URLs recursively starting from the given source URL.
- In the Source section fields, identify the documents that you want to use in the batch update.
- In the Exceptions section, identify any files that you would like to exclude from the batch update.
- In the Resources section, enter the maximum number of simultaneous connections and the maximum number of documents to traverse.
- In the Timing section, enter the start and end times for the generation of the batch update. Only one batch update can be active at any time, so it is best to not overlap other batch update configurations.
- Click OK.
- Click Restart Required. The Apply Changes page displays.
- Click the Restart Proxy Server button to apply the changes.
Editing or Deleting Batch Update Configurations
You can edit or delete batch updates using the Set Cache Batch Updates page. You may want to edit a batch update if you need to exclude certain files or want to update the batch more frequently. You may also want to delete a batch update configuration completely.
To edit or delete a batch update configuration
- Access the Server Manager, and click the Caching tab.
- Click the Set Cache Batch Updates link. The Set Cache Batch Updates page displays.
- If you want to edit a batch, select the name of that batch and “Edit” from the drop-down lists next to Create/Select a Batch Update Configuration. If you want to delete a batch, select the name of that batch and “Delete” from the drop-down lists.
- Click OK. The Set Cache Batch Updates page displays.
- Modify the information as you wish.
- Click OK.
- Click Restart Required. The Apply Changes page displays.
- Click the Restart Proxy Server button to apply the changes.
Using the Cache Command Line InterfaceThe proxy server comes with several command line utilities that let you configure, change, generate, and repair your cache directory structure. Most of these utilities are duplications of the Server Manager pages, but you might want to use the utilities if you need to schedule the maintenance (for example, as a cron job). All of the utilities are located in the extras directory.
To run the command line utilities
Building the Cache Directory Structure
The proxy has a utility called cbuild which is an offline cache database manager. This utility allows you create a new cache structure or modify an existing cache structure using the command-line interface. You can use the Server Manager pages to enable the proxy to use the newly created cache.The utility does not update the server.xml file. cbuild cannot resize a cache that has multiple partitions. The server.xml file has a element called CACHE that has a cachecapacity parameter. When the cache is created or modified by cbuild, the cachecapacity parameter should be manually updated in the server.xml file.
<PARTITION partitionname="part1" partitiondir="/home/build/install9
/proxy-server1/cache" maxsize="1600" minspace="5" enabled="true"/>
<CACHE enabled="true" cachecapacity="2000" cachedir="/tmp/cache">
You can invoke the cbuild utility in two modes. The first mode is:
cbuild -d conf-dir -c cache-dir -s cache size
cbuild -d conf-dir -c cache-dir -s cache size -r
For example:
cbuild -d server_root/proxy-serverid/config -c server_root/proxy-serverid/cache -s 512
cbuild -d server_root/proxy-serverid/config -c server_root/proxy-serverid/cache -s 512 -r
where:
- conf-dir is the configuration directory of the proxy instance. It is located in the following path server_root/proxy-serverid/config.
- cache-dir is the directory for your cache structure.
- cache size is the maximum size to which the cache can grow This option cannot be used along with the cache-dim parameter. The maximum size is 65135 MB.
- -r resizes an existing cache structure provided it has a single partition. This is not required for creating a new cache.
The second mode you can run cbuild is:
cbuild -d conf-dir -c cache-dir -n cache-dim
cbuild -d conf-dir -c cache-dir -n cache-dim -r
For example:
cbuild -d server_root/proxy-serverid/config -c server_root/proxy-serverid/cache -n 3
cbuild -d server_root/proxy-serverid/config -c server_root/proxy-serverid/cache -n 3 -r
where:
- conf-dir is the configuration directory of the proxy instance. It is located in the following path server_root/proxy-serverid/config.
- cache-dir is the directory for your cache structure.
- cache-dim determines the the number of sections. For example, in Figure 12-1 the section shown as s3.4, the 3 indicates the the dimension. The default value of cache-dim is 0 and the maximum value is 8.
- -r resizes an existing cache structure provided it has a single partition. This is not required for creating a new cache.
Managing the Cache URL List
The proxy has a utility called urldb that manages the URL list in the cache. You can use this utility to list the URLs that are cached. You can also selectively expire and remove cached objects from the cache database.
The urldb commands can be categorised into three groups based on the -o option:
To list domains, enter the following at the command line:
urldb -o matching_domains -e reg_exp -d conf-dir
For example:
urldb -o matching_domains -e “.*phoenix.*” -d server_root/proxy-serverid/config
where
To list all the matching sites in a domain, enter the following at the command line:
urldb -o matching_sites_in_domain -e reg_exp -m domain_name -d conf-dir
For example:
urldb -o matching_sites_in_domain -e “.*atlas” -m phoenix.com -d server_root/proxy-serverid/config
where
- matching_sites_in_domain lists all the sites in a domain that match the regular expression
- reg_exp is the regular expression used
- domain_name is the name of the domain
- conf-dir is the configuration directory of the proxy instance. It is located in the following path server_root/proxy-serverid/config
To list all the matching sites, enter the following at the command line:
urldb -o all_matching_sites -e reg_exp -d conf-dir
For example:
urldb -o all_matching_sites -e “.*atlas.*” -d server_root/proxy-serverid/config
where
To list matching urls in a site, enter the following at the command line:
urldb -o matching_urls_from_site -e reg_exp -s site_name -d conf-dir
For example:
urldb -o matching_urls_from_site -e “http://.*atlas.*” -s atlas.phoenix.com -d server_root/proxy-serverid/config
where
To expire or remove matching urls in a site, enter the following at the command line:
urldb -o matching_urls_from_site -e reg_exp -s site_name -x e -d conf-dir
urldb -o matching_urls_from_site -e reg_exp -s site_name -x r -d conf-dir
For example:
urldb -o matching_urls_from_site -e “http://.*atlas.*” -s atlas.phoenix.com -x e -d iserver_root/proxy-serverid/config
where
- matching_urls_from_site lists all urls from site that match the regular expression
- reg_exp is the regular expression used
- site_name is the name of the site
- -x e is the option to expire the matching URLs from the c ache database. This option can not be used with the domain and site modes
- -x r is the option to remove the matching URLs from the cache database
- conf-dir is the configuration directory of the proxy instance. It is located in the following path server_root/proxy-serverid/config
To list all matching urls , enter the following at the command line:
urldb -o all_matching_urls -e reg_exp -d conf-dir
For example:
urldb -o all_matching_urls -e “.*cgi-bin.*” -d server_root/proxy-serverid/config
where
To expire or remove all matching urls , enter the following at the command line:
urldb -o all_matching_urls -e reg_exp -x e -d conf-dir
urldb -o all_matching_urls -e reg_exp -x r -d conf-dir
For example:
urldb -o all_matching_urls -e “.*cgi-bin.*” -x e -d server_root/proxy-serverid/config
where
- all_matching_urls lists all the URLs that match the regular expression
- reg_exp is the regular expression used
- -x e is the option to expire the matching URLs from the cache database
- -x r is the option to remove the matching URLs from the cache database
- conf-dir is the configuration directory of the proxy instance. It is located in the following path server_root/proxy-serverid/config
To expire or remove a list of URLs , enter the following at the command line:
urldb -l url-list -x e -e reg_exp -d conf-dir
urldb -l url-list -x r -e reg_exp -d conf-dir
For example:
urldb -l url.lst -x e -e “.*cgi-bin.*” -d server_root/proxy-serverid/config
where
- url-list is the list of URLs that need to be expired. This option can be used for providing the URL list.
- -x e is the option to expire the matching URLs from the cache database.
- -x r is the option to remove the matching URLs from the cache database.
- reg_exp is the regular expression used
- conf-dir is the configuration directory of the proxy instance. It is located in the following path server_root/proxy-serverid/config.
Managing Cache Garbage Collection
The cachegc utility allows you to clean up the cache database of objects may have expired or are too old to be cached in the directory due to cache size constraints.
The cachegc utility can be used in the following way:
cachegc -f leave-fs-full-percent -u gc-high-margin-percent -l gc-low-margin-percent -e extra-margin-percent -d conf-dir
For example:
cachegc -f 50 -u 80 -l 60 -e 5 -d server_root/proxy-serverid/config
where
- leave-fs-full-percent determines the percentage of the cache partition size below which garbage collection will not go
- gc-high-margin-percent controls the percentage of the maximum cache size that, when reached, triggers garbage collection
- gc-low-margin-percent controls the percentage of the maximum cache size that the garbage collector targets
- extra-margin-percent is used by the garbage collector to determine the fraction of the cache to remove.
- conf-dir is the configuration directory of the proxy instance. It is located in the following path server_root/proxy-serverid/config.
Managing Batch Updates
The bu utility updates the cache and works in two modes. In the first mode, it iterates through the cache database and updates all the URLs that are present in the cache by sending HTTP requests for each. In the second mode, it starts with a given URL and does a breadth first iteration of all the links from that URL to the depth that you specify and fetches pages to the cache. bu is a RFC compliant robot.
bu -n hostname -p port -t time-lmt -f contact-address -s sleep-time -o object -r n -d conf-dir
For example:
bu -n phoenix -p 80 -t 3600 -f admin@phoenix.com -s 60 -o nova -r n -d server_root/proxy-serverid/config
where
- hostname is the hostname of the machine on which proxy is running. The default value is the localhost.
- port is the port on which proxy server is running. The default port is 8080.
- time-lmt is the time limit to which the utility will run
- contact-address determines the contact address that would be sent in the HTTP requests that are sent from bu. The default value is worm@proxy-name.
- sleep-time is the sleep time between two consecutive requests. The default value is 5 seconds.
- object is the object specified in bu.conf that we are executing currently
- -r n option determines whether the robot.txt policy is followed. The default value is y.
- conf-dir is the configuration directory of the proxy instance. It is located in the following path server_root/proxy-serverid/config.
Using the Internet Cache Protocol (ICP)About ICP
The Internet Cache Protocol (ICP) is an object location protocol that enables caches to communicate with one another. Caches can use ICP to send queries and replies about the existence of cached URLs and about the best locations from which to retrieve those URLs. In a typical ICP exchange, one cache will send an ICP query about a particular URL to all neighboring caches. Those caches will then send back ICP replies that indicate whether or not they contain that URL. If they do not contain the URL, they send back a “MISS.” If they do contain the URL, they send back a “HIT.”
Routing through ICP Neighborhoods
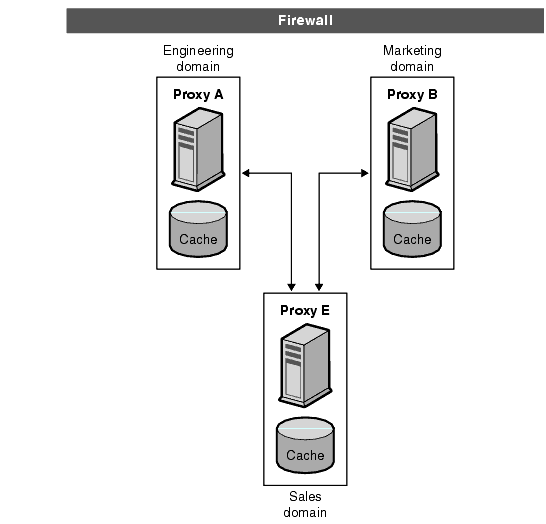
ICP can be used for communication among proxies located in different administrative domains. It allows a proxy cache in one administrative domain to communicate with a proxy cache in another administrative domain. It is effective for situations in which several proxy servers want to communicate, but cannot all be configured from one master proxy (as they are in a proxy array). Figure 12-3 shows an ICP exchange between proxies in different administrative domains.
The proxies that communicate with each other through ICP are called neighbors. You cannot have more than 64 neighbors in an ICP neighborhood. There are two types of neighbors in an ICP neighborhood, parents and siblings. Only parents can access the remote server if no other neighbors have the requested URL. Your ICP neighborhood can have no parents or it can have more than one parent. Any neighbor in an ICP neighborhood that is not a parent is considered a sibling. Siblings cannot retrieve documents from remote servers unless the sibling is marked as the default route for ICP, and ICP uses the default.
You can use polling rounds to determine the order in which neighbors receive queries. A polling round is an ICP query cycle. For each neighbor, you must assign a polling round. If you configure all neighbors to be in polling round one, then all neighbors will be queried in one cycle. In other words, they will all be queried at the same time. If you configure some of the neighbors to be in polling round 2, then all of the neighbors in polling round one will be queried first and if none of them return a “HIT,” all round two proxies will be queried. The maximum number of polling rounds is two.
Since ICP parents are likely to be network bottlenecks, you can use polling rounds to lighten their load. A common setup is to configure all siblings to be in polling round one and all parents to be in polling round two. That way, when the local proxy requests a URL, the request goes to all of the siblings in the neighborhood first. If none of the siblings have the requested URL, the request goes to the parent. If the parent does not have the URL, it will retrieve it from a remote server.
Each neighbor in an ICP neighborhood must have at least one ICP server running. If a neighbor does not have an ICP server running, it cannot answer the ICP requests from their neighbors. Enabling ICP on your proxy server starts the ICP server if it is not already running.
Figure 12-3 An ICP Exchange
To set up ICP
- Add parent(s) to your ICP neighborhood. (This step is only necessary if you want parents in your ICP neighborhood.) For more information on adding parents to an ICP neighborhood, see Adding Parents to an ICP Neighborhood.
- Add sibling(s) to your ICP neighborhood. For more information on adding siblings to your ICP neighborhood, see Adding Siblings to an ICP Neighborhood.
- Configure each neighbor in the ICP neighborhood. For more information on configuring ICP neighbors, see Configuring Individual ICP Neighbors.
- Enable ICP. For information on enabling ICP, see Enabling ICP.
- If your proxy has siblings or parents in its ICP neighborhood, enable routing through an ICP neighborhood. For more information on enabling routing through an ICP neighborhood, see Enabling Routing Through an ICP Neighborhood.
Adding Parents to an ICP Neighborhood
To add parent proxies to an ICP neighborhood
- Access the Server Manager, and click the Caching tab.
- Click the Configure ICP link. The Configure ICP page displays.
- In the Parent List section of the page, click the Add button. The ICP Parent page displays.
- In the Machine Address field, enter the IP address or host name of the parent proxy you are adding to the ICP neighborhood.
- In the ICP Port field, enter the port number on which the parent proxy will listen for ICP messages.
- In the Multicast Address field, you can enter the multicast address to which the parent listens. A multicast address is an IP address to which multiple servers can listen. Using a multicast address allows a proxy to send one query to the network that all neighbors who are listening to that multicast address can see; therefore, eliminating the need to send a query to each neighbor separately. Using multicast is optional.
- In the TTL field, enter the number of subnets that the multicast message will be forwarded to. If the TTL is set to 1, the multicast message will only be forwarded to the local subnet. If the TTL is 2, the message will go to all subnets that are one level away, and so on.
- In the Proxy Port field, enter the port for the proxy server on the parent.
- From the Polling Round drop-down list, choose the polling round that you want the parent to be in. The default polling round is 1.
- Click OK.
- Click Restart Required. The Apply Changes page displays.
- Click the Restart Proxy Server button to apply the changes.
Editing Parent Configurations in an ICP Neighborhood
To edit the parent configuration
- Access the Server Manager, and click the Caching tab.
- Select the Configure ICP link. The Configure ICP page displays.
- Click the radio button next to the parent you want to edit.
- Click the Edit button.
- Modify the appropriate information.
- Click OK.
- Click Restart Required. The Apply Changes page displays.
- Click the Restart Proxy Server button to apply the changes.
Removing Parents from an ICP Neighborhood
To remove parent proxies from an ICP neighborhood
- Access the Server Manager, and click the Caching tab.
- Select the Configure ICP link. The Configure ICP page displays.
- Click the radio button next to the parent you want to remove.
- Click the Delete button.
- Click Restart Required. The Apply Changes page displays.
- Click the Restart Proxy Server button to apply the changes.
Adding Siblings to an ICP Neighborhood
To add sibling proxies to an ICP neighborhood
- Access the Server Manager, and click the Caching tab.
- Select the Configure ICP link. The Configure ICP page displays.
- In the Sibling List section of the page, click the Add button. The ICP Sibling page displays.
- In the Machine Address field, enter the IP address or host name of the sibling proxy you are adding to the ICP neighborhood.
- In the Port field, enter the port number on which the sibling proxy will listen for ICP messages.
- In the Multicast Address field, enter the multicast address to which the sibling listens. A multicast address is an IP address to which multiple servers can listen. Using a multicast address allows a proxy to send one query to the network that all neighbors who are listening to that multicast address can see; therefore, eliminating the need to send a query to each neighbor separately.
- In the TTL field, enter the number of subnets that the multicast message will be forwarded to. If the TTL is set to 1, the multicast message will only be forwarded to the local subnet. If the TTL is 2, the message will go to all subnets that are one level away.
- In the Proxy Port field, enter the port for the proxy server on the sibling.
- From the Polling Round down-down list, choose the polling round that you want the sibling to be in. The default polling round is 1.
- Click OK.
- Click Restart Required. The Apply Changes page displays.
- Click the Restart Proxy Server button to apply the changes.
Editing Sibling Configurations in an ICP Neighborhood
To edit the sibling configuration
- Access the Server Manager, and click the Caching tab.
- Select the Configure ICP link. The Configure ICP page displays.
- Click the radio button next to the sibling you want to edit.
- Click the Edit button.
- Modify the appropriate information.
- Click OK.
- Click Restart Required. The Apply Changes page displays.
- Click the Restart Proxy Server button to apply the changes.
Removing Siblings from an ICP Neighborhood
To remove sibling proxies from an ICP neighborhood
- Access the Server Manager, and click the Caching tab.
- Select the Configure ICP link. The Configure ICP page displays.
- Click the radio button next to the sibling you want to remove.
- Click the Delete button.
- Click Restart Required. The Apply Changes page displays.
- Click the Restart Proxy Server button to apply the changes.
Configuring Individual ICP Neighbors
You need to configure each neighbor, or local proxy, in your ICP neighborhood.
To configure the local proxy server in your ICP neighborhood
- Access the Server Manager, and click the Caching tab.
- Select the Configure ICP link. The Configure ICP page displays.
- In the Binding Address field, enter the IP address to which the neighbor server will bind.
- In the Port field, enter the port number to which the neighbor server will listen for ICP.
- In the Multicast Address field, enter the multicast address to which the neighbor listens. A multicast address is an IP address to which multiple servers can listen. Using a multicast address allows a proxy to send one query to the network that all neighbors who are listening to that multicast address can see; therefore, eliminating the need to send a query to each neighbor separately.
If both a multicast address and bind address are specified for the neighbor, the neighbor uses the bind address to send replies and uses multicast to listen. If neither a bind address or a multicast address is specified, the operating system will decide which address to use to send the data.
- In the Default Route field, enter the name or IP address of the proxy to which the neighbor should route a request when none of the neighboring proxies respond with a “hit.” If you enter the word “origin” into this field, or if you leave it blank, the default route will be to the origin server.
- In the second Port field, enter the port number of the default route machine that you entered into the Default Route field.
- From theOn No Hits, Route Through drop-down list, choose the neighbor’s behavior when none of the siblings in the ICP neighborhood have the requested URL in their caches. You can choose:
- In the Server Count field, enter the number of processes that will service ICP requests.
- In the Timeout field, enter the maximum amount of time the neighbor will wait for an ICP response in each round.
- Click OK.
- Click Restart Required. The Apply Changes page displays.
- Click the Restart Proxy Server button to apply the changes.
Enabling ICP
To enable ICP
- Access the Server Manager, and click the Preferences tab.
- Click the Configure System Preferences link. The Configure System Preferences page displays.
- Select the Yes radio button for ICP.
- Click OK.
- Click Restart Required. The Apply Changes page displays.
- Click the Restart Proxy Server button to apply the changes.
Enabling Routing Through an ICP Neighborhood
To enable routing through an ICP neighborhood
- Access the Server Manager, and click the Routing tab.
- Click the Set Routing Preferences link. The Set Routing Preferences page displays.
- Select the resource from the drop-down list or click the Regular Expression button, and enter a regular expression, and click OK.
- Select the radio button next to the text Route Through.
- Select the checkbox next to ICP.
- If you want the client to retrieve a document directly from the ICP neighbor that has the document instead of going through another neighbor to get it, select the checkbox next to the text redirect.
Using Proxy ArraysAbout Proxy Arrays
Proxy arrays for distributed caching allow multiple proxies to serve as a single cache. In other words, each proxy in the array will contain different cached URLs that can be retrieved by a browser or downstream proxy server. Proxy arrays prevent the duplication of caches that often occurs with multiple proxy servers. Through hash-based routing, proxy arrays route requests to the correct cache in the proxy array.
Proxy arrays also allow incremental scalability. In other words, if you decide to add another proxy to your proxy array, each member’s cache is not invalidated. Only 1/n of the URLs in each member’s cache, where n is the number of proxies in your array, will be reassigned to other members.
Routing through Proxy Arrays
For each request through a proxy array, a hash function assigns each proxy in the array a score that is based on the requested URL, the proxy’s name and the proxy’s load factor. The request is then routed to the proxy with the highest score.
Since requests for URLs can come from both clients and proxies, there are two types of routing through proxy arrays: client to proxy routing and proxy to proxy routing.
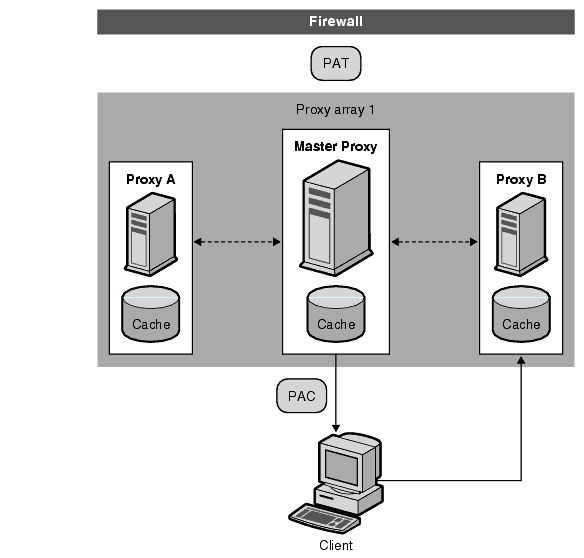
In client to proxy routing, the client uses the Proxy Auto Configuration (PAC) mechanism to determine which proxy to go through. However, instead of using the standard PAC file, the client uses a special PAC file which computes the hash algorithm to determine the appropriate route for the requested URL, Figure 12-4 shows client to proxy routing.
In Figure 12-4, each member of the proxy array loads and polls the master proxy for updates to the PAT file. Once the client has a PAC file, it only needs to download this file again if the configuration changes. Generally, clients will download the PAC file at restart.
The proxy server can automatically generate the special PAC file from the Proxy Array Membership Table (PAT) specifications made through the administration interface.
In proxy to proxy routing, proxies use a PAT (Proxy Array Table) file to compute the hash algorithm instead of the PAC file used by clients. The PAT file is an ASCII file that contains information about a proxy array, including the proxies’ machine names, IP addresses, ports, load factors, cache sizes, etc. For computing the hash algorithm at the server, it is much more efficient to use a PAT file than a PAC file (which is a JavaScript file that has to be interpreted at run-time). However, most clients do not recognize the PAT file format, and therefore, must use a PAC file. Figure 12-5 shows proxy to proxy routing.
The PAT file will be created on one proxy in the proxy array - the master proxy. The proxy administrator must determine which proxy will be the master proxy. The administrator can change the PAT file from this master proxy server and all other members of the proxy array can then manually or automatically poll the master proxy for these changes. You can configure each member to automatically generate a PAC file from these changes.
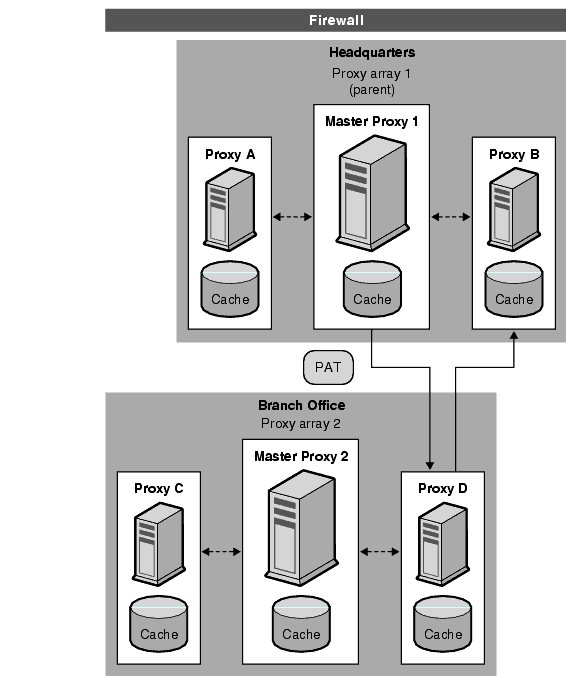
You can also chain proxy arrays together for hierarchical routing. If a proxy server routes an incoming request through an upstream proxy array, the upstream proxy array is then known as a parent array. A parent array is a proxy array that a proxy server goes through. In other words, if a client requests a document from Proxy X, and Proxy X does not have the document, it sends the request to Proxy Array Y instead of sending it directly to the remote server. So, Proxy Array Y is a parent array. In Figure 12-5, Proxy Array 1 is a parent array to Proxy Array 2. A member of Proxy Array 2 loads and polls for updates to the parent array’s PAT file. Usually, it polls the master proxy in the parent array. The hash algorithm for the requested URL is computed using the downloaded PAT file and the member in the Proxy Array 2 then retrieves the requested URL from whichever proxy in Proxy Array1 that has the highest score. In Figure 12-5, Proxy B has the highest score for the URL requested by the client.
Figure 12-4 Client to Proxy Routing
Figure 12-5 Proxy to Proxy Routing
To set up a proxy array
- From the master proxy, do the following steps:
- Create the proxy array. For more information on creating the member list, see Creating a Proxy Array Member List.
- Generate a PAC file from your PAT file. You only need to generate a PAC file if you are using client to proxy routing. For more information on generating a PAC file from a PAT file, see Generating a PAC File from a PAT File.
- Configure the master member of the array. For more information on configuring master members, see Configuring Proxy Array Members.
- Enable routing through a proxy array. For more information on enabling routing through a proxy array, see Enabling Routing Through a Proxy Array.
- Create a PAT mapping to map the URL “/pat” to the PAT file.
- Enable your proxy array. For more information on enabling a proxy array, see Enabling a Proxy Array.
- From each of the non-master proxies, do the following steps:
- Configure the non-master member of the array. For more information on configuring non-master members, see Configuring Proxy Array Members
- Enable routing through a proxy array. For more information on enabling routing through a proxy array, see Enabling Routing Through a Proxy Array.
- Enable your proxy array. For more information on enabling a proxy array, see Enabling a Proxy Array.
.
Note
If your proxy array is going to route through a parent array, you also need to enable the parent array and configure each member to route through a parent array for desired URLs. For more information on parent arrays, see Routing through Parent Arrays.
Creating a Proxy Array Member List
You should create and update the proxy array member list from the master proxy of the array only. You only need to create the proxy array member list once, but you can modify it at any time. By creating the proxy array member list, you are generating the PAT file to be distributed to all of the proxies in the array and to any downstream proxies.
Caution
You should only make changes or additions to the proxy array member list through the master proxy in the array. All other members of the array can only read the member list.
- Access the Server Manager, and click the Caching tab
- Click the Configure Proxy Array link. The Configure Proxy Array page displays.
- In the Array name field, enter the name of the array.
- In the Reload Configuration Every field, enter the number of minutes between each polling for the PAT file.
- Click the Array Enabled checkbox.
- Click the Create button.
- Click Restart Required. The Apply Changes page displays.
- For each member in the proxy array, enter the following and then click OK:
- Name. The name of the proxy server you are adding to the member list
- IP Address. The IP address of the proxy server you are adding to the member list
- Port. This is the port on which the member polls for the PAT file.
- Load Factor. An integer that reflects the relative load that should be routed through the member.
- Status. The status of the member. This value can be either on or off. If you disable a proxy array member, the member’s requests will be re-routed through another member .
- Click Restart Required. The Apply Changes page displays.
- Click the Restart Proxy Server button to apply the changes.
Editing Proxy Array Member List Information
At any time, you can change the information for the members in the proxy array member list. You can only edit the proxy array member list from the master proxy.
To edit member list information for any of the members in a proxy array
- Access the Server Manager, and click the Caching tab.
- Click the Configure Proxy Array link. The Configure Proxy Array page displays.
- In the Member List, select the radio button next to the member that you want to edit.
- Click the Edit button. The Configure Proxy Array Member page displays.
- Edit the appropriate information.
- Click OK.
- Click Restart Required. The Apply Changes page displays.
- Click the Restart Proxy Server button to apply the changes.
Deleting Proxy Array Members
Deleting proxy array members will remove them from the proxy array. You can only delete proxy array members from the master proxy.
To delete members of a proxy array
- Access the Server Manager, and click the Caching tab.
- Click the Configure Proxy Array link. The Configure Proxy Array page displays.
- In the Member List, select the radio button next to the member that you want to delete.
- Click the Delete button.
- Click Restart Required. The Apply Changes page displays.
- Click the Restart Proxy Server button to apply the changes.
Configuring Proxy Array Members
You only need to configure each member in the proxy array once, and you must do so from the member itself. You cannot configure a member of the array from another member. You also need to configure the master proxy.
To configure each member of the proxy array
- Access the Server Manager, and click the Caching tab.
- Click the Configure Proxy Array Member link. The Configure Proxy Array Member page displays.
- In the Proxy Array section, indicate whether or not the member needs to poll for the PAT file by selecting the appropriate radio button. The choices are:
- Non-Master Member. You should select this option if the member you are configuring is not the master proxy. Any proxy array member that is not a master proxy will need to poll for the PAT file in order to retrieve it from the master proxy.
- Master Member. You should select this option if you are configuring the master proxy. If you are configuring the master proxy, the PAT file is local and does not need to be polled.
- In the Poll Host field, enter the name of the master proxy that you will be polling for the PAT file.
- In the Port field, enter the port at which the master proxy accepts HTTP requests.
- In the URL field, enter the URL of the PAT file on the master proxy. If on your master proxy, you have created a PAT mapping to map the PAT file to the URL /pat, you should enter /pat in the URL field.
- In the Headers File field, enter the full pathname for a file with any special headers that must be sent with the HTTP request for the PAT file (such as authentication information). This field is optional.
- Click OK.
- Click Restart Required. The Apply Changes page displays.
- Click the Restart Proxy Server button to apply the changes.
Enabling Routing Through a Proxy Array
To enable routing through a proxy array
- Access the Server Manager, and click the Routing tab.
- Click the Set Routing Preferences link. The Set Routing Preferences page displays.
- Select the resource from the drop-down list or click the Regular Expression button, enter a regular expression, and click OK.
- Select the Route Through option.
- Select the checkboxes for proxy array and/or parent array.
- If you choose to route through a proxy array and you want to redirect requests to another URL, select the redirect checkbox. Redirecting means that if a member of a proxy array receives a request that it should not service, it tells the client which proxy to contact for that request.
- Click OK.
- Click Restart Required. The Apply Changes page displays.
- Click the Restart Proxy Server button to apply the changes.
Enabling a Proxy Array
To enable a proxy array
- Access the Server Manager, and clcik the Preferences tab.
- Click the Configure System Preferences link. The Configure System Preferences page displays.
- Click the Yes option for the type of array or arrays you want to enable - either a normal proxy array or a parent array.
- Click OK.
- Click Restart Required. The Apply Changes page displays.
- Click the Restart Proxy Server button to apply the changes.
Redirecting Requests in a Proxy Array
If you choose to route through a proxy array, you need to designate whether you want to redirect requests to another URL. Redirecting means that if a member of a proxy array receives a request that it should not service, it tells the client which proxy to contact for that request.
Caution
Redirect is not currently supported by any clients, so you should not use the feature at this time.
Generating a PAC File from a PAT File
Because most clients do not recognize the PAT file format, the clients in client to proxy routing use the Proxy Auto Configuration (PAC) mechanism to receive information about which proxy to go through. However, instead of using the standard PAC file, the client uses a special PAC file derived from the PAT file. This special PAC file computes the hash algorithm to determine the appropriate route for the requested URL.
You can manually or automatically generate a PAC file from the PAT file. If you manually generate the PAC file from a specific member of the proxy array, that member will immediately re-generate the PAC file based on the information currently in the PAT file. If you configure a proxy array member to automatically generate a PAC file, the member will automatically re-generate the file after each time it detects a modified version of the PAT file.
Note
If you are not using the proxy array feature for your proxy server, then you should use the Create / Edit Autoconfiguration File page to generate your PAC file. For more information see Using the Client Autoconfiguration File. .
Manually Generating a PAC File from a PAT File
To manually generate a PAC file from a PAT file
- Access the Server Manager of the master proxy, and click the Caching tab.
- Click the Configure Proxy Array link. The Configure Proxy Array page displays.
- Click the Generate PAC button. The PAC Generation page displays.
- If you want to use custom logic in your PAC file, in the Custom logic file field, enter the name of the file containing the customized logic you would like to include in the generation of your PAC file. This logic is inserted before the proxy array selection logic in the FindProxyForURL function. This function is typically used for local requests which need not go through the proxy array.
If you have already entered the custom logic file on the Configure Proxy Array Member page, this field will be populated with that information. You may edit the custom logic filename if you wish, and the changes you make will transfer to the Configure Proxy Array Member page as well.
- In the Default Route field, enter the route a client should take if the proxies in the array are not available.
If you have already entered the default route on the Configure Proxy Array Member page, this field will be populated with that information. You may edit the default route if you wish, and the changes you make will transfer to the Configure Proxy Array Member page as well.
- Click OK.
- Click Restart Required. The Apply Changes page displays.
- Click the Restart Proxy Server button to apply the changes.
Automatically Generating a PAC File from a PAT File
To automatically generate a PAC file from a PAT file each time a change is detected
- Access the Server Manager, and click the Caching tab.
- Click the Configure Proxy Array Member link.The Configure Proxy Array Member page displays.
- Select the Auto-generate PAC File checkbox.
- If you want to use custom logic in your PAC file, in the Custom Logic File field, enter the name of the file containing the customized logic you would like to include in the generation of your PAC file. This logic is inserted before the proxy array selection logic in the FindProxyFor URL function.
If you have already entered and saved the custom logic file on the Configure Proxy Array page, this field will be populated with that information. You may edit the custom logic file name if you wish, and the changes you make will transfer to the Configure Proxy Array page as well.
- In the Default Route field, enter the route a client should take if the proxies in the array are not available.
- If you have already entered and saved the default route on the Configure Proxy Array page, this field will be populated with that information. You may edit the default route if you wish, and the changes you make will transfer to the Configure Proxy Array page as well.
- Click OK.
- Click Restart Required. The Apply Changes page displays.
- Click the Restart Proxy Server button to apply the changes.
Routing through Parent Arrays
You can configure your proxy or proxy array member to route through an upstream parent array instead of going directly to a remote server.
To configure a proxy or proxy array member to route through a parent array
- Enable the parent array. For more information on enabling an array, see Enabling a Proxy Array.
- Enable routing through the parent array. For more information on enabling routing through an array, see Enabling Routing Through a Proxy Array.
- Access the Server Manager, and click the Caching tab.
- Click the Configure Proxy Array Member link. The Configure Proxy Array Member page displays.
- In the Poll Host field in the Parent Array section of the page, enter the host name of the proxy in the parent array that you will poll for the PAT file. This proxy is usually the master proxy of the parent array.
- In the Port field in the Parent Array section of the page, enter the Port number of the proxy in the parent array that you will poll for the PAT file.
- In the URL field, enter the URL of the PAT file on the master proxy. If on your master proxy, you have created a PAT mapping, you should enter the mapping into this URL field.
- In the Headers File field in the Parent Array section of the form, full pathname for a file with any special headers that must be sent with the HTTP request for the PAT file (such as authentication information). This field is optional.
- Click OK.
- Click Restart Required. The Apply Changes page displays.
- Click the Restart Proxy Server button to apply the changes.
Viewing Parent Array Information
If your proxy array is routing through a parent array, you need information about the members of the parent array. This information is sent from the parent array in the form of a PAT file. The information in this PAT file is displayed on the View Parent Array Configuration page.
To view parent array information