| C H A P T E R 1 |
|
Sun Java Studio Enterprise 7 Overview |
This chapter provides an overview of the various parts of the Sun Java Studio Enterprise 7 development environment (hereafter referred to as the IDE) and emphasizes the use of the visual tools for developing web applications using Sun Java Studio's Web Application Framework (formerly Sun ONE Application Framework and JATO).
This document focuses on a few specific dockable windows of the IDE. In previous versions of the IDE these windows made up the tabs of the Explorer window. In the latest version of the IDE these tabs are now normal IDE windows; they are listed in the Windows menu of the IDE. The windows and IDE features discussed in this document include views of your application's file system structure, application structure and runtime integration in the IDE's environment. Some of these tabs might be outside the scope of this document.
A completed version of the JatoTutorial application is used as a reference for demonstrating the various features of the Web Application Framework tools. If you have completed the JatoTutorial, you are familiar with the objects of this Web Application Framework application. If you have not completed the JatoTutorial, you might find it helpful to do so before proceeding with this document.
For complete documentation on the basic features of the NetBeans-based Sun Java Studio Enterprise 7 software, visit the NetBeans online documentation at: http://www.netbeans.org/kb/using-netbeans/36/index.html.
The following figure shows a complete view of the Sun Java Studio Enterprise 7 IDE featuring the Web Application Framework.
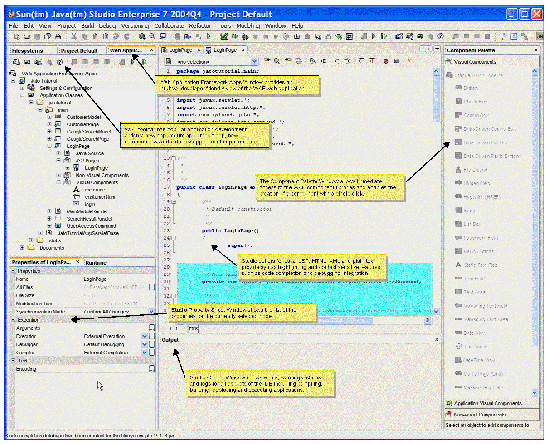
Sun Java Studio Enterprise 7 projects provide you with an IDE sandbox, which is a way to isolate different development environments that you can customize for several different development efforts. When you run the Sun Java Studio Enterprise 7 software for the first time, you are working in the default Sun Java Studio Enterprise 7 project.
For example, suppose you have an assignment that requires working with J2ME for wireless applications. You could mount all the necessary libraries and file systems, set compiler, editor, and build options, and more, that are unique for that particular project.
In another assignment, you might be working with CORBA, RMI, and rich GUI clients. This might require the mounting of several other kinds of libraries and file systems, and it might require very different build configurations.
Another scenario might be that you are tasked with maintaining a Web application framework at the company for which you are employed. In your spare time, you might work on an open source application server effort. These two projects could be placed into separate Sun Java Studio Enterprise 7 projects: Real Job Project and Open Source Project.
For additional information about Sun Java Studio Enterprise 7 projects, visit the NetBeans online documentation at:
http://usersguide.netbeans.org/gwd/gwd_project_setup.html#projects
To create a new Sun Java Studio Enterprise 7 project select the Project > Project Manager menu option, click New, and provide a project name when prompted. A new Sun Java Studio Enterprise 7 project is created and opens. You can configure the project as required.
To open another Sun Java Studio Enterprise 7 project, select the Project > Project Manager menu option. From the list of projects, select the project that you want to open and click the Open button. If the Open button is not enabled when you select the project name, that project is the currently open project.
The Sun Java Studio Enterprise 7 usually has many windows docked together as tabbed windows. While the layout and visibility of these windows is fully configurable, in this document we use a layout with three windows:
at the upper left and two windows:
However, this can vary, as the Sun Java Studio Enterprise 7 allows for extreme layout customization. Each of these window expose a view of the Sun Java Studio Enterprise environment in a different way. See the image below which shows the Windows menu listing all the windows available in the IDE.
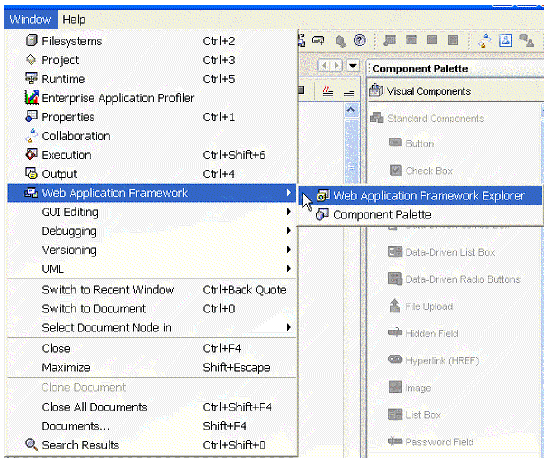
For additional information about the Sun Java Studio Enterprise 7 Explorer window, visit the NetBeans online documentation at:
http://usersguide.netbeans.org/gwd/gwd_project_setup.html#explorer
The Filesystems window of the Explorer window displays all currently mounted directories, as shown in the following figure.
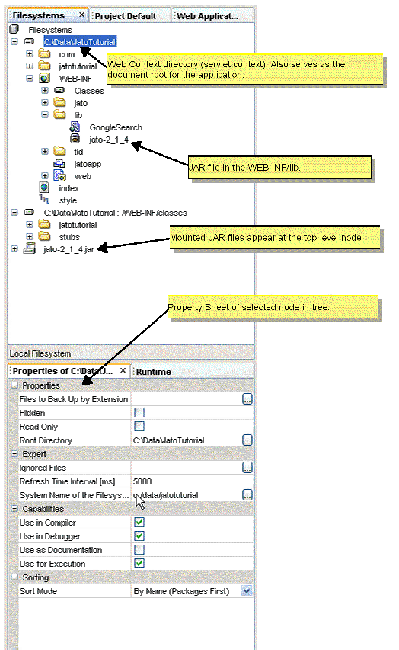
When you create a new Web Application Framework application, the Web Context directory (also known as servlet context or base Web application directory) is mounted automatically. Any JAR files located in the WEB-INF/lib directory of your Web Application Framework application are also mounted. Although these JAR files only physically exist in the WEB-INF/lib directory, they are displayed at the top level node.
As you add Web Application Framework components that require additional libraries (for example, jaxrpc-api.jar, and others for Web Service models) or when you manually copy JAR files to your application's WEB-INF/lib directory, the Sun Java Studio Enterprise 7 automatically mounts these new JAR files. The Sun Java Studio Enterprise 7 might not recognize a new JAR file immediately. This is dependent upon the refresh rate setting for your Sun Java Studio Enterprise 7 configuration.
Besides the virtual view of the JAR files, the Filesystems view provides the raw directory and file layout as found in your operating system's file system. As a Web Application Framework application developer, you do not need to spend much, if any, time in this view.
For Web applications, such as a Web Application Framework application, the Project window displays a logical (flattened) view of your Web application's directory structure, as shown in the following figure.
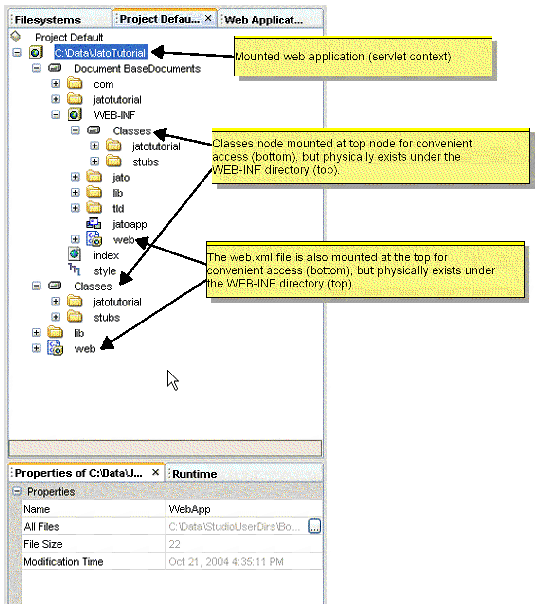
Like the JAR files in the Filesystems window, some buried nodes are mounted at the top level node for convenient access. As a Web Application Framework application developer, you probably never need to view this window.
The Runtime window shows various resources available in the Sun Java Studio Enterprise 7 in the form a tree node structure.
Nodes that you might interact with while developing applications (not limited to Web applications or Web Application Framework web applications) are as follows:
The following figure shows the Runtime window.
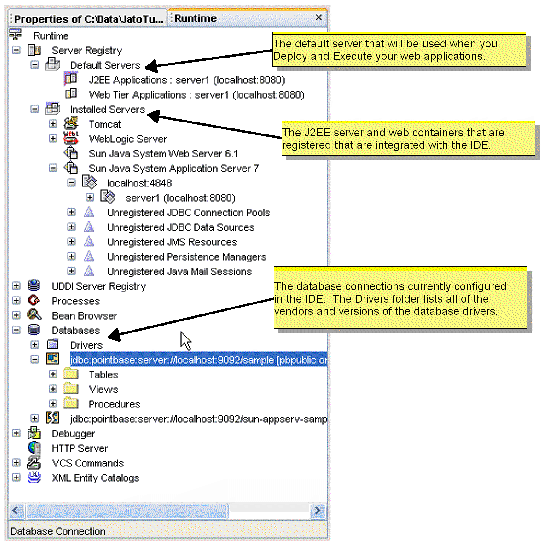
Server Registry contains a list of all the servlet containers that can be managed and utilized from within the Sun Java Studio Enterprise 7. Tomcat and Sun ONE Application Server are two such servlet containers that come with the Sun Java Studio Enterprise 7. You might have to visit the Sun Java Studio Enterprise 7 Update Center to download and install the module if it has not already been installed by default.
Processes lists any processes that were launched (and are still running) by the Sun Java Studio Enterprise 7 IDE. When you compile your application, the compilation process displays in Processes until it has finished its task. When you test run your application, the servlet container process is listed here.
The servlet container remains running until you shut it down. To shut down any process launched by the Sun Java Studio Enterprise 7 IDE, go to the Processes list, right-click the desired process, and select Terminate Process.
Shut down all processes launch by the Sun Java Studio Enterprise 7 IDE before closing the Sun Java Studio Enterprise 7 IDE or switching Sun Java Studio Enterprise 7 projects. Sun Java Studio Enterprise 7 projects are managed (created, deleted, opened) from the Sun Java Studio Enterprise 7 Project menu option. Sun Java Studio Enterprise 7 projects are outside the scope of this document.
Databases is a list of all the RDBMS drivers and connections that have been configured in the Sun Java Studio Enterprise 7. There is a Drivers folder subnode, and potentially a list of database connections.
The Drivers folder node has a list of many vendor database driver versions. If the drivers for a particular database are available to the Sun Java Studio Enterprise 7, the Drivers folder node is enabled. Otherwise, it is disabled (a diagonal, red line through its icon). You can add new drivers by right-clicking the Drivers folder node, selecting the Add Driver action, and supplying the required driver information in the dialog box that is presented. You must also make the driver available to the Sun Java Studio Enterprise 7 by placing it in the Sun Java Studio Enterprise 7 lib/ext directory.
The connections, if any, can be connected (represented by a complete icon), or disconnected (represented by a broken icon). To connect a connection, right-click the connection node and select the Connect or Connect As action. You are prompted for the required connection information (username, password, and so on). To complete the connection, the target database server must be running, so be sure the preferred database server is started and accessible. To disconnect, right-click the connection and select the Disconnect action.
You can add new connections by right-clicking the Databases node and selecting the Add Connection action. You are prompted with the database type, location, and connection information. Before attempting to create a connection to the database, be sure, as described earlier in this section (Databases Node), that the proper driver is available to the Sun Java Studio Enterprise 7.
The Web Application Framework Apps window provides a user friendly view of your Web application. You can mount one or more Web Application Framework applications in this window. Mounting a Web Application Framework application also mounts it as a Filesystem in the Filesystems window, and as a Web module in the Project window. Within each mounted Web Application Framework application there are three top level nodes, as follows:
Each of these nodes is introduced in Chapter 2, Web Application Framework Apps Window Overview, with details on creating and mounting Web Application Framework applications.
Copyright © 2004, Sun Microsystems, Inc. All Rights Reserved.