Chapter 10 Working With Remote Systems (Tasks)
This chapter describes all the tasks required to log in to remote systems and work with their files. This is a list of the step-by-step instructions in this chapter.
What is a Remote System?
For the purpose of this chapter, a remote system is a workstation or server that is connected to the local system with any type of physical network and configured for TCP/IP communication, shown in the figure below:
Figure 10-1 A Remote System

On systems running the Solaris release, TCP/IP configuration is established automatically during start-up. For more information, see System Administration Guide, Volume 3.
Logging In to a Remote System (rlogin)
The rlogin command enables you to log in to a remote system. Once logged in, you can navigate through the remote file system and manipulate its contents (subject to authorization), copy files, or execute remote commands.
If the system you are logging into is in a remote domain, be sure to append the domain name to the system name. In this example, SOLAR is the name of the remote domain:
rlogin pluto.SOLAR
Also, you can interrupt a remote login operation at any time by typing Control-d.
Authentication for Remote Logins (rlogin)
Authentication (establishing who you are) for rlogin operations can be performed either by the remote system or by the network environment.
The main difference between these forms of authentication lies in the type of interaction they require from you and the way they are established. If a remote system tries to authenticate you, you will be prompted for a password, unless you set up the /etc/hosts.equiv or .rhosts file. If the network tries to authenticate you, you won't be asked for a password, since the network already knows who you are. The figure below shows a simplified illustration to describe authentication for remote logins.
Figure 10-2 Authentication for Remote Logins (rlogin)
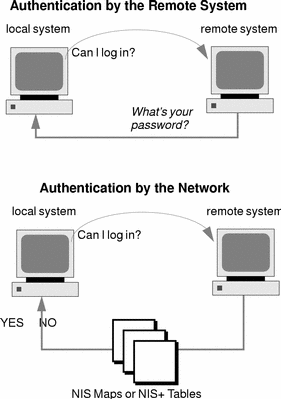
When the remote system attempts to authenticate you, it relies on information in its local files; specifically if:
-
Your system name and user name appears in the remote system's /etc/hosts.equiv file, or
-
Your system name and user name appears in the remote user's .rhosts file, under the remote user's home directory
Network authentication relies on one of these two methods:
-
A "trusting network environment" that has been set up with your local network information service and the automounter
-
One of the network information services pointed to by the remote system's /etc/nsswitch.conf file contains information about you
Note -
Network authentication generally supersedes system authentication.
The /etc/hosts.equiv File
The /etc/hosts.equiv file contains a list of trusted hosts for a remote system, one per line. If a user attempts to log in remotely (using rlogin) from one of the hosts listed in this file, and if the remote system can access the user's password entry, the remote system allows the user to log in without a password.
A typical hosts.equiv file has the following structure:
host1 host2 user_a +@group1 -@group2 |
When a simple entry for a host is made in hosts.equiv, such as the entry above for host1, it means that the host is trusted, and so is any user at that machine.
If the user name is also mentioned, as in the second entry in the example, then the host is trusted only if the specified user is attempting access.
A group name preceded by a plus sign (+) means that all the machines in that netgroup are considered trusted.
A group name preceded by a minus sign (-) means that none of the machines in that netgroup are considered trusted.
Security Risks When Using the /etc/hosts.equiv File
The /etc/hosts.equiv file presents a security risk. If you maintain a /etc/hosts.equiv file on your system, you should include only trusted hosts in your network. The file should not include any host that belongs to a different network, or any machines that are in public areas. (For example, do not include a host that is located in a terminal room.)
This can create a serious security problem. Either replace the /etc/hosts.equiv file with a correctly configured one, or remove the file altogether.
A single line of + in the /etc/hosts.equiv file indicates that every known host is trusted.
The .rhosts File
The .rhosts file is the user equivalent of the /etc/hosts.equiv file. It contains a list of host-user combinations, rather than hosts in general. If a host-user combination is listed in this file, the specified user is granted permission to log in remotely from the specified host without having to supply a password.
Note that a .rhosts file must reside at the top level of a user's home directory. .rhost files located in subdirectories are not consulted.
Users can create .rhosts files in their home directories. Using the .rhosts file is another way to allow trusted access between their own accounts on different systems without using the /etc/hosts.equiv file.
Security Risks When Using the .rhosts File
Unfortunately, the .rhosts file presents a major security problem. While the /etc/hosts.equiv file is under the system administrator's control and can be managed effectively, any user can create a .rhosts file granting access to whomever the user chooses without the system administrator's knowledge.
In a situation in which all of the users' home directories are on a single server and only certain people have superuser access on that server, a good way to prevent a user from using a .rhosts file is to create an empty file as superuser in their home directory. You would then change the permissions in this file to 000 so that it would be difficult to change it, even as superuser. This would effectively prevent a user from risking system security by using a .rhosts file irresponsibly. It would not, however, solve anything if the user is able to change the effective path to his or her home directory.
The only secure way to manage .rhosts files is to completely disallow them. See "How to Search for and Remove .rhosts Files" for detailed instructions. As system administrator, you can check the system often for violations of this policy. One possible exception to this policy is for the root account--you might need to have a .rhosts file to perform network backups and other remote services.
Linking Remote Logins
Provided your system is configured properly, you can link remote logins. In this example, a user on earth logs in to jupiter, and from there decides to log in to pluto:
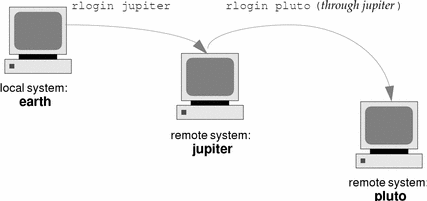
Of course, the user could have logged out of jupiter and then logged in directly to pluto, but this type of linking can be more convenient.
To link remote logins without having to supply a password, you must have the /etc/hosts.equiv or .rhosts file set up correctly.
Direct vs. Indirect Remote Logins
The rlogin command allows you to log in to a remote system directly or indirectly, as shown in the figure below.
Figure 10-3 Direct and Indirect Logins
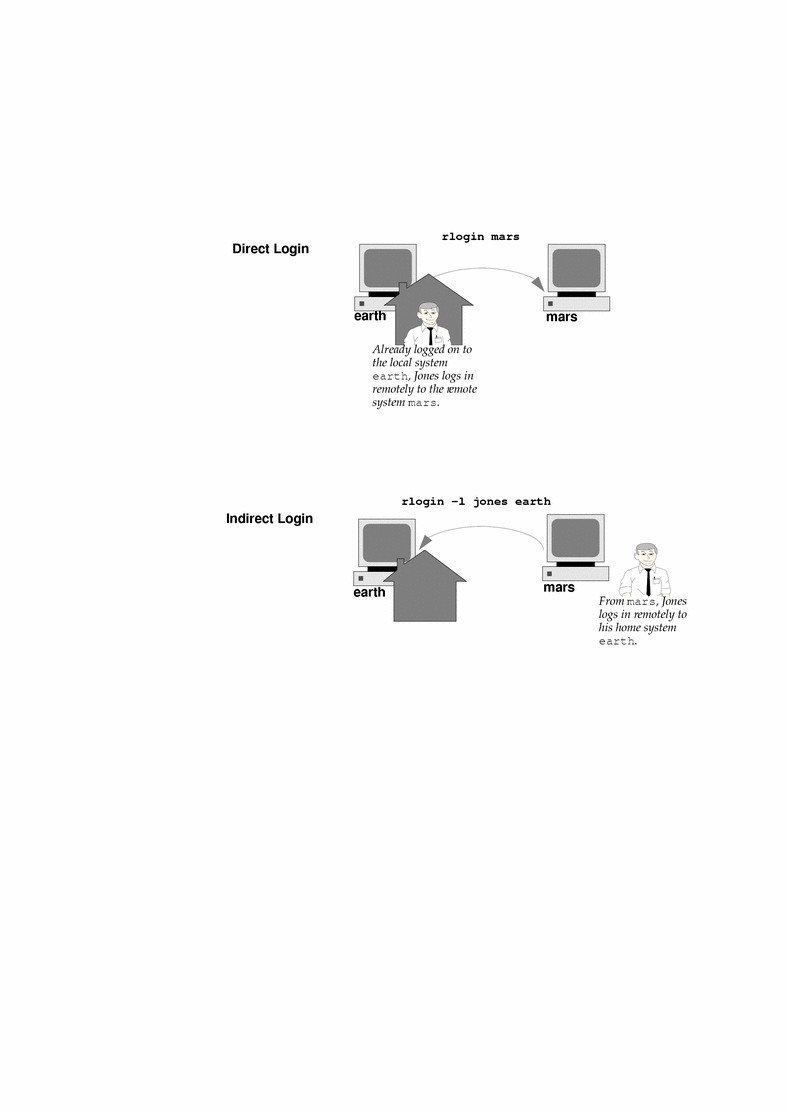
A direct remote login is attempted with the default user name; that is, the user name of the individual currently logged in to the local system. This is the most common form of remote login.
An indirect remote login is attempted with a different user name, which is supplied during the remote login operation. This is the type of remote login you might attempt from a workstation that you borrowed temporarily. For instance, if you were in a coworker's office and needed to examine files in your home directory, you might log in to your system remotely, from your coworker's system, but you would perform an indirect remote login, supplying your own user name.
The dependencies between direct and indirect logins and authentication methods are summarized in the table below.
Table 10-1 Dependencies Between Login Method and Authentication Method (rlogin)|
Type of Login |
User Name Supplied By |
Authentication |
Password |
|---|---|---|---|
|
Direct |
System |
Network |
None |
|
|
|
System |
Required |
|
Indirect |
User |
Network |
None |
|
|
|
System |
Required |
What Happens After You Log In Remotely
When you log in to a remote system, the rlogin command attempts to find your home directory. If the rlogin command can't find your home directory, it will assign you to the remote system's root (/) directory. For example:
Unable to find home directory, logging in with / |
However, if the rlogin command finds your home directory, it sources both your .cshrc and .login files. Therefore, after a remote login, your prompt is your standard login prompt, and the current directory is the same as when you log in locally.
For example, if your usual prompt displays your system name and working directory, and when you log in, your working directory is your home directory, your login prompt looks like this:
earth(/home/smith): |
Then when you log in to a remote system, you will see a similar prompt and your working directory will be your home directory, regardless of the directory from which you entered the rlogin command:
earth(/home/smith): rlogin pluto . . . pluto(/home/smith): |
The only difference is that the name of the remote system would take the place of your local system at the beginning of the prompt. Where, then, is the remote file system? It is parallel to your home directory, as shown below:
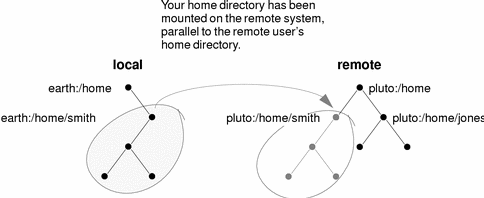
In other words, if you cd to /home and then run ls, this is what you'll see:
earth(home/smith): cd .. earth(/home): ls smith jones |
How to Search for and Remove .rhosts Files
-
Search for and remove .rhosts files by using the find(1) command.
# find home-directories -name .rhosts -print -exec rm{}home-directories
Identifies the path to a directory where users' home directories are located. Note that you can enter multiple paths to search more than one home directory at a time.
-name .rhosts
Identifies the filename.
-print
Prints the current pathname.
-exec rm {} \;
Tells the find command to apply the rm command to all files identified using the matching filename.
The find command starts at the designated directory and searches for any file named .rhosts. If it finds any, it prints the path on the screen and removes it.
Example--Searching For and Removing .rhosts Files
The following example searches and removes .rhosts files in all the user's home directories located in the /export/home directory.
# find /export/home -name .rhosts -print | xargs -i -t rm{}
|
How to Find Out If a Remote System Is Operating
Find out if a remote system is operating by using the ping command.
$ ping system-name | ip-address |
|
system-name |
The name of the remote system. |
|
ip-address |
The IP address of the remote system. |
The ping command returns one of three messages:
|
Status Message |
Explanation |
|---|---|
|
system-name is alive |
The system can be accessed over the network. |
|
ping:unknown host system-name |
The system name is unknown. |
|
The system is known, but is not currently operating. |
If the system you "ping" is located in a different domain, the return message can also contain routing information, which you can ignore.
The ping command has a time-out of 20 seconds. In other words, if it does not get a response within 20 seconds, it returns the third message. You can force ping to wait longer (or less) by entering a time-out value, in seconds:
$ ping system-name | ip-address time-out |
For more information, see ping(1M).
How to Find Who Is Logged In to a Remote System
Find who is logged in to a remote system by using the rusers(1) command.
$ rusers [-l] remote-system-name |
|
rusers |
(No options) Displays the name of the system followed by the name of users currently logged in to it, including root. |
|
-l |
Displays additional information about each user: the user's login window, login time and date, amount of time logged in, and the name of the remote system from which the user logged on. |
Example--Finding Who Is Logged In to a Remote System
The following example shows the short output of rusers.
$ rusers pluto pluto smith jones |
In the following example, the long version of rusers show that two users are logged in to the remote system starbug. The first user logged in from the system console on September 10 and has been logged on for 137 hours and 15 minutes. The second user logged in from a remote system, mars, on September 14.
$ rusers -l starbug root starbug:console Sep 10 16:13 137:15 rimmer starbug:pts/0 Sep 14 14:37 (mars) |
How to Log In to a Remote System (rlogin)
Log in to a remote system using the rlogin(1) command.
$ rlogin [-l user-name] system-name |
|
rlogin |
(No options) Logs you in to the remote system directly; in other words, with your current user name. |
|
-l user-name |
Logs you into the remote system indirectly; in other words, with the user name you supply. |
If the network attempts to authenticate you, you won't be prompted for a password. If the remote system attempts to authenticate you, you will be asked to provide a password.
If the operation succeeds, the rlogin command displays brief information about your latest remote login to that system, the version of the operating system running on the remote system, and whether you have mail waiting for you in your home directory.
Example--Logging In to a Remote System (rlogin)
The following example shows the output of a direct remote login to pluto. The user has been authenticated by the network.
$ rlogin starbug Last login: Mon Jul 12 09:28:39 from venus Sun Microsystems Inc. SunOS 5.8 February 2000 starbug: |
The following example shows the output of an indirect remote login to pluto, with the user being authenticated by the remote system.
$ rlogin -l smith pluto password: user-password Last login: Mon Jul 12 11:51:58 from venus Sun Microsystems Inc. SunOS 5.8 February 2000 starbug: |
How to Log Out From a Remote System (exit)
Log out from a remote system by using the exit(1) command.
$ exit |
Example--Logging Out From a Remote System (exit)
This example shows the user smith logging out from the system pluto.
$ exit pluto% logout Connection closed. earth% |
Logging In to a Remote System (ftp)
The ftp command opens the user interface to the Internet's File Transfer Protocol. This user interface, called the command interpreter, enables you to log in to a remote system and perform a variety of operations with its file system. The principal operations are summarized in the table below.
The main benefit of ftp over rlogin and rcp is that ftp does not require the remote system to be running UNIX. (The remote system does, however, need to be configured for TCP/IP communications.) On the other hand, rlogin provides access to a richer set of file manipulation commands than ftp does.
Authentication for Remote Logins (ftp)
Authentication for ftp remote login operations can be established either by:
-
Including your password entry in the remote system's /etc/passwd file or equivalent network information service map or table.
Essential ftp Commands
Table 10-2 Essential ftp Commands|
Command |
Description |
|---|---|
|
ftp |
Accesses the ftp command interpreter |
|
ftp remote-system |
Establishes an ftp connection to a remote system. For instructions, see "How to Open an ftp Connection to a Remote System" |
|
open |
Logs in to the remote system from the command interpreter |
|
close |
Logs out of the remote system and returns to the command interpreter |
|
bye |
Quits the ftp command interpreter |
|
help |
Lists all ftp commands or, if a command name is supplied, briefly describes what the command does |
|
reset |
Re-synchronizes the command-reply sequencing with the remote ftp server |
|
ls |
Lists the contents of the remote working directory |
|
pwd |
Displays the name of the remote working directory |
|
cd |
Changes the remote working directory |
|
lcd |
Changes the local working directory |
|
mkdir |
Creates a directory on the remote system |
|
rmdir |
Deletes a directory on the remote system |
|
get, mget |
Copies a file (or multiple files) from the remote working directory to the local working directory |
|
put, mput |
Copies a file (or multiple files) from the local working directory to the remote working directory |
|
delete, mdelete |
Deletes a file (or multiple files) from the remote working directory |
For more information, see ftp(1).
How to Open an ftp Connection to a Remote System
-
Make sure you have ftp authentication.
You must have ftp authentication, as described in "Authentication for Remote Logins (ftp)".
-
Open a connection to a remote system by using the ftp command.
$ ftp remote-system
If the connection succeeds, a confirmation message and prompt is displayed.
-
Enter your user name.
Name (remote-system:user-name): user-name
-
If prompted, enter your password.
331 Password required for user-name:
Password: password
If the system you are accessing has established an anonymous ftp account, you will not be prompted for a password. If the ftp interface accepts your password, it displays a confirmation message and the (ftp>) prompt.
You can now use any of the commands supplied by the ftp interface, including help. The principal commands are summarized in Table 10-2.
Example--Opening an ftp Connection to a Remote System
This ftp session was established by the user smith on the remote system pluto:
$ ftp pluto Connected to pluto. 220 pluto FTP server (SunOS 5.8) ready. Name (pluto:smith): smith 331 Password required for smith: Password: password 230 User smith logged in. ftp> |
How to Close an ftp Connection to a Remote System
Close an ftp connection to a remote system by using the bye command.
ftp> bye 221 Goodbye. earth% |
A good-bye message appears, followed by your usual shell prompt.
How to Copy Files From a Remote System (ftp)
-
Change to a directory on the local system where you want the files from the remote system to be copied.
$ cd target-directory
-
Change to the source directory.
ftp> cd source-directory
If your system is using the automounter, the home directory of the remote system's user appears parallel to yours, under /home.
-
Make sure you have read permission for the source files.
ftp> ls -l
-
To copy a single file, use the get command.
ftp> get filename
-
To copy multiple files at once, use the mget command.
ftp> mget filename [filename ...]
You can supply a series of individual file names and you can use wildcard characters. The mget command will copy each file individually, asking you for confirmation each time.
-
Close the ftp connections.
ftp> bye
Examples--Copying Files From a Remote System (ftp)
In this example, the user kryten opens an ftp connection to the system pluto, and uses the get command to copy a single file from the /tmp directory:
$ cd $HOME ftp pluto Connected to pluto. 220 pluto FTP server (SunOS 5.8) ready. Name (pluto:kryten): kryten 331 Password required for kryten. Password: xxx 230 User kryten logged in. ftp> cd /tmp 250 CWD command successful. ftp> ls 200 PORT command successful. 150 ASCII data connection for /bin/ls (129.152.221.238,34344) (0 bytes). dtdbcache_:0 filea files ps_data speckeysd.lock 226 ASCII Transfer complete. 53 bytes received in 0.022 seconds (2.39 Kbytes/s) ftp> get filea 200 PORT command successful. 150 ASCII data connection for filea (129.152.221.238,34331) (0 bytes). 226 ASCII Transfer complete. ftp> bye 221 Goodbye. |
In this example, the same user kryten uses the mget command to copy a set of files from the /tmp directory to his home directory. Note that kryten can accept or reject individual files in the set.
$ ftp> cd /tmp 250 CWD command successful. ftp> ls files 200 PORT command successful. 150 ASCII data connection for /bin/ls (129.152.221.238,34345) (0 bytes). fileb filec filed 226 ASCII Transfer complete. remote: files 21 bytes received in 0.015 seconds (1.36 Kbytes/s) ftp> cd files 250 CWD command successful. ftp> mget file* mget fileb? y 200 PORT command successful. 150 ASCII data connection for fileb (129.152.221.238,34347) (0 bytes). 226 ASCII Transfer complete. mget filec? y 200 PORT command successful. 150 ASCII data connection for filec (129.152.221.238,34348) (0 bytes). 226 ASCII Transfer complete. mget filed? y 200 PORT command successful. 150 ASCII data connection for filed (129.152.221.238,34351) (0 bytes). 226 ASCII Transfer complete.200 PORT command successful. ftp> bye 221 Goodbye. |
How to Copy Files to a Remote System (ftp)
-
Change to the source directory on the local system.
The directory from which you enter the ftp command will be the local working directory, and thus the source directory for this operation.
-
Establish an ftp connection.
-
Change to the target directory.
ftp> cd target-directory
Remember, if your system is using the automounter, the home directory of the remote system's user appears parallel to yours, under /home.
-
Make sure you have write permission to the target directory.
ftp> ls -l target-directory
-
To copy a single file, use the put command.
ftp> put filename
-
To copy multiple files at once, use the mput command.
ftp> mput filename [filename ...]
You can supply a series of individual file names and you can use wildcard characters. The mput command will copy each file individually, asking you for confirmation each time.
-
To close the ftp connection, type bye.
ftp> bye
Examples--Copying Files to a Remote System (ftp)
In this example, the user kryten opens an ftp connection to the system pluto, and uses the put command to copy a file from his system to the /tmp directory on system pluto:
$ cd /tmp ftp pluto Connected to pluto. 220 pluto FTP server (SunOS 5.8) ready. Name (pluto:kryten): kryten 331 Password required for kryten. Password: xxx 230 User kryten logged in. ftp> cd /tmp 250 CWD command successful. ftp> put filef 200 PORT command successful. 150 ASCII data connection for filef (129.152.221.238,34356). 226 Transfer complete. ftp> ls 200 PORT command successful. 150 ASCII data connection for /bin/ls (129.152.221.238,34357) (0 bytes). dtdbcache_:0 filea filef files ps_data speckeysd.lock 226 ASCII Transfer complete. 60 bytes received in 0.058 seconds (1.01 Kbytes/s) ftp> bye 221 Goodbye. |
In this example, the same user kryten uses the mput command to copy a set of files from his home directory to pluto's /tmp directory. Note that kryten can accept or reject individual files in the set.
$ cd $HOME/testdir $ ls test1 test2 test3 $ ftp pluto Connected to pluto. 220 pluto FTP server (SunOS 5.8) ready. Name (pluto:kryten): kryten 331 Password required for kryten. Password: xxx 230 User kryten logged in. ftp> cd /tmp 250 CWD command successful. ftp> mput test* mput test1? y 200 PORT command successful. 150 ASCII data connection for test1 (129.152.221.238,34365). 226 Transfer complete. mput test2? y 200 PORT command successful. 150 ASCII data connection for test2 (129.152.221.238,34366). 226 Transfer complete. mput test3? y 200 PORT command successful. 150 ASCII data connection for filef (129.152.221.238,34356). 226 Transfer complete. ftp> bye 221 Goodbye. |
Remote Copying With rcp
The rcp command copies files or directories between a local and a remote system or between two remote systems. You can use it from a remote system (after logging in with the rlogin command) or from the local system (without logging in to a remote system).
With rcp, you can perform the following remote copy operations:
-
Copy a file or directory from your system to a remote system
-
Copy a file or directory from a remote system to your local system
-
Copy a file or directory between remote systems from your local system
If you have the automounter running, you can perform these remote operations with the cp command. However, the range of cp is constrained to the virtual file system created by the automounter and to operations relative to a user's home directory and, since rcp performs the same operations without these constraints, this section will describe only the rcp versions of these tasks.
Security Considerations for Copy Operations
To copy files or directories between systems, you must have permission to log in and copy files.
Both the cp and rcp commands can overwrite files without warning. Make sure file names are correct before executing the command.
Specifying Source and Target
With the rcp command in the C-shell, you can specify source (the file or directory you want to copy) and target (the location into which you will copy the file or directory) with either absolute or abbreviated pathnames.
|
|
Absolute Pathnames |
Abbreviated Pathnames |
|---|---|---|
|
From Local System |
mars:/home/jones/myfile.txt |
~jones/myfile.txt |
|
After Remote Login |
/home/jones/myfile.txt |
~jones/myfile.txt |
Absolute pathnames identify files or directories mounted on a particular system. In the example above, the first absolute pathname identifies a file (MyFile.txt) on the mars system. Abbreviated pathnames identify files or directories relative to a user's home directory, wherever that might reside. In the first example above, the abbreviated pathname identifies the same file, MyFile.txt, but uses "~" symbol to indicate the jones home directory. In effect . . .
~ = mars:/home/jones
The examples on the second line, above, demonstrate the user of absolute and abbreviated pathnames after a remote login. There is no difference for the abbreviated pathname, but because the remote login operation mounted the jones home directory onto the local system (parallel to the local user's home directory), the absolute pathname no longer requires the system name mars. For more information about how a remote login operation mounts another user's home directory, see "What Happens After You Log In Remotely".
The table below provides a sample of absolute and abbreviated pathnames recognized by the C shell. It uses the following terminology:
-
Working directory - The directory from which the rcp command is entered. Can be remote or local.
-
Current user - The user name under which the rcp command is entered.
|
Logged in to |
Syntax |
Description |
|---|---|---|
|
Local system |
. |
The local working directory |
|
|
path/filename |
The path and filename in the local working directory |
|
|
~ |
The current user's home directory |
|
|
~/path/filename |
The path and filename beneath the current user's home directory |
|
|
~user |
The home directory of user |
|
|
~user/path/filename |
The path and filename beneath the home directory of user |
|
|
remote-system:path/filename |
The path and filename in the remote working directory |
|
Remote system |
. |
The remote working directory |
|
|
filename |
The filename in the remote working directory |
|
|
path/filename |
The path and filename in the remote working directory |
|
|
~ |
The current user's home directory |
|
|
~/path/filename |
The path and filename in the current user's home directory |
|
|
~user |
The home directory of user |
|
|
~/user/path/filename |
The path and filename beneath the home directory of user |
|
|
local-system:path/filename |
The path and filename in the local working directory |
How to Copy Files Between a Local and a Remote System (rcp)
-
Be sure you have permission to copy.
You should at least have read permission on the source system and write permission on the target system.
-
Determine the location of the source and target.
If you don't know the path of the source or target, you can first log into the remote system with the rlogin command, as described in "How to Log In to a Remote System (rlogin) ". Then, navigate through the remote system until you find the location. You can then perform the next step without logging out.
-
Copy the file or directory.
$ rcp [-r] source-file|directory target-file|directory
rcp
(No options) Copies a single file from the source to the target.
-r
Copies a directory from the source to the target.
This syntax applies whether you are logged in to the remote system or in to the local system. Only the pathname of the file or directory changes, as described in Table 10-3 and as illustrated in the examples below.
You can use the "~" and "." characters to specify the path portions of the local file or directory names. Note, however, that "~" applies to the current user, not the remote system, and that "." applies to system you are logged into. For explanations of these symbols, see Table 10-3.
Examples--Copying Files Between a Local and a Remote System (rcp)
Here are a few examples. In the first two, the source is remote; in the last two, the source is local.
In this example, rcp copies the file letter.doc from the /home/jones directory of the remote system pluto to the working directory (/home/smith) on the local system, earth:
earth(/home/smith): rcp pluto:/home/jones/letter.doc . |
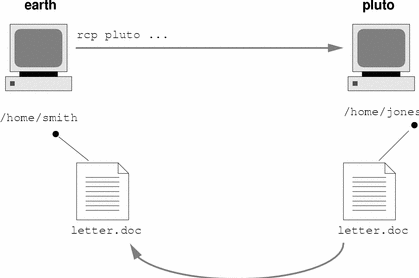
Since the rcp operation is performed without a remote login, the "." symbol applies to the local system, not the remote system.
The working directory happens to be the local user's home directory, so it could have been specified with the "~" symbol as well:
earth(home/smith): rcp pluto:/home/jones/letter.doc ~ |
In the following example, rcp is used --while logged in to the remote system-- to perform the same operation. Although the flow of the operation is the same, the paths change to take into account the remote login:
earth(/home/smith): rlogin pluto . . . pluto(/home/jones): rcp letter.doc ~ |
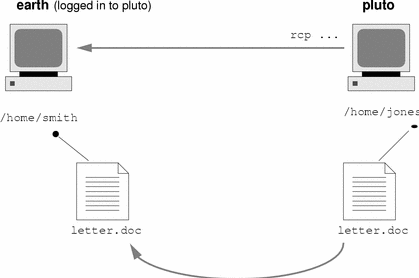
Use of the "." symbol would be inappropriate in this instance because of the remote login; it would simply apply to the remote system, essentially directing rcp to create a duplicate file. The "~" symbol, however, refers to the current user's home directory, even when logged in to a remote system.
In the following example, rcp copies the file notice.doc from the home directory (/home/smith) of the local system earth to the /home/jones directory of the remote system, pluto:
earth(/home/smith): rcp notice.doc pluto:/home/jones |
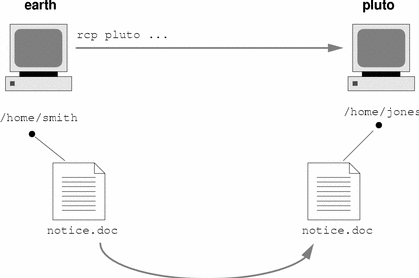
Because no remote filename is provided, the file notice.doc is copied into the /home/jones directory with the same name.
In this example, the operation is repeated, but rcp is entered from a different working directory on the local system (/tmp). Note the use of the "~" symbol to refer to the current user's home directory:
earth(/tmp): rcp ~/notice.doc pluto:/home/jones |
In this example, rcp is used --while logged in to the remote system-- to perform the same operation as in the previous example. Although the flow of the operation is the same, the paths change the take into account the remote login:
earth(/home/smith): rlogin pluto . . . pluto(/home/jones): rcp ~/notice.doc . |
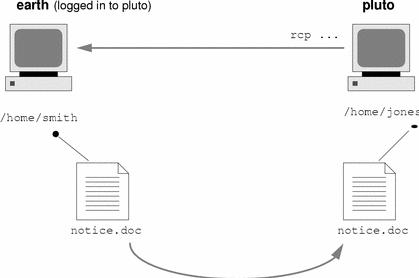
In this instance, the "~" symbol can be used to denote the current user's home directory, even though it is on the local system. The "." symbol refers to the working directory on the remote system because the user is logged in to the remote system. Here is an alternative syntax that performs the same operation:
pluto(/home/jones): rcp earth:/home/smith/notice.doc /home/jones |
- © 2010, Oracle Corporation and/or its affiliates
