Sample Programs
Two sample programs that make use of XFileChooser are included with this release:
-
The first,
DemoEditor, found in Appendix C, The DemoEditor Sample Program, is a simple file editor that uses the XFileChooser in selecting a file for editing. -
The second,
XFileChooserDemo, found in Appendix D, The XFileChooser Sample Program, is a mock application that shows how a file chooser may be customized.
The DemoEditor Sample Program
The DemoEditor program allows a user to open a text file and perform simple edits on it (Cut, Paste, etc.). The file can then be saved to another name.
Figure 5-6 The DemoEditor Program

As part of the initialization of the application,
-
menu items are created for opening, closing, and saving a file, and for exiting;
-
listeners are added to the menu items;
-
the menu items are attached to the File menu.
JMenu filemenu = new JMenu("File");
openItem = new JMenuItem("Open");
openItem.addActionListener(this);
fileMenu.add(openItem);
If an item on the File menu is selected, an actionEvent is fired off which causes the actionPerformed() method to be called. actionPerformed() checks the type of menu item selected and acts accordingly: it creates an XFileChooser object, and, if Open or Save is selected from the menu, brings up a file chooser.
public void actionPerformed(ActionEvent ae) {
   int retval;
   XFileChooser chooser = new XFileChooser();
   if (ae.getSource == closeItem)
     closeDocument();
   } else if (ae.getSource() == openItem) {
      retval = chooser.showOpenDialog(this);
      if (retval == XFileChooser.APPROVE_OPTION) {
        XFile theFile = chooser.getSelectedXFile();
   // make sure we're not already editing a file!
        closeDocument();
        if (theFile != null)
          readFromFile(theFile);
     }
   } else if (ae.getSource() == saveItem) {
     retval = chooser.showSaveDialog(this);
     if (retval == XFileChooser.APPROVE_OPTION) {
        XFile theFile = chooser.getSelectedXFile();
        if (theFile != null)
          writeToFile(theFile);
        }
   } else if (ae.getSource() == exitItem) {
     System.exit(0);
   }
}
Some things to note about the foregoing:
-
All the file I/O involves XFile objects, not File objects. The XFileChooser method getSelectedXFile() is used in place of the JFileChooser method getSelectedFile().
readFromFile(), which reads from a file into the Editor, takes an XFile as an argument, and in turn calls XFileInputStream(), which is the Extended File API's equivalent to the java.lang.io method FileInputStream():
public void readFromFile(XFile file) {
     Document doc = jtp.getDocument();
     try {
          XFileInputStream is = new XFileInputStream(file);
          String ins = retrieveAsString(is);
          doc.insertString(0, ins, stdoutSet);
...
-
The same file chooser is instantiated for both Open and Save As. This has two advantages: first, the chooser remembers the current directory between uses, so that the Open and Save As dialogue windows automatically share the same directory. Second, if you choose to customize the file chooser, you only have to customize it once; your customizations apply to both the Open and Save versions of it.
-
The actual dialogue box (shown in Figure 5-1) is brought up by the call to either showOpenDialog() or showSaveDialog(), both of which are inherited from JFileChooser. (APPROVE_OPTION is also inherited from JFileChooser.)
The XFileChooserDemo Sample Program
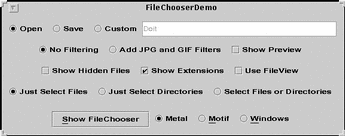
The XFileChooserDemo program is a mock application designed to show the different ways an XFileChooser can be customized.
Note -
Since this program is just a modification of the sample program FileChooserDemo2 shown in the Java Tutorial, much of the description has been left out. Please see How To Use File Choosers for a description of that program.
Figure 5-7 The XFileChooserDemo Sample Program

When the settings are as shown in Figure 5-7, a default file chooser (shown in Figure 5-1), will pop up when the Show File Chooser button is pressed.
This sample program differs from DemoEditor in several aspects:
First, the file chooser that comes up has been customized in three different ways:
-
A user-configurable filter has been added; that is, the user can choose to filter the file list shown in the file chooser.
-
The FileView -- the way that each file appears in the list, depending on its type -- has been modified to display a custom icon next to each file name.
-
An Accessory component has been provided for the files displayed. In this case, it displays a preview of a selected file if the file is a graphic file.
(See "Customizing the File Chooser" for information on other ways a file chooser may be customized.)
The second way that this program differs from DemoEditor is that the file chooser is invoked not from a menu but from a single button, the Show File Chooser button. Which kind of file chooser is brought up -- Open, Save, or a custom operation -- depends upon the settings in the main window.
Finally, unlike DemoEditor, the look-and-feel of this sample program is changeable by the user. The file chooser inherits the look-and-feel of its parent application.
Determining Which File Chooser to Bring Up
The DemoEditor program had separate menu items for opening and saving a file, so that a different file chooser would appear, depending on the item selected. (Remember, however, that the same XFileChooser object is instantiated in both cases.) Things are different with the XFileChooserDemo program: There's a single button, Show File Chooser, and which dialogue this button brings up depends on which radio button (Open, Save, or Custom) in the main window has been selected. The code for using the Open button is shown below.
// Create an `Open' radio button
openButton = new JRadioButton("Open")
...
openButton.addActionListener(optionListener);
// Create `Show File Chooser' button
button = new JButton("Show File Chooser");
button.addActionListener(this);
When a radio button is selected, OptionListener() is called. If the Open radio button is selected, the OptionListener() sets the file chooser to be an Open file chooser with the setDialogType() method:
class OptionListener implements ActionListener {
   public void actionPerformed(ActionEvent e) {
     JComponent c = (JComponent) e.getSource();
     if (c == openButton) {
        chooser.setDialogType(XFileChooser.OPEN_DIALOG);
...
OptionListener() does the same sort of thing when Save is chosen, except that the dialogue type is set to SAVE_DIALOG. Note, by the way, that setDialogType() and the OPEN_DIALOG field are inherited from JFileChooser.
In the DemoEditor program, the actionPerformed() method chose between bringing up a file chooser with showOpenDialog() or showSaveDialog(), depending on whether Open or Save was selected off the File menu. Since the dialog type is already set here, it is not necessary to differentiate between them in actionPerformed(). Instead, a "generic" method, showDialog(), is used to bring up the file chooser:
public void actionPerformed(ActionEvent e) {
   int retval = chooser.showDialog(frame, null);
...
Another difference to note is that the XFileChooser is not instantiated in actionPerformed(), as it was in the DemoEditor program. Instead, it's instantiated at the class level so that the dialog type can be set in OptionListener(). In both programs, however, a single file chooser is instantiated for all operations (Open, Save, or custom).
Filtering Files
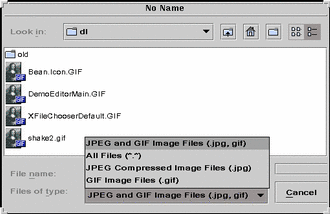
As mentioned in "Customizing the File Chooser", three different file filters can be applied to a file chooser. In this program, a filter chosen by the user is enabled. If the Add JPEG and GIF Filters radio button is selected, the resulting file chooser presents the user with several filters to choose from, as shown in Figure 5-8:
Figure 5-8 Filtering Files

The file filters used by XFileChooserDemo are described in the class ExampleFileFilter, found in ExampleFileFilter.java (shown in "ExampleFileFilter"). ExampleFileFilter takes two arguments: a file extension (for example, .jpg) and a description of the file, and filters files appropriately.
Here is where XFileChooserDemo instantiates the various filters:
jpegFilter = new ExampleFileFilter("jpg", "JPEG
Compressed Image Files");
gifFilter = new ExampleFileFilter("gif", "GIF
Image Files");
bothFilter = new ExampleFileFilter(new String[] ""jpg", "gif"}, "JPEG
and GIF Image Files");
The program's OptionListener() checks to see if the radio buttons governing filters have been changed. If the user has selected the Add JPEG and GIFs button, OptionListener() adds the various filters provided by ExampleFileFilter, using the addChoosableFileFilter() method inherited from JFileChooser:
class OptionListener implements ActionListener {
   public void actionPerformed(ActionEvent e) {
      JComponent c = (JComponent) (e.getsource();
...
        else if (c == addFiltersButton) {
           chooser.addChoosableFileFilter(bothFilter);
              chooser.addChoosableFileFilter(jpgFilter);
           chooser.addChoosableFileFilter(gifFilter);
        }
(The program could have used finer control in determining which filters to add to the file chooser, but the approach used here minimizes the number of radio buttons cluttering the main window.)
When the user chooses a new filter in the file chooser, a CHOOSABLE_FILE_FILTER_CHANGED_PROPERTY is fired off, and the panel displaying the list of files gets updated accordingly, to show only the filtered files.
Modifying the FileView
The FileView is the way a file in a list is presented. By default, a file chooser shows each file with a small icon showing whether the file is a directory of a flat file. An example of a modified FileView is seen in Figure 5-8; compare the icon shown next to the file shakes2.gif to the icon that appears in next to it in Figure 5-1.
Setting the FileView works in the same way as filtering files does. Here's how it's done in XFileChooserDemo:
-
Create a custom subclass of the class FileViewapi, overriding any of its abstract methods you need. For this sample program, one has been created called ExampleFileView (see "ExampleFileView"), which looks at a file's extension (for example,.jpg) and returns the file's name and, if the extension indicates that the file is a graphic file, an icon representing that type of file.
-
Create a FileView object.
fileView = new ExampleFileView();
-
Add a checkbox for changing the FileView, and add a listener to it.
useFileViewButton = new JCheckbox("Use FileView");
useFileViewButton.addActionListener(optionListener);
-
In optionListener(), call setFileView() when the Use FileView checkbox gets selected.
if (c == useFileViewButton) {
     if (useFileViewButton.isSelected() {
          chooser.setFileView(fileView);
     else
                chooser.setFileView(null);
Now when a file chooser is brought up ExampleFileView will be used to display the files in the file list.
Setting the Accessory
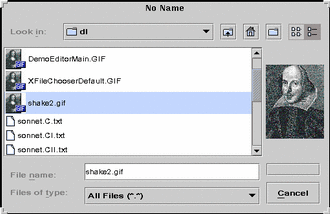
The XFileChooserDemo's accessory component is a small panel on the right side of the file chooser that displays a preview of GIF and JPEG graphics files. In Figure 5-9 it's the picture of William Shakespeare:
Figure 5-9 The XFileChooserDemo's Accessory

Another use for an accessory is a panel with more controls in it (say, checkboxes to toggle certain features).
Two aspects of accessories are important:
-
An accessory can be any object that inherits from JComponent.
-
The accessory should implement either paint() or paintComponent().
-
The component should have a preferred size that looks good in a file chooser.
The XFileChooserDemo program begins by creating the file chooser; the accessory (here called the previewer), which is declared to be a FilePreviewer object; and a related checkbox. It adds a listener (ActionListener) to the checkbox, as we've seen with the file view and file filtering:
chooser = new XFileChooser;
...
previewer = new FilePreviewer(chooser);
...
accessoryButton = new JCheckBox("Show Preview");
accessoryButton.addActionListener(optionListener);
The OptionListener() checks to see if the Show Preview checkbox is checked; if it is, it calls setAccessory():
if (c == accessoryButton) {
     if (AccessoryButton.isSelected()) {
          chooser.setAccessory(previewer);
     else
          chooser.setAccessory(null);
The previewer itself just sets its preferred size and adds a PropertyChangeListener() that listens for changes to the file chooser's state.
This is its only method, its constructor:
public FilePreviewr(XFileChooser fc) {
     setPreferredSize(new Dimension(100, 50));
     fc.addPropertyChangeListener(this);
If a property is changed, addPropertyChangeListener() calls the abstract method PropertyChange(). Here's how PropertyChange() defined for the XFileChooserDemo program. It first checks to see what property has changed; if a new file has been selected, then a new preview is required.
public void propertyChange(PropertyChangeEvent e) {
     String prop = e.getPropertyName();
     if (prop.equals(XFileChooser.SELECTED_XFILE_CHANGED_PROPERTY)) {
          f = (File) e.getNewValue()
          if (isShowing()) {
               loadImage();
               repaint();
          }
     }
}
- © 2010, Oracle Corporation and/or its affiliates
