Viewing Images
With Image Viewer, you can view, edit, print, and translate the file formats of monochrome and color images and PostScript files. See "Image Viewer File Formats" for a list of the file formats that Image Viewer can open. See "Viewing PostScript Files" to learn how to view PostScript files.
To Open an Image File
-
Choose Open from the File menu.
The Open dialog box appears.
-
To navigate among and display the contents of folders, double-click a folder in the Folders list.
-
Select an image file from the Files list or type its name in the Enter file name field.
-
Click OK to open the image file.
To Open an Image File Using Drag and Drop
If Image Viewer is already running, drop an image file icon on an open Image Viewer window.
If Image Viewer is not running:
-
Drag an image file icon from File Manager and drop it on the workspace.
-
Click mouse button 3 over the image file icon on the workspace and choose Open from the Workspace Object menu.
Image Viewer starts and the image file is displayed in Image Viewer's View window.
-
To remove the icon from the Workspace when you are finished with it, click mouse button 3 on the icon and select Remove From Workspace from the pop-up menu.
To View an Image in Gray Scale or Color
To determine whether images appear in gray scale or color:
-
Choose Options from the File menu.
-
Select either Gray Scale or Color for the View Image In setting.
-
If you chose to display images in color, set the Color option to the number of colors you want used.
The Color setting depends on the type of display monitor you have. For example, if only one option, such as 256, appears, that is the only option available on your monitor.
-
Click OK to activate the settings and close the dialog box. Click Apply to activate the setting and leave the dialog box displayed.
To Move the Image within the View Window
-
Select Palette from the Edit menu if the palette is not displayed.
-
Click the Pan tool in the palette.
See "Using the Palette Tools" for information on the palette.
-
Move the pointer into the View window, over the image or page.
The pointer changes to a hand shape.
-
Drag the pointer in the direction you want to move the image or page.
To Change an Image Orientation in the View Window
To rotate the displayed image in 90-degree increments (mimics landscape or portrait orientation):
-
Choose Page Viewing Controls from the View menu.
-
Select a percentage by which you want the image rotated (90 degrees, 180 degrees, or 270 degrees).
-
Select whether you want the image rotated Right or Left.
-
Click OK to rotate the image and close the dialog box, or Apply to rotate the image and leave the dialog box displayed.
To Display Information about an Image
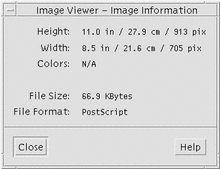
Choose Image Info from the View menu.
The Image Information dialog box appears.
Figure 14-2 Image Information dialog box

The dialog box displays the following information about the image:
- © 2010, Oracle Corporation and/or its affiliates
