Configuring Synchronization
The application opens by default to the Synchronization tab.
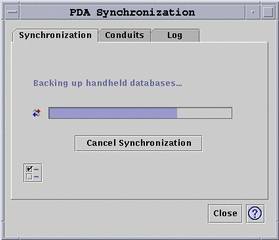
Figure 20-1 Configuring Synchronization

The application begins a synchronization operation using current or default configurations on the currently active or default conduits, as defined on the Conduits tab. The first thing you must do when the Synchronization window appears is establish the port setting in the Synchronization Properties window.
Setting Synchronization Properties
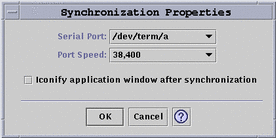
Clicking the properties button (the one with a checkmark on it) on the Synchronization tab brings up the Synchronization Properties dialog box (refer to the following figure). This dialog contains all of the PDA Sync options that are not directly related to specific conduits and therefore do not belong in the conduit configuration dialog boxes. The options in this dialog box are not likely to require changing very often.
Figure 20-2 Setting Synchronization Properties

In this dialog you can:
-
Set the serial port. Select the port (A or B) to which you connected the PDA.
-
Set the port speed. The default is "As fast as possible". The choices in this pull-down menu are the speeds that are supported by the API.
-
Set the "Iconify application window after synchronization" to ON (default) or OFF. The window will minimize itself to an icon automatically upon completion of the sync. If it is turned OFF, the window will remain open on the screen after the sync is completed.
- © 2010, Oracle Corporation and/or its affiliates
