설치 계획과 설정
Solaris Web Start 실행 방법
Solaris Web Start의 실행 방법은 다음 두 가지가 있습니다.
-
로컬 또는 원격 CD-ROM 드라이브 또는 네트워크 연결, 프레임 버퍼, 키보드 및 모니터가 필요한 그래픽 사용자 인터페이스
-
로컬 또는 원격 CD-ROM 드라이브 또는 네트워크 연결, 프레임 버퍼, 키보드 및 모니터가 필요한 명령줄 사용자 인터페이스. Solaris Web Start 명령줄 사용자 인터페이스는 tip(1)을 사용하여 실행할 수 있습니다.
일반적으로 그래픽 사용자 인터페이스와 명령줄 사용자 인터페이스에서의 명령 내용과 시퀀스는 아래 예에서와 같이 약간의 차이를 제외하고는 동일합니다.
예 1-1 그래픽 사용자 인터페이스: 시간대 대화 상자
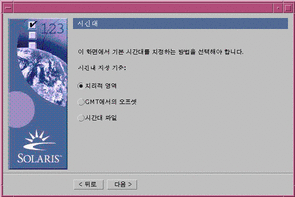
예 1-2 명령줄 사용자 인터페이스: 시간대 메뉴와 프롬프트
Please select how to specify your default time zone. Specify Time Zone by: 1. Geographic region 2. Offset from GMT 3. Time zone file Please enter the number corresponding to how you would like to specify the time zone [1]: |
사용할 인터페이스의 결정 기준
시스템용 프레임 버퍼가 발견되면 Solaris Web Start는 그래픽 사용자 인터페이스를 사용하고 프레임 버퍼가 발견되지 않으면 명령줄 사용자 인터페이스를 사용합니다.
설치 계획하기
주 -
본 설명서에 있는 지시 사항들은 CD를 사용하여 Solaris 8 소프트웨어를 설치하는 방법에 대해 설명합니다. 네트워크 상에서 Solaris 8 소프트웨어를 설치하도록 선택하면 일부 단계가 달라집니다.
-
먼저 실행할 작업을 결정하려면 이 의사 결정표를 사용하십시오.
Solaris 소프트웨어 설치 수단
실행 단계
시스템에 부착된 CD-ROM 드라이브
단계 2. 네트워크 상의 CD-ROM 드라이브
Solaris 8 Advanced Installation Guide와 이 장 및 다음 장들에 제시되어 있는 단계.
-
시스템에 Solaris 운영 환경이 이미 설치되어 있습니까?
-
하드웨어가 지원되는지 확인하십시오.
-
시스템이 네트워크에 연결되어 있는 경우, Solaris 운영 환경을 설치할 시스템에 관해 다음과 같은 정보를 수집하십시오.
주 -시스템에 Solaris 운영 환경이 설치되어 있지 않은 경우, 시스템 관리자나 네트워크 관리 책임자에게 다음 정보를 문의하십시오.
정보
예
정보를 찾기 위한 명령(Solaris가 설치되어 있는 경우)
호스트 이름
crater
uname -n
호스트 IP 주소
129.221.2.1
ypmatch system_name hosts 또는
nismatch system_name hosts.org_dir
Subnet mask
255.255.255.0
more /etc/netmasks
이름 서비스 유형(DNS, NIS 또는 NIS+)
passwd:     files nis
group:      files nis

hosts:      xfn nis [NOTFOUND=return] files
networks:   nis [NOTFOUND=return] files
protocols:  nis [NOTFOUND=return] files
rpc:        nis [NOTFOUND=return] files
ethers:     nis [NOTFOUND=return] files
netmasks:   nis [NOTFOUND=return] files
bootparams: nis [NOTFOUND=return] files
publickey:  nis [NOTFOUND=return] files

netgroup:   nis

automount:  files nis
aliases:    files nis

services:   files nis
sendmailvars:   files
cat /etc/nsswitch.conf
도메인 이름
lbloom.West.Arp.COM
domainname
이름 서버의 호스트 이름
thor75
ypwhich
이름 서버의 호스트 IP 주소
129.153.75.20
ypmatch nameserver_name hosts 또는
nismatch nameserver_name hosts.org_dir
-
설치할 소프트웨어와 해당 소프트웨어 설치에 필요한 전체 디스크 공간을 결정하십시오.
-
Solaris 소프트웨어 그룹
소프트웨어 그룹
권장 디스크 공간
전체 배포와 OEM 지원 2.4GB 전체 배포 2.3GB 개발자 시스템 지원 1.9GB 최종 사용자 시스템 지원 1.6GB
주 -권장 디스크 공간에는 교체 공간이 포함되어 있습니다. 교체 공간의 최소 크기는 320MB이지만 가용 메모리와 기타 요소들로 인해 그 이상의 공간이 필요할 수 있습니다. 기본적으로 Solaris Web Start는 교체 공간으로 512MB를 할당합니다.
-
기타 소프트웨어
필요한 디스크 공간은 설명서를 참조하십시오.
-
판매자 또는 협력업체 소프트웨어
판매자 또는 협력업체 소프트웨어 설명서를 참조하십시오.
-
홈 디렉토리용 공간
홈 디렉토리에는 우편, 텍스트 또는 데이터 파일 및 응용프로그램 파일과 같은 사용자 파일들을 저장할 수 있습니다.
-
-
-
Solaris 8 설치 영어 SPARC 플랫폼판 또는 Solaris 8 설치 다국어 SPARC 플랫폼판
-
Solaris 8 소프트웨어 1/2 SPARC 플랫폼판 과 Solaris 8 소프트웨어 2/2 SPARC 플랫폼판
-
Solaris 8 언어 SPARC 플랫폼판 (다국어 CD를 사용하는 경우)
-
설치를 위한 설정 방법
-
tip(1) 행을 통해 Solaris 소프트웨어를 설치하시겠습니까?
-
아니면 다음 단계로 넘어가십시오.
-
tip 행을 사용하려면 창 디스플레이 크기가 최소 80열에 24행이 되는지 확인하십시오.
주 -tip 창의 현재 크기를 결정하려면 stty(1) 명령을 사용하십시오.
-
-
Solaris 8 설치 영어 SPARC 플랫폼판 또는 Solaris 8 설치 다국어 SPARC 플랫폼판라는 제목의 CD를 시스템의 CD-ROM 드라이브에 삽입하십시오.
-
시스템을 부팅하십시오.
시스템 상태
실행 방법
새 시스템
시스템을 켜십시오.
기존 시스템
ok 프롬프트가 표시되도록 한 다음(수퍼유저로서 halt를 입력하거나 Stop과 A 키를 동시에 누름),
boot cdrom을 입력하십시오.
-
Solaris 8 설치 영어 SPARC 플랫폼판라는 제목의 CD를 사용하는 중이면 다음과 유사한 정보가 표시됩니다.
Boot device: /sbus/espdma@e,8400000/esp@e,8800000/sd@6,0:f
File and args:
SunOS Release 5.8 Version Generic 32-bit
Copyright 1983-2000 Sun Microsystems, Inc.  All rights reserved.
Configuring /dev and /devices
Using RPC Bootparams for network configuration information.
le0: No carrier - cable disconnected or hub link test disabled?
Solaris Web Start 3.0 installer

English has been selected as the language in which to perform the
install.
Starting the Web Start 3.0 Solaris installer

Solaris installer is searching the system's hard disks for a
location to place the Solaris installer software.

Your system appears to be upgradeable.
Do you want to do a Initial Install or Upgrade?

  1) Initial Install
  2) Upgrade
  Please Enter 1 or 2 >
-
Solaris 8 설치 다국어 SPARC 플랫폼판라는 제목의 CD를 사용하는 중이면 다음과 유사한 정보가 표시됩니다.
Boot device: /sbus/espdma@e,8400000/esp@e,8800000/sd@6,0:f  File and args:
SunOS Release 5.8 Version Generic 32-bit
Copyright 1983-2000 Sun Microsystems, Inc.  All rights reserved.
Configuring /dev and /devices
Using RPC Bootparams for network configuration information.
le0: No carrier - cable disconnected or hub link test disabled?
Solaris Web Start 3.0 installer

The Solaris Installer can be run in English, or any of the following
languages:

  1) English           6) Japanese
  2) German            7) Korean
  3) Spanish           8) Swedish
  4) French            9) Simplified_Chinese
  5) Italian          10) Traditional_Chinese
 Select the language you want to use to run the installer:
-
-
-
Solaris 8 설치 영어 SPARC 플랫폼판 CD를 사용하는 중이면 다음 단계로 넘어가십시오.
-
Solaris 8 설치 다국어 SPARC 플랫폼판 CD를 사용하는 중이면 프롬프트, 메시지 및 기타 설치 정보를 표시할 언어의 번호를 입력하십시오.
다음과 유사한 정보가 (선택한 언어로) 표시됩니다.
language_you_selected has been selected as the language in which to perform
the install.
Starting the Web Start 3.0 Solaris installer

Solaris installer is searching the system's hard disks for a
location to place the Solaris installer software.

Your system appears to be upgradeable.
Do you want to do a Initial Install or Upgrade?

  1) Initial Install
  2) Upgrade
  Please Enter 1 or 2 >
-
-
초기 설치의 경우 프롬프트 상태에서 1을 입력한 다음 Enter를 누르십시오.
다음과 유사한 정보가 표시됩니다.
The default root disk is /dev/dsk/c0t0d0.
The Solaris installer needs to format
/dev/dsk/c0t0d0 to install Solaris.

WARNING: ALL INFORMATION ON THE DISK WILL BE ERASED!


Do you want to format /dev/dsk/c0t0d0?  [y,n,?,q]
-
프롬프트 상태에서 y를 입력한 다음 Enter를 누르십시오.
다음과 유사한 정보가 표시됩니다.
NOTE: The swap size cannot be changed during filesystem layout.


Enter a swap slice size between 384MB and 2027MB, default = 512MB [?]
-
프롬프트 상태에서 Enter를 눌러 교체 슬라이스 크기를 기본 설정값으로 지정하거나 원하는 교체 슬라이스 크기를 입력한 다음 Enter를 누르십시오.
다음과 유사한 정보가 표시됩니다.
The Installer prefers that the swap slice is at the beginning of the
disk. This will allow the most flexible filesystem partitioning later in
the installation.

Can the swap slice start at the beginning of the disk  [y,n,?,q]
-
교체 공간을 디스크 시작 부분에 배치하시겠습니까(이렇게 하면 파일 시스템 영역 분할 작업을 융통성 있게 수행할 수 있고 디스크 액세스 효율이 높아집니다)?
-
원한다면 y를 입력하고 Enter를 누른 다음 단계 10로 넘어가십시오.
-
원하지 않는다면 n을 입력하고 Enter를 누르십시오.
다음과 유사한 정보가 표시됩니다.
WARNING: Placing the swap slice at a cylinder location other than
cylinder 0
requires expert knowledge about disk layout. This choice may affect
disk layout choices later in the installation.

Enter a starting cylinder between 0 and 2043, default = 0 [?]
-
-
Enter를 눌러 기본 설정 시작 실린더(0)를 선택하거나 원하는 시작 실린더를 입력한 다음 Enter를 누르십시오.
다음과 유사한 정보가 표시됩니다.
You have selected the following to be used by the Solaris installer: Disk Slice : /dev/dsk/c0t0d0 Size : 512 MB Start Cyl. : 0 WARNING: ALL INFORMATION ON THE DISK WILL BE ERASED! Is this OK [y,n,?,q] -
프롬프트 상태에서 y를 입력한 다음 Enter를 누르십시오.
다음과 유사한 정보가 표시됩니다.
The Solaris installer will use disk slice, /dev/dsk/c0t0d0s1.
After files are copied, the system will automatically reboot, and
installation will continue.
Please Wait...

Copying mini-root to local disk....done.


Copying platform specific files....done.

Preparing to reboot and continue installation.
Rebooting to continue the installation.
Syncing file systems... 41 done
rebooting...
Resetting ...

            Sun Ultra 1 SBus (UltraSPARC 143MHz), Keyboard Present
            OpenBoot 3.5, 64 MB memory installed, Serial #9058749.
            Ethernet address 8:0:20:8d:35:a5, Host ID: 808d35a5.


Rebooting with command: boot /sbus@1f,0/espdma@e,8400000/esp@e,
8800000/sd@0,0:b
Boot device: /sbus@1f,0/espdma@e,8400000/esp@e,8800000/sd@0,0:b
File and args:
SunOS Release 5.8 Version Generic 32-bit
Copyright 1983-2000 Sun Microsystems, Inc.  All rights reserved.
Configuring /dev and /devices
Using RPC Bootparams for network configuration information.
le0: No carrier - cable disconnected or hub link test disabled?
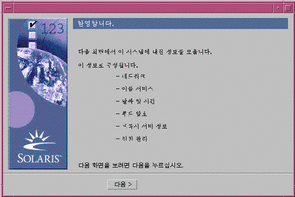
몇 초 뒤에 환영 창이 나타납니다.
-
제 2 장으로 넘어가십시오.
- © 2010, Oracle Corporation and/or its affiliates


