Edit Menu
The commands on the Edit menu are common to most DeskSet tools. Click MENU on the Edit button to display the Edit menu.
Whenever a command cannot be performed, the corresponding menu item is dimmed. For example, Undo is dimmed when there are no editing operations to undo.
Clear
The Clear command removes the current sound data from the display canvas. Click SELECT on Clear when you want to delete all the data in the canvas.
Note -
The clear operation does not change the name of the file that's being edited. Take care not to accidentally save an empty canvas to an audio file.
The clear operation can be undone, and the audio data is retained so that it can be used by a Redo operation. However, since newly recorded data consumes space in the temp file directory, you might consider using the File New operation. This operation, which cannot be undone, recovers the unused space in the filesystem.
Undo
The Undo command reverses the effects of the last editing command issued. Click MENU on Undo to display the Undo submenu, which has the following options:
-
Last Edit--Restores the previous data prior to the last change. This is the default action for Undo. -
All Edits--Restores all edited changes to their state as of the last time the audio file was saved, loaded, or cleared.
Redo
The Redo command restores the effects of the Undo command. Click MENU on Redo to display the Redo submenu, which has the following options:
-
Last Undo--Restores the previously revised data. This is the default action for Redo. -
All Undos--Restores all edited changes.
Making edits to the audio buffer clears any subsequent editing history in the redo list.
Cut
The Cut command removes the current selection from your sound file and places it on the clipboard. Click SELECT on Cut to cut the selection.
Copy
The Copy command copies the current selection to the clipboard, without modifying the original sound file. Click SELECT on Copy to copy the selection.
Paste
The Paste command pastes data currently stored on the clipboard into the current audio file at the location specified by the play position pointer. For example, after doing a Cut or Copy, the next step is often to paste the stored data to some new location. Click SELECT on Paste to paste the selection.
Delete
The Delete command removes the current selection from the sound file, without modifying the contents of the clipboard. Use Delete instead of Cut when something is on the clipboard that should not be overwritten or when you are sure you do not want to use the selection again.
Click MENU on Delete to display the Delete submenu with the following options:
-
Selection--This is the default, which deletes the current audio selection. -
Unselected--This option deletes everything that is not selected. This enables you to select the part of an audio segment that you want, then delete the parts that you don't want. -
All Silence--This option deletes all silent segments, which are indicated by horizontal lines. This is useful, for example, when you are sending or storing voice mail. -
Silent Ends--This option deletes only the silent segments at the beginning and end of the file. This enables you to remove a pause that occurs between the time you press the Rec button and start talking, or the pause between the time that you stop talking and press the Stop button.
Properties
Properties... enables you to modify the functionality of Audio Tool.
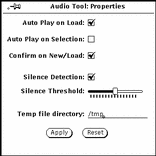
Click SELECT on this menu item to display the Audio Tool: Properties window, shown in Figure 11-19.
Figure 11-19 Audio Tool: Properties Window

The controls on the Audio Tool: Properties
window are described in the following paragraphs.
-
Auto Play on Load:--Causes Audio Tool to begin playing files as soon as they are loaded or dragged and dropped onto the drop target.
-
Auto Play on Selection:--Causes selections to be played immediately after a selection is made. This option can be useful when you are working on a specific editing task because the entire selection replays each time that you make or change a selection.
-
Confirm on New/Load:--Causes a confirmation message to be displayed if a file contains unsaved data when a New or Load operation is performed.
-
Silence Detection:--Turns silence detection ON or OFF. If this option is turned off, no silence detection occurs and the entire audio file is displayed as a single sound segment. Turning off this option speeds up the time it takes to load an audio file.
Note -
Silence detection is automatically suppressed for audio file formats that have a sample rate greater than 16kHz, regardless of the silence detection setting in the Edit Properties... window.
-
Silence Threshold:--Changes the parameters for silence detection. Moving the slider to the left increases the sensitivity to short pauses. This should increase the number of sound and silence segments. Moving the slider to the right decreases the sensitivity to short pauses. This should decrease the number of segments.
-
Temp file directory:--This displays the name of the directory where temporary sound files are placed. All newly recorded data is stored in this directory until the data is saved.
Note -
Recorded audio can quickly use up disk space. Set the temp file directory to a file system that contains adequate disk space. Also, if you are using high sampling rates (e.g., CD or DAT format), you may have difficulty recording to a remotely mounted temp file system.
In addition, there are two buttons at the bottom of the Properties window, Apply and Reset. Use these buttons as follows:
-
Click SELECT on
Applyto apply all changes made in the Properties window. -
Click SELECT on
Resetto restore all parameters to their original value, as set by the last Apply operation.
- © 2010, Oracle Corporation and/or its affiliates
