Chapter 12 Tape Tool
Tape Tool enables you to copy files and directories onto a tape cartridge. You may need to do this to make backup copies or to archive files that you want to retain but that you do not need on a regular basis. Or, you may need to copy files or directories onto tape in order to pass them on to someone else with a compatible system who can then extract them from the tape.
Tape Tool provides a user interface to the UNIX tar tape archiving and retrieval functions. Refer to the manual page for tar for more detailed information.
Note -
Tape Tool is not intended to be an all-purpose system backup tool. It cannot read tapes that have been written using the cpio command.
To open Tape Tool, choose Workspace -> Programs -> Tape Tool.
Tape Tool Icon
The Tape Tool icon has an image of a tape cartridge, as shown in Figure 12-1.
Figure 12-1 Tape Tool Icon
You can select files and folders from the File Manager to be archived on tape. You can drag and drop them as a group or individually onto the Tape Tool icon or onto the open Tape Tool window to accumulate a list of files to be written to a tape or archive file.
Tape Tool Window
The Tape Tool base window is shown in Figure 12-2.
Figure 12-2 Tape Tool Window
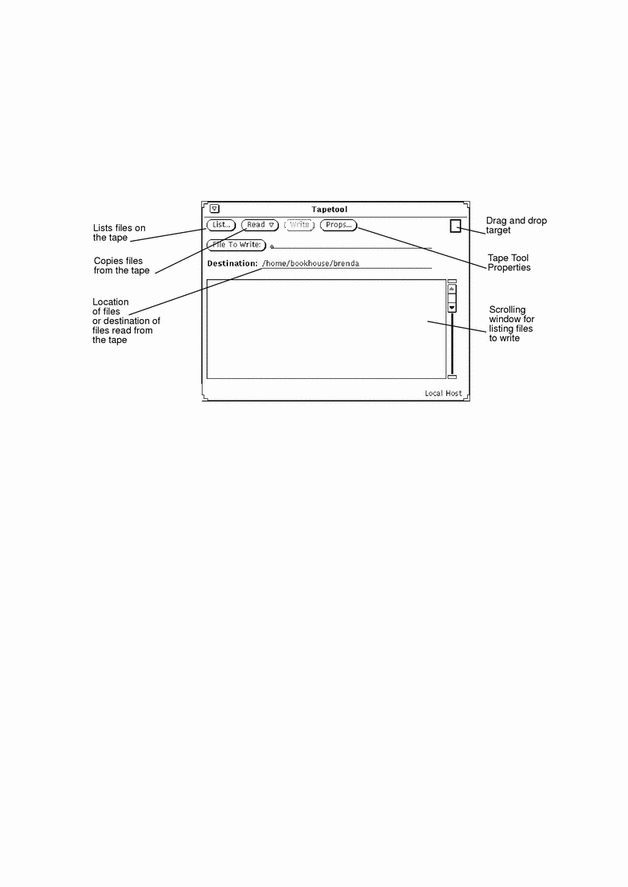
You can perform the following operations from the Tape Tool window:
-
List the files from a streaming tape cartridge or archive file that have been archived using the tar command.
-
Read some or all of the files from the tape or archive file into the directory that you specify.
-
Write specific files or directories that you specify onto a streaming tape cartridge or into an archive file.
-
Display a window in which you set the properties for the tar command from the Tape Tool Properties window.
The control area provides controls for listing, reading to tape, writing from tape, and setting Tape Tool properties.
Use the File To Write button and text field to type in the names of files that you want to write to tape. The scrolling list displays a list of the files you specify by typing file names or by dragging and dropping icons from the File Manager.
If files were archived without a path name or with a relative path name, you can specify in the Destination field where those files are put in your file system when they are read from the tape. The default destination is your current working directory.
If the files on a tape have a complete path name (absolute path name), the files are always put in the directory specified on the tape, regardless of what you type in the Destination field. To strip files of their absolute path name when you archive them, set the Strip Path option in the Tape Tool Properties window to All and click SELECT on the Apply button.
Each of the Tape Tool operations is described in more detail in the following sections.
Editing the List of Files in the Tape Contents Window
Once the files are listed (by pressing the List button) in the Tape Contents window, you can retrieve all of the files in the list, retrieve specific selected files, or edit the list to remove files you do not want to retrieve.
The Tape Contents window has a Read Functions pop-up menu, shown in Figure 12-3. To display this menu, move the pointer into the Tape Contents window and press MENU.
Figure 12-3 Read Functions Pop-up Menu in the Tape Contents Window
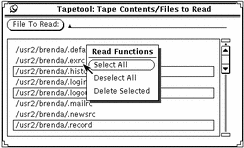
Select All from the Read Functions menu selects all files on the tape.
You can edit a group of files by clicking SELECT on the name of each file that you want to delete. Clicking SELECT on a selected file deselects it. Files such as group, licenses, and passwd are highlighted, as shown in Figure 12-4.
Figure 12-4 Selected Files to Read (group, licenses, and passwd)
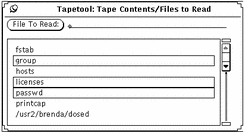
Delete Selected from the Read Functions pop-up menu removes these files from the list. Choose Select All and then Delete Selected from the pop-up menu to delete all the files from the list.
To restore an accidentally deleted file, add it back to the list by typing the file name in the File To Read text field, then press the Return key or click SELECT on the File To Read button.
These functions prepare the scrolling list for an operation from the Read menu described in the next section.
Reading Files from a Tape
The Read menu, available from the Read button at the top of the Tape Tool base window, has three options to read files from the tape or archive files to the directory specified in the Tape Tool window.
When you read files that have a path name in front of them (an absolute path name), as shown in the Tape Contents list, that path name is always used as the destination.
If the files are not preceded by a file name, the directory you specify in the Destination text field is used as the destination.
Read Selected
When you have listed the contents of a tape and selected all or some of the files, choosing Selected from the Read menu copies the specified files to the destination directory shown in the control area.
When you have not listed the contents of a tape, choosing Selected displays the Tape Contents window without a listing. If you know the names of specific files that you want to retrieve, you can type a name in the File To Read text field, then press the Return key or click SELECT on the File To Read button to add them to the list.
Read Entire List
When you have listed the files from a tape, choosing Entire List from the Read menu reads the entire list of files from the Tape Contents window.
When you have not listed the contents of a tape, choosing Entire List displays the Tape Contents window without a listing.
While the files are being read, messages are displayed in the footer of the Tape Tool window showing you the percentage of files that have been read. As the files are read, they are removed from the Tape Contents window. When the process is complete, a message is displayed in the footer of the Tape Tool window telling you how many files were read.
If there are a large number of files, it may take several minutes for the files to be copied to your system.
Read Entire Tape
Choosing Entire Tape from the Read menu copies all of the files on the tape to the destination directory without displaying the Tape Contents window.
Copying (Writing) Files onto Tape
To copy (write) one or more files or directories onto a tape cartridge:
-
Click SELECT on the Props button to display the Tape Tool Properties window and confirm that you have the correct options set.
You should check the Tape Tool Properties window each time you write files to a tape, since the settings are not saved if you quit Tape Tool and start it up again.
-
Check the tape to be sure that it is not write-protected.
-
Insert a blank tape into your tape drive.
Alternatively, you can use a tape containing data that are no longer needed.
 Caution -
 Any data on the tape will be overwritten by the new data.
-
Click SELECT on the files or directories in a File Manager file pane that you want to copy onto tape.
Use ADJUST to select additional files or directories.
-
Drag and drop the files onto the Tape Tool drag and drop target and release.
Press SELECT and use the pointer to move the file or directory icon across the Workspace to the Tape Tool target.
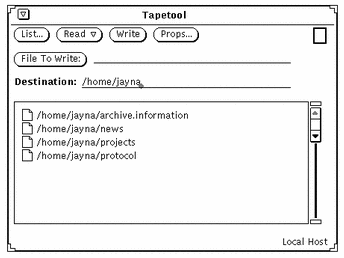
Alternatively, you can type the name of a directory or of an individual file in the File To Write text field and then press the Return key or click SELECT on the File To Write button. The files or directories you have chosen are listed in the Tape Tool window pane, as shown in the example in Figure 12-5. When you see the directory in the scroll box, select it.
Figure 12-5 Files to be Copied to Tape
-
Click SELECT on the Write button in the Tape Tool window.
The file listing is cleared from the window pane when the copy is complete.
Because the files are copied, the original data remain on your system. If you are archiving the files to free up disk space, you then need to delete the files from your system. Before removing the files, refer to, "Checking the Tape Contents".
Checking the Tape Contents
Before deleting the backup files from your system, make certain that the copy occurred. At any time, you can list the files on a tape as follows:
-
Insert the tape into the tape drive.
-
Click SELECT on the List button in the Tape Tool base window.
In a few moments, the contents of the tape are listed in the Tape Contents window pane. Messages in the footer tell you how many files have been found.
Retrieving (Reading) Files from a Tape
The following three sections describe three methods of retrieving (reading) files from a tape. The method you choose depends upon whether you want to retrieve a small portion of the files, a large portion, or all of the files from the tape.
Retrieving a Portion of the Files from a Tape
To retrieve a particular portion of the archived files from a tape cartridge (providing they were initially archived with the SunOS tar command, or through Tape Tool), follow these steps:
-
Click SELECT on the Props button to display the Tape Tool Properties window and confirm that you have the correct options set.
You may want to check the Tape Tool Properties window each time you retrieve files, since the settings are not saved if you quit Tape Tool and start it up again.
-
Insert the tape into the tape drive.
-
Click SELECT on the List button in the Tape Tool window.
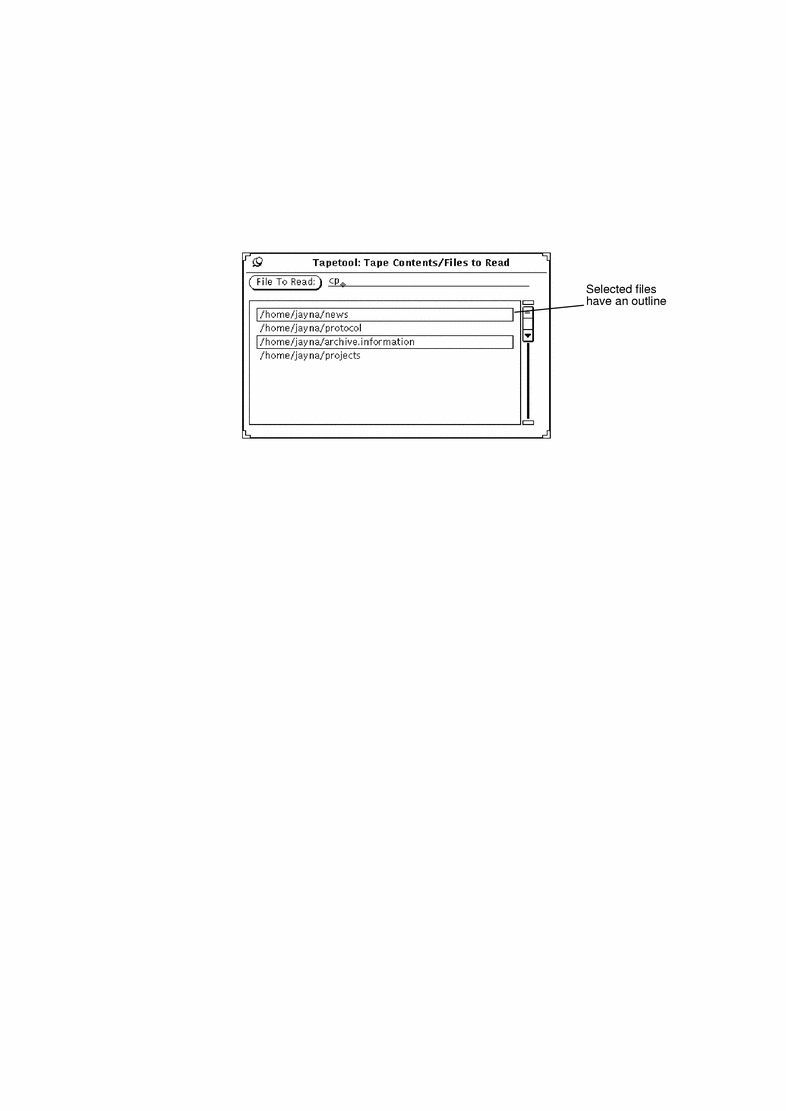
A Tape Contents window displays listing the files on the tape. If there are a large number of files, it may take several minutes for the listing to be complete. Figure 12-6 shows a list of files in Tape Tool's scrolling window.
Figure 12-6 File Listing from a Tape Showing Two Files Selected
-
Click SELECT on the files you want to retrieve from the list.
-
Type the destination path, if necessary.
If you want the destination path to be somewhere other than the path you specified when the files were written (copied) to the tape, type it in the Destination text field.
-
Choose Read -> Selected from the Tape Tool base window.
Alternatively, because the Selected option is the default, you can just click SELECT on the Read menu button.
Retrieving Most of the Files from a Tape
If you have a long list of files, and you want to retrieve all but a few of them:
-
Click SELECT on the Props button to display the Tape Tool Properties window and confirm that you have the correct options set.
You may want to check the Tape Tool Properties window each time you retrieve files, since the settings are not saved if you quit Tape Tool and start it up again.
-
Insert the tape into the tape drive.
-
Click SELECT on the List button in the Tape Tool base window.
-
Deselect the files you do not want in the Tape Contents window.
Click SELECT on those files that you do not want to include in the file extraction.
-
Choose Delete -> Selected from the Tape Contents window Read Functions menu.
The files you have selected are removed from the list.
-
Choose Read -> Entire List from the Tape Tool base window.
The files remaining in the list are extracted from the tape.
If you have archived a group of files, you can retrieve the whole group or just a few of them. Unless you removed or changed the path names of the files when you archived them, they are automatically restored to their original directories. (If you have removed or changed the path names, then the files are restored to the new paths with which you archived them.)
Retrieving All Files from a Tape
If you want to retrieve everything on the tape and do not want to list the contents first:
-
Click SELECT on the Props button to display the Tape Tool Properties window and confirm that you have the correct options set.
You may want to check the Tape Tool Properties window each time you retrieve files, since the settings are not saved if you quit Tape Tool and start it up again.
-
Insert the tape in the tape drive.
-
Choose Read -> Entire Tape.
The contents of the entire tape are copied onto your system.
Customizing the Tape Tool
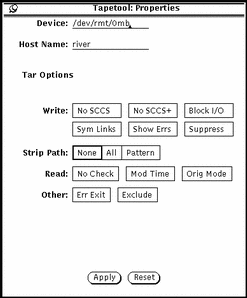
Before you read to or write from a tape or archive file, you may want to confirm that the properties you want to use are set correctly, as shown in Figure 12-7.
To display the Properties window, click SELECT on the Props button.
Figure 12-7 Tape Tool Properties Window
-
Device text field identifies the tape drive to your system. The most common device numbers for a tape drive are /dev/rmt/0mb (m is for medium density) and /dev/rmt/0lb (l is for low density). Alternatively, you can specify a file name in this field if you wish to read or write files to and from one big archive file instead of a tape.
-
Host Name text field identifies the name of the workstation where the reading or archiving of files is to take place. The default value is your local host name.
-
Write sets none, some, or all of the options listed here:
-
No SCCS+ excludes all SCCS directories, files with a suffix .o, and files named errs, core, and a.out.
-
Block I/O specifies a blocking factor for better throughput. When you click SELECT on this setting, a text field is displayed in which you can type the blocking factor you want Tape Tool to use.
-
Sym Links follows symbolic links as if they were normal files.
-
Show Errs displays error messages if all links to archived files cannot be resolved.
-
Suppress suppresses information showing owner and file modes.
-
Strip Path settings determine whether selected files are stripped completely of their path names, use complete path names, or use a specific path name. When you click SELECT on Pattern, a text field is displayed in which you can type the name of a path to use for all the files.
-
Read sets none, some, or all of the options listed here:
-
Other sets none, one, or both of the following options for both read and write operations:
-
Err Exit exits the operation as soon as an error is encountered.
-
Exclude to specifies a file name that contains a list of files and/or directories that you want to exclude from reading from the tape. This item can be useful when the tape contains many files and you want to retrieve all but a few of them.
-
When you have set the options you want, click SELECT on the Apply button to apply the changes. These options will remain in effect until you quit the Tape Tool application.
- © 2010, Oracle Corporation and/or its affiliates
