Display Settings Properties
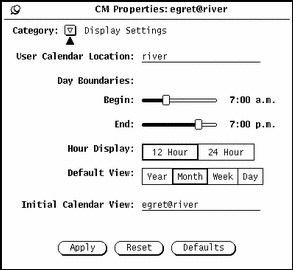
The Display Settings controls, shown in Figure 5-28, specify the location of the default user calendar; the boundary times for the day; 12 or 24-hour time display; the default calendar view and the initial calendar to be viewed in the Calendar Manager window. To display this set of controls, choose Display Settings from the Category menu.
Figure 5-28 Display Settings Properties

Changing the User Calendar Location
You can change user calendar location by specifying a different machine name. Just type the machine name. The new user calendar location becomes the first name (or default) in the Browse menu pulldown. Any properties applied are added to the new calendar.
Changing Day Boundaries
You can specify the range of hours for your workday using the Day Boundaries sliders shown in Figure 5-28. This determines the hours displayed by Calendar Manager in these places:
-
Calendar Manager Day view
-
Week chart in the Calendar Manager Week view
-
Multiple Calendars display
-
Start and End time menus in the Appointment Editor window
The current value of the day boundaries is displayed to the right of each slider. To change the setting, follow these steps:
-
Move the pointer to the slider drag box and press SELECT.
-
Drag the pointer to the left or to the right.
Note that the time changes as you drag the slider.
-
When the time you want is displayed, release SELECT.
Alternatively, you can move the pointer onto the slider bar to the left or right of the drag box and click SELECT to change the time hour by hour.
You cannot set a day boundary that ends before it begins. When the values overlap, the drag boxes are synchronized and move together so that the end time is always at least one hour after the start time.
-
When you have set the day boundaries, click SELECT on the Apply button to record them.
Your new boundaries are now in effect.
Changing the Hour Display
You can specify the way hours are displayed with the Hour Display setting on the Properties window. The default setting is 12 Hour, which displays the hours from 1:00 to 12:00, with an "a.m." or "p.m." extension. You can use the 24-Hour setting to display the hours in 24-hour time. An appointment that goes from 11:30 am to 1:00 pm with the 12-Hour setting will go from 1130 to 1300 with the 24-Hour setting.
To change the hour display, click SELECT on the setting you want and then click SELECT on the Apply button. The change takes effect immediately.
Changing the Default View
You can set the default view of the Calendar Manager window to Year, Month, Week, or Day using the Default View settings on the Properties window. After you have changed the default view, click SELECT on the Apply button. The changes take effect immediately.
Changing the Initial Calendar View
You can specify the default calendar (initial calendar to be viewed) with the Initial Calendar View text field, the first time Calendar Manager is started.
After you have changed the calendar view, click SELECT on the Apply button. The changes take effect immediately.
- © 2010, Oracle Corporation and/or its affiliates
