Customizing Your Calendar Manager
You can customize the following parts of Calendar Manager from the Properties window:
-
Editor Defaults, for the Appointment Editor pop-up window
-
Display Settings, to specify default display options
-
Access List and Permissions, to specify security access defaults
-
Printer Settings, to specify default print options
-
Date Formats, to specify the format for the date on the Appointment Editor
The Properties window has five separate displays (selected from the category field) that you use to modify the five different sets of properties.
To display the Properties window:
Choose Edit Properties
or move the pointer into the control area or pane of the Calendar Manager window and press the Properties key (L3) on the keyboard to display the Properties window, shown in Figure 5-26.
Figure 5-26 Properties Window
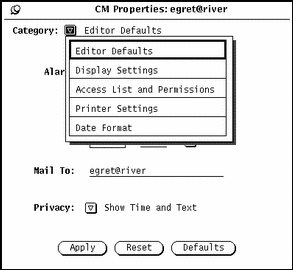
To display a particular category of properties:
When you release MENU, the contents of the Properties window show the properties you can set for that category.
When you have changed properties, you must apply them by clicking SELECT on the Apply button. This only applies the properties currently displayed. To change properties of a different category, display the new category, change the desired settings, and click SELECT on the Apply button again.
Alternatively, you can click SELECT on the Reset button to reset all the options to be the same as they were since the last time you applied changes. Click SELECT on the Defaults button to reset all the options to their default settings.
Editor Defaults Properties
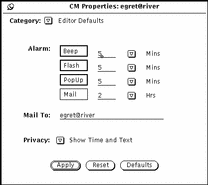
The Editor Defaults properties, shown in Figure 5-27, specify the defaults for the Appointment Editor pop-up window. When you set the editor defaults from the Properties window, they are automatically set each time you display the Appointment Editor window. The Mail To text field determines who receives reminder mail when you use the Mail Alarm.
Figure 5-27 Editor Defaults Properties
To change the defaults:
-
Click SELECT on the settings you want to change.
-
Click SELECT in the text field and type a new number.
Use the abbreviated menu buttons to indicate minutes, hours, or days. Figure 5-27 shows an example of the Alarms with Beep, Flash, and PopUp set. You can change the default Privacy setting to Show Time Only or Show Nothing.
When you click SELECT on the Apply button, the new defaults become effective immediately. Changing the Alarm settings does not affect any appointments that have already been scheduled using the old default choices.
Display Settings Properties
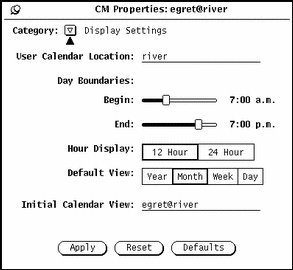
The Display Settings controls, shown in Figure 5-28, specify the location of the default user calendar; the boundary times for the day; 12 or 24-hour time display; the default calendar view and the initial calendar to be viewed in the Calendar Manager window. To display this set of controls, choose Display Settings from the Category menu.
Figure 5-28 Display Settings Properties
Changing the User Calendar Location
You can change user calendar location by specifying a different machine name. Just type the machine name. The new user calendar location becomes the first name (or default) in the Browse menu pulldown. Any properties applied are added to the new calendar.
Changing Day Boundaries
You can specify the range of hours for your workday using the Day Boundaries sliders shown in Figure 5-28. This determines the hours displayed by Calendar Manager in these places:
-
Calendar Manager Day view
-
Week chart in the Calendar Manager Week view
-
Multiple Calendars display
-
Start and End time menus in the Appointment Editor window
The current value of the day boundaries is displayed to the right of each slider. To change the setting, follow these steps:
-
Move the pointer to the slider drag box and press SELECT.
-
Drag the pointer to the left or to the right.
Note that the time changes as you drag the slider.
-
When the time you want is displayed, release SELECT.
Alternatively, you can move the pointer onto the slider bar to the left or right of the drag box and click SELECT to change the time hour by hour.
You cannot set a day boundary that ends before it begins. When the values overlap, the drag boxes are synchronized and move together so that the end time is always at least one hour after the start time.
-
When you have set the day boundaries, click SELECT on the Apply button to record them.
Your new boundaries are now in effect.
Changing the Hour Display
You can specify the way hours are displayed with the Hour Display setting on the Properties window. The default setting is 12 Hour, which displays the hours from 1:00 to 12:00, with an "a.m." or "p.m." extension. You can use the 24-Hour setting to display the hours in 24-hour time. An appointment that goes from 11:30 am to 1:00 pm with the 12-Hour setting will go from 1130 to 1300 with the 24-Hour setting.
To change the hour display, click SELECT on the setting you want and then click SELECT on the Apply button. The change takes effect immediately.
Changing the Default View
You can set the default view of the Calendar Manager window to Year, Month, Week, or Day using the Default View settings on the Properties window. After you have changed the default view, click SELECT on the Apply button. The changes take effect immediately.
Changing the Initial Calendar View
You can specify the default calendar (initial calendar to be viewed) with the Initial Calendar View text field, the first time Calendar Manager is started.
After you have changed the calendar view, click SELECT on the Apply button. The changes take effect immediately.
Access List and Permissions Properties
Calendar Manager allows you to browse the appointments of others, as well as allowing other users to browse your appointments. See "Multiple Calendars Base Window" for more information about browsing.
TheAccess List and Permissions properties let you specify who may browse, insert, delete or change your appointments.
The default access list, shown in Figure 5-29, gives all users permission to browse your calendar.
To display the Access List controls, choose the Access List and Permissions item from the Category menu.
Figure 5-29 Access List and Permissions Properties
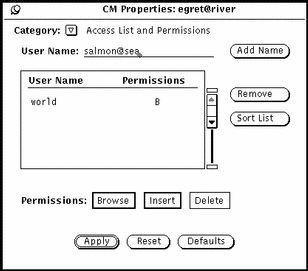
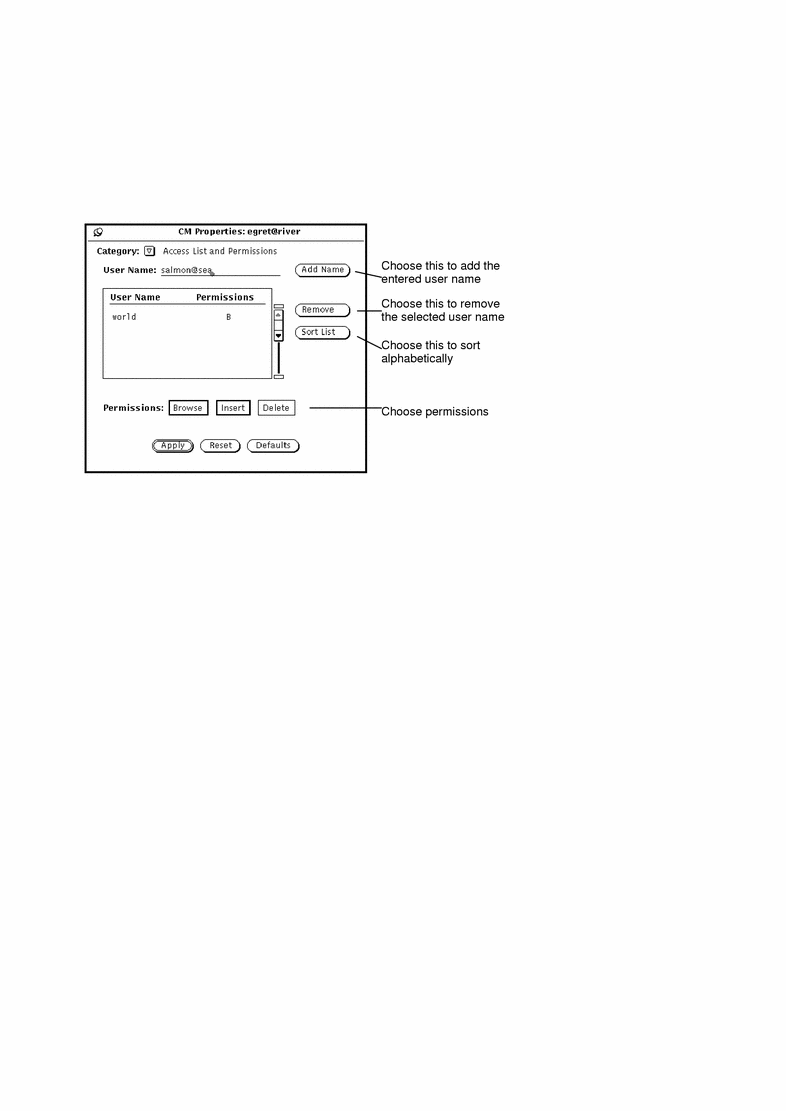
The scrolling list displays everyone who has access to your calendar. The entry "world" means everyone who is using the DeskSet environment. The default is that the world has Browse access permissions. If you delete the world entry, only the users you specifically add will be able to access your appointments.
To the right of each name in the scrolling list are letters indicating the permissions that user has. The available permissions are:
-
"B" for Browse, meaning the user can read your appointments.
-
"I" for Insert, meaning the user can add new appointments in your calendar.
-
"D" for Delete, meaning the user can delete existing appointments from your calendar.
If you give more permissions to the world than you give to an individual, that individual will still have the world permissions. For example, if you give a user named Jim permission to browse your calendar, but the world has permission to browse and insert, Jim will inherit the world permissions and will be able to insert appointments as well as browse your calendar.
To give someone the ability to edit or change appointments, you must give them both Insert and Delete permissions. That person then has full permissions to insert new appointments, and delete or modify existing appointments they own. After you have entered the list of users, you can sort the list alphabetically using the sort list button.
Adding Users to the Access List
To add a user, follow these steps:
-
In the User Name text field, type the email address of the user you want to add.
Names in the access list can either be in the form name@host or simply name. Note that if you just specify the user name, you are giving access to any user on your network with that name.
If you are using the NIS or DNS system, which uses the concept of domains, make sure names on the access list do not use the format name@domain or name@host.domain. Just use name@host.
-
Select the permissions you want to give the user.
-
To add the name, enter a name in the User Name: text field, choose Add Name, as shown in Figure 5-30.
Figure 5-30 Adding a Name to the Access List
-
Click SELECT on the Apply button to record the changes.
Deleting Users from the Access List
To delete a user from the access list, select the user name in the scrolling list, choose Remove from the Properties menu or the scrolling list pop-up menu, and click SELECT on the Apply button to record the changes.
Changing the Access List
To change the existing permissions for a user already on the Access List, follow these steps:
-
Click SELECT on the user name in the scrolling list.
If you want to change several users at one time, click SELECT on each additional user name you want to change.
-
Select the new permissions you want to give the user.
In Figure 5-30, Browse and Insert are selected to replace the existing permission of Insert forsalmon@sea.
-
Click SELECT on Add Name from the Calendar menu or the scrolling list pane menu.
Add Name is used to add a new user, and it's also used to change the access permissions of an existing user.
-
Click SELECT on the Apply button to record the changes.
Printer Settings Properties
You can set printing options from the Printer Settings Properties window.
To display this set of controls, choose the Printer Settings item from the Calendar Manager Properties window Category menu.
Figure 5-31 shows the default settings for the Printer Settings window.
Figure 5-31 Printer Settings Properties Window
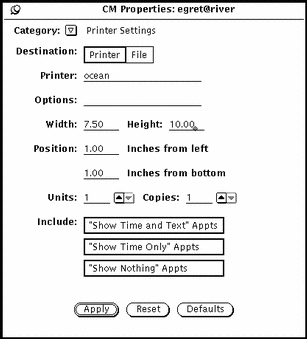
You can specify the following options from the Printer Options window:
-
Destination of the printed output (Printer or File)
-
Printer name and printer options, or file destination and file name
If the Destination is Printer, as in Figure 5-31, a field called Options is displayed. You can type in UNIX print options in this field to customize your printer option defaults.
If the Destination is File, the Printer and Options fields are replaced by Directory and File fields. Use these fields to type in the directory and file name of the file that you want to print to.
-
Width and height of the printed image
-
Left and bottom margins (position)
-
Number of units that print
The "unit" is the number of calendar views to print: day, week, month, or year. When a day view is printed, the unit is Days, and so on. The selected unit always begins the sequence. For example, if February 13th is selected, and the number of units is three, then February 13th, 14th and 15th are printed.
-
Number of copies to print
-
Whether or not to include appointments created for Privacy Type (Show Time and Text, Show Time Only, Show Nothing) on the printed output
When you're done choosing your Printer Settings, click SELECT on the Apply button to record the changes.
Date Format Properties
The Date Format properties, shown in Figure 5-32, determine how the date is displayed in the Appointment Editor window, in the Go To text field of the Multiple Calendars window, and in the Browser Editor window.
To display this set of controls, choose the Date Format item from the Calendar Manager Properties window Category menu.
Figure 5-32 Date Format Properties
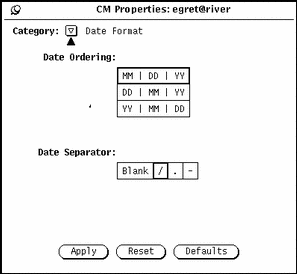
The Date Ordering item determines the order in which the month, day, and year appear in the various date fields. The Date Separator item determines what character separates each element of the date.
To change the defaults, click SELECT on the settings you want. When you click SELECT on Apply, the new date format becomes effective immediately.
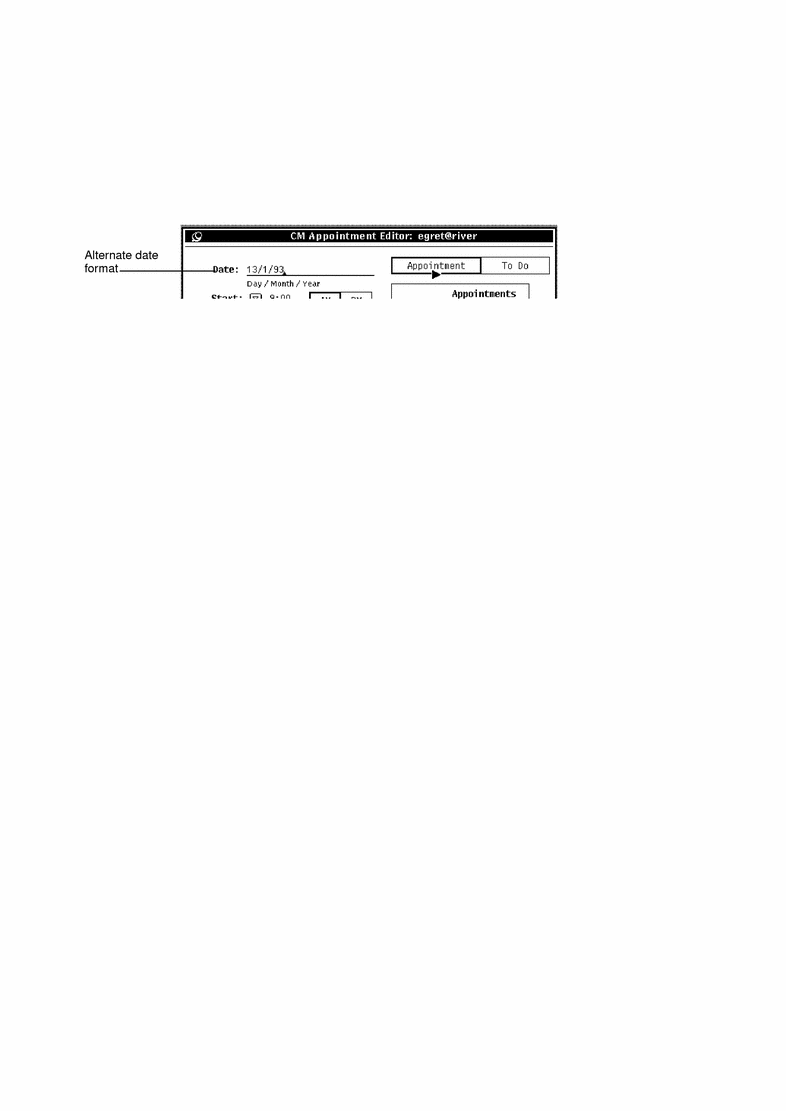
Figure 5-33 shows the Appointment Editor with the DD|MM|YY date ordering and the / date separator.
Figure 5-33 Appointment Editor with an Alternate Date Format
- © 2010, Oracle Corporation and/or its affiliates
