Multiple Calendars Base Window
Calendar Manager allows you to access the calendars of other users if you are included on their Access List. This convenient feature allows you and your coworkers to coordinate scheduling of appointments. You can use the Show Multiple Calendars menu item to overlay the calendars of many users at one time in order to find the best time to schedule a meeting. Once you have found a convenient meeting time, you can schedule the meeting in everyone's calendar, and/or send each user mail about the new appointment.
You can also see all the public appointments on another user's calendar, and insert, delete, or change existing appointments, as long as you have the appropriate access list permissions. See "Access List and Permissions Properties" for information about creating the access list for your personal calendar.
Using Multiple Calendars
The Show Multiple Calendars menu item allows you to view many people's calendars overlaid onto the same display at one time. It lets you see how many and which users are busy during any particular hour, and quickly tells you if there is a time slot in which all the users are free. If there is not a time slot when all the users are free, you can determine a time when the majority or a particular subset of users are available. This makes it much easier to figure out the best time for a meeting.
Once you have figured out the best time for a meeting, you can schedule the appointment for all the users who have given you Insert access to their calendars. In addition, you can send mail to the meeting participants in a format that the users can drag from the Mail Tool and drop onto their Calendar Manager in order to schedule the appointment themselves.
Multiple Calendars Window
You access Multiple Calendars by choosing Show Multiple Calendars from the Browse menu. This displays the Multiple Calendars window. Figure 5-17 displays the Multiple Calendars icon and the default window with one calendar displayed. Using Show Multiple Calendars to display multiple calendars is described later in this section.
Figure 5-17 Multiple Calendars Icon and Window
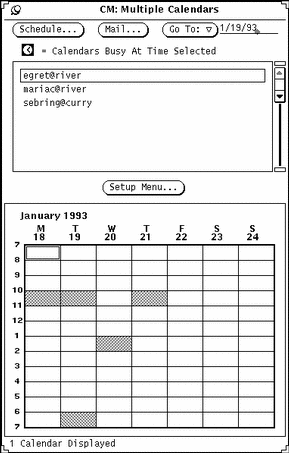
The Multiple Calendars window has the following controls:
-
Schedule, Mail, and Go To buttons that you use to schedule appointments for many users at once, mail information about new appointments, and change the display of Multiple Calendars to show a different week or month.
-
Setup menu button from which you type the user names (login and system name) of the calendars that you want to add to the browser scrolling list
-
Multiple Calendars display, on which any number of calendars can be overlaid to show a composite schedule
In Figure 5-17there is one calendar displayed. A footer message tells you how many calendars are being displayed at any time.
The gray areas of the calendar display indicate the times that the selected user has scheduled an appointment. If several calendars are being displayed, the gray blocks have varying shades. Darker blocks indicate more existing appointments during that time slot. (There are only up to three shades of gray, so a time slot with four existing appointments will not appear any darker than a time slot with three appointments.) The white areas indicate times in which none of the selected users are busy.
Figure 5-18 shows Multiple Calendars with five calendars displayed. The calendars displayed are those of the five users selected in the scrolling list. The unshaded white area on Monday at 11:00 indicates that this is a time when the five selected users are all available.
Figure 5-18 Multiple Calendars with Five Calendars Displayed
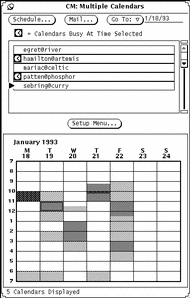
One hour in the Multiple Calendars display has a double border. On color workstations, the inside border is the color of your Windows, as determined by the Workspace Properties Color category. This indicates the selected time.
Every user who has an appointment scheduled during the selected time has a clock symbol to the left of their name in the scrolling list. You can use these clock symbols to see who is busy during a desired time slot. For example, if you have to schedule a meeting and there is no time that everyone is available, you can use the check mark display to find out who is scheduled during a time slot for which only one person is busy.
The selected time in Figure 5-18 is Tuesday at 11:00. You can see by the check marks in the scrolling list that users hamilton@artemis and patten@phosphor both have appointments scheduled on Tuesday at 11:00 a.m.
Adding a Calendar to Multiple Calendars and the Browse Menu
The scrolling list of the Multiple Calendars displays all the calendars that are available to be browsed. The Browse menu (from the Browse button of the Calendar Manager control panel) is also made up of this same list of calendars. In order to browse a calendar, you must first add it to the Multiple Calendars scrolling list.
New calendars are displayed on the Browse menu in the order you enter them in the Multiple Calendars scrolling list. This list can be sorted alphabetically after adding the name to the list.
To add calendars to the browse list and menu follow these steps:
-
If the Multiple Calendars window is not currently displayed, choose Browse Setup Menu.
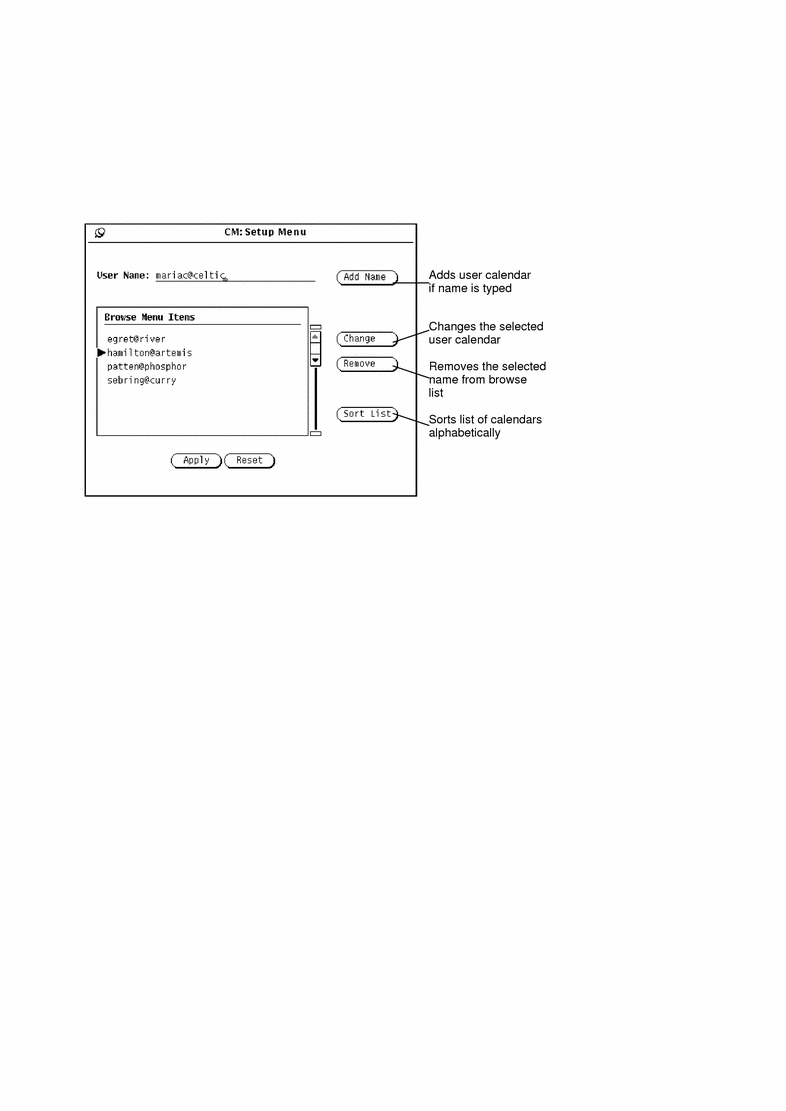
If the Multiple Calendars window is displayed, click SELECT on the Setup Menu... button. You see the Setup Menu window.
-
In the User Name text field, type the calendar address of the user whose calendar you want to add.
The calendar address is the user's login name, followed by @, followed by the user's host machine name. For example, the calendar address mariac@celtic is in the Calendar field of Figure 5-19.
If you are using the NIS or DNS system, which uses the concept of domains, make sure you are either browsing a calendar in your domain, or that you specify the remote domain.
For example, if you are trying to browse the calendar for user egret in your own domain, the correct calendar address is egret@host. However, if egret is in another domain, the calendar address needs to be in the format egret@host.domain.
Figure 5-19 Adding a Calendar to Multiple Calendars and the Browse Menu
-
Select Add Name to add the name.
If you enter an invalid host name or an invalid user name, while attempting to browse, you see an "Unable to access Calendar" error message.
Note -To improve system and network performance, Calendar Manager does not confirm that the user name is valid or that you have browse permission for that calendar when you enter the user name in the scrolling list. Calendar Manager does this checking when you select the calendar in the Multiple Calendars scrolling list, or when you choose the calendar from the Browse menu.
-
Click Apply.
Deleting/Removing a Calendar from Multiple Calendars and the Browse Menu
To delete a calendar from your Multiple Calendars scrolling list and from your Browse menu, follow these steps:
-
Choose Setup Menu from the Browse Menu pulldown or Setup Menu from the Multiple Calendars window.
-
Select each calendar that you want to delete in the Browse Menu Items scrolling list.
-
Choose Remove from the Setup menu to delete all the selected names in the scrolling list.
Note -You cannot delete your calendar name or "initial calendar view".
-
Click Apply.
Selecting a Week to Browse
When you display the Multiple Calendars window, the week shown in the Multi-Browser calendar display is determined as follows:
-
If the current view is the Day view or Month view, the week containing the currently selected day is displayed.
-
If the current view is the Week view, the current week is displayed.
-
If the current view is the Year view, the first week of the currently selected month is displayed.
To change the week displayed in Multiple Calendars, use the Go To menu and text field.
To display a specific week, type a date during the desired week in the Go To text field, and click SELECT on the GoTo button. Type the date using the format set on the Date Format Properties window. The default format is MM/DD/YY. See the section "Date Format Properties" for more information.
You can also use the items of the Go To menu to change the Multiple Calendars week display, as follows:
-
Choose Prev Week or Next Week to display the previous or next week.
-
Choose This Week to display the week of the day currently selected in the Calendar Manager base window.
-
Choose Prev Month or Next Month to display a week one month before or after the current Multiple Calendars week.
Finding a Time Slot for a New Appointment for Many Users
If you want to schedule a meeting or other appointment that involves many users, follow these steps:
-
Choose Multiple Calendars from the Browse menu, if the Multiple Calendars window is not currently displayed.
-
Add the calendars to the Multiple Calendars scrolling list for all the meeting participants.
See "Adding a Calendar to Multiple Calendars and the Browse Menu"for information.
-
Select all the calendars of the meeting participants by clicking SELECT on each user's calendar in the scrolling list.
Each selected calendar is overlaid in the Multiple Calendars display area.
-
If the week you want is not currently displayed, use the Go To menu or text field to display the desired week.
See "Selecting a Week to Browse" for more information.
-
When all calendars are selected and overlaid, find an unshaded block of time for the meeting.
This represents a time when everyone is available. For example, in Figure 5-20 all selected calendars have an open time slot on Tuesday from 1:00 to 2:00 and from 3:00 to 5:00.
Figure 5-20 Multiple Calendars window with Five Users Selected

-
If there is not a large enough available time slot for all the selected calendars, select a time slot that is lightly shaded and look at the clock(s) in the scrolling list to see who has a time conflict.
Keep trying this until you find a time slot with the least number of conflicts, or where only the people who don't have to be at the meeting have conflicts.
Alternatively, you can deselect the calendar of a user who does not have to be at the meeting by clicking SELECT on that calendar in the scrolling list. The Multiple Calendars display is then updated, and you may now be able to find an available time slot.
Scheduling Appointments for a Group of Users
Once you have found a good time for a new appointment for many users, you can use the Appointment Editor to schedule the appointment in the calendars of all users who have given you Insert access.
For complete information on scheduling an appointment with the CM Appointment Editor see "Appointment Editor Options".
Note -
If a question mark "?" appears in the Calendars Insert Access field it means that the user you are trying to access is running an older version of Calendar Manager. You may or may not have access to this user's calendar, and you can determine this by attempting to access the calendar.
The Appointments scrolling list on the CM Appointment Editor displays appointments for all of the calendars selected in the Calendars scrolling list, at the time selected in the Multiple Calendars window. When you select an appointment on the Appointments scrolling list, the appointment information is displayed in the CM Appointment Editor fields, and the Calendars scrolling list is updated to display only the owner of the appointment.
To schedule an appointment for a group of users at one time, follow these steps:
-
Use Show Multiple Calendars to find a time slot for the new appointment.
If you are unsure how to do this, see the section "Finding a Time Slot for a New Appointment for Many Users" for complete information.
-
Move the pointer to the block of time that you want to schedule the appointment for and click SELECT.
The selected time must be for one hour in the Multiple Calendars display, but you can change the time or duration when you schedule the appointment.
-
Click SELECT on Multiple Calendars Schedule.
Alternatively, you can just double-click SELECT on the block of time in step 2. The CM Appointment Editor is shown in Figure 5-21.
Figure 5-21 CM Appointment Editor
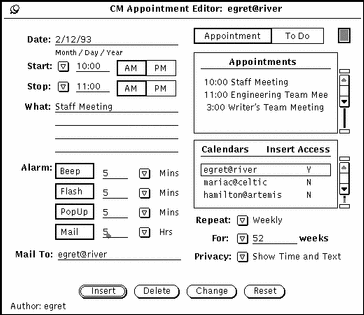
The CM Appointment Editor is displayed. The selected date and time are filled in and the selected calendars are listed on the Calendars scrolling list. If you have Insert Access to any of these calendars, that calendar is automatically selected. If any of the selected calendars has an appointment at the selected time, that appointment is added to the Appointments scrolling list.
If you change the time or selected calendars in the Multiple Calendars window, that information is automatically updated in the CM Appointment Editor window.
Sending Mail about Appointments from Multiple Calendars
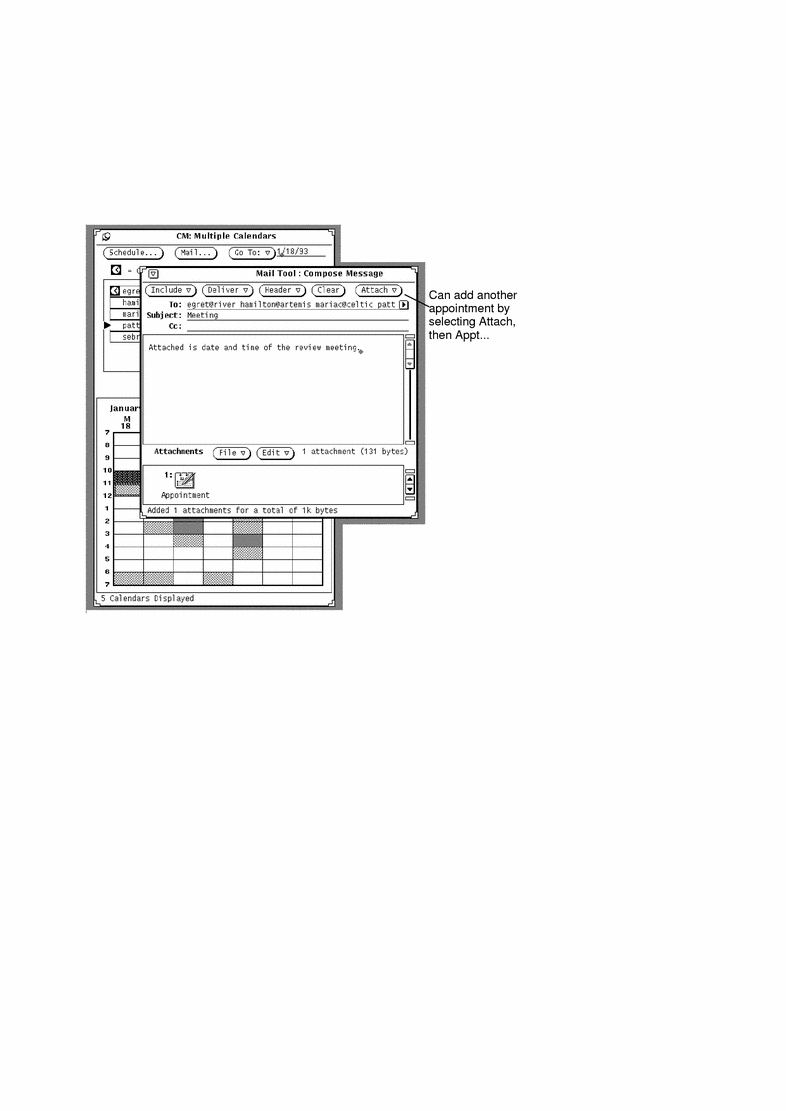
You can use the Multiple Calendars Mail facility to send mail about an appointment to other users. The mail is sent with an appointment icon that, for easy scheduling, can be dragged and dropped on the Calendar Manager main window. See "Using Calendar Manager with Mail Tool" for information about using drag and drop with Mail Tool to schedule Calendar Manager appointments.
This feature is particularly useful when you have used the Multiple Calendars to schedule a new appointment. After scheduling the appointment, you may want to send mail about the appointment to all the participants. In addition, there may be users who have not given you Insert access to their calendar, in which case you can send them mail and let them schedule the appointment themselves.
To use the Multiple Calendars mail feature:
Click SELECT on the Mail button at the top of the Multiple Calendars window.
This displays a Mail Tool Compose window that contains an appointment icon in the attachment area. Refer to "Using Calendar Manager with Mail Tool" for more information. See "Mail Tool Compose Window" in Chapter 4, Multimedia Mail Tool for information about creating and sending mail.
If you have calendars selected in the Multiple Calendars scrolling list, the Mail Tool Compose window displayed by the Mail button is automatically addressed to those users. The subject field is "Meeting".
The Calendar Manager appointment icon in the Compose window attachments area is automatically filled out with the appropriate date and time, as follows:
-
If the Appointment Editor window is or has been displayed, the Date, Start, End, and What fields are included with the appointment attachment with the corresponding fields from the most recent session of the Appointment Editor. For complete information on using the Appointment Editor, refer to "Appointment Editor Options".
-
If the Mail Tool Compose window is displayed before the Appointment Editor window is displayed, the Date, Start, and End fields are included in the appointment attachment with the date and time of the currently selected time in the Multiple Calendars display.
You can change any of the information that is automatically filled out, and add more information. Figure 5-22 shows the Mail Tool Compose window displayed when the Mail button is selected from the Multiple Calendars window. Attaching the appointment saves your changes.
Figure 5-22 Multiple Calendars Compose Message Window
- © 2010, Oracle Corporation and/or its affiliates
