10.5.4 Running Calibrator Tool
Once you have adjusted your viewing environment, connected your puck (if you have one) and your monitor has warmed up for at least one hour, you are ready to run Calibrator Tool.
Run Calibrator Tool with kcms_calibrate in a command tool window. The kcms_calibrate program runs on Solaris 2.4 or 2.5 and requires a color frame buffer, or color monitor. Calibrator Tool takes approximately one minute to calibrate PseudoColor visuals and another minute to calibrate TrueColor visuals. If your framebuffer supports both types of visuals, allow at least two minutes for calibration.
10.5.4.1 To Start Calibrator Tool
Type kcms_calibrate to run Calibrator Tool.
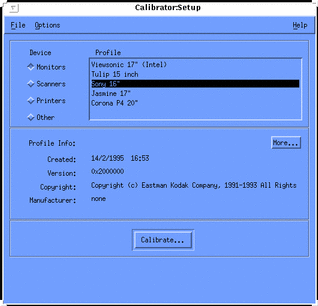
The Setup window is displayed as shown in Figure 10-1.
Figure 10-1 Calibrator Tool Setup Window

10.5.4.2 To Select a Monitor
Before you press the Calibrate... button, you must choose a monitor.
-
Click on Monitors.
A list of monitor profiles available in your environment is displayed as shown in Figure 10-1.
-
Select a Monitor Type.
If you do not know the type of monitor you have, you can get general information about a monitor by clicking on the More... button. The information is displayed in a separate window. The following information is an example of the type of information given when you select a Sony 16" profile and press the More... button:
-
Color space = RGB
-
Device manufacturer = Sony
-
Device model = 16"
-
White point = 0.964294 1.000000 0.825104, press OK to dismiss window
You can also use Table 10-2to help you choose a monitor. The Sun part number is located on the monitor's nameplate. Find the part number on your monitor and match it to the part number in this table. Use the rest of the information in the row to choose a monitor.
Sun Part Number
Description
Manufacturer
Profile Description
365-1130-01
P3 16" Color
Sony
Sony 13/16/19" Monitor
365-1112-01
P3 19" Color
Sony
Sony 13/16/19" Monitor
365-1159-01
P3 16" Color
Sony
Sony 13/16/19" Monitor
365-1160-01
P3 19" Color
Sony
Sony 13/16/19" Monitor
365-1147-01
P3 16" Color SH (Southern Hemisphere)
Sony
Sony 13/16/19" Monitor
365-1148-01
P3 19" Color SH
Sony
Sony 13/16/19" Monitor
365-1288-01
P3 19" Color Logoless
Sony
Sony 13/16/19" Monitor
365-1289-01
P3 16" Color Logoless
Sony
Sony 13, 16 and 19" Monitor
365-1153-01
Skol 19" P3 MPR2
Sony
N/A
365-1151-02
Rosebud 17" Mid Range (MR) Color
Sony
N/A
365-1166-02
Rosebud 17" MR Color Logoless
Sony
N/A
365-1164-02
Rosebud 17" MR SH Color
Sony
N/A
365-1165-02
Rosebud 17" MPR2 MR
Sony
N/A
365-1068-01
21" Color
Toshiba
N/A
365-1286-01
Tulip 15" FS Color
Nokia
Sony 15" Monitor
365-1167-01
Corona P4 20" Color
Sony
Sony 20" Monitor
365-1313-01
Corona P4 20" Color Logoless
Sony
Sony 20" Monitor
365-1317-01
Corona P4 20" Color SH
Sony
Sony 20" Monitor
365-1316-01
Jasmine 17" N1 Color
Sony
-
10.5.4.3 To Calibrate a Monitor
-
Click on Calibrate...
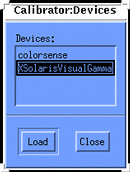
A separate window is displayed asking you to choose a device as shown in Figure 10-2.
Figure 10-2 Calibrator Devices Window

-
Choose a device.
If you have a puck that correlates to a device in the list, choose that device.
If you do not have a puck, choose XSolarisVisualGamma. The calibrated profile is based on the gamma values stored in the LUT for your specific frame buffer.
-
Click on Load.
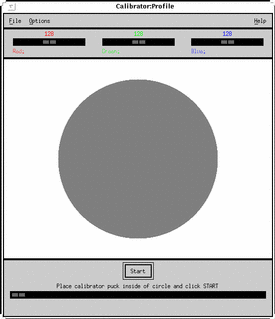
If you have a puck, a separate window will be displayed as shown in Figure 10-3. It is the Calibrator Profile window with a medium gray circle. This circle will be in the middle of your screen.
Figure 10-3 Calibrator Profile Window

The center of your screen provides the most accurate readings. Do not move the window, and since calibration takes several minutes, be sure that no extraneous window (like a pop-up dialog) will obscure the calibration window until calibration is complete.
If you do not have a puck, the Calibrator Profile window will be displayed. You do not need to worry about moving the window or pop-up dialogs. Skip to Step 5.
-
If you have a calibrator puck, place it firmly in the center of the circle.
-
Click on the Start... button.
After a few seconds, the circle becomes cyan and calibration begins.
Depending on the type of frame buffer you have, the measurement cycle (for red, green and blue) may repeat a second time. If your frame buffer supports both PseudoColor and TrueColor visuals, two sets of measurements will be taken. If the frame buffer implements only one of these types, only one set of measurements is taken.
If a pop-up dialog appears in the middle of the color circle, you must restart the calibration. The calibration data is now contaminated and will produce inaccurate measurement data. See "10.5.4.4 To Interrupt Calibration"for information on halting calibration.
When the tool has completed reading measurements, the monitor's profiles are updated and a message is displayed informing you that calibration is completed.
-
Remove the calibrator puck from the screen.
Once calibration is completed, remove the puck from the screen. Store it in a position that prevents dirt and dust from gathering on its glass faceplate.
10.5.4.4 To Interrupt Calibration
Click on Stop.
A separate window is displayed asking if you want to continue calibration or exit. If something obstructed the calibrator puck from reading the circle, you must exit and then restart calibration.
Calibration does not halt until the current color has been completely measured. For example, if you click on Stop while the Red measurement indicator is at 24, calibration will continue until Calibrator Tool is finished measuring Red (when the indicator is 255).
10.5.4.5 To Quit Calibrator Tool
Click on Quit.
You can then quit the Calibration window and quit Calibrator Tool.
- © 2010, Oracle Corporation and/or its affiliates
