Managing Disks With Disk Manager
Table A-2 Task Map: Managing Disks With Disk Manager|
Task |
Description |
For Instructions, Go To |
|||||
|---|---|---|---|---|---|---|---|
|
Specify a Viewing Filter |
Specify the attributes of the disk(s) that you want to view in the Disk Manager main browser. | ||||||
|
Specify a Volume Label |
Assign a name to a disk. | ||||||
|
Modify fdisk Partitions |
Select an active fdisk partition, modify fdisk partition sizes, or modify the type of fdisk partitions. | ||||||
|
Modify Slice Geometry |
Modify slice sizes. | ||||||
|
Clone a Disk |
Copy a disk's characteristics onto other disks of the same type. | ||||||
How to Specify a Viewing Filter
-
Choose Filter from the View menu.
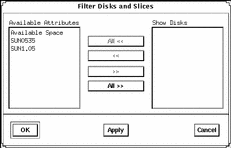
The Filter Disks and Slices window appears with a list of the available disk attributes in the Available Attributes list.
-
Specify which disks, with specific disk attributes, you want to display in the main window.
-
Click a disk attribute in the Available Attributes list.
-
Click the >> button to move the attribute to the Show Disks list.
-
Repeat Step a and Step b until the Show Disks list contains all the disk attributes that disks displayed in the main window will have.
Note -Clicking on the All >> button moves the entire list of attributes in the Available Attributes list to the Show Disks list. Clicking on the All << button, moves the entire list of attributes in the Show Disks list to the Available Attributes list.
-
-
Click OK.
The main window refreshes, displaying only the disks that match the criteria specified in the Show Disks list. The message area below the main browser displays the number of filtered disks.
Example -- Filter Disks and Slices Window

The Available Attributes section contains an entry for each disk type present in the current context, and an entry called "Available Space" that corresponds to all disks and slices with free space. The Show Disks section lists the attributes of the disks displayed in the main window. By default, this section is empty because filtering is turned off.
How to Specify a Volume Label
-
Select the disk that you want to modify in the Disk Manager main browser.
-
Open the Property Book for the selected disk.
For more information see "Disk Manager Property Book".
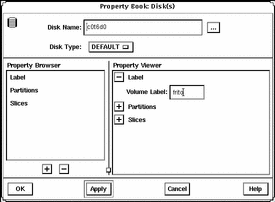
The Property Book window appears.
-
Open the Label chapter.
For more information see "Disk Manager Property Book".
-
Delete the existing name in the Volume Label field, if applicable.
-
Enter the name of the volume label, which must be an alphanumeric string of 8 or fewer characters.
-
Click OK.
Example -- Specifying a Volume Label

How to Modify fdisk Partitions
-
Select the disk that you want to modify in the Disk Manager main browser.
-
Open the Property Book for the selected disk.
For more information see "Disk Manager Property Book".
The Property Book window appears.
-
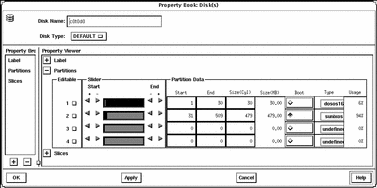
Open the Partitions chapter.
For more information see "Disk Manager Property Book".
Size the Property Book window so that the entire partition layout is visible.
-
Click the select box in the Editable column that corresponds to the fdisk partition you want to edit.
-
Modify the size of an fdisk partition(s) by clicking on the arrows in the Slider portion of the window, or click the appropriate Start or End field in the Partition Data portion of the window, type in a value, and press Return.
For reference information, see online help.
Note -For x86 platforms, fdisk Solaris partitions must start at cylinder 1 or higher and they may not overlap.
-
If desired, select the button in the Boot column to make the fdisk partition active (the one whose operating system will be used at system start-up).
-
Choose the type of the fdisk partition.
Choose the appropriate type using the menus in the Type column.
-
Click OK.
Example -- Modifying fdisk Partitions

How to Modify Slice Geometry
-
Select the disk that you want to modify in the Disk Manager main browser.
-
Open the Property Book for the selected disk.
For more information see "Disk Manager Property Book".
The Property Book window appears.
-
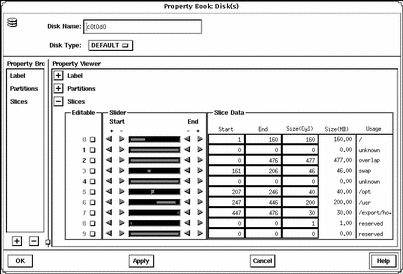
Open the Slices chapter.
For more information see "Disk Manager Property Book".
Size the Property Book window so that the entire slice layout is visible.
-
Click the select box in the Editable column that corresponds to the slice you want to edit.
-
Modify the size of a slice(s) by clicking on the arrows in the Slider portion of the window, dragging the bar indicators, or typing values in the Start and End fields.
For reference information, see online help.
Note -For x86 platforms, slices must start at cylinder 1 or higher and may not overlap.
-
Click OK.
Example -- Modifying Slice Geometry

How to Clone a Disk
-
Select the disk you want to clone in the Disk Manager main browser.
-
Click the copy icon in the tool bar or choose Copy from the Edit menu.
-
Select a unused disk of the same type, or select a controller containing one or more unused disks of the same type, in the Disk Manager main browser.
-
Click the paste icon in the tool bar, or choose Paste from the Edit menu.
Note -An alternate method to performing the tasks described in Step 2 to Step 4 is to press ADJUST (by default the middle mouse key) over the disk you want to copy, drag the cursor onto the disk of the same type, and release the ADJUST button.
- © 2010, Oracle Corporation and/or its affiliates
