Chapter 3 Using Window Manager Enhancements
Solaris 8 workspace and window management has been enhanced in the Solaris 8 6/00 release and again in the 4/01 release. The following information supplements desktop information that is in Solaris Common Desktop Environment: User's Guide.
The workspace and window management enhancements consist of three separate applications. They are:
These three applications provide the ability to manipulate workspaces and windows from the different applications, depending on the tasks you want to perform. The Graphical Workspace Manager allows for changes in workspaces and windows. The Window List concentrates on the manipulation of windows. Finally, the Workspace Manager controls the number of workspaces, whether or not the Workspace Switch Area appears on the Front Panel, and the ability to restore the default values.
Note –
For the most current man pages, use the man command. The Solaris 8 Update release man pages include new feature information that is not in the Solaris 8 Reference Manual Collection.
Graphical Workspace Manager
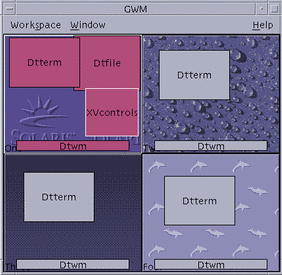
The Graphical Workspace Manager enables you to operate a workspace "control panel.“ This panel displays a window containing a miniaturized picture of each workspace on the desktop. Workspaces may be created, deleted, renamed, tiled, or cascaded. Application windows may be moved (within or between workspaces), terminated, minimized, or maximized.
Figure 3–1 Graphical Workspace Manager Main Screen
Starting the Graphical Workspace Manager
You can start the Graphical Workspace Manager either from the desktop or from the command line.
To Start the Graphical Workspace Manager From the Desktop
-
Right-click on the desktop to open the Workspace Menu.
-
Choose Applications.
-
Choose Application Manager.
-
Double-click Desktop_Apps.
-
Double-click GWM.
To Start the Graphical Workspace Manager From the Command Line
At the command line, type sdtgwm.
Graphical Workspace Manager Tasks
You can perform several tasks by using the Graphical Workspace Manager.
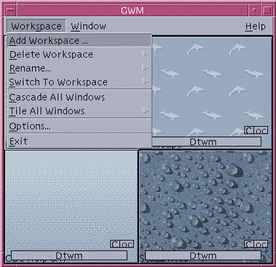
Figure 3–2 Graphical Workspace Manager – Workspace Menu
To Add a Workspace
-
Choose Add Workspace from the Workspace menu.
-
Type a name in the Add Workspace dialog box.
-
Click OK.
To Delete a Workspace
-
Choose Delete Workspace from the Workspace menu.
-
Choose the workspace to be deleted from the submenu.
To Rename a Workspace
-
Choose Rename from the Workspace menu.
-
From the submenu, select the workspace to be renamed.
-
Type the new name in the Rename Workspace dialog box.
-
Click OK.
To Switch to a Different Workspace
-
Choose Switch to Workspace from the Workspace menu.
-
From the submenu, select the workspace to which you want to switch.
To Cascade All Windows in a Workspace
This task executes in the current workspace.
Choose Cascade All Windows from the Workspace menu.
To Tile All Windows in a Workspace
This task executes in the current workspace.
-
Choose Tile All Windows from the Workspace menu.
-
From the submenu, choose either Horizontal or Vertical.
To Open the Options Dialog Box
Choose Options from the Workspace menu.
For further information on the Options dialog box, see Graphical Workspace Manager Options Dialog Box..
Figure 3–3 Graphical Workspace Manager — Window Menu

To Minimize a Window
To Close a Window
-
In the Graphical Workspace Manager, select a window.
-
Choose Close Window from the Window menu.
-
(Optional) If the window you are closing is the only window that contains the application, a confirmation dialog box appears. Click OK to continue with closing the window.
To Terminate an Application
-
In the Graphical Workspace Manager, select an application window.
-
Choose Terminate Application from the Window menu.
-
In the confirmation dialog box, click OK.
To Move a Window to a Different Workspace
-
In the Graphical Workspace Manager, select a window.
-
Choose Move to Workspace from the Window menu.
-
From the submenu, choose the workspace to which you want the window to move. You can also choose All Workspaces.
To Occupy Workspace(s)
-
In the Graphical Workspace Manager, select a window.
-
Choose Occupy Workspace from the Window menu.
-
Choose the workspace(s) from the submenu.
You can select multiple workspaces by pressing the Control key and selecting the additional workspaces.
-
Click OK.
To Unoccupy Workspace(s)
-
In the Graphical Workspace Manager, select a window.
-
Choose Unoccupy Workspace from the Window menu.
Graphical Workspace Manager Options Dialog Box
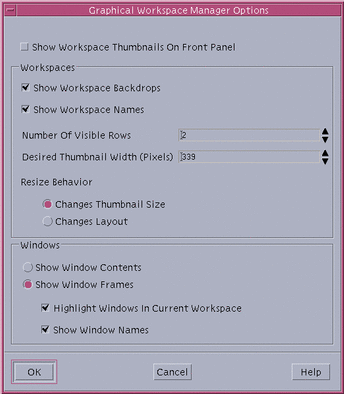
You can set the following options from the Graphical Workspace Manager Options dialog box.
-
Show Workspace Thumbnails On Front Panel – Ensures that the Graphical Workspace Manager workspace images appear on the Front Panel.
-
Show Workspace Backdrops – Ensures that the actual workspace backdrops are displayed in the Graphical Workspace Manager.
-
Show Workspace Names – Displays the workspace names in the thumbnailed workspaces of the Graphical Workspace Manager.
-
Number of Visible Rows – Enables the setting of the number of rows that are used to display the open workspaces of the Graphical Workspace Manager.
-
Desired Thumbnail Width (Pixels) – Sets the width, in pixels, of the workspace display in the Graphical Workspace Manager.
-
Changes Thumbnail Size – Specifies that a resize of the Graphical Workspace Manager actually increases or decreases the size of the Graphical Workspace Manager main window. This option changes the size of the workspace thumbnails.
-
Changes Layout – Specifies that a resize of the Graphical Workspace Manager changes only the layout of the workspace thumbnails within the Graphical Workspace Manager.
-
Show Window Contents – Causes window images to be grabbed and displayed.
-
Show Window Frames – Window images are not grabbed. Blank boxes are displayed.
-
Highlight Windows In Current Workspace – The windows in the current workspace are displayed in the desktop highlight color. This option is only available if Show Window Frames is selected.
-
Show Window Names – The command name of the window appears in the window. This option is only available if Show Window Frames is selected.
Figure 3–4 Graphical Workspace Manager Options Dialog Box
Window List
The Window List displays information about all windows across the CDE workspaces. After it is launched, the window list is updated in a dynamic fashion.
Figure 3–5 Window List Main Screen
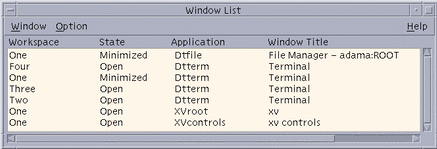
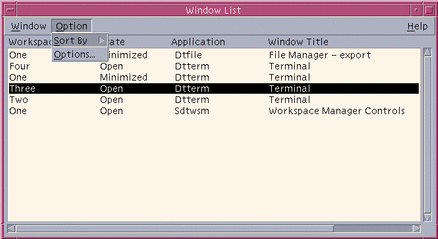
You can sort the windows in one of the following orders:
-
Workspace Name
-
Window State
-
Application Name
-
Window Title
Starting the Window List
You can start the Window List either from the desktop or from the command line.
To Start the Window List From the Desktop
-
Right-click the desktop to open the Workspace Menu.
-
Select Applications.
-
Select Application Manager from the Applications submenu.
-
Double-click Desktop_Apps.
-
Double-click Window List.
To Start the Window List From the Command Line
At the command line, type sdtwinlst.
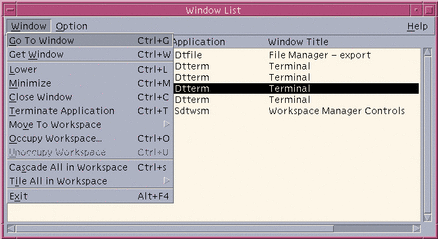
Performing Window List Tasks From the Window Menu
You can perform several tasks by using the Window List. These tasks are:
-
To Go to a Window – Goes to the selected window and gives it focus. If the window is in another workspace, you are moved to that workspace.
-
To Get a Window – Moves the selected window from whatever workspace it is in to the one you are currently in and gives it focus.
-
To Lower a Window in the Stack – Lowers the selected window to the bottom of the window stack.
-
To Minimize the Selected Window – Minimizes the selected window(s).
-
To Close a Window – Closes the selected window(s). If the window to be closed is the only window that is associated with an application, a confirmation dialog box appears.
-
To Terminate an Application – A confirmation dialog box appears and all windows that are associated with that application are closed.
-
To Move the Selected Window Into Another Workspace – Moves the selected window(s) to the specified workspace.
-
To Occupy the Selected Workspace – Opens the Workspace Chooser dialog box and places the selected window in the workspace that is chosen from the list.
-
To Unoccupy the Selected Workspace – Removes the selected window from the current workspace. If the current workspace is the only workspace that the selected window resides in, this option is grayed out.
-
To Cascade All Non-minimized Windows in a Workspace – Cascades all windows in the current workspace.
-
To Tile All Non-minimized Windows in a Workspace – Tiles all windows in the current workspace. You can choose horizontal tiling or vertical tiling.
Figure 3–6 Window List Window Menu
To Go to a Window
Note –
Depending on the setting of the Window List Options, you might be able to double-click the Window List entry and move to the workspace that contains the selected window. You could also have the window move to the current workspace. Refer to To Set the Action of a Double-click on a Window Entry.
To Get a Window
To Lower a Window in the Stack
To Minimize the Selected Window
To Close a Window
-
From the Window List, select a window or windows.
-
Choose Close Window from the Window menu.
-
(Optional) If the window you are choosing is the only window that contains a particular application, a confirmation dialog box appears. Click OK to close the window and terminate the application.
To Terminate an Application
-
From the Window List, select a window.
-
Choose Terminate Application from the Window menu.
-
(Optional) If the window you are closing is the only window that contains a particular application, a confirmation dialog box appears. Click OK to close the window and terminate the application.
To Move the Selected Window Into Another Workspace
-
From the Window List, select a window or windows.
-
Choose Move to Workspace from the Window menu.
-
Choose a workspace or All Workspaces.
To Occupy the Selected Workspace
-
From the Window List, select a window or windows.
-
Choose Occupy a Workspace from the Window menu.
-
Choose the workspace for the window to occupy from the Occupy Workspace dialog box.
To Unoccupy the Selected Workspace
To Cascade All Non-minimized Windows in a Workspace
You can perform this task only in the current workspace.
Choose Cascade All in Workspace from the Window menu.
To Tile All Non-minimized Windows in a Workspace
You can perform this task only in the current workspace.
Performing Window List Tasks From the Option Menu
You can perform the following tasks from the Option Menu.
Figure 3–7 Window List Option Menu
Sorting Options
Opening the Options Dialog
Select Options from the Option menu.
Window List Options
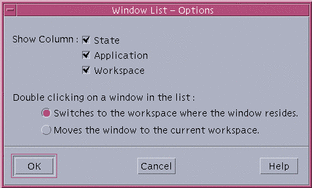
By using the Window List – Options dialog box, you can change the following options.
-
Show Column
-
Double–clicking a window in the list
These options enable you to select which columns appear in the Window List and what action is taken when you double-click a window item in the Window List.
Figure 3–8 Window List – Options Dialog
To Show Columns
Click the State, Application, or Workspace check boxes for that column to be displayed.
The absence of a checkmark means the column will not be displayed.
Note –
The Window Title column is always visible.
To Set the Action of a Double-click on a Window Entry
The Window List provides the ability to select the effect of double-clicking a window entry in the Window List.
-
Click the check box for Switches to the workspace where the window resides.
This setting has the effect of switching to the workspace that contains the selected window.
-
Click the check box for Moves the window to the current workspace.
This setting has the effect of moving the selected window to the current workspace.
Workspace Manager
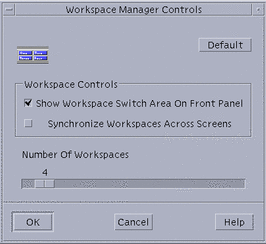
The Workspace Manager provides a graphical user interface (GUI) for controlling behavior and the number of workspaces. You can also add and delete workspaces by using the slider. Workspace Manager enables you to show the Workspace Switch Area on the Front Panel instead of the workspace buttons. You can also return to the default settings.
Figure 3–9 Workspace Manager Main Screen
Starting Workspace Manager
You can start the Workspace Manager either from the Workspace Menu or at the command line.
To Start the Workspace Manager From the Desktop
-
Right-click the desktop to open the Workspace Menu.
-
Choose Applications.
-
Choose Application Manager from the submenu.
-
Double-click Desktop_Apps.
-
Double-click Workspace Manager Controls.
To Start the Workspace Manager From the Command Line
At the command line, type sdtwsm.
Using Workspace Manager Controls
You can perform several functions by using the Workspace Manager.
To Display the Workspace Switch Area on the Front Panel
To Synchronize Workspaces Across Screens
To Set the Number of Workspaces
-
Move the Number of Workspaces slider until the desired number of workspaces appears.
-
If the resulting number of workspaces is an addition, the new workspace icon or icons appears on the Front Panel.
-
(Optional) If the resulting number of workspaces is a reduction, the Workspace Manager Delete Workspace dialog box appears. Click OK to delete the workspace or workspaces.
To Restore the Default Settings
Click the Default button in the Workspace Manager Controls window.
- © 2010, Oracle Corporation and/or its affiliates
