| SunVTS 5.1 User's Guide |
| SunVTS 5.1 User's Guide |
| C H A P T E R 3 |
|
Starting SunVTS |
This chapter contains information that describes:
Before you start SunVTS, consider the following runtime issues:
System load--Before you run SunVTS on your system you should consider the added system activity created by SunVTS and consider its effect on users. Depending on the mode that you select, testing can add significantly to your system load or be quite minimal. Added load is desirable when using SunVTS for system stress testing and validation.
Other applications--Some SunVTS tests stress the system resources (such as virtual memory) to the point that other applications might not run.
System functionality--SunVTS is an diagnostic tool. It only runs when your system is fully booted to run level 3 (multi-user level). SunVTS will not run from single-user (maintenance mode) nor from run level 0 (monitor mode).
Superuser access--For security reasons, only superuser is permitted to run SunVTS unless the SunVTS security file is modified when you use the basic SunVTS security scheme.
Graphics Tests--Running tests on frame buffers has two key considerations: You must not run any other application or screen saver program that uses the frame buffer. The frame buffer graphic tests print test patterns on the display. This temporarily prevents you from working in your window environment.
Swap Space--The amount of swap space required for testing varies widely with individual hardware and software configurations. If an adequate amount of swap space is not available on your machine, a window pops up and displays the amount of additional swap space needed.
Your system must meet the following requirements to run SunVTS:
The SunVTS packages must be installed on the systems on which you plan to run SunVTS. Refer to Installing and Removing SunVTS for installation information.
To run SunVTS with a graphical user interface (GUI), that GUI must be installed (CDE). Otherwise, start SunVTS with the TTY interface.
|
Note - Although it is not a requirement, it is good practice to prepare devices like tape drives, CD-ROM drives, and diskette drives by installing the proper media before starting SunVTS. This practice assures the most reliable device-probe results. See Preparing Devices for Testing for more information. |
The following table describes the process for testing your system with SunVTS. The table also provides a brief description, and refers you to the location in the document for more detailed information.
|
Log in as root or use su to become root (superuser). Note: To access SunVTS the user or host must be granted access through one of the SunVTS security mechanisms. See SunVTS Security. |
||
|
Your system is considered online if other applications are running and the system is operating in a production capacity. If the system is online, you should stop the applications and make sure the system remains offline for the duration of your testing. See SunVTS Runtime Considerations. |
||
|
Load the required test media and loopback connectors. Test media is required when testing your tape, CD-ROM, and diskette drives in Functional mode. Communication port tests require loopback connectors. Refer to Preparing Devices for Testing. |
||
|
SunVTS runs in the CDE window environment, or in a non-graphical window environment (in TTY mode). |
||
|
The method for doing this depends on the SunVTS interface that you are using: |
||
|
To run the tests, select the start button in the SunVTS interface. The testing process may take as little as one second, or run indefinitely, based on how SunVTS is configured. |
||
|
Test results are displayed real-time in the SunVTS interface and logged in three log files. You can also configure SunVTS to notify you by email. |
||
|
Refer to Quitting SunVTS for more details. |
Several tests require the installation of media or loopback connectors. Install such requirements before the SunVTS kernel probes for devices (when SunVTS is started, or when the SunVTS reprobe command is run) to allow the SunVTS kernel to properly identify each device.
You must install media in these devices if you plan to test them in Functional Mode:
Tape drive--Load a scratch tape in the tape drive that you plan to test. The tape test has a Read-only mode, but use a scratch tape to avoid inadvertently writing over data.
Diskette drive--Load a scratch diskette in the drive. The diskette test has a Read-only mode, but use a scratch tape to avoid inadvertently writing over data.
SmartCard Reader--Allocate a scratch smart card for testing purposes because the SmartCard test writes on the card.
Communication ports--Many of these tests require a loopback connector attached to the port. Attach any required loopback connectors for the ports you plan to test. For more information about loopback connectors refer to the SunVTS Test Reference Manual.
This section describes the common ways to start SunVTS:
The typical way to start SunVTS is to use the sunvts command. This command starts the SunVTS kernel, either the 32-bit or 64-bit version, and one of the SunVTS user interfaces, based on your system environment.
The SunVTS UI that starts is determined by the following criteria:
When the CDE window manager (DTWM) is running, the SunVTS CDE UI is started (vtsui).
If no window manager is running, then the SunVTS TTY UI is started (vtstty).
|
Note - The sunvts command starts SunVTS assuming that the system under test is in an offline state. All other system applications should be stopped. |
3. Refer to one of the following chapters according to the SunVTS UI you are using:
You can use the sunvts command with a variety of options (as shown in the following table) to control how SunVTS is started.
1. For example, the following command starts SunVTS with the TTY UI no matter what window environment you are using:
The sunvts command starts both the SunVTS kernel and the user interface that is appropriate for your system. However, there are commands that you can use to start just the SunVTS kernel, or to specify a specific user interface.
1. The vtsk command starts the SunVTS kernel. You can use command-line options (see the following table below) to control the behavior of this command.
For systems running in the 32-bit Solaris environment, use the following command:
For systems running in the 64-bit Solaris environment, use the following command:
The vtsk command-line syntax and options are listed below:
In most cases, when you use the sunvts command, the appropriate SunVTS user interface is started.
1. For situations when you want to start a specific user interface without starting the SunVTS kernel, use one of the following:
In all cases, the user interface attempts to connect to the SunVTS kernel.
As of SunVTS 4.3, the SunVTS online testing capability that was initiated using the vtsui.online command is no longer available. The SUNWodu package that provides this online testing functionality is no longer provided.
Online Diagnostic testing of Sun systems is now available through the Sun Management Center software using the Sun Hardware Diagnostic Suite add-on software. See http://www.sun.com/sunmanagementcenter for details.
Before you start a SunVTS test session stop all user applications.
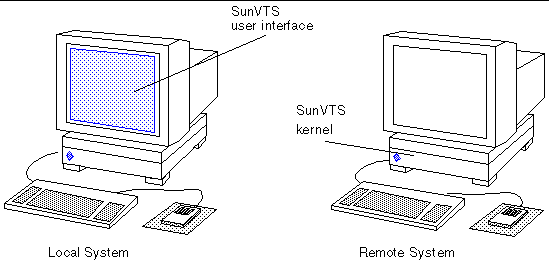
You can start, view, and control SunVTS testing sessions over a network. There are several ways to do it, but the desired effect is to have SunVTS display the SunVTS user interface on the local system (the system that you are on), while the SunVTS kernel is running and testing a remote system (connected via Ethernet, modem lines, and the like).
The following procedures are described in this section:
In addition to the normal SunVTS requirements (refer to Requirements for Starting SunVTS), the following requirements must be met to run SunVTS on a remote system:
The user or host making the remote connection must be an authorized SunVTS user, either through the .sunvts_sec file (basic security), or through the SEAM security scheme. See SunVTS Security.
The same version of SunVTS must be installed on both the local and remote systems.
1. Type the following command:
Replace remote_hostname with the hostname or IP address of the remote system.
The sunvts command starts the SunVTS kernel (vtsk) on the remote system, and starts the SunVTS user interface on the local system. The user interface connects to the kernel and the displays the test session of the remote system. Refer to FIGURE 3-1 below.
The term system under test (SUT) refers to the system running the SunVTS kernel, which is the remote system in this example.
2. Configure SunVTS for the test session and start the tests as described in the following sections:
1. Use the xhost command to allow the remote system to display on your local system.
Replace remote_hostname with the name of the remote system.
2. Log in to the remote system as superuser.
Replace local_hostname with the name of the local system.
The SunVTS kernel starts on the remote system and the user interface displays on your system.
4. Configure SunVTS for the test session and start the tests.
You can run SunVTS on a remote system with the TTY interface through a telnet or tip session.
You need to set the correct terminal type and number of columns and rows before starting the interface. The steps below describe this process.
1. Use the echo command to display the value of the TERM variable:
In this example, the TERM variable is a Korn or Bourne shell variable and the value is sun-cmd. Your display device may be something else like a Wyse, TeleVideo, or other kind of terminal. In that case your TERM value will be something different.
2. Use the stty command to display the settings of your terminal:
$ stty speed 9600 baud; -parity hupcl rows = 60; columns = 80; ypixels = 780; xpixels = 568; swtch = <undef>; brkint -inpck -istrip icrnl -ixany imaxbel onlcr echo echoe echok echoctl echoke iexten |
|
Note - You must have a minimum of 80 columns and 24 rows to run the SunVTS TTY interface. |
3. Write down the values of your TERM variable and rows and columns settings.
You will need these values later.
4. Connect to the remote system using either the telnet or tip commands.
Refer to the telnet(1) and tip(1) man pages for more information about these commands.
5. Become superuser on the remote system.
6. Identify your terminal type and settings in the telnet (or tip) session window:
7. Start SunVTS with the TTY interface:
8. Configure SunVTS for the test session and start the tests.
Refer to Using the SunVTS TTY User Interface.
1. If SunVTS is testing, stop the test session before quitting SunVTS.
2. To quit SunVTS, access the Quit SunVTS submenu and choose from one of the following:
vts kernel and ui--terminates the user interface and the SunVTS kernel
Quit Button--terminates only the user interface
The vtsprobe command lists all of the system testable devices, associated configuration information, and corresponding hardware tests.
The SunVTS kernel must be running on the test machine for the vtsprobe command to work. See Starting the SunVTS Kernel and Interface Separately.
Any user or remote host that wishes to run vtsprobe must be listed in the .sunvts_sec file. By default, root on the local host is listed.
1. Type the following command:
|
Note - The user or local host must be listed in the .sunvts_sec file on the remote system. |
1. Make sure that the SunVTS kernel is running on the remote system.
2. Type the following command:
The vtsprobe utility connects to the remote machine and displays the hardware devices of the remote machine. The output is displayed on the window in which you invoke vtsprobe.
| SunVTS 5.1 User's Guide | 816-5144-10 |
Copyright © 2002, Sun Microsystems, Inc. All rights reserved.
