| C H A P T E R 2 |
|
Installing Windows Server 2008 Operating System |
This chapter provides information about installing the Windows Server 2008 Operating System (OS).
This chapter includes the following topics:
Use TABLE 2-1 to preview the installation process defined as a series of tasks. The table defines the required tasks, describes them, and provides pointers to the instructions for performing that task.
|
Verify that all applicable requirements are met for installing an operating system to a server. |
|||
|
The Windows OS is shipped with the CD and DVD media and documentation that you will need to install the Windows OS. |
|
||
|
Follow the instructions in this chapter to install the Windows 2008 operating system. |
|||
|
Install driver(s) and supplemental software post installation, if applicable. |
If necessary, install the updated server-specific drivers and the server supplemental software. |
| Note - The complete Microsoft Windows operating system installation process is not documented in this section. This section walks you through the steps for booting the Windows Server 2008 media, installing drivers (if necessary) at boot, and partitioning the drive. For additional information, consult the Microsoft’s Windows 2008 Product Documentation at http://www.microsoft.com/windowsserver2008/en/us/product-documentation.aspx |
The following procedure describes how to boot the Windows Server 2008 operating system from local or remote media. It assumes you are booting the Windows installation media from one of the following sources:
| Note - If you are booting the installation media from a PXE environment, refer to Installing Windows Server 2008 Using a PXE Network for instructions. |
Prior to performing the installation, the following requirements must be met:
After completing this procedure, you will need to perform the post installation tasks as described in Post Installation.
|
1. Ensure that the installation media is available to boot.
2. Reset or power on the server.
Where n is the number of server module in chassis.
3. When the Press F8 for BBS POPUP message appears on the BIOS POST screen, press F8 to select a boot device.
The Boot Device dialog appears.
| Note - The dialog that appears in your installation may be different depending the type of disk controller installed in your server. |
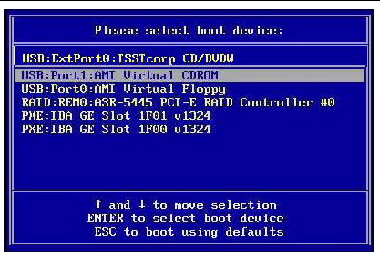
4. In the Boot Device dialog, select the menu item according to the Windows media installation method you elected to use and press Enter.
5. When prompted with Press any key to boot from CD, press any key.
The Windows installation wizard starts.
Continue the Windows installation wizard until the Installation Type dialog appears.
6. In the Installation Type dialog, click Custom (advanced).
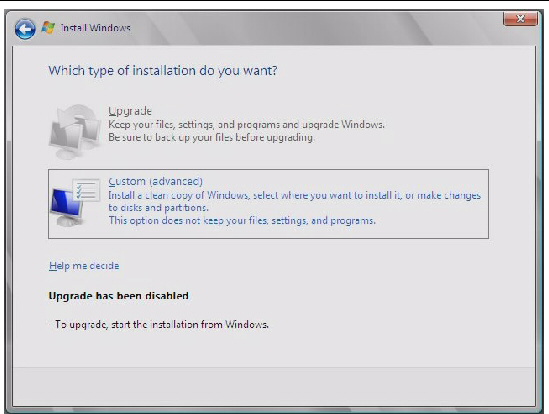
The Where Do You Want to Install Windows dialog appears:
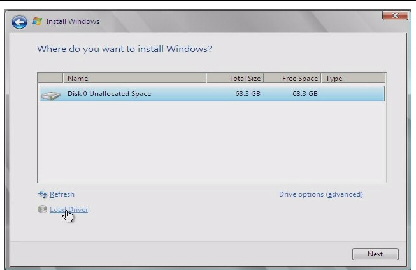
7. In the Where do you want to Install Windows dialog, do one of the following:

|
Caution - Formatting or re-partitioning a pre-existing partition will destroy all data on the partition. |
The Where do you want to Install Windows dialog appears:
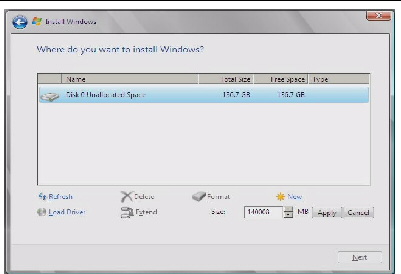
8. In the Where to Install Windows dialog, do the following:
a. Click Delete to delete the existing partition.
A confirmation window appears.
b. Click OK to confirm the partition deletion.
c. Click New to create the new partition.
d. Change partition size settings as needed, and then click Apply.
e. Click Next and proceed to the next step.
The Windows installation begins.
The server will reboot multiple times during the installation process. This process could take several minutes.
9. When the Windows installation is complete, Windows starts and prompts you to change the user password.
10. In the user password dialog, click OK and set up the initial user login account.
After the initial user account is created, the Windows Server 2008 desktop appears.
11. Proceed to Post Installation.
This section explains the initial information you will need to install the Windows Server 2008 operating system over an established PXE-based network via a customer-provided Windows Deployment Services (WDS) image.
Topics included in this section:
Note that the procedure presented in this section documents the initial steps to install Windows 2008 over the network using a Windows Deployment Services (WDS) image. Specifically, it explains the steps for selecting the server PXE network interface card that will be communicate with your WDS installation server. For further information about using a WDS image to install the Windows Server 2008 operating system, see Microsoft’s Windows Deployment Services documentation.
After completing this procedure, you will need to perform the post installation tasks as described in Post Installation.
Follow the WIM installation instructions in the Windows Server 2008 documentation.
For instructions, see Appendix A Incorporate Sun Blade Server Drivers Into WIM.
|
1. Reset or power on the server, for example:
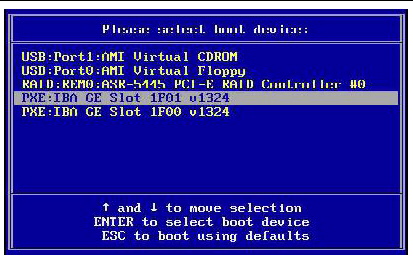
2. Press F8 to specify a temporary boot device.
The Please Select Boot Device menu appears.
3. In the Please Select Boot Device menu, select the appropriate PXE installation boot device and press Enter.
The PXE installation boot device is the physical network port configured to communicate with your network installation server.
The Boot Agent dialog appears:
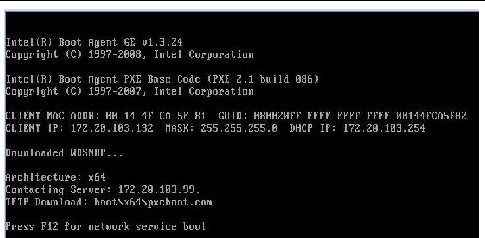
4. Continue the normal Windows Server 2008 WDS network installation. For additional information, consult Microsoft’s Windows Deployment Services product documentation.
5. Proceed to Post Installation.
Copyright © 2009 Sun Microsystems, Inc. All rights reserved.