Installing and Applying Standby Power to the Server Module
|
This chapter contains the following topics:
Server Module Front Panel Indicators, Buttons, and Port
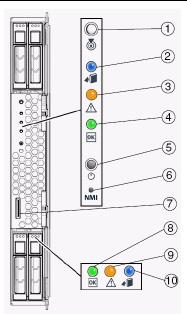
The Sun Blade X6270 M2 Server Module provides standard indicators and buttons, and a Universal Connector Port on its front panel. See FIGURE 2-1 for the locations of LEDs, buttons, and port.
FIGURE 2-1

Figure Legend Server Module LEDs, Buttons, and Port
|
1
|
Server Module Locate LED - White
|
|
2
|
Server Module Ready to Remove LED - Blue
|
|
3
|
Server Module Service Action Required LED - Amber
|
|
4
|
Server Module OK/Power LED - Green (blinking or solid state)
|
|
5
|
Server Module Power button/reset
|
|
6
|
Non-Maskable Interrupt (NMI) button (Service only)
|
|
7
|
Universal Connector Port (UCP), used for dongle cable
|
|
8
|
HDD OK/Power LED - Green
|
|
9
|
HDD Service Action Required LED - Amber
|
|
10
|
HDD Ready to Remove LED - Blue
|
Installing the Server Module Into the Chassis
Consult the following sections when installing a server module into a powered on chassis:
Before You Begin
Prior to installing the server module into a powered-on chassis, ensure that the following requirements are met.
- Ensure that the following chassis components are installed and powered-on in the Sun Blade 6000 Series chassis.
- Chassis monitoring module (CMM)
- Network express modules (NEMs)
- All required cabling to the chassis are attached.
- The system chassis is powered-on.
For information about installing chassis components, attaching cables, and powering on the chassis, see the Sun Blade 6000 Series chassis documentation at: http://docs.sun.com/app/docs/prod/blade.srvr#hic
- Review the required installation tasks for properly installing and setting up the Sun Blade X6270 M2 Server Module in the Sun Blade 6000 Series chassis documentation. For more information, see TABLE 1-4.
| Note - If the Sun Blade X6270 M2 Server Module is inserted into a Sun Blade 6000 Modular System chassis that has SAS-1 Network Express Modules (NEMs), or SAS-1 NEMs and a Sun Blade 6000 Disk Module, the server module’s SAS-2 REM might hang. To prevent this problem, you need to upgrade the firmware of your SAS-1 components (SAS NEMs and disk modules) to a firmware version that supports SAS-1/SAS-2 coexistence. This upgrade must be done before you insert the Sun Blade X6270 M2 Server Module into the chassis. At a minimum, all SAS expanders for SAS-1 NEMs and Sun Blade 6000 Disk Modules must be upgraded to firmware revision 5.04.03 to allow SAS-1/SAS-2 device coexistence in the Sun Blade 6000 Modular System chassis. See the SAS-1/SAS-2 Compatibility Upgrade Guide (821-1800) for details on obtaining the firmware and performing the upgrade.
|
- If applicable, install the following optional server module components prior to installing the server module into the system chassis:
For instructions, see the Sun Blade X6270 M2 Server Module Service Manual (821-0499).
- Use a grounded antistatic wrist strap or equivalent safety equipment to prevent electrostatic discharge (ESD) when you install the Sun Blade server module into the system chassis.

|
Caution - To protect electronic components from electrostatic damage, which can permanently disable the system or require repair by service technicians, place components on an antistatic surface, such as an antistatic discharge mat, an antistatic bag, or a disposable antistatic mat. Wear an antistatic grounding strap connected to a metal surface on the chassis when you work on system components.
|
 Install Server Module Into a Powered-On Chassis Install Server Module Into a Powered-On Chassis
|
1. Verify that the Sun Blade 6000 Series chassis is powered-on.
When the chassis is powered-on, the fans are operating and the OK/Power LED illuminates a steady-on green light. The OK/Power LED is located on both the front and rear panels of the chassis. If the chassis is not powered-on, refer to the system chassis documentation.
2. In the front of the chassis, locate and remove the desired server module filler panel.
Pull the lever out and eject the filler panel.

|
Caution - If you are not installing a server module into a slot, do not remove the server module filler panel from the slot. The server module filler panel is required to meet FCC standards for electromagnetic interference (EMI).
|
3. Position the server module vertically so that the ejectors are on the right and extend outward.
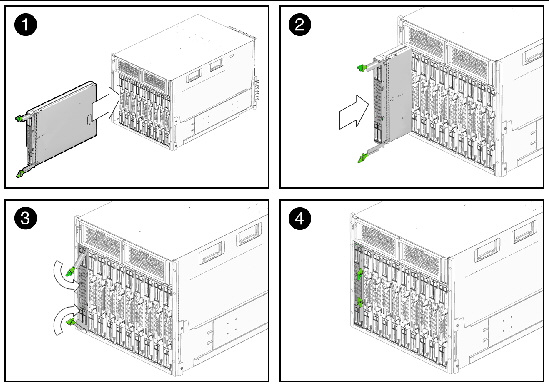
The following illustrations show the server module being inserted into the Sun Blade 6000 Modular System. See box 1 in FIGURE 2-2.
FIGURE 2-2 Inserting the Server Module Into the Chassis

4. Push the server module into the slot until the server module stops and is flush with the chassis.
See Boxes 2 and 3 in FIGURE 2-2.
5. To lock the server module into the chassis, do the following:
- Rotate the top ejector down until it snaps into place. See Box 3 in FIGURE 2-2.
- Rotate the bottom ejector up until it snaps into place. See Box 3 in FIGURE 2-2.
The server module is locked in the chassis (Box 4 in FIGURE 2-2) and standby power is applied to the server module SP.
| Note - The server SP can take several minutes to boot. As the server SP is booting, the server module’s OK/Power LED illuminates a slow blink (0.5 second on, 0.5 second off). After the server SP boots, the OK/Power LED illuminates a standby blink (0.1 second on, 2.9 seconds off). The standby blink state indicates that the server SP is active and the server module host (BIOS) is powered off.
|
Applying Standby Power to the Server Module
After installing a server module into a powered-on chassis (the chassis OK/Power LED illuminates a steady-on green light), the server module SP automatically boots and standby power from the chassis power supplies is supplied directly to the server module SP. To verify that the server module is in standby mode, refer to Verify Standby Power State on Server.
In standby power mode, main power is not yet applied to the server module. However, you can connect to the Oracle Integrated Lights Out Manager (ILOM). For information about connecting to ILOM and applying main power to the server module, see Connecting to ILOM and Applying Main Power to the Server Module.
 Verify Standby Power State on Server Verify Standby Power State on Server
|
1. Verify that the system chassis is powered-on.
A steady-on green light should be visible from the chassis OK/Power LED.
If the chassis is not powered on, refer to the system chassis documentation for instructions on powering on the system chassis.
2. Ensure that the OK/Power LED on the server module illuminates a standby blink.
The OK/Power LED on the server module front panel illuminates a standby blink (0.1 second on, 2.9 seconds off). The standby blink indicates that the server module SP is active but the server module host is powered off.
| Note - The server module OK/Power LED will be set to standby blink only when there is enough chassis power for the server module to power on. If there is not enough chassis power, the OK/Power LED will remain off until there is enough power for the server module to power on. To troubleshoot this issue, see Troubleshoot Server Power States.
|
Attaching Devices to the Server Using a Dongle Cable
Your system chassis is shipped with the following dongle cable that enables you to connect communication devices directly to the Sun Blade X6270 M2 Server Module:
- 3-Cable Dongle II (P/N 530-3936 Option #4622A). This cable provides a VGA connector, RJ-45 serial connector, and one dual USB connector.
| Note - The 3-Cable Dongle II is typically provided with each Sun Blade 6000 Series chassis. Additional cables can be ordered.
|
You can use the VGA or USB connectors on the dongle cable to communicate with the server module BIOS and operating system. Or, you can use the serial connector to communicate with the server module SP.
| Note - Direct management of an individual server module is through the embedded server module SP and the Oracle Integrated Lights Out Manager (ILOM). Access to the server module SP is made through the serial port or the chassis monitoring module (CMM) management network. For more information about server-level management or chassis-level management in ILOM, see the system chassis documentation or the Oracle Integrated Lights Out Manager (ILOM) 3.0 Documentation Collection.
|

|
Caution - You should use the dongle cable for configuration and service purposes. Disconnect the dongle cable from the server module after the configuration or service operation is complete to avoid damaging the cable.
|
 Attach Devices to Server Using the 3-Cable Dongle Attach Devices to Server Using the 3-Cable Dongle
|
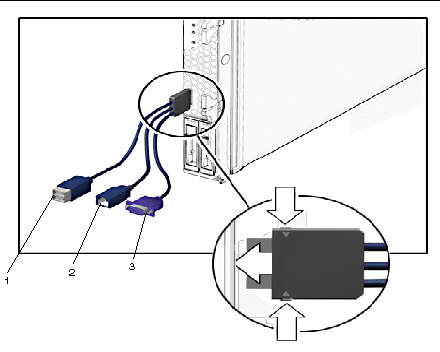
1. Insert the dongle cable into the universal connector port (UCP) on the server module front panel.
See FIGURE 2-3.
2. Attach the connectors on the dongle cable to the appropriate devices.
See FIGURE 2-3.
FIGURE 2-3 Dongle Cable Connections

Figure Legend Dongle Cable Connectors
|
1
|
Dual USB 2.0 connectors
|
|
2
|
RJ-45 serial port connector
|
|
3
|
VGA video connector
|
| Sun Blade X6270 M2 Server Module Installation Guide
|
821-0495-13
|
   
|
Copyright © 2010, Oracle and/or its affiliates. All rights reserved.


