| C H A P T E R 5 |
|
Installing and Configuring the RFID Information Server (UNIX) |
The RFID Information Server can be installed after your selected application server has been successfully installed and is running on the host machine. You also need an properly installed and licensed installation of a supported database.
The following sections are included in this chapter:
Installing the RFID Information Server has the following prerequisites:
You can select the installer option to have the installer update the policy file during installation or you can perform this step manually after installing the RFID Information Server. See To Update the Application Server Policy File for the RFID Information Server (UNIX) to perform this step manually.
You can do this step either before or after you install the RFID Information Server. If you do it after installing the RFID Information Server, you will need to restart the application server before you can start the RFID Information Server.
The RFID Information Server is deployed to the selected application server. The application server communicates with the database through JDBC to handle additions, deletions and insertions of rows for the EPC tags identified. You need to install the necessary JDBC driver for your database and application server combination.
|
You must perform this procedure to use either the RFID Management Console or the RFID Information Server. You can perform this procedure either before or after installing either of those RFID modules. If you update the JDBC drivers after installing the RFID modules, you must restart the application server before starting either the RFID Information Server or the RFID Management Console.
1. Get the proper JDBC driver for your database.
Sun does not ship JDBC drivers as part of this release. These drivers can be obtained in the following ways:
For example, on UNIX systems, the default path for Oracle 10g might be /opt/oracle/product/10g/jdbc/lib/ojdbc14.jar
If you cannot find the JDBC driver in your Oracle installation, you can find it at http://www.oracle.com/technology/software/tech/java/sqlj_jdbc/index.html.
2. Copy the JDBC driver to the designated directory in the application server installation path as follows:
/opt/SUNWappserver/domains/domain1/lib/ext
Typically, the Oracle JDBC driver is already included in the BEA WebLogic Server 8.1 SP4 installation.
For PostgreSQL, copy the JDBC driver to the following directory, BEA-install-dir/server/lib.
/opt/SUNWappserver/domains/domain1/lib/ext
Typically, the Oracle JDBC driver is already included in the WebLogic installation.
For PostgreSQL, copy the JDBC driver to the following directory, BEA-install-dir/server/lib.
3. (For BEA WebLogic Server 8.1 SP4 using a PostgreSQL database): Add the location of the JDBC driver to the class path.
Copying the JDBC driver JAR file to the proper directory is not sufficient by itself. You must add the JAR file to your class path variable, which is set inside the WebLogic startup script. The name and location of this script file varies. Your database administrator will know this information.
For example, the script could be named startWebLogic.sh. Modify the class path declaration from: CLASSPATH = ${EXISTING_CLASSPATH} to CLASSPATH =BEA-install-dir/server/lib/postgres-jdbc.jar:${EXISTING_CLASSPATH} where the variable, BEA-install-dir, represents your BEA WebLogic Server 8.1 SP4 installation directory and the variable, postgres-jdbc.jar, represents the proper JDBC JAR file.
4. Restart your application server.
Use the following procedure to install the RFID Information Server on a supported Solaris OS or Linux platform.
|
1. Review and confirm the requirements for installation of the RFID Information Server.
See Requirements for Installing the RFID Information Server (UNIX).
2. If you have not already done so, get the software.
See Getting the RFID Software and the RFID Documentation.
3. Enable access to the X server.
5. Set the DISPLAY environment variable to display to your machine name. For example, using the csh shell, you would type:
6. Start the RFID Information Server installation.
a. Change to the appropriate directory.
7. From the Welcome panel, click Next and follow the instructions on the installer wizard panels.
Use the Typical installation option. There is no useful difference between typical and custom installation when installing the RFID Information Server.
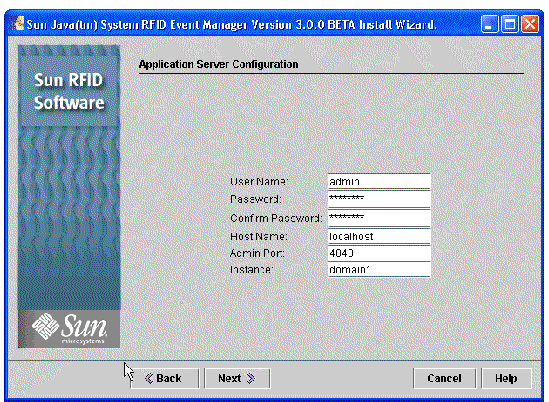
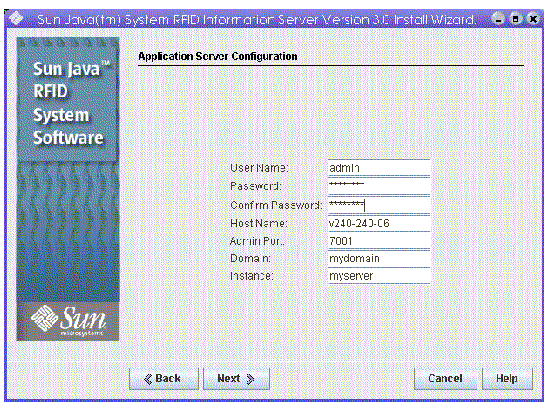
8. On the Application Server Configuration panel, enter the configuration information for your application server installation.
It is important that this information be entered correctly, as the RFID Information Server cannot function correctly unless it is properly deployed to your application server.
The following screen captures show examples of the application server configuration fields for the Application Server Platform Edition and the BEA WebLogic Server 8.1 SP4.
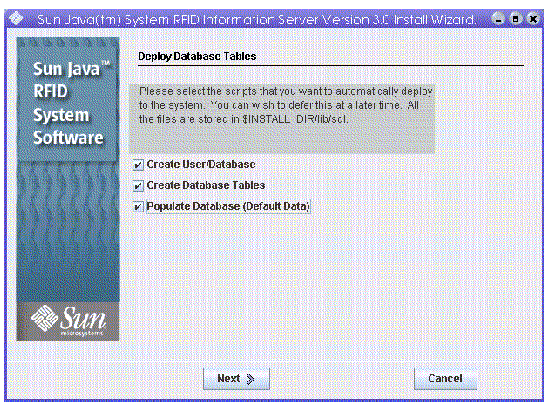
9. On the Deploy Database Tables panel, indicate whether you want the installer wizard to deploy the RFID database schema for you.
This option requires a locally installed database.

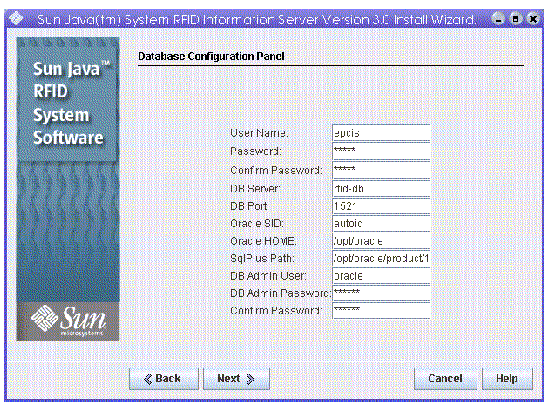
10. On the Database Selection panel, select your database and enter the configuration information when prompted.
The following screen capture shows a sample Database Configuration Panel for deploying sample data using an Oracle database.
|
Configuration Parameters[1] |
||
|---|---|---|
|
Password (and confirm Password) DB Port - database port number Additional fields appear if you are deploying the sample data. |
This is the user that is used to create the Oracle database tables. For example, epcis. The name or IP address where the database is installed. Confirm this value as the installer defaults this value to the name of the machine where the installer is running. Port number where you connect to the database. This defaults to 1521. Contact your database administrator for information if you do not know the values of these fields. The path to the location of your oracle database, oradata. For example: /opt/oracle The path to the executable sqlplus. For example, /opt/oracle/product/10g/bin |
|
|
This is the user name that is used to create the database tables. Location of the database installation. |
11. When installation is complete, click Close.
You might need to perform additional steps before your RFID Information Server is ready to use. If you did not select the option to update your application server policy file during installation, you need to update the file manually.
See To Update the Application Server Policy File for the RFID Information Server (UNIX) or To Update the BEA WebLogic Server 8.1 SP4 Policy File as applicable for the application server that you are using.
12. (Sun Java System Application Server 8.1) Verify communication between your application server and your database installation.
See To Verify Database Communication Between the RFID Information Server and Sun Java System Application Server 8.1.
13. Define the valid users for your RFID Information Server.
See Defining Valid Users for RFID Information Server.
14. (Optional) Validate your RFID Information Server installation by viewing the EPCIS Index page in your browser window.
See To Validate the RFID Information Server Installation.
|
1. Log in to the application server's Admin Console as the admin user.
The Admin Console URL is as follows:
2. Check the JDBC connection pool by choosing Resources  JDBC
JDBC  Connection Pools
  jdbc-sun-pool.
On this page you see three buttons, Save, Load Defaults, Ping.
The message "Ping succeeded" indicates that your database communication is working correctly. If you see an error, confirm that you have installed the JDBC driver correctly. See To Install the JDBC Driver for Use With the RFID Software (UNIX).
To use the RFID Information Server, you must customize your application server. Review the following sections and perform the required procedures for your installation.
|
An option to perform this task has been added to the RFID Information Server installer. If you selected the option to have the installer update the server.policy file, you do not need to perform this procedure. If you did not select this installer option, follow this procedure using the file locations appropriate for your OS platform.
1. In a terminal window, change to the directory containing the RFID policy file and find the file named server.policy.
This file needs to replace the file of the same name that is located in the application server's configuration directory. The RFID policy file can be found in the following default locations.
2. Copy the server.policy file to your application server's configuration directory.
The path to this directory depends on your application server installation and the location might vary depending on the specific platform and version of the application server that you are using.
3. If you are performing this procedure after installing the RFID Information Server, restart your application server.
|
1. In a terminal window, change to the directory containing the RFID policy file and find the file named server.policy.
The default location of this file is as follows:
This file needs to replace the file weblogic.policy that is located in the BEA WebLogic Server 8.1 SP4 configuration directory.
2. Copy server.policy to the BEA WebLogic Server 8.1 SP4 configuration directory to a file named weblogic.policy.
The path to the configuration directory depends on your server installation and the location may vary depending on the specific platform and version that you are using.
The full default path to the policy file is: /usr/local/bea/weblogic81/server/lib/weblogic.policy.
3. (Optional) If you are performing this procedure manually after installing the RFID Management Console, you must restart the application server for the change to take effect.
Authentication and authorization are central concepts of Sun Java Application Server security. RFID Information Server uses Application Server's built in security. Application Server enforces its authentication and authorization policies upon the following entities: Users, Groups, Roles and Realms.
Users - A user is an individual identity that has been defined in the Application Server. A user can be associated with a group. The RFID Information Server defines two users, guest and tester, in the deployment descriptor. The guest user is in the viewer group and the tester user is in the modifier group.
Groups - A group is a category of users classified by common traits, such as read/ write access to the information of RFID Information Server. Categorizing users into groups makes it easier to control access by large numbers of users. The RFID Information Server defines two groups, viewer and modifier, in the deployment descriptor. The viewer group has the readonly role and the modifier group has the readwrite role.
Roles - A role defines which applications and what parts of each application users can access and what they can do. In other words, roles determine a user's authorization level. To control the access permission of information, the RFID Information Server defines two security roles, readonly and readwrite, in the deployment descriptor. The readonly role has read-only permission and the readwrite role has read/write permission.
Realms - A realm, also called a security policy domain or security domain, is a scope over which the server defines and enforces a common security policy. In practical terms, a realm is a repository where the server stores user and group information. The Application Server is preconfigured with three realms: file (the initial default realm), certificate, and admin-realm. The RFID Information Server uses the file realm as the security domain.
Authentication is the way the RFID Information Server determines that an RFID Information Server user is valid. A user must provide security credentials (user name and password) to authenticate his/her identity to the RFID Information Server.
Typically, authentication means a user logging in to RFID Information Server using a web browser or a programmatic mechanism with a user name and password. If RFID Information Server verifies those credentials, the user is authenticated.
The user is associated with this authenticated security identity for the remainder of the session.
Once a user is authenticated, the level of authorization determines which operations the user can perform. A user's authorization level is based on their role. For instance, RFID Information Server defines the readonly and the readwrite roles.
|
You can define a valid user for the RFID Information Server in two ways. You can either use the default user, tester, or define your own user names. Follow these steps and use the appropriate values as indicated by the examples in Step 6.
1. If necessary, review the background information in the section, Defining Valid Users for RFID Information Server.
2. Log in to your Application Server's Admin Console.
 Configuration
  Security
  Realms
  file.
file.
 Configurations
  default-config
  Security
  Realms
  file.
file.
The Create File Realm User dialog box appears.
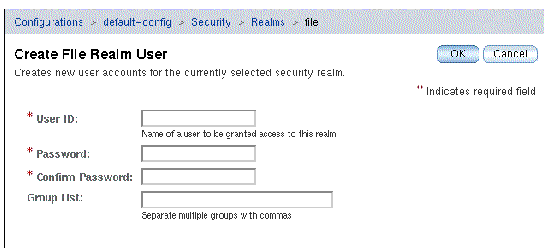
6. Type the values corresponding to the user that you are defining.
7. Click OK, then click Close.
8. Restart your application server to enable the changes.
|
You can define a valid user for the RFID Information Server in two ways. You can either use the default user, tester, or define your own user names. Follow these steps and use the appropriate values as indicated by the examples in Step 6 in the previous procedure, To Define Users for the RFID Information Server Using Application Server 8.1.
1. If necessary, review the background information in the section, Defining Valid Users for RFID Information Server.
2. Log in to your BEA WebLogic Server 8.1 SP4 Admin Console.
For example, in your web browser type http://machinename:7001/console.
3. Choose mydomain  Security
  Realms
  myrealm
  Users.
4. Click Configure a New User.
5. Create the necessary users.
See the BEA WebLogic Server 8.1 SP4 documentation for more details.
6. Restart your application server to enable the changes.
The database scripts can be used if you do not use the Deploy Database option of the installer and you want to set up the databases manually.
Two sets of scripts are provided: sql scripts to be used with the database SQL client and shell scripts that can be executed from the command line. It is outside the scope of this document to provide detailed database command-level procedures.
The database scripts are located in the directory /rfid-install-dir/lib/sql. For a default installation, the locations are the following:
The following table lists the Oracle scripts.
The scripts listed in TABLE 5-3 are provided for use with the supported PostgreSQL database.
|
1. Copy the scripts to the directory on the machine where the database server is running.
2. Change to the directory where you copied the scripts.
3. Run the scripts that you need.
Refer to TABLE 5-2. You must run these scripts at the database admin user. If you want to create the tables and deploy sample data, use oracle_rfidis_setup.
|
Note - The SQL scripts use the database configuration information provided at installation time. The scripts populate the tables with sample data. |
|
The PostgreSQL database must be installed to perform this procedure. The RFID software installer does not install the database software.
1. Copy the scripts to a directory on the machine where the database server is running.
2. Change to the directory where you copied the scripts.
3. Run the scripts that you need.
Refer to TABLE 5-3. You must run these scripts at the database admin user. If you want to create the tables and deploy sample data, use the postgres_rfidis_setup script.
|
Note - The SQL scripts use the database configuration information provided at installation time. The scripts populate the tables with sample data. |
4. Confirm that your PostgreSQL server is configured to enable incoming TCP/IP connections. This is not the default setting.
This is necessary even when the database server is running on the same host as your application server. See the PostgreSQL server administration documentation for further information.
When the RFID Information Server installation has been successfully completed, you can validate the installation by viewing the EPCIS Index page in your browser window.
|
1. Navigate to the following URL: http://hostname:port/epcis. For example, http://myhost:8080/epcis.
The variable, hostname, specifies your application server's location. The variable, port, is the port number of the Application Server HTTP port that was configured during Application Server installation. The RFID Information Server Index page appears in your browser window as shown in the following screen capture.
2. When prompted, enter your RFID Information Server user name and password.
See To Define Users for the RFID Information Server Using Application Server 8.1 or To Define Users for the RFID Information Server Using BEA WebLogic Server 8.1 SP4 for more information on setting up RFID Information Server users.
|
1. From your Application Server Enterprise Edition Admin Console, choose Configurations  server-config
  JVM settings.
The JVM Settings page appears.
2. Choose JVM Options  Add JVM Option.
3. Type -Djava.awt.headless=true and save the new option.
4. Restart your Application Server Enterprise Edition instance.
|
1. From your Application Server Enterprise Edition Admin Console, select Application Server in the left pane.
A page appears showing several tabs across the top.
2. Select the JVM Settings tab.
The JVM Settings page appears.
5. In the Value field, type the option -Djava.awt.headless=true.
7. Restart your Application Server Platform Edition instance.
|
1. You need to modify startWLS.sh and include the following line for the JVM parameters:
2. Restart the application server to pick-up these changes.
Copyright © 2006, Sun Microsystems, Inc. All Rights Reserved.