How to Install SEAM Software Using the GUI
In this example, the SEAM master server installation is selected, but the process is much the same for the slave and client installations. The SEAM packages have been installed on /net/denver/export/SEAM, although they could be installed on a local file system or you can install using the SEAS CD.
SEAM client installations can be made faster by following the instructions in "How to Install SEAM Clients Without the GUI".
-
Start the installation script.
# cd /net/denver/export/SEAM/products/Sun_Enterprise_Authentication_Mechanism_1.0
# ./installer
-
Click Next in the Welcome screen.
-
Select the type of installation.
The next screen asks you to select a default installation or a custom installation. Select the custom installation. Click Next to proceed.
-
Click Next in the Locale Selection screen.
Currently there are no locales to select in the SEAS release.
-
Click Next in the Select Install Directory screen.
SEAM will install files in several directories. You must leave the path as "/".
-
Select the software components to be installed.
For a master, select the Master Server package. For a slave, select the Slave Server package. Other packages are added as needed. Click Next to proceed.
Note -A disk space check is done after this step. If there is enough space then you should not have to do anything.
-
Click Install Now to start the installation.
The screen will show the components selected.
-
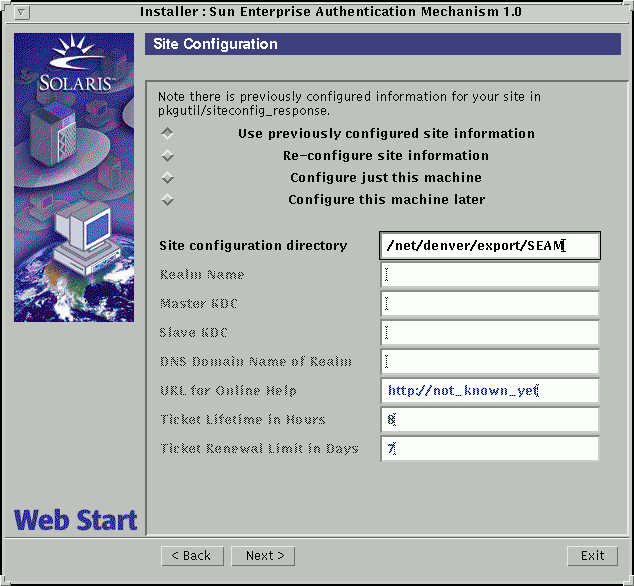
Select the configuration procedure and directory.
The next screen allows you to select the configuration procedure, as well as identifying the path to the configuration files. If you have preconfigured site information, select "Use previously configured site information" and specify the directory path to the configuration files.

-
A summary of the installation process is displayed; click Next to proceed.
-
Additional information is displayed in the next screen; click Exit to finish the procedure.
Where to Go From Here
The Sun Enterprise Authentication Mechanism Guide includes a list of the tasks that can be done after the SEAM software is installed.
- © 2010, Oracle Corporation and/or its affiliates
