How to Preconfigure SEAM Installations
This procedure can be followed to preconfigure much of the information needed when configuring either the KDCs or the SEAM clients. If preconfiguration is needed, a writeable file system must be available for the preconfiguration information (see "How to Copy the SEAM Image to a Local File System" or "How to Mount a Writeable File System on the SEAS CD"). The information stored on the NFS file system can be accessed by each host in the realm during the installation procedure. This process is optional, but should be very helpful for large sites.
Note -
This procedure will install SEAM on the NFS server using the preconfiguration information, but none of the SEAM applications will work until at least a KDC master is installed.
In this procedure the following configuration parameters are used:
hardware configuration = SPARC
realm name = ACME.COM
DNS domain name = acme.com
master kdc = kdc1.acme.com
slave kdc = kdc2.acme.com
answerbook server = denver
online help URL = http://denver:8888/ab2/coll.384.1/SEAM/@AB2PageView/8897
file system holding SEAM packages = /export/SEAM
-
Become root on an NFS server.
-
Start the install process.
# cd /export/SEAM/products/Sun_Enterprise_Authentication_Mechanism_1.0
# ./installer
Note -If you are using the CD for package installations instead of using an NFS server, then installer is found in: /net/denver/cdrom/products/Sun_Enterprise_Authentication_Mechanism_1.0.
-
Click Next in the Welcome screen.
-
Select the type of installation.
The next screen asks you to select a default installation or a custom installation. Select the custom installation to get to the preconfiguration screens. Click Next to proceed.
-
Click Next in the Locale Selection screen.
-
Select the software components to be installed.
If the NFS server is not going to be a SEAM client or if you are just collecting preconfiguration information, then none of the components need to be selected. For a Solaris 7 NFS server that is going to provide Kerberized NFS support, the only components that should be selected are Kernel Module and SEAM Client. For a Solaris 2.6 NFS server that is going to provide Kerberized NFS support, select the same components but make sure to add the "5.6 Patches" and the GSS-API component. Click Next to proceed.
Note -A disk space check is done after this step. If there is enough space then you should not have to do anything.
-
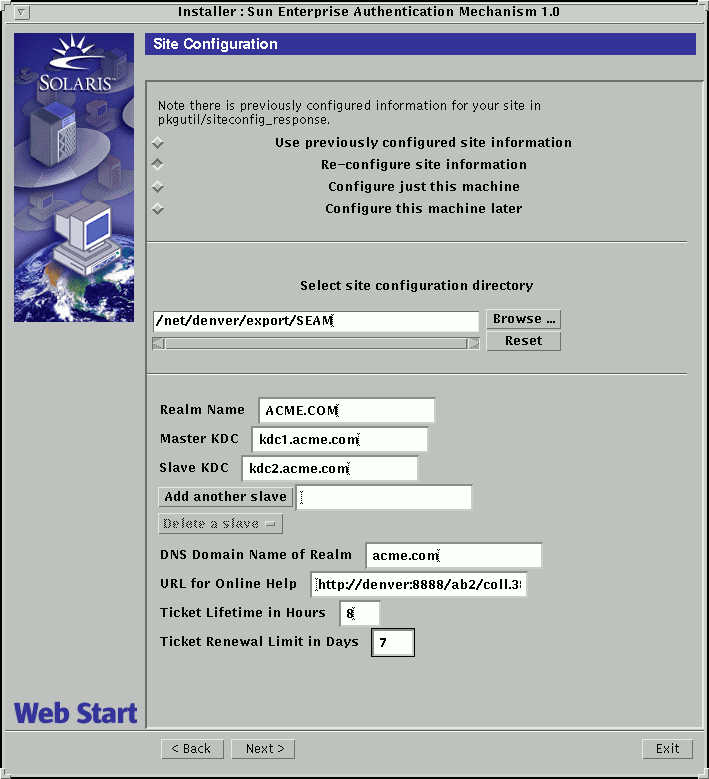
Define site configuration information.
The next screen allows you to select the configuration procedure as well as entering configuration information.
-
Select the configuration procedure.
The top part of the screen allows you to select how the machine will be configured. For this procedure you should select "Re-configure site information." You can select to:
-
Use previously configured site information -- Use after the preconfiguration process has been completed
-
Re-configure site information -- Use this to enter new information
-
Configure just this machine -- Use to enter new information for this host
-
Configure this machine later -- Use when you are not sure about all of the configuration parameters, but want to install the packages anyway
-
-
Identify the site configuration directory.
The path should be to a file system that is mountable by all of the systems that require SEAM installations.
-
Specify the realm name.
By convention, the realm name is capitalized to help differentiate it from other domain names. For this example, the domain name is ACME.COM.
-
Identify the master KDC and slave KDC server names.
Use fully-qualified host names. For this example, the host names are kdc1.acme.com for the master and kdc2.acme.com for the slave. You can add as many slaves as needed.
-
Enter the DNS domain name for this realm.
-
Specify the URL for online help.
This URL is used by the SEAM Administration Tool, so the URL should be defined properly to enable the "Help Contents" menu to work. The web version of this manual can be installed on any appropriate AnswerBook2 server. You will need to change the localhost entry and add information after the SEAM portion of the address.
For this example, the URL should point to http://denver:8888/ab2/coll.384.1/SEAM/@AB2PageView/6685, unless another location is more appropriate. The section titled "SEAM Administration Tool" in the "Administering Principals and Policies" chapter of the Sun Enterprise Authentication Mechanism Guide is the suggested location to use.
You can verify the URL by entering the URL into any web browser and verifing that the page is available. Make sure that the SEAS documentation has been installed before attempting to verify the URL.
-
Identify the maximum lifetime for tickets.
If the default value is acceptable, do not change it.
-
Identify the maximum lifetime for renewable tickets.
If the default value is acceptable, do not change it.
-
Review the definitions that you have set.
If the definitions are correct, click Next to proceed. When you click Next, the preconfiguration information is saved to the configuration directory.

-
-
Click Install Now to start the installation.
The screen will show the components selected. If there are no components selected and you are just collecting the preconfiguration information, you can click Exit.
-
A summary of the installation process is displayed; click Next to proceed.
-
Additional information is displayed in the next screen; click Exit to finish the procedure.
A window is displayed asking if you want to reboot. Rebooting is not necessary until the server needs to use SEAM.
- © 2010, Oracle Corporation and/or its affiliates
