Miscellaneous
The following Workspace items can be customized from Miscellaneous:
-
Screensaver on/off
-
Screensaver timeout
-
When to beep
-
Beep duration
-
Focus policy
-
Icon location
-
Scrollbar placement
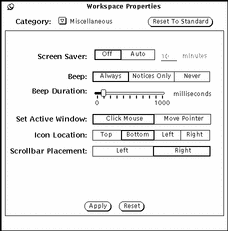
To customize these settings, choose the Miscellaneous category from the Workspace Properties menu. Figure 17-10 shows the Miscellaneous category.
Figure 17-10 Miscellaneous Category of Workspace Properties

Setting the Screensaver Feature
The screensaver feature makes the screen go blank after a period of no use. This option is turned off by default, but you can enable it.
To turn on the screensaver:
-
Press SELECT on Auto.
-
Type the number of minutes before it is enabled. The default is five minutes.
-
Press SELECT on Apply.
Your changes now apply.
Returning to the Desktop
If you have set the screensaver option and your screen turns blank, you can restore your desktop by moving the mouse in any direction. Although input from any keyboard key or mouse button will restore your screen, it is advised that you move the mouse instead. This is because pressing a key creates system input. This means, as an example, that if the pointer is positioned in a text file, you may insert a character in the text.
Setting the System Beep
Use the Beep setting to specify whether your system beeps for all application-generated beep actions (errors, messages in your Console, and so on), only when a notice is displayed, or never. Figure 17-10 shows the beep settings. To customize the system beeps, click SELECT on the chosen beep setting in the Miscellaneous category of the Workspace Properties.
You can move the slider from Beep Duration to increase the length of time the system beeps.
Setting the Active Window
Use the Set Active Window setting to specify whether you must click SELECT on the window to change input focus, or whether you simply move the pointer into the window to specify that window as the active input area. The active input area is where you enter text, whether in a text pane of a base window or a text field of a window control area. The two choices, Click Mouse and Move Pointer, are also called Click-to-Type and Focus-Follow-Pointer. In Figure 17-10, the Click Mouse choice is selected.
The default is Click Mouse. The Click Mouse option requires that when you move the pointer from one window to another, you must click SELECT before you can type any text into the window.
If you choose the Move Pointer option, you don't need to click in the window to make it active and ready for input. The presence of the pointer within the boundaries of the window tells the current window that now it is the focus of the user's attention.
To change the setting, click SELECT on the setting you prefer.
Setting the Default Locations for Icons
You can change the default location where icons appear in the Workspace when they are closed from windows. The OpenWindows default location for icons is on the bottom edge of the Workspace.
To change the default locations of icons:
-
In the Workspace Properties window, press MENU on the Category menu button and choose Miscellaneous.
-
Click Select on the appropriate button.
You can specify any of the four edges of the Workspace as the default location for icons.
-
Click SELECT on Apply.
Changes to the Icons setting take effect immediately. That is, icons for applications that are on the Workspace or are subsequently opened are located in the newly specified location. Icons for applications started from the command line with an explicit icon location appear in the specified location.
Changing Scrollbar Placement
Use the Scrollbar Placement setting to specify whether scrollbars are displayed at the right or the left side of the pane. This setting applies to all scrollable application windows on the Workspace. In Figure 17-10 the default option, Right, is selected.
To set the location of the scrollbars on the left side, click SELECT on the Left button.
Note -
Scrollbar changes do not affect applications that are already on the Workspace.
After you make your choices for system beep, input area, and scrollbar placement, click SELECT on Apply to store the changes. Changes made to the Miscellaneous category take place immediately after you apply them.
Locale
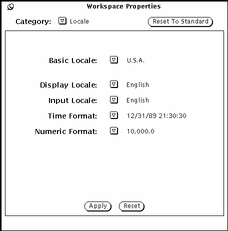
The Locale category of the Workspace Properties window provides users with a mechanism for specifying an input language and display language, as well as time, date, and numeric formats for a specific locale. Figure 17-11 shows the Locale category in the Workspace Properties window.
Figure 17-11 Locale Category in the Workspace Properties Window

If your system has a Solaris localization installed, such as Japanese Solaris, German Solaris, or French Solaris, you have access to locales in addition to the basic U.S.A. locale. If you do not have a Solaris localization installed, U.S.A. (English) is the only available locale. The following is a description of each of the choices in the Properties window:
-
Basic Locale is the name of the country or native language of the user interface. Specific setting choices vary depending on the basic locale setting.
-
The following settings help define characteristics of a particular locale or cultural area.
-
Display Locale specifies the language in which messages, menu labels, button labels, help files, and so forth are displayed.
-
Input Locale specifies the language to be input.
-
Time Format specifies the format for the time and date.
-
Numeric Format defines the numeric format or placement of the comma or decimal point.
Note -For systems that allow locale specifications, changes apply when you start a new application. The changes do not affect applications already running.
-
- © 2010, Oracle Corporation and/or its affiliates
