Chapter 1 Using Enterprise Manager Management Applications in Java CAPS
The following sections provide instructions on how to Use Enterprise Manager Management Applications in Java CAPS. If you have any questions or problems, see the Java CAPS web site at http://goldstar.stc.com/support.
This chapter covers the following topics
Management Applications Overview
Management Application is composed of various management applications. Management Application enables you to manage these applications and to deploy new ones.
Management Applications Task Overview
The task included in this section allows you to perform the following,
Displaying Management Application Tabs
The procedures must be performed by an Enterprise Manager user who is been assigned the role of a Manager.
 To Start the Enterprise Manager Security Gateway
-
Start the Enterprise Manager.
-
Open a supported web browser and type the following URL
http://hostname:port
-
When the login page appears, enter the User ID and the Password.
Note –The default User ID is admin and the default Password is adminadmin.
-
Click Login to work with the Enterprise Manager Security Gateway.
 To Display the Configuration Tabs
-
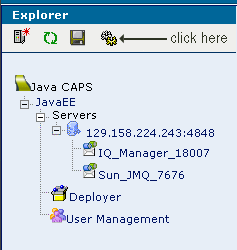
In the Explorer panel of Java CAPS Enterprise Manager, click the Configuration icon.
Figure 1–1 Configuration Icon
The following tabs are displayed,
-
User Preferences
-
Web Routing Manager
-
Web Applications Manager
-
-
Click each one of the tabs to perform a task related operation.
Setting Up the User Preferences
Browsers usually allow you to specify preferences, for example, browser refresh rate. The User Preferences page is a special page. comprising of options, which allow a user to personalize the settings.
 To Set Up the User Preferences
Perform the following to set up the preferences,
-
Browser Refresh Rate (in seconds)
Set the browser to refresh the current web page contents, so that it stays up-to-date.
-
Choose any one or both of the following preferences,
-
Disable Browser Auto Refresh
Choose this option to disable the browser from automatically refreshing the current web page contents.
-
Keep Enterprise Manager Alive (No Timeout)
The security feature of the Enterprise Manager ensures that the browser periodically times out after a certain period of inactivity.
Checking this option keeps the connection to the Enterprise Manager alive for as long as the user is logged on.
Note –Choosing both the options, will enable only the first option, by default.
Figure 1–2 User Preferences Tab

-
Displaying Web Routing Manager
You can view and change the management applications that handle various object types. You can use this feature as a diagnostic tool to display the web routing information.
 To Display the Web Routing Information
-
Click the Web Routing Manager tab.
The routing information appears in the Details panel.
Figure 1–3 Web Routing Information
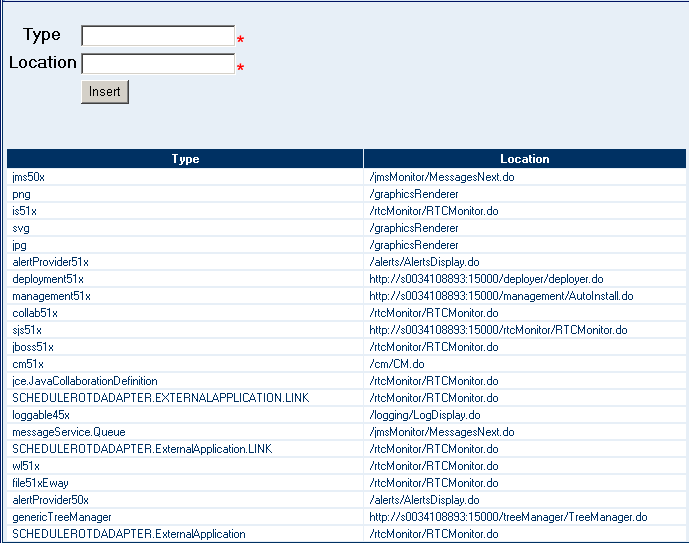
Figure 1–3 contains the following fields.
 To Change the Management Application for an Object Type
-
In the Type field, enter the object type.
Note –This field is mandatory.
-
In the Location field, enter the URL of the management application that you want to handle the corresponding object type.
Note –This field is mandatory.
-
Click Insert.
Displaying Web Applications Manager
The following tabs appear below the Web Applications Manager tab.
-
Auto-Install from Repository
-
Manage Applications
-
Manage Alert Codes
Automatically Install From the Repository
Perform the following steps.
-
From Enterprise Manager, navigate to the Auto-Install from Repository tab.
-
Connect to the Repository, select the application, and deploy it.
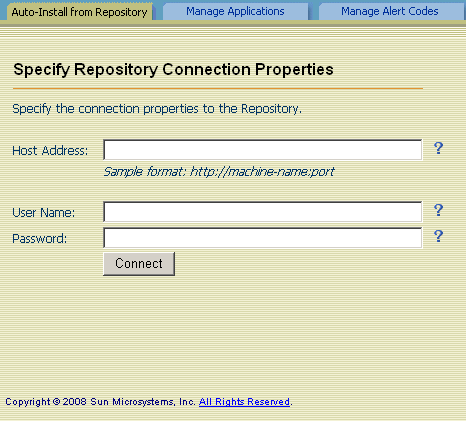
The Auto-Install from Repository tab enables you to install components that are available from the Repository. Typically, the components are the Enterprise Manager plug-ins for various Java CAPS products. You should first connect to the Repository, and then specify, which components to install.
Note –
This page allows you to specify the connection properties to the Repository.
Figure 1–4 Auto-Install From Repository Tab
 To Automatically Install Components From the Repository
-
In the Host Address field, enter the URL that is used to connect to the Repository.
Note –For example, http://machine-name:port
-
In the User Name field, enter the Repository user name.
Note –The default User Name is admin
-
In the Password field, enter the corresponding password.
Note –The default Password is adminadmin
-
Click Connect.
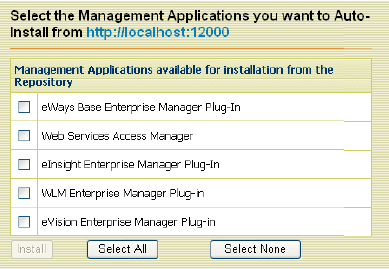
The available management applications are displayed.
Note –The list includes any management applications that are already installed.
Figure 1–5 Available Management Applications
-
In the row that lists the application, select the check box.
Note –You can select more than one check box. This enables you to install more than one application.
-
Click Install.
After the installation process is complete, the Results area indicates whether the installation is successful.
Managing Applications
The Manage Applications tab displays the management applications that are deployed in Enterprise Manager.
Perform the following steps.
-
From the Installer, click the application and save it to a temporary directory.
-
From Enterprise Manager, navigate to Manage Applications tab.
-
Click Browse to select the application file and click Deploy.
An additional component called Base Enterprise Manager Plug-In appears in the Downloads page of the Installer. If you install any of the Adapter Management Applications, then you must also install this component.
Note –
You need to install the component only once.
Figure 1–6 Manage Applications Tab
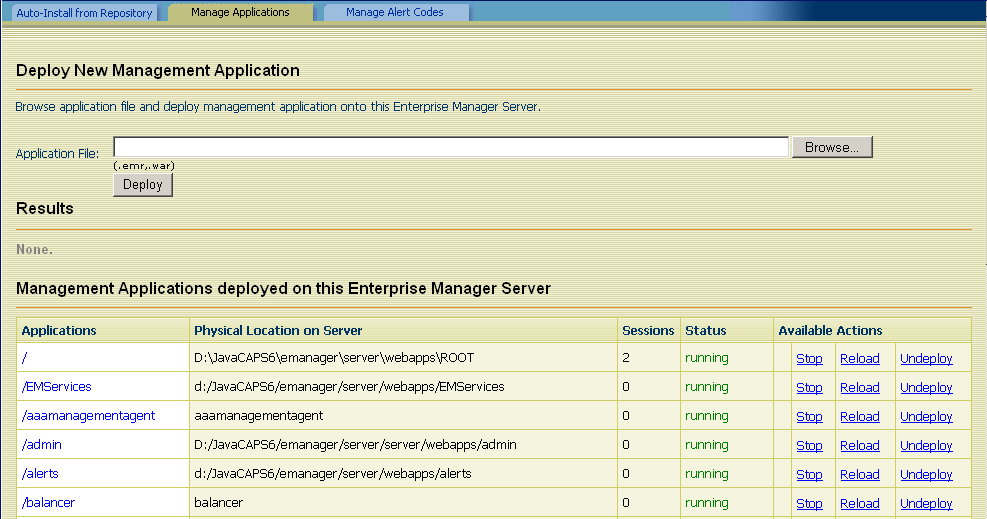
The table contains the following columns,
-
The Applications column lists the name of each application.
-
The Physical Location on Server column lists the directory where each application is installed.
-
The Sessions column lists how many browser sessions are currently running for each application.
-
The Status column indicates whether each application is running or stopped.
-
The Available Actions column enables you to start, stop, reload, and undeploy each application.
Managing the Existing Management Applications
You can start, stop, reload, and undeploy the management applications that are currently deployed.
 To Start a Management Application
-
In the row that lists the application, click Start.
Under the Results heading, a message indicates that the application is started.
 To Stop a Management Application
-
In the row that lists the application, click Stop.
Under the Results heading, a message indicates that the application is stopped.
 To Reload a Management Application
-
In the row that lists the application, click Reload.
Under the Results heading, a message indicates that the application is reloaded.
 To Undeploy a Management Application
-
In the row that lists the application, click Undeploy.
Under the Results heading, a message indicates that the application is undeployed.
Deploying New Management Applications
If a management application is available in the Repository, you can download the application by using the Suite Installer and then deploy the application by using Enterprise Manager.
The file name of the application has an extension of EMR or WAR.
 To Deploy a New Management Application
-
Download the Management Application from the Repository using the Installer. Save the file in a temporary directory.
-
Go to Enterprise Manager.
-
Navigate to Manage Applications tab.
-
Click Browse.
-
Select the EMR or WAR file and click Open.
-
Click Deploy.
The new management application is displayed. Enterprise Manager users can use the application immediately.
Managing Alert Codes
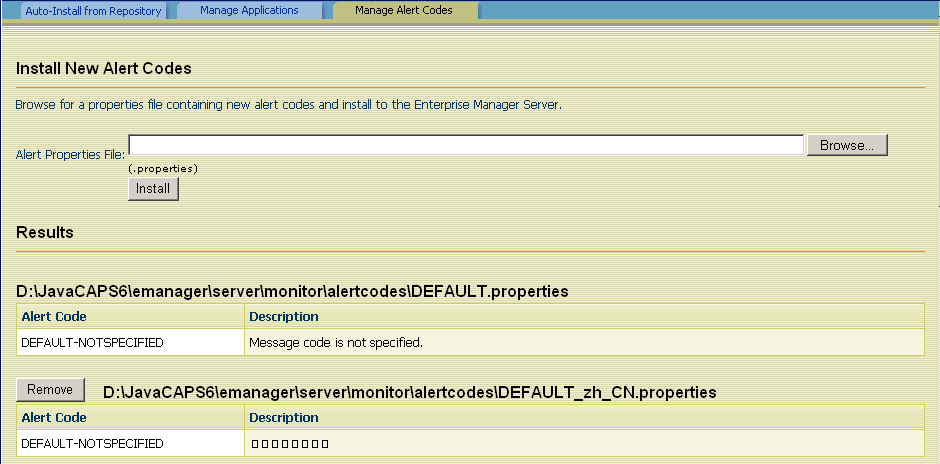
The Manage Alert Codes tab displays the alert codes that are currently deployed. You can install new alert codes from this tab. To install new alert codes, create a properties file and then upload the file.
Figure 1–7 Manage Alert Codes Tab
Properties File Format
Java CAPS enables you to generate custom alerts in a Java-based Collaboration. Use the custom method of the alerter node. The first argument of the custom method is the new alert code. For detailed instructions, see the document at the following URL http://dlc.sun.com/pdf/820-0952/820-0952.pdf.
Create a text file that includes one entry for each new alert code that you specify. The entry contains three parts
-
The alert code
-
An equal sign (=)
-
The alert message
To enter a comment line, start the line with a pound sign (#).
When you are done, save the file with the .properties file extension.
Here is a sample properties file:
# This file contains new alert codes. MY-00001=alert message 1 MY-00002=alert message 2 MY-00003=alert message 3 MY-00004=alert message 4 |
Uploading the Properties File
After you create the properties file, upload the file to Enterprise Manager.
 To Upload the Properties File
-
Go to Enterprise Manager.
-
Navigate to Manage Alert Codes tab.
-
Click Browse.
-
Select the properties file and click Open.
-
Click Install.
The new alert codes are displayed.
Removing Alert Codes
You can remove a set of alert codes.
 To Remove Alert Codes
- © 2010, Oracle Corporation and/or its affiliates
