Maintaining Auxiliary ID Information in a Patient Profile
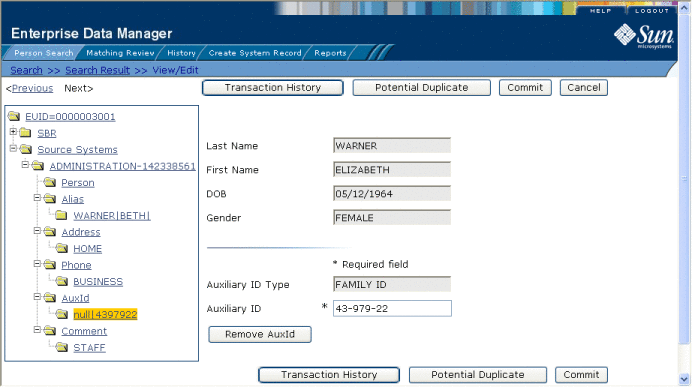
You can add, modify, and delete auxiliary IDs in a patient profile. If you make any of these modifications to the system record, the survivor calculator determines what changes, if any, should be made to the SBR. You can only modify information in the SBR if you have overwrite permissions.
Figure 46 View/Edit Page - Auxiliary ID Information

Adding an Auxiliary ID to a Patient Profile
Once you have saved a patient profile, you can add auxiliary IDs to that profile either in the SBR or the affected system record. You can add multiple IDs of the same type to a patient profile. If you add the ID to a system record, then the survivor calculator determines what changes, if any, should be made to the SBR.
 To Add an Auxiliary ID to a Patient Profile
-
Using one of the search methods described in Searching for Patient Profiles, display the patient profile you want to modify on the View/Edit page.
-
Do one of the following:
-
Enter the new auxiliary ID information in the fields in the right portion of the page (for more information, see About Auxiliary ID Fields on the Patient EDM).
-
In the lower left portion of the page, click Add AuxId.
-
Click Commit.
The page refreshes, and, if you modified a system record, the SBR is recalculated based on the new information.
Note –If you added the auxiliary ID to the SBR, all fields in the auxiliary ID record are automatically locked, and will not be updated by incoming system messages until they are unlocked.
Modifying Auxiliary ID Information
If an auxiliary ID was entered in error for a patient profile, you can modify the ID in the SBR or the affected system record.
 To Modify an Auxiliary ID in a Patient Profile
-
Using one of the search methods described in Searching for Patient Profiles, display the patient profile you want to modify on the View/Edit page.
-
Do one of the following:
-
Select the ID type of the auxiliary ID you want to modify.
-
Modify the fields in the right portion of the page (for more information, see About Auxiliary ID Fields on the Patient EDM).
-
If you are working in the SBR, select the overwrite check box to the left of the field for each field you modify.
-
When you are done modifying information, click Commit.
The page refreshes, and, if you modified a system record, the SBR is recalculated based on the new information.
Deleting an Auxiliary ID from a Patient Profile
If an existing auxiliary ID for a patient is no longer valid or was entered in error, you can delete the obsolete ID from the affected system record. Once an auxiliary ID is deleted from a patient profile, the deletion cannot be undone.
 To Delete an Auxiliary ID From a Patient Profile
-
Using one of the search methods described in Searching for Patient Profiles, display the patient profile you want to modify on the View/Edit page.
-
To delete an auxiliary ID from a system record, do the following:
-
To delete an auxiliary ID from the SBR, deselect the overwrite check boxes for all field in the address.
Note –You can only delete an auxiliary ID from the SBR if it was originally added directly to the SBR.
-
Click Commit.
The page refreshes, and the SBR is recalculated based on the new information.
- © 2010, Oracle Corporation and/or its affiliates
