Viewing a Patient's Transaction History
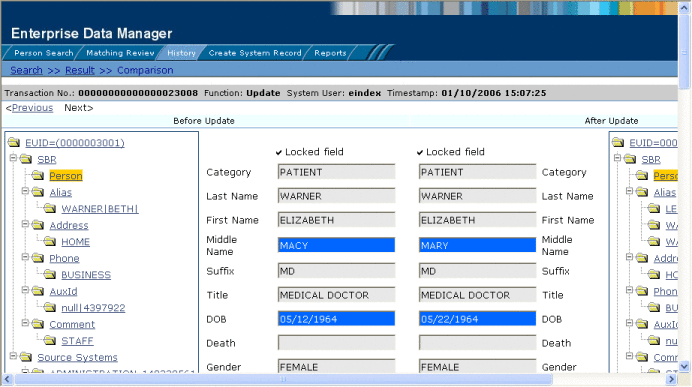
Using the History function, you can view historical information for a specific patient, and compare the patient’s profile before and after a specific transaction occurred to determine what information was modified as a result of the transaction. The Transaction History page contains an EUID tree for the before image and one for the after image. From the EUID trees you can specify the type of information to view and whether to view SBR or system record information.
The image on the left side of the Transaction History Comparison page reflects the patient’s information before the transaction occurred. The image on the right reflects the patient’s information after the transaction occurred. If the displayed record has no historical data, then the message There is nothing to show in this area appears in the left side of the page.
Figure 22 Transaction History Comparison Page

 To View a Transaction History
-
Obtain information about the patient, such as the EUID, a system in which the patient was registered, or a specific transaction performed against the patient’s profile.
Note –To access a transaction history, you can perform a search for a patient profile, display the profile on the View/Edit page, and then click Transaction History, or you can perform the steps described here.
-
On the Patient EDM main menu, click History.
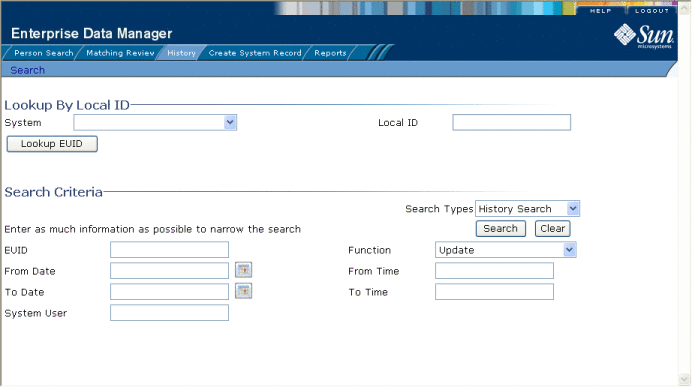
The Transaction History Search page appears.
Figure 23 Transaction History Search Page

-
Select History Search from the Search Types drop-down list.
-
Do one of the following:
-
To search for a record by system and local ID, enter the system and local ID in the upper section of the window and then click Lookup EUID.
If an EUID is found, it is populated into the EUID field in the Search Criteria section.
-
To search by EUID or transactional information, enter the search criteria for the patient you want to view (for more information, see About Transaction History Search Fields on the Patient EDM).
-
-
On the Transaction History Search page, click Search.
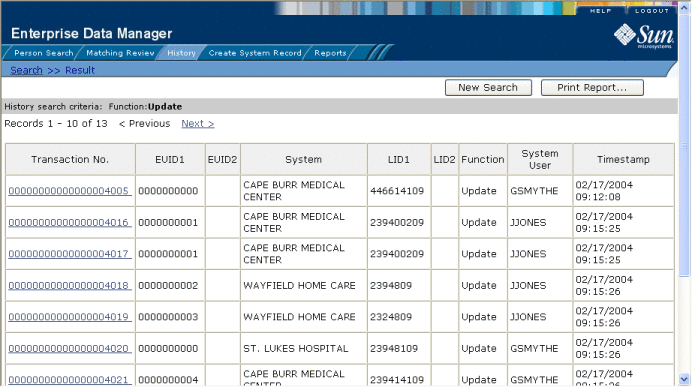
If more than one transaction matches the search, the Transaction History Result page appears with a list of matching profiles (for more information, see About Transaction History Results Fields on the Patient EDM).
Figure 24 Transaction History Results

-
If the Transaction History Result page appears, click the transaction number of the transaction you want to view. (If an asterisk appears next to a transaction, it means the transaction history cannot be accessed.)
The Transaction History Comparison page appears, displaying information in the SBR with any differences between the before and after image highlighted in blue.
-
Select the type of information you want to view from the EUID trees on both sides of the page (for more information, review the instructions and field descriptions under Viewing Patient Profiles).
Note –If you select different types of information from the two sides, differences are not highlighted (for example, if you view SBR address data on one side and system record address data on the other side; or if you view SBR address data on one side and SBR phone data on the other).
-
If you are viewing a merge transaction, additional options appear in the upper left portion of the page, allowing you to view different images for the transaction (see Figure 25).
-
If you are viewing an unmerge transaction, additional options appear in the upper right portion of the page, allowing you to view different images for the transaction (see Figure 26).
- © 2010, Oracle Corporation and/or its affiliates


