Creating a Master Index Application
The wizard provides a simple method for you to create the object definition and the runtime configuration files for your master index application. This section provides instructions for creating a new project and using the wizard to create the configuration files for the master index application. To create the initial master index framework, follow these steps.
Step 1: Create a Project and Start the Wizard
When you create a new Master Index project in NetBeans, the wizard for creating a master index application automatically appears.
 To Create a Project and Start the Wizard
-
On the NetBeans toolbar, click New Project.
The New Project wizard appears.
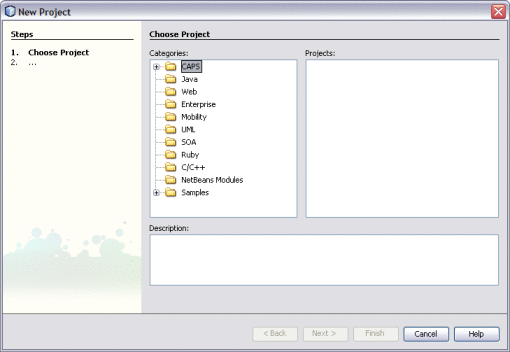
Figure 1 New Project Wizard
-
Under Categories, select CAPS and then select MDM.
-
Under Projects, select Master Index Application and then click Next.
The Project Name page appears.
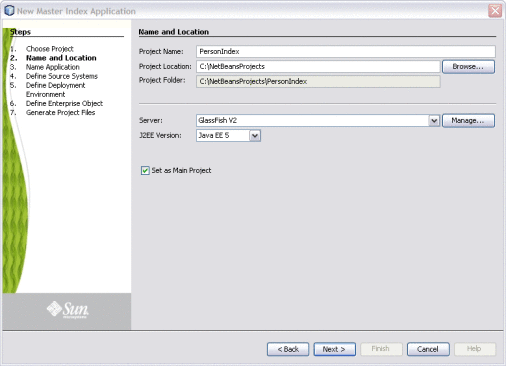
Figure 2 Project Name and Location
-
Enter the project name and the path where you want to store the project files in the upper portion of the window.
-
Enter the application server and Java version you are using in the lower portion of the window.
-
To make the Master Index project a main project, select Set as Main Project.
-
Click Next.
-
Continue to Step 2: Name the Master Index Application.
Step 2: Name the Master Index Application
Before you can configure the new master index application, you must give the master index application a unique name. It is a good practice to give each master index application a unique name you create because certain components within the application server are based on the application name. Dependent components include the data source for the JDBC connection and the outbound Topic (if one is used).
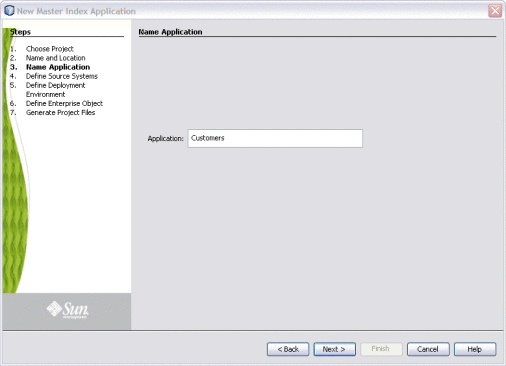
Figure 3 Name Application Window
 To Name the Master Index Application
-
In the Application field of the Name Application window, enter a name for the new master index application, and then click Next.
Note –Give the application the same name you will give to the parent object when you define the object structure.
-
Continue to Step 3: Define Source Systems.
Step 3: Define Source Systems
After you specify a name for the new master index application, you need to specify the processing codes for the source systems that will be integrated into the master index system.
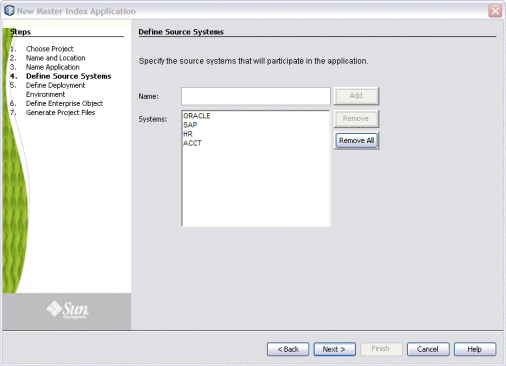
Figure 4 Define Source Systems
 To Define Source Systems
-
In the Name field of the Define Source Systems window, enter the processing code of one of the source systems that will share data in the master index system, and then click Add.
You can enter any of the following characters:
-
Do any of the following:
-
To define additional systems, repeat the above step for each source system that will share information with the master index application.
-
To remove a system from the list, highlight the name of that system in the Systems box, and then click Remove.
-
To remove all systems from the list, click Remove All.
-
-
When you have defined all required source systems, click Next.
-
Continue to Step 4: Define the Deployment Environment.
Step 4: Define the Deployment Environment
Note –
MySQL is only supported in Java CAPS 6 Update 1.
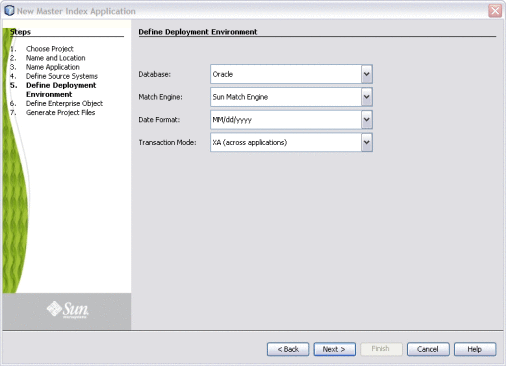
Once you define systems, you must specify information about the deployment environment, including the database, match engine, and standardization engine vendors.
Figure 5 Define Deployment Environment
 To Define the Deployment Environment
-
Complete Step 3: Define Source Systems.
-
On the Define Deployment Environment window, enter the following information:
-
Database – The type of database being used for the master index application. You can select MySQL, Oracle or SQL Server.
-
Match Engine – The type of match and standardization engine to use for the implementation. Currently, the only option is “Sun Match Engine”.
-
Date Format – The date format for the master index system. This defines how dates should be entered and how they appear on the MIDM. You can select MM/dd/yyyy, dd/MM/yyyy, or yyyy/MM/dd.
-
Transaction Mode – An indicator of whether transactions are distributed. Select one of the following options:
-
XA (across applications), if the transactions will be distributed across multiple applications
-
XA (within application only), if the transactions will be distributed just across the master index application.
-
Local, if the transactions will not be distributed.
-
-
-
When you have defined the deployment environment fields, click Next.
-
Continue to Step 5: Define Parent and Child Objects.
Step 5: Define Parent and Child Objects
After you define the deployment environment for the master index application, you can begin to define the structure of the object you want to index. The primary object will be the parent object for any other objects defined. Child objects are not required if all information is stored under the parent object.
You can create new undefined objects, create objects using predefined templates, or use a combination of both methods to create the objects in your enterprise object. Perform any of the following actions to define the objects in the enterprise object.
Complete Step 4: Define the Deployment Environment before performing these procedures.
Note –
The names of database constraints are created based on the parent and child object names. Due to database naming restrictions, the length of the parent object name plus the length of any of the child object names must be 21 characters or less. Give the parent object the same name you gave the application earlier in the wizard.
Creating Undefined Objects
When you create undefined objects, you create an empty object with no predefined fields or child objects.
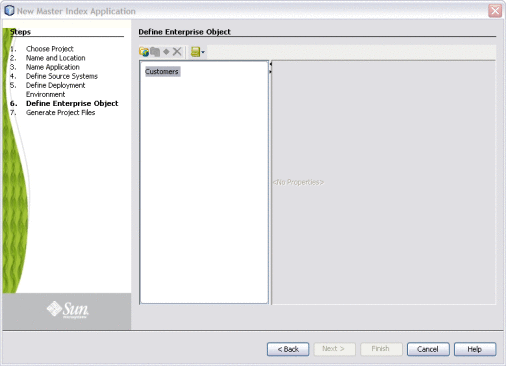
Figure 6 Define Enterprise Object
 To Create Undefined Parent and Child Objects
-
On the Define Enterprise Object window, click Add Primary Object.
The initial node appears on the tree. By default, the name of the field is the same as the name of the application you defined in Step 2: Name the Master Index Application.
-
Accept the default name by pressing Enter, or type a new name and press Enter.
-
To create a new child object, select the primary object created above and then click Add Sub Object.
The new child node appears on the tree.
-
Accept the default name by pressing Enter, or type a new name and press Enter.
-
Repeat the previous two steps for each child object.
-
Continue to Step 6: Define the Fields for Each Object.
Creating Objects from a Template
When you create objects from a template, secondary objects and fields are predefined. You can modify the objects, fields, and field properties in a template to suit your processing needs.
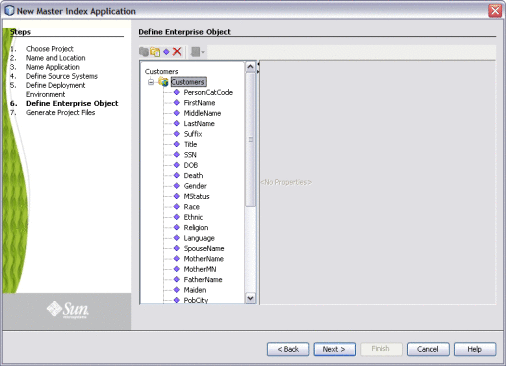
Figure 7 Define Enterprise Object
 To Create Parent and Child Objects From a Template
-
To create a complete object structure from a template, click Templates on the Define Enterprise Object toolbar, and select the template you want to use.
The objects and fields from the template appear in the tree-view panel in the center of the window.
-
To create a child object from a template after creating the parent object, right-click the parent object, point to Template, and then select the name of the template you want to use.
The new object and any defined fields appear in the object tree.
-
If necessary, change the name of the new object by doing the following:
-
Repeat steps 2 and 3 for each child object template you want to create.
-
Continue to Step 6: Define the Fields for Each Object.
Deleting an Object from the Structure
If you add an object in error, or do not want to use one of the objects in a predefined template, you can delete the object from the structure.
 To Delete an Object From the Structure
-
On the Define Enterprise Object window, select the object you want to remove.
-
Do any of the following:
Step 6: Define the Fields for Each Object
After you define all the parent and child objects for your enterprise object, you need to define the fields in each object. Every field has a set of properties that must be configured before creating the master index configuration files. If you chose a predefined template to create your objects, be sure to check the properties for all predefined fields to be sure they are configured correctly for your implementation.
After you define the parent and child objects, you can perform any of the following actions to define the fields for those objects.
Adding a Field
If you created an empty object in Step 5: Define Parent and Child Objects, you need to create each field that belongs to the object. If you created objects using a predefined template, you can add new fields to the object if needed.
 To Add a Field
-
Complete Step 5: Define Parent and Child Objects.
-
In the object tree panel of the Define Enterprise Object window, do one of the following:
-
To add the field to the end of the object’s field list, select the name of the object to which you want to add a new field and then click Add Field.
-
To add the field immediately following an existing field, select the field after which you want to add the new field and then click Add Field.
The tree expands and a new field is inserted.
-
-
Do one of the following:
-
To accept the default name, press Enter.
-
To change the name, type the new name and then press Enter.
For information about field name restrictions, see Master Index Wizard Field Name Restrictions.
-
-
Continue to Configuring Field Properties.
Configuring Field Properties
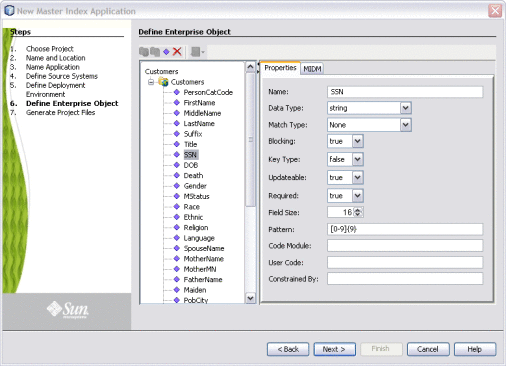
When you create a field, a set of default properties is defined for that field. You can modify the property configuration for each field to suit your data processing, storage, and display requirements. After you modify a property value, press Enter to apply the change.
 To Configure Field Properties
-
Complete the steps under Adding a Field.
-
In the object tree panel of the Define Enterprise Object window, select the field you want to configure.
-
On the Properties page in the right side of the window, modify the value of any of the properties listed in Master Index Wizard General Field Properties.
Figure 8 Field Properties
-
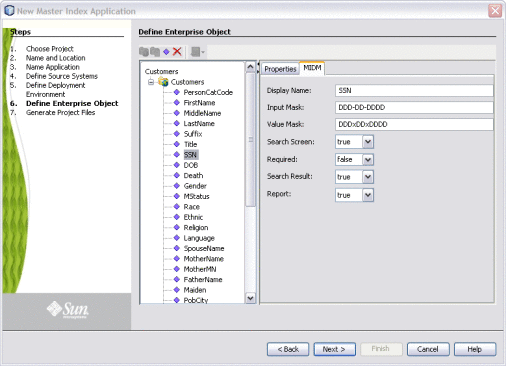
On the right side of the window, click the MIDM tab, and then modify the value of any of the properties listed in Master Index Wizard MIDM Field Properties.
Figure 9 Field MIDM Properties
-
When you have created and configured all of the necessary fields for each object, click Next.
-
Continue to Step 7: Generate the Project Files.
Deleting a Field
If you add a field in error, or do not need one of the predefined fields from a template, you can delete the field.
 To Delete a Field
-
In the object tree panel of the Define Enterprise Object window, select the field you want to delete.
-
Right-click in the object tree panel.
-
From the context menu, select Delete.
The field is removed from the object tree.
Step 7: Generate the Project Files
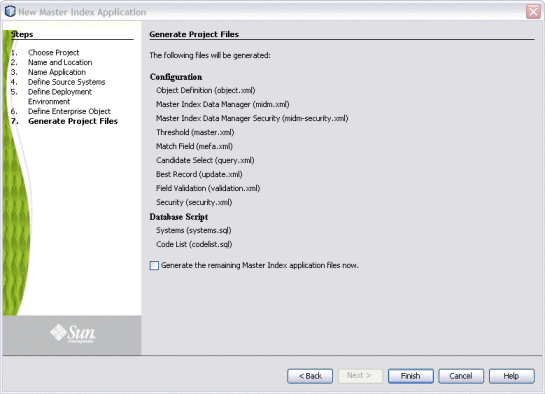
Once you have named the application and configured the source systems, deployment environment, objects, and fields for the master index application, you need to generate the configuration files and database scripts. Review the configuration files to be sure the application is set up correctly for your data processing environment.
Note –
Modifying the configuration files is not covered in this document. For instructions on configuring a master index application, see Configuring Sun Master Indexes .
Figure 10 Generate Project Files
 To Generate the Configuration Files
-
Verify that all of the information you have entered is complete and correct.
-
On the Generate Configuration Files window, click Finish.
The configuration files are generated, and are stored in the eGate Repository.
-
Continue to Step 8: Review the Configuration Files.
Step 8: Review the Configuration Files
After the wizard is complete, several nodes representing the master index configuration files are placed in the project for the master index application. Verify that the configuration files are customized correctly for your implementation. If you need to modify the configuration files, see Configuring Sun Master Indexes for information about configuration tasks. For information about the configuration files and configurable options, see Understanding Sun Master Index Configuration Options .
- © 2010, Oracle Corporation and/or its affiliates
