Working With HL7 OTDs
The OTD Editor displays the structure of a selected Object Type Definition (OTD) and allows you to verify its operation with a built-in tester. You can also use the editor to create and modify OTDs. For an overview of Object Type Definitions, OTD structure, and the OTD Editor, see the Sun Enterprise Service Bus User’s Guide. The Sun Enterprise Service Bus User’s Guide defines all available OTD properties and provides a description of all of the OTD Editor’s features.
The following section provides information specific to using Library OTDs with the OTD Editor. These OTDs are templates that correspond to message types used by industry-specific data exchange systems and open-source standards. The templates are pre-defined and can be used as-is, or modified using the OTD Editor.
Viewing an OTD Using the OTD Editor
The OTD Editor displays the structure of a selected Object Type Definition (OTD) and allows you to verify its operation with a built-in tester. You can also use the editor to create and modify User-Defined OTDs.
 To View an OTD
To view the HL7 Generic OTD or an HL7 Library OTD (if you are using the HL7 adapter in conjunction with the Sun HL7 OTD Library) using the OTD Editor, perform the following:
-
Expand the Sun OTD Library directory, the HL7 directory, and the folder for the appropriate HL7 Library version from the Project tree in Java CAPS.
Only the version or versions you install will be displayed in your build.
Note –The OTDs available under OTD Library in the Project Editor are protected (read-only).
-
Double-click the OTD in its current location to view the OTD in read-only mode.
 To Copy an OTD to the Project
-
Copy and paste the OTD to your Project to view the OTD in an editable mode.
-
Right-click the OTD and select Copy from the shortcut menu.
-
Right-click your Project and select Paste from the shortcut menu.
The OTD is added to your Project on the Project Explorer tree.
-
Double-click the copied OTD to view the copied OTD.
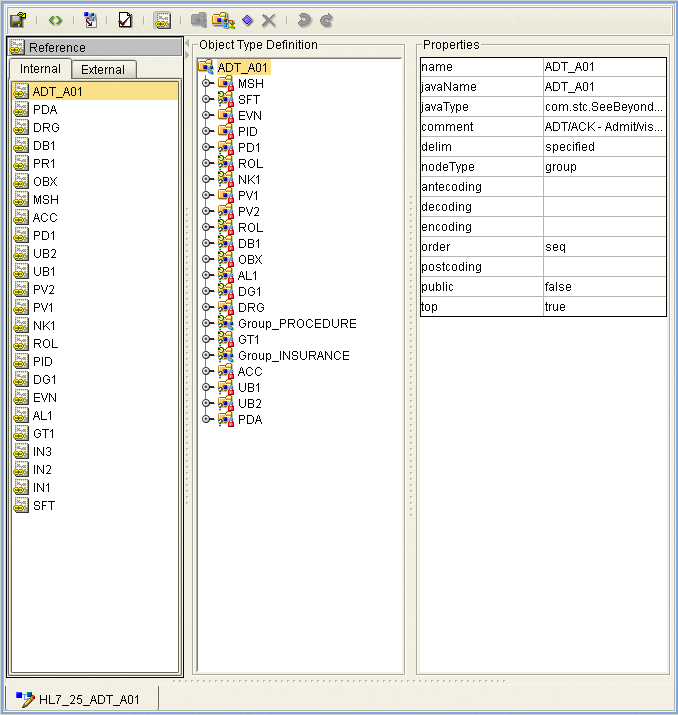
The editable OTD appears in the OTD Editor. Notice that for the Library OTDs, the OTD segments are still write protected. The OTDs properties can only be modified from the Root node at this point.
-
Select any of the OTDs nodes or sub-nodes to see the nodes properties displayed in the editor’s Properties pane from the editor’s Object Type Definition pane.
For an overview of Object Type Definitions, OTD structure, and the OTD Editor, see the Sun Enterprise Service Bus User’s Guide.
Modifying an OTD Using the OTD Editor
OTD Check Out and Check In
The Generic HL7 OTDS and OTDs installed from the HL7 OTD Library) are located in the Project Explorer’s Sun folder. These OTDs are protected and cannot be modified. This assures that the original OTDs are always available in their original form. To modify an OTD, you must first copy and paste the OTD from the Sun ⇒ OTD Library folder to your Project.
Version Control is available for any OTD you save to your Projects. To check-in or check-out an OTD, right-click the OTD from the Project Explorer tree, and select Version Control ⇒ Check Out or Check In from the shortcut menu. When an OTD has been checked-in, the OTD file icon appears in the Project Explorer tree as “locked” (The icon includes a red padlock).
Editing an OTD’s Root Properties
The HL7 OTD copied to your Project can only be edited from the Root node. Each of the OTD’s segments are write protected. The OTD segments are visible from the Reference pane of the OTD Editor. This Reference pane contains internal and external templates for the OTD file. To edit specific segments of a Library OTD, see Adding and Editing OTD Segments. For more information regarding OTD properties, see OTD Properties.
Root Node Properties
The set of properties associated with Root nodes is shown in the following table.
|
Node Property Descriptions |
|
|---|---|
|
name |
Node display name. This can be a virtually-arbitrary string. |
|
javaName |
Property accessor basename. This is normally derived from the display name, modified to suit the restrictions on Java identifiers, and supplied automatically by the Sun Enterprise Service Bus. |
|
javaType |
Java type; automatically assigned, not editable. |
|
comment |
Free-form text (no run-time effect). |
|
delim |
Specified delimiter. See Specifying Delimiters. |
|
nodeType |
Governs the marshal/unmarshal format. See Specifying the Node Type. |
|
antecoding |
Specifies the input data coding (see Specifying Data Encoding on page 219). If this property is not specified, the value specified for the decoding property will be used for the input data. This property is displayed only when the top property is set to true. |
|
decoding |
Specifies the unmarshal coding (see Specifying Data Encoding on page 219). (It is recommended to use UTF-8 for DBCS data, since the hex value of some ASCII delimiter may coincide with a hex value contained within a double-byte character.) This property is displayed only when the top property is set to true. |
|
encoding |
Specifies the marshal coding (see Specifying Data Encoding on page 219). This property is displayed only when the top property is set to true. |
|
order |
Specifies the ordering of the Root node’s children:
|
|
postcoding |
Specifies the output data coding (see Specifying Data Encoding on page 219). If this property is not specified, the value specified for the encoding property will be used for the output data. This property is displayed only when the top property is set to true. |
|
public |
Reserved for future development |
|
top |
Flag on Root node: support marshal/unmarshal (T/F). |
Properties edited from the Root node are applied inclusively to the OTD. For example, a level three delimiter, changed from the Root node, applies to all level three node delimiters. (The properties for specific segments can be exclusively edited, but to do this you must copy and paste the specific OTD that the segment refers to into your Project. For more information on editing specific segments, see Adding and Editing OTD Segments. .
 To Edit an HL7 OTD’s Root Node Properties
-
Copy and paste the OTD to your Project. The OTD is added to your Project in the Project Explorer tree.
-
Double-click the OTD to open your Project in the OTD Editor.
-
Select the Root node of the OTD from the editor’s Object Type Definition pane.
The Root properties and displayed in the editor’s Properties pane.
-
Click on any property field to edit the property from the Properties pane.
Editing the OTD Delimiters
Delimiters for all node levels are set (and modified) from the Root node. Be aware that the default level 1 delimiter character is a non-ASCII character. Once it has been changed it cannot be typed back in as a character (but can be pasted). For information about editing a specific segment of the OTD, see Adding and Editing OTD Segments. .
 To Edit the Delimiters From the Root Node
-
Select the Root node in the Object Type Definition pane (for this example ADT_A02) from the OTD Editor.
-
Double-click the delim properties field from the Properties pane.
An ellipsis (...) button appears in the field.
-
Click the ellipsis button.
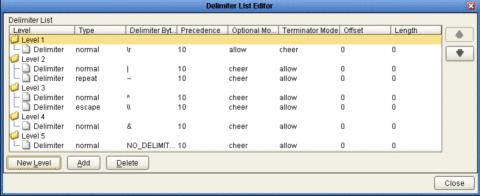
The Delimiter List Editor appears.
-
Double-click any field in the OTD Editor’s Properties field, for any level, make the field editable or displays a list of options.
-
Double-click the Delimiter Bytes field for level 3. Change the current delimiter character to a pound sign (#), Tab to the next field, and click OK.
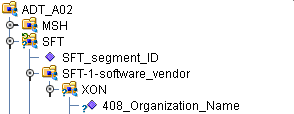
The delimiter for all level 3 nodes in the OTD is now a pound sign (#), unless it is specified differently for a specific segment. The figure displays an example of various levels in the Object Type Definition tree, from the Root node.
Changing HL7 Standard Encoding Characters
All HL7 OTDs have a predefined list of delimiters, per the definition in the HL7 Standard. If you elect to change the delimiter encoding characters in your HL7 messages, you must change the delimiter in the OTD from the Root node using the OTD Editor, to match the delimiters used in the HL7 message.
The delimiter encoding character field is a fixed-length field of four encoding characters plus the field separator. The fifth (extra) character is necessary for the segment field separator.
If you wish to validate against the encoding characters, modify the pre-built Collaboration rules as follows:
// first unmarshal the HL7 OTD payload


// then get the encoding character field:

String encodingChars = otdHL7_GENERIC_EVT_1.getMSH().getMsh2EncodingCharacters();


if (!encodingChars.equals(“<customer_encoding_characters>”)) {

validated = false;

ErrorMessage = "Validation Failure: Receiving Facility";

log( LOG_LEVEL_ERROR, "Validate HL7 Message failed: Encoding character field" );

}
|
Specifying Delimiters
A node defines a set of delimiters to be used in the external data representation for itself and its descendents in the hierarchical data structure. If a node defines a delimiter list, this negates any effect of any ancestor’s delimiter list on itself and its descendents. The delimiter list is typically specified on the Root node.
For example, if you want to parse the following data:
a^b|c^d|e |
you might define an OTD as follows:
The delimiter list for this OTD will be specified on the demo-otd element, so that it applies to the entire OTD, and will have two levels:
Level 1
-
Delimiter |
Level 2
-
Delimiter ^
Level 1’s delimiter applies to the two elements and field5, and level 2’s delimiter applies to fields 1 through 4.
Delimiter lists can be much more complex than this very simple example. For instance, you can create multiple delimiters of different types at any given level, and you can specify a delimiter list on any node within the OTD—not only the Root node as shown in the example. See Modifying an OTD Using the OTD Editor for a description of the procedure for creating a Delimiter List.
Delimiter Properties
Delimiters are defined using the Delimiter List Editor.
The Delimiter properties and values are displayed in Table 1–12.
Table 1–12 Delimiter Properties|
Delimiter Properties and Value Options |
||
|---|---|---|
|
Property |
Option |
Description |
|
Level |
Child level beneath defining node. |
|
|
Type |
escape |
Escape sequence. |
|
repeat |
Array delimiter/separator. |
|
|
normal |
Terminator. |
|
|
Delimiter Bytes |
Delimiter (single or multiple characters). |
|
|
Precedence |
See Precedence. |
|
|
Optional Mode |
never |
Do not allow on input, do not emit on output (empty field between delimiters implies zero length data field). |
|
allow |
Skip empty field if present; if absent, do not delimit on output. |
|
|
cheer |
Skip empty field if present; if absent, do delimit on output. |
|
|
force |
Require empty, delimited field on input; always delimit on output. |
|
|
Terminator Mode |
never |
Do not allow on input, do not emit on output (pure separator). |
|
allow |
Allow on input, do not emit on output. |
|
|
cheer |
Allow on input, always emit on output. |
|
|
force |
Require on input, always emit on output (pure terminator). |
|
Type Property - Escape Option
An escape delimiter is simply a sequence that will be recognized and ignored during parsing. Its purpose is to allow the use of escape sequences to embed byte sequences in data that would otherwise be seen as delimiter occurrences.
For example, if there is a normal delimiter “+” at a given level, and we define an escape delimiter “\+”, then aaa+b\+c+ddd will parse as three fields: aaa, b\+c, and ddd. If the escape delimiter were not defined, the sequence would then parse as four fields: aaa, b\, c, and ddd.
If there is only an escape delimiter on a given level, however, it presents a no delimiter defined situation for delim and array nodes.
Delimiter Bytes
There is essentially no limitation on what characters you can use as delimiters; however, you obviously want to avoid characters that can be confused with data or interfere with escape sequences. The backslash (\) is normally used as an escape character (the HL7 protocol uses a double backslash as part of an escape sequence that provides special text formatting instructions).
Note –
You should avoid using a colon (:) as a delimiter character, since it is used as a literal in system-generated time strings. This can interfere with recovery procedures, for example following a Domain shutdown.
Terminator Mode Property
Consider the tree structure shown in the previous example, where the node a has a pipe (|) as its delimiter, the sub-node b has a tilde (~) as its delimiter, and sub-node c has an asterisk (*) as its delimiter.
|
Option |
Input |
Output |
|---|---|---|
|
never |
c| |
c| |
|
allow |
c| or c*| |
c| |
|
cheer |
c| or c*| |
c*| |
|
force |
c*| |
c*| |
Optional Mode Property
Consider the tree structures shown in the figures, where the node a has a pipe (|) as its delimiter, and the sub-nodes b, c, and d all have asterisks (*) as their delimiters.
-
Example 1: Sub-node c is optional. (Sub-node c and sub-node d must have different values for the match parameter.)
|
Option |
Input |
Output |
|---|---|---|
|
never |
b*d| |
b*d| |
|
allow |
b**d| |
b*d| |
|
cheer |
b**d| |
b**d| |
|
force |
b**d| |
b**d| |
-
Example 2: Both sub-node c and sub-node d are optional.
|
Option |
Input |
Output |
|---|---|---|
|
never |
b| |
b| |
|
allow |
b|, b*|, or b**| |
b| |
|
cheer |
b|, b*|, or b**| |
b**| |
|
force |
b**| |
b**| |
Precedence
Precedence indicates the priority of a certain delimiter, relative to the other delimiters. By default, all delimiters are at precedence 10, which means they are all considered the same; fixed fields are hard-coded at precedence 10. Delimiters on parent nodes are not considered when parsing the child fields; only the child’s delimiter (or if it is a fixed field, its length).
Changing the precedence of a delimiter will cause them to be applied to the input data-stream in different ways. For example:
-
Root node
-
element (type delim, delimiter = “^”, repeat)
-
field1 (type fixed, length = 5)
-
field2 (type fixed, length = 8, optional)
-
Although this will parse ”abcde12345678^zyxvuABCDEFGH’, it will not parse the text ”abcde^zyxvuABCDEFGH’ even though the second fixed field is optional. The reason is that the element’s delimiter is ignored within the fixed field because they have the same precedence. If you want the element’s delimiter to be examined within the fixed field data, you must change its precedence, for example:
-
Adding and Editing OTD Segments
HL7 Library OTDs are made up of various OTDs that correspond to the HL7 message segments. The main HL7 message OTDs contain references to the segment OTDs, which are located in the same HL7 directory.
Editing a Segment
The following example uses the HL7_25_ADT_A02 OTD. To edit the properties for the specific segment of an OTD, perform the following:
-
Edit, copy and paste the segment OTD from the Project Explorer’s Sun ⇒ OTD Library ⇒ HL7 folder to your Project.
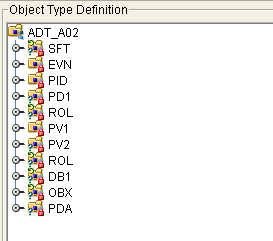
Note –Make a note of the segment OTD order in the Editor’s Object Type Definition pane. It is important to retain the original OTD structure. In the following step you will be deleting a segment OTD from this list, so it is important to make a note of the original segment OTDs location so that you can relocate the edited segment OTD to it’s original position in the OTD structure as illustrated in the figure.
-
Right-click to delete the SFT segment the segment from the Internal tab of the Reference pane. Select Delete.
-
Delete the SFT segment from the OTD tree in the Object Type Definition pane. Right-click the segment and select Delete from the shortcut menu.
-
Delete any one reference of the segment OTD from the External tab of the Reference pane.
This removes all other references to the segment OTD.
-
Click the Import OTD to External Template icon to import the segment OTD to your main OTD.
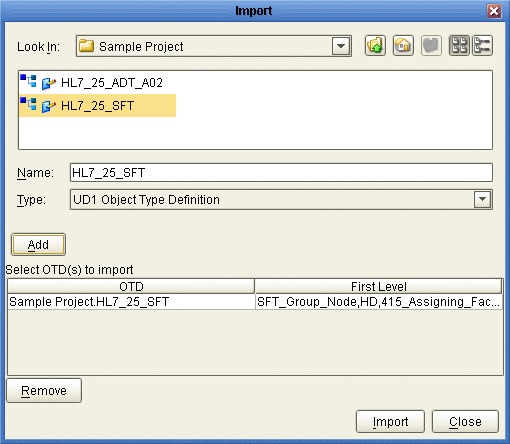
The Import dialog box appears.
-
Locate and select the OTD you want to import from your Project file from the Import dialog box.
-
Click the Add button to add the OTD to the Select OTD(s) to import field. Click Import.
The OTD is added to the editor’s External tab of the Reference pane.
-
Drag and drop the imported segment reference (for this example HL7_25_SFT/SFT) onto the Root Node of the Object Type Definition pane from the External tab of the Reference pane.
The segment is added to the Object Type Definition tree.
-
Right click the segment and select Level Up from the shortcut menu to move the segment up the tree from the Object Type Definition tree.
Repeat this step until the new segment is in the same position as that of the segment being replaced.
-
Save the changes to the Repository.
You can now open the segment OTD, located in your Project, and edit the properties.
Adding a Segment OTD to a Message OTD
You can also modify an OTD by adding additional segment OTDs to your OTD’s external template.
-
Copy and save your OTD and any segment OTDs you wish to import, to your Project.
This opens the OTD in the OTD Editor.
-
Click the Import OTD to External Template icon from the OTD Editor toolbar.
The Import dialog box appears.
-
Locate and select the OTDs you want to import from your Project file from the Import dialog box.
-
Click the Add button to add the OTD to the Select OTD(s) to import field.
-
Click Import.
The OTD is added to the editor’s External tab of the Reference pane.
-
Drag and drop the segment OTD reference onto the Root Node in the Object Type Definition pane from the External tab of the Reference pane.
The segment OTD is added to the Object Type Definition tree.
-
Save the changes to the Repository.
OTD Properties
The Object Type Definition pane (center pane) of the OTD Editor displays the nodes, elements, and fields of the OTD. When any of these are selected, the item’s properties are displayed in the Properties pane.
Node Properties
When an HL7 OTD is opened in the OTD Editor, the properties of the Root node are displayed in the Properties pane. The configurable node properties are displayed in the table.
|
Node Property Descriptions |
|
|---|---|
|
name |
Node display name. This can be a virtually-arbitrary string. |
|
javaName |
Property accessor basename. This is normally derived from the display name, modified to suit the restrictions on Java identifiers, and supplied automatically by the Sun Enterprise Service Bus. |
|
javaType |
Java type; automatically assigned, not editable. |
|
comment |
Free-form text (no run-time effect). |
|
delim |
Specified delimiter. See Specifying Delimiters. |
|
nodeType |
Governs the marshal/unmarshal format. See Specifying the Node Type. |
|
antecoding |
Specifies the input data coding (see Specifying Data Encoding on page 219). If this property is not specified, the value specified for the decoding property will be used for the input data. This property is displayed only when the top property is set to true. |
|
decoding |
Specifies the unmarshal coding (see Specifying Data Encoding on page 219). (It is recommended to use UTF-8 for DBCS data, since the hex value of some ASCII delimiter may coincide with a hex value contained within a double-byte character.) This property is displayed only when the top property is set to true. |
|
encoding |
Specifies the marshal coding. This property is displayed only when the top property is set to true. |
|
order |
Specifies the ordering of the Root node’s children:
|
|
postcoding |
Specifies the output data coding (see Specifying Data Encoding on page 219). If this property is not specified, the value specified for the encoding property will be used for the output data. This property is displayed only when the top property is set to true. |
|
public |
Reserved for future development |
|
showDelim |
If nodeType is delimited. |
|
top |
Flag on Root node: support marshal/unmarshal (T/F). |
Note –
Do not modify the javaName property.
Element Properties
The set of properties associated with the element level is shown in the following figure.
Figure 1–14 OTD Editor - OTD Element Properties
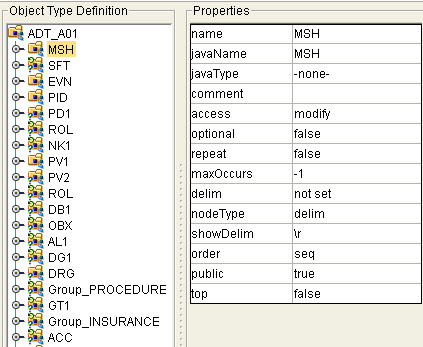
The configurable element properties are displayed in the table.
|
Element Property Descriptions |
|
|---|---|
|
name |
Element display name. |
|
javaName |
Property accessor basename. |
|
javaType |
Java type; automatically assigned, not editable. |
|
comment |
Free-form text (no run-time effect). |
|
access |
Access specification. |
|
optional |
Flag: Can the element be absent? (T/F) Not applicable to Root, or child of a choice Node. |
|
repeat |
Flag: Can the node appear multiple times? (T/F) Not applicable to Root, or child of a choice Node. |
|
maxOccurs |
Specifies the maximum number of occurrences of the node if the node is repeating. Property has no effect if node is non-repeating, but may show error during validation if set to value >1. |
|
delim |
Delimiter specification (see Specifying Delimiters). |
|
nodeType |
Governs the marshal/unmarshal format. |
|
showDelim |
If nodeType is delimited, |
|
Public |
For future use, not currently active. |
|
Top |
Specifies whether or not marshal/unmarshal is supported (true or false). The default value is true. |
Note –
Do not modify the javaName property.
Field Properties
The set of properties associated with the field level is shown in the following figure.
Figure 1–15 OTD Editor - OTD Field Properties
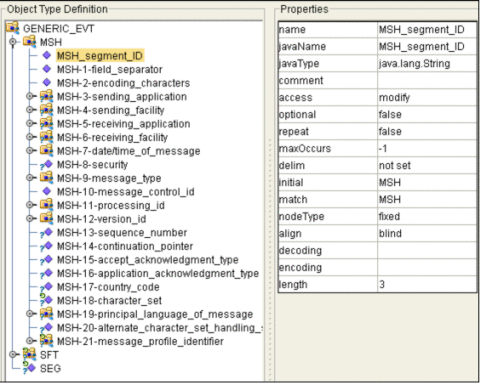
The configurable field properties are displayed in the table.
|
Field Property Descriptions |
|
|---|---|
|
name |
Field display name. |
|
javaName |
Property accessor basename. |
|
javaType |
Java type: can be either java.lang.String or byte array (byte[]). |
|
comment |
Free-form text (no run-time effect). |
|
access |
Access specification. |
|
optional |
Specifies whether or not the field can be absent from an instance. Clicking the Value field toggles between true and false. Not applicable if the field is the child of a choice element node. |
|
repeat |
Specifies whether or not the node can appear multiple times. Clicking the Value field toggles between true and false. Not applicable if the field is the child of a choice element node. |
|
maxOccurs |
Specifies the maximum number of occurrences of the node if the node is repeating. Property has no effect if node is non-repeating, but may show error during validation if set to value >1. |
|
delim |
Delimiter specification (see Specifying Delimiters). |
|
initial |
Initial field value, set when the parent node is created or reset. When provided, it is assigned to the node before the node is populated with any data. |
|
match |
If nodeType is delimited, performs exact match to the data. |
|
nodeType |
Governs the marshal/unmarshal format. |
|
align |
Specifies the byte alignment criteria for the match property. |
|
decoding |
Displayed only if nodeType is fixed. Specifies the unmarshal coding. (It is recommended to use UTF-8 for DBCS data, since the hex value of some ASCII delimiter may coincide with a hex value contained within a doublebyte character.) |
|
encoding |
Displayed only if nodeType is fixed. Specifies the marshal coding. |
|
length |
Displayed only if nodeType is fixed. Specifies the length of the field; the default value is 0. |
Note –
Do not modify the javaName property.
Specifying the Node Type
Click on the nodeType properties field to activate the field for editing. Click the arrow button to display the selection menu. Descriptions of the property options are listed in the table.
|
Node Type Property Options |
||||
|---|---|---|---|---|
|
Option |
Description |
Element |
Field |
Internal |
|
array |
Array is a delimited structure. If repeated, occurrences are separated by the repeat delimiter. The last occurrence may be terminated by a normal delimiter. |
Yes |
Yes |
simple or group |
|
delim |
Delim (delimited) structure. If repeated, occurrences are separated by a normal delimiter. |
Yes |
Yes |
simple or group |
|
fixed |
Fixed indicates a fixed length, which is specified by non-negative integer (or zero to indicate end of parent node data). |
Yes |
Yes |
simple or group |
|
group |
Group provides organizational grouping for purposes such as repetition. Applies only to elements. |
Yes |
No |
group |
|
trans |
Trans (transient) appears only in an internal tree as a scratch pad field. It does not appear in external data representation, and can only have trans nodeTypes as children. |
Yes |
Yes |
choice, simple, or group |
Note –
If you move an OTD node, you must reset the nodeType for that node.
Node Management
The OTD Editor allows you to:
-
Add nodes and elements to an OTD.
-
Delete nodes and elements from an OTD.
When a node is deleted, both the node and its associated children (data elements) are deleted.
-
Prune nodes in an OTD.
When a node is pruned, only its associated children (data elements) are deleted, while the node itself is preserved. Pruning can only be performed on nodes.
These commands are accessed from the node context menu.
- © 2010, Oracle Corporation and/or its affiliates
