Designing with Sun JCA Adapters
The following sections provide installation and deployment instructions for Sun JCA Adapters. Some of the information pertains to deploying a specific Oracle project. The following topics are covered:
-
Using the Oracle Wizard and JCA Adapter Tooling with an EJB Project
-
Using the Oracle Applications Wizard and JCA Adapter Tooling with an EJB Project
Technical Overview for Sun JCA Adapters
The components provided for developing Sun JCA Adapters include the runtime JCA resource adapter component as well as the design time tools to facilitate developing applications that utilize the JCA resource adapter. The design time tools included are:
-
Code wizards that generate template JCA resource adapter client code.
-
Wizards that generate code based on higher level object models pertaining to the external applications. The model used is referred to as Object Type Definitions (OTD) and the application-specific wizards are referred to as OTD Wizards.
Inbound JCA Resource Adapter Client Code
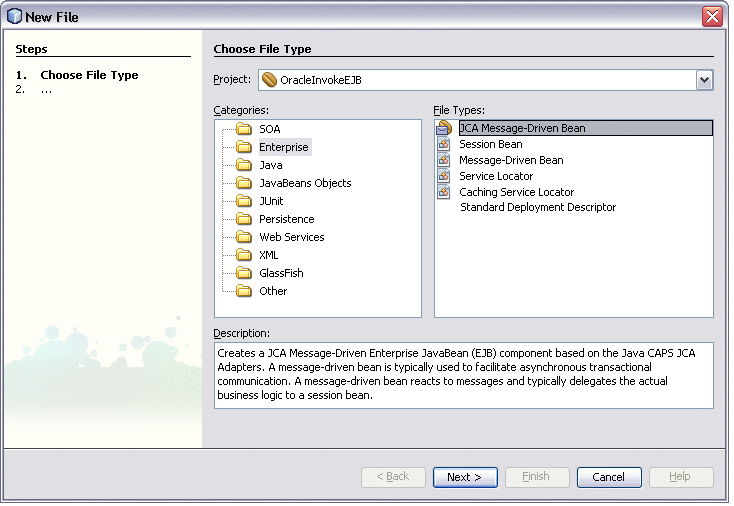
JCA Resource Adapters that support inbound communication depend on deployment of a Message-Driven Bean (MDB). To develop an application utilizing a JCA Adapter for inbound communication, the JCA Message-Drive Bean wizard must be used. When the wizard is finished, the message driven bean code skeleton is generated. For example, for the File JCA Adapter, the following MDB code skeleton is created:
/*
* To change this template, choose Tools | Templates
* and open the template in the editor.
*/
package test;
import javax.ejb.MessageDriven;
import com.stc.connector.fileadapter.eway.FileListener;
import com.stc.connector.framework.eway.FaultException;
import com.stc.connector.framework.eway.InboundException;
/**
*
* @author SUN
*/
@MessageDriven(name="test.FileJCAMessageBean")
public class FileJCAMessageBean implements FileListener {
public FileJCAMessageBean() {
}
public void onContents(byte[] data, String encoding) throws FaultException,
InboundException {
// implement listener interface here
}
}
Note –
The MDB generated implements the associated Listener interface for the JCA Adapter specified in the JCA Message-Driven Bean wizard. In the case of File JCA Adapter, the FileListener interface is implemented.
Outbound JCA Resource Adapter Client Code
JCA Adapters that support outbound connection to an external application are utilized via the client interface supported by the adapter. The client interface supported by Sun JCA Adapters are based on a simple Application Client Interface. The client interface involves establishment of an application connection via JNDI. The application connection is a container managed connection obtained from a connection pool. The application connection is used along with the OTD objects provided with the JCA adapter to perform operations on the external application.
The tooling for creating code, based on the outbound JCA's client interface is provided via the adapter in the form of specific objects from the Palette draggable onto the code editor. The Palette is made visible by selecting Palette from the Window top-level drop-down menu.
Upon dragging an item from the Palette to the code editor, the JCA wizard is started. In the JCA wizard, a method name must be specified. The method will be added to the code being edited. Depending on the type of external dragged from the Palette, the choice of OTD to be used may need to be specified. The JCA client interface code, required to obtain a JCA connector resource from JNDI, establishes then closes the JCA connection. It then instantiates the associated OTD object, which is also added. The method specified in the JCA wizard is created to simplify development of application logic as the method implementation can simply use OTD objects passed in.
For example, dragging the File object from the Palette to the onContents method of the File MDB and specifying a method name "send" in the JCA wizard adds the following code in the onContents method implementation:
public void onContents(byte[] data, String encoding) throws FaultException,
InboundException {
try {
_invoke_send(data, encoding);
} catch (java.lang.Throwable t) {
ectx.setRollbackOnly();
java.util.logging.Logger.getLogger(this.getClass().getName(
)).log(java.util.logging.Level.WARNING, "Failed to invoke _invoke_send: " + t, t);
}
}
The user application logic can be implemented in the send method which works directly with the OTD objects passed in.
private void send(byte[] data, String encoding, com.stc.connector.fileadapter.appconn.FileClientApplication fileOTD) throws java.lang.Exception {
}
The additional code shown below are also added providing the connection establishment and OTD instantiation.
// <editor - fold defaultstate= collapsed desc="Connection setup and takedown.
Click on the + sign on the left to edit the code.">
private void _invoke_send(byte[] data, String encoding) throws java.lang.Exception {
com.stc.connector.appconn.common.ApplicationConnection fileConnection = null;
try {
if (fileConnection != null) {
fileConnection.close();
}
} catch (Exception e) {
}
}
} // </editor-fold>
// <editor-fold defaultstate="collapsed" desc="file resource declaration. Click on the + sign on the left to edit the code.">
// comments for inserted variable
@javax.annotation.Resource(name = "jca/file", description = "", shareable = false)
private com.stc.connector.appconn.common.ApplicationConnectionFactory file; // </editor-fold>
// <editor-fold defaultstate="collapsed" desc="EJBContext declaration. Click on the + sign on the left to edit the code.">
@javax.annotation.Resource
private javax.ejb.EJBContext ectx; // <editor-fold>
Object Type Definition Wizards
The client interface to certain external applications may involve dynamically generating Object Type Definition code based on the external application metadata. This step is accomplished by executing the OTD wizards. The jar containing the generated OTD code is added to the NetBeans project where it can be used as a library.
The classes generated by the OTD wizard varies for each external system or application. The database OTD wizards, for instance, will generate code that will facilitate querying or updating databases while the SAP OTD wizards will provide objects representing SAP BAPIs or IDocs to facilitate operations on those entities. For more detailed information on the specific OTDs or models, refer to the corresponding sections on Designing with the respective JCA Adapters.
Installing the Sun JCA Adapters
There are three components to install for the Sun JCA Adapters: design–time components in NetBeans, runtime components in GlassFish, and third-party JAR files.
Perform the following steps to install the Adapters:
Installing the NetBeans Modules
This topic describes installation instructions for the NetBeans modules. A common library package (contained in the commonLib directory) is a prerequisite before installing any individual components.
 Installing the Modules Pack
-
Extract the contents of the AdapterPack.zip file to a local directory.
-
To install the common library modules (NBMs) launch NetBeans.
-
Click the Tools menu and then select Plugins.
-
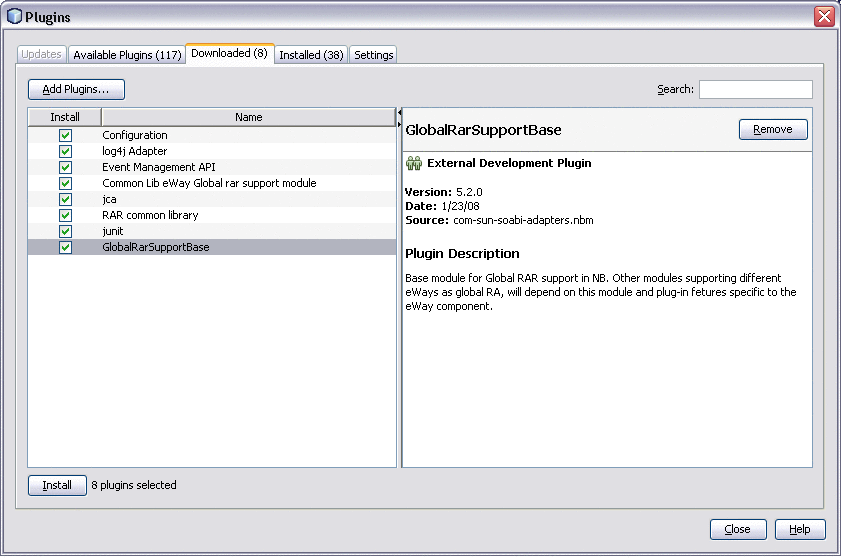
Click on the Downloaded tab, and then click Add Plugins.
-
Navigate to the ZipFile\AdapterPack\NetBeansModules\CommonLib directory, where ZipFile is the directory where the AdapterPack.zip file was extracted, and select all the available NBM files.
Note –If you are installing the NBMs into a Java CAPS environment, you should only need to install com-sun-soabi-common-wizard-library.nbm. The remaining libraries should be pre-installed.
-
Right-click in the Plugins list and click Select All.
-
Click Install at the bottom of the window.
-
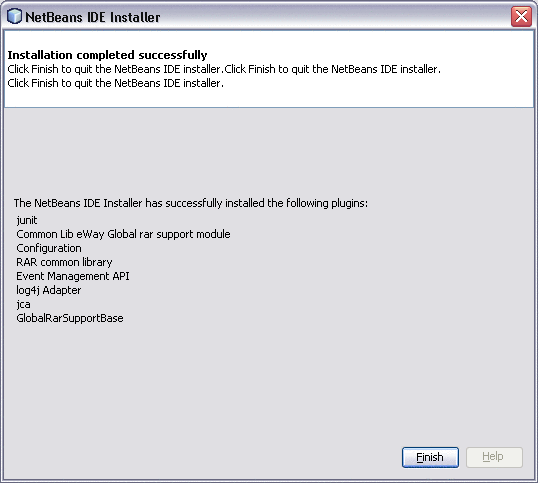
Follow the steps on the NetBeans IDE Installer. Ignore any warnings that may appear.
-
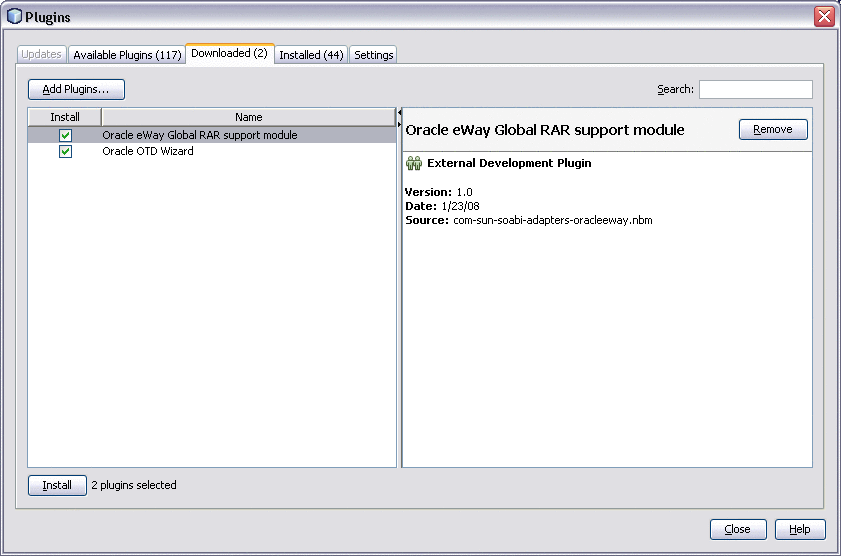
Repeat the above steps, selecting all the NBM files in ZipFile\AdapterPack\NetBeansModules directory, where ZipFile is the directory where the AdapterPack.zip file was extracted.
This installs the necessary Wizards and tools. The image below shows the Oracle OTD Wizard, for example.
Note –If you are installing the JCA Adapters into a Java CAPS environment, many of the NBMs in this directory are pre-installed; however, you do need to install the wizards and certain support modules. If you select all NBMs to add, the installer will only install the ones that are not already installed.
Installing the Runtime Components for Sun JCA Adapters
Follow the instructions below to install the required base components for Sun JCA Adapters.
 To Install Runtime Components
Before You Begin
Make sure you have GlassFish Server installed. You can access GlassFish downloads from https://glassfish.dev.java.net/public/downloadsindex.html#top.
-
Stop all running GlassFish domains.
-
Extract the contents of the AdapterPack.zip file to a local directory.
-
Download the JBI core installer from http://download.java.net/jbi/binaries/open-esb/main/nightly/latest/CORE/jbi-core-installer.jar or use the jbi-core-installer.jar file available in your GlassFish installation.
-
Run the JBI Core Installer by executing the following command:
java -jar jbi-core-installer.jar GlassfishHome install
where GlassFishHome is the full path to the GlassFish directory.
-
Start the GlassFish Server.
-
In the directory where you extracted the Adapter Pack, navigate to Runtime/install and open install.properties in a text editor.
-
Modify the properties for your GlassFish installation, and then save and close the file. Be sure to uncomment the line that specifies your operating system.
-
Run the following command from GlassFishHome/bin:
asant -f AdapterPack/Runtime/install.xml
where AdapterPack is the directory where you extracted the Adapter Pack.
Installing Third-Party JAR Files
JCA Adapters for certain systems, such as SAP and Siebel, require that third-party JAR files be installed. The Adapter Pack provides a JAR file installer that you can access by extracting com-sun-adapters-thirdpartylib-installer.zip. The extracted files include a readme file to help you through the installation You can also find additional information and instructions at Installing Third-Party JAR Files.
Configuring Runtime Components in an EJB/JCA Application
The following task outlines the steps need to configure runtime components in an EJB/JCA application Specific examples are provided for File and Oracle JCA adapters.
 Configuring Connector Pools for File Adapter
-
To create an Outbound Connector Connection Pool for the File Adapter, navigate to the Application Server Admin Console at htt://localhost:4848.
-
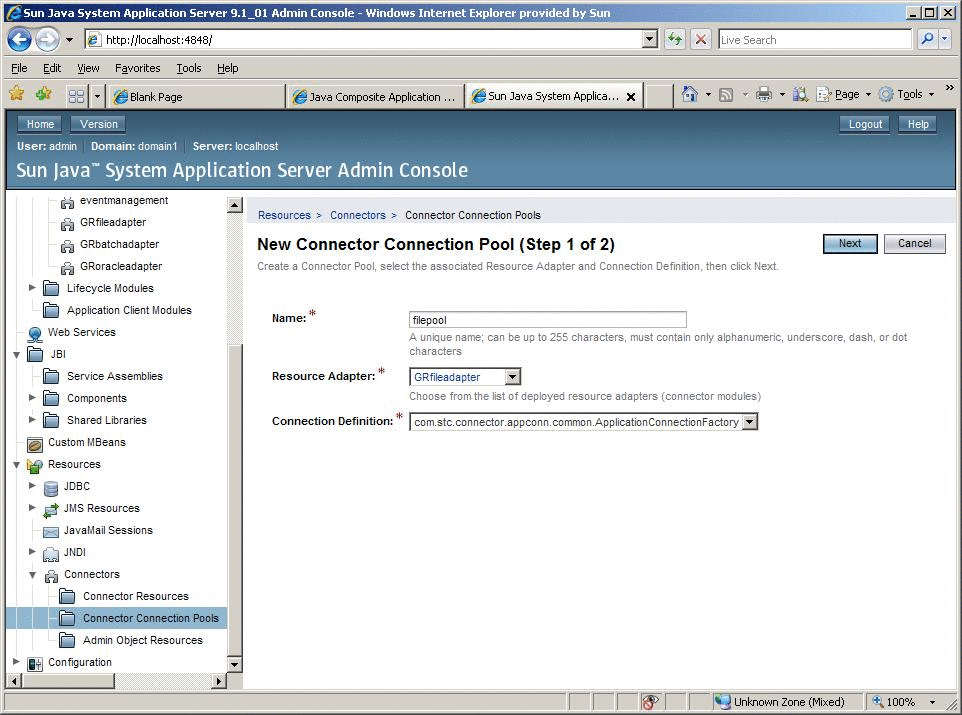
Select the Resources > Connectors > Connector Connection Pools tree node, and click New.
-
Enter a name for the pool name, and select GRfileadapter as the Resource Adapter type.
-
Click Next, and then Finish.
-
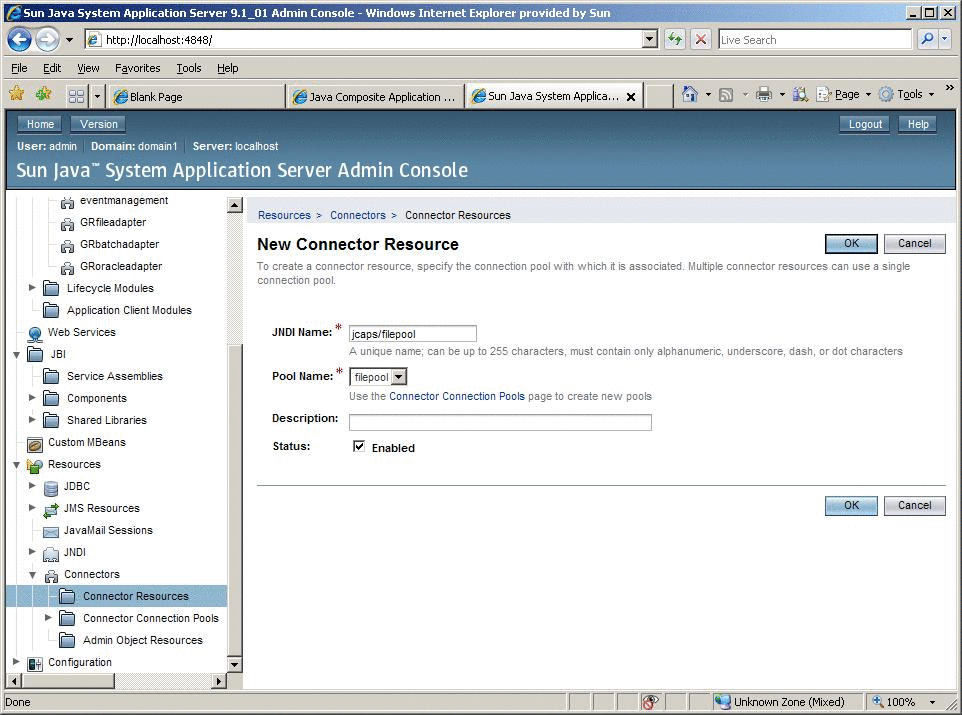
Create an Outbound Connector Resource from the Resource Pool above. In the Admin Console, select Resources > Connectors > Connector Resources, and click New.
-
Fill in the JNDI Name for the Resource, and select the name of the Resource Pool created previously, and click OK.
-
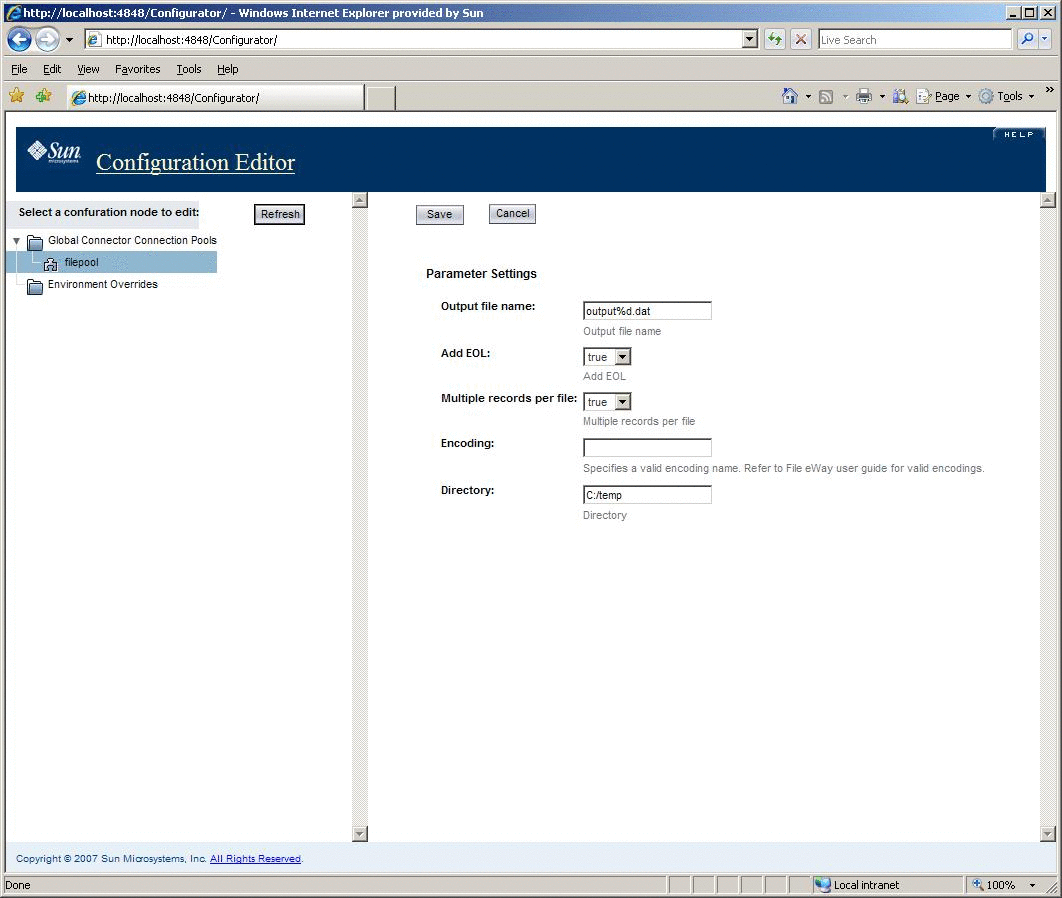
To configure the File outbound pool, navigate to the web-based configuration editor at htt://localhost:4848/Configurator.
-
Select filepool from tree.
-
Modify the Output file name, Add EOL, Multiple records per file, Encoding, and Directory as required for your project.
 Configuring Connector Pools for Oracle Adapter
-
To create an Outbound Connector Connection Pool for the File Adapter, navigate to the Application Server Admin Console at htt://localhost:4848.
-
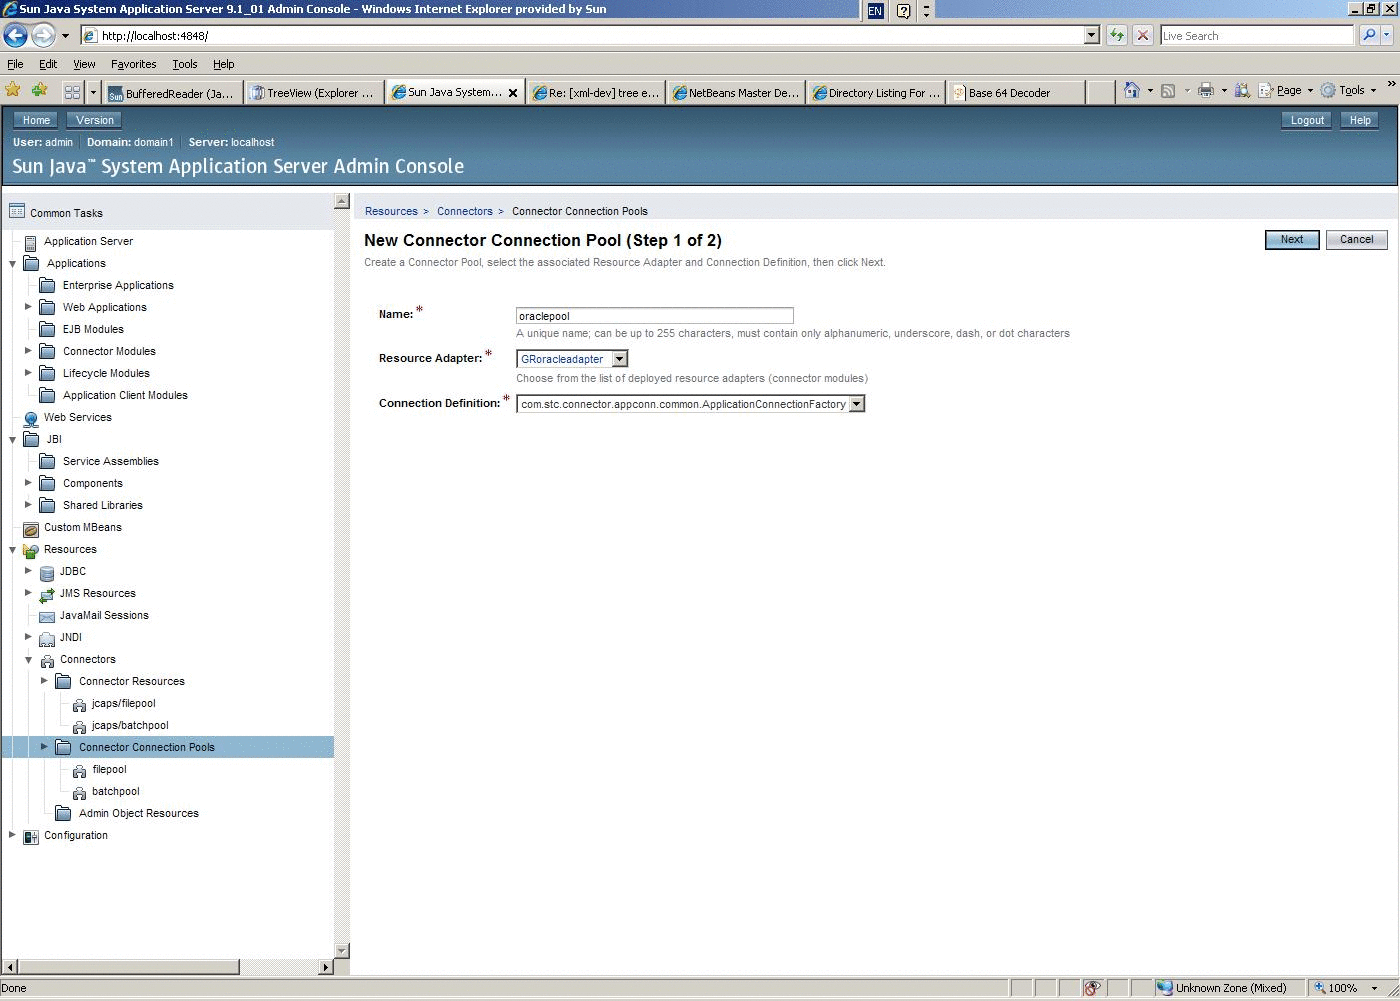
Select the Resources > Connectors > Connector Connection Pools tree node, and click New.
-
Enter a name for the pool name, and select GRoracleadapter as the Resource Adapter type.
-
Click Next, and then Finish.
-
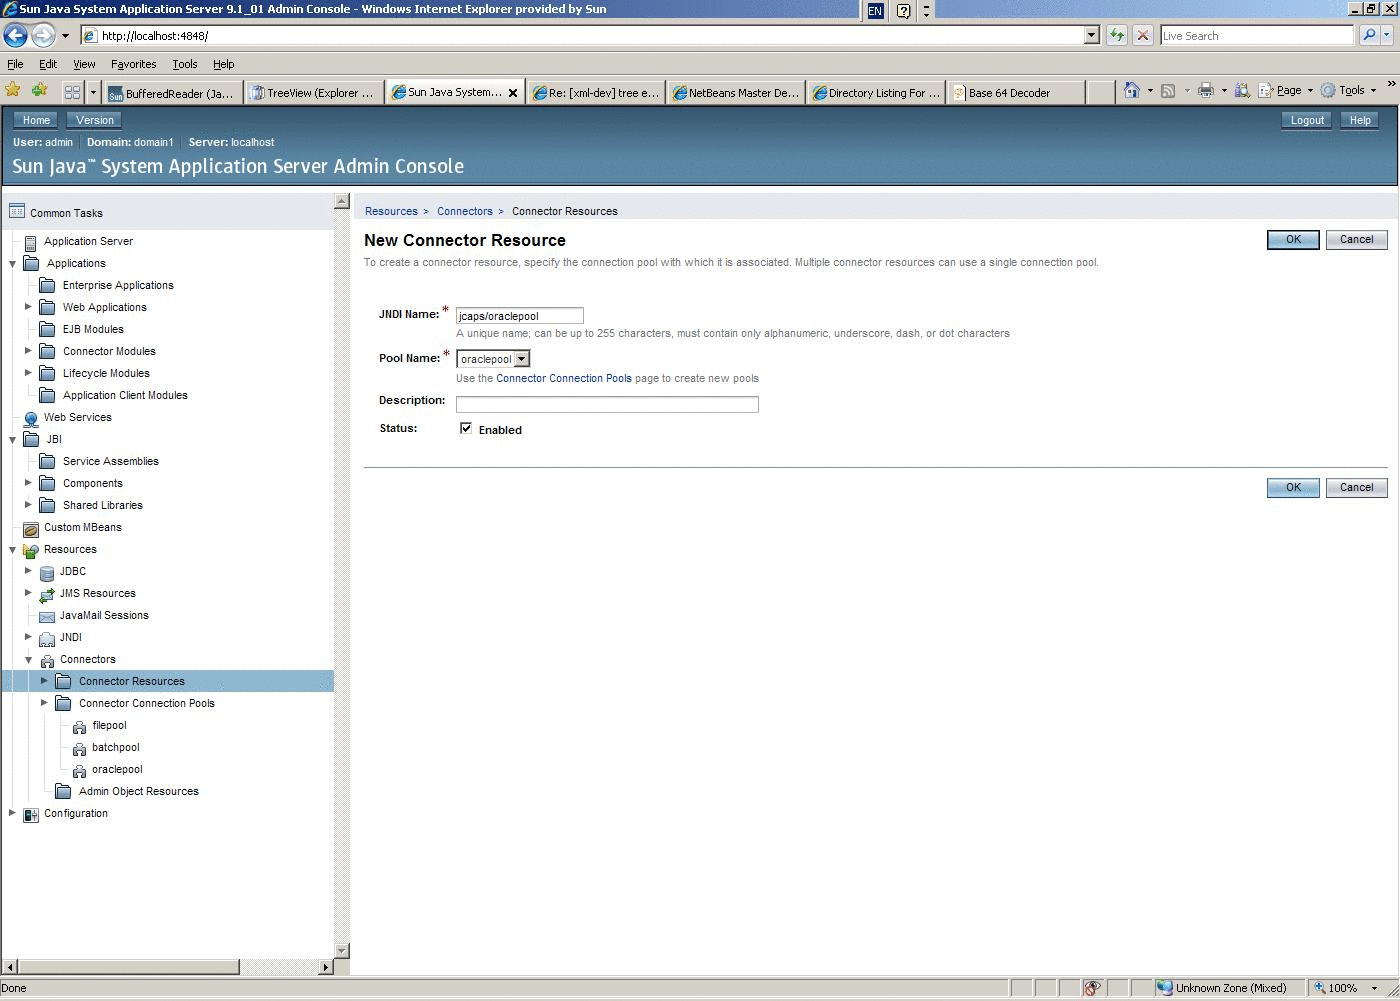
Create an Outbound Connector Resource from the Resource Pool above. In the Admin Console, select Resources > Connectors > Connector Resources, and click New.
-
Fill in the JNDI Name for the Resource, and select the name of the Resource Pool created previously, and click OK.
-
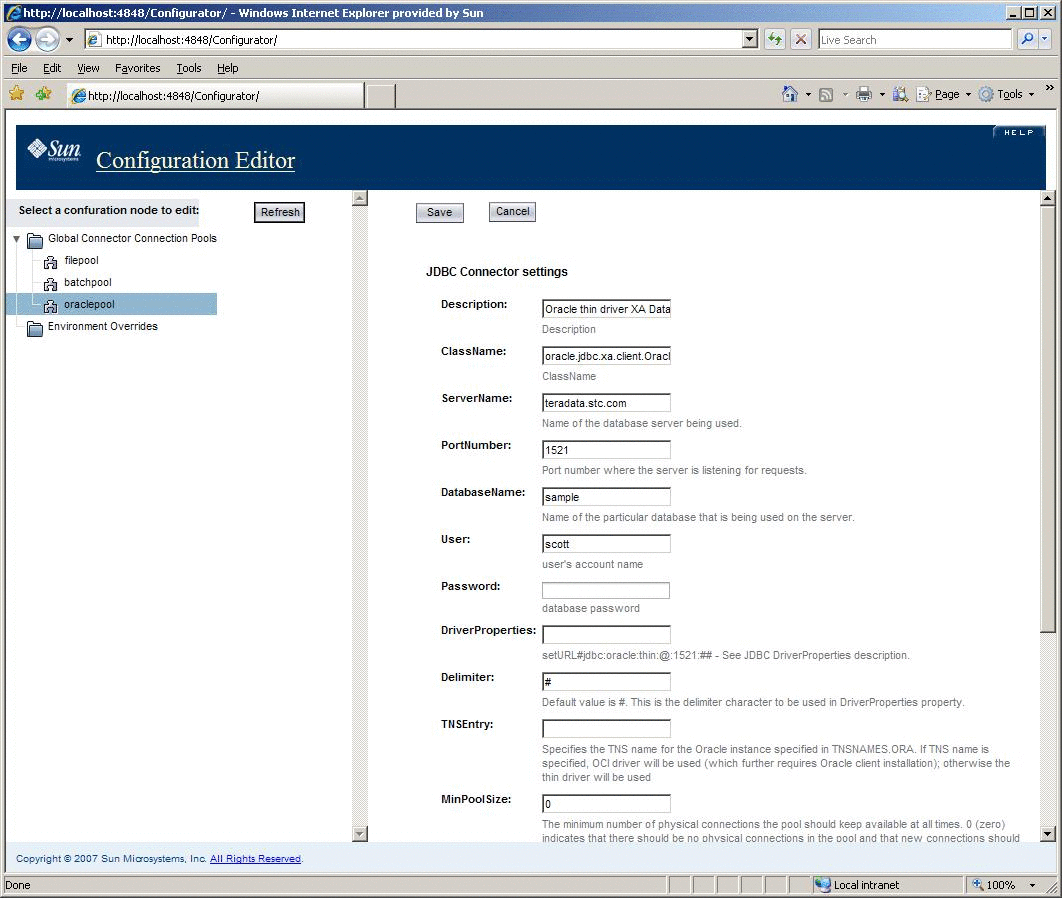
To configure the Oracle outbound pool, navigate to the web-based configuration editor at htt://localhost:4848/Configurator.
-
Select oraclepool from tree.
-
Modify the following fields as required for your project:
-
Description
-
ClassName
-
ServerName
-
PortNumber
-
User
-
Password
-
DriverProperties
-
Delimiter
-
TNSEntry
-
MinPoolSize
-
Deployment of Sun JCA Adapters
The Sun JCA Adapter runtime components (RAR files) are contained in the Adapter Pack under the Runtime/adapters directory.
To Deploy JCA Adapters via Command Line
Use the asadmin command to deploy a RAR file. For example, to deploy the File JCA RAR filesun-file-adapter.rar, navigate to the c:\glassfish\bindirectory (where c:\glassfish is the full path of the GlassFish installation) run the following command: asadmin deploy c:\AdapterPack\Runtime\eways\GRfileadapter.rar.

To Deploy JCA Adapters via the Admin Console
-
Start the application server.
-
Log in to the Admin Console from a browser. If the application server is running locally, browse to http://localhost:4848.
-
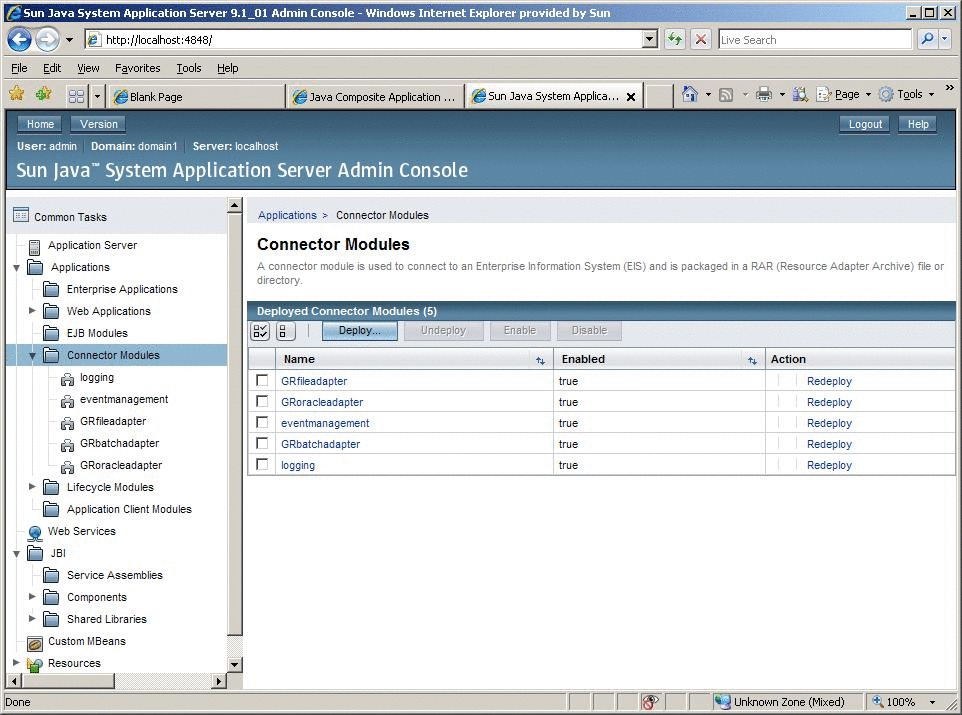
Locate the Connector Modules subnode under the Applications node.
-
Click Deploy.
-
Specify the RAR file you want to deploy by clicking on the Browse button under the selected check box Packaged file to be uploaded to the server. The RAR files are available in the c:\AdapterPack\Runtime directory where c:\AdapterPack is the location of the extracted contents of the AdapterPack.zip file.
-
Click OK and then Finish.
-
Verify successful deployment of the JCA Adapters in the Admin Console.
Using the Oracle Wizard and JCA Adapter Tooling with an EJB Project
The following task outlines the steps need to implement a specific EJB project where a directory is polled for input data using a query statement (the statement is executed against an Oracle database), and the results are written to an output file.
 To implement the Oracle JCA Adapter with an
EJB Project
-
Create the required connector or connectors in the Application Server. In this particular example, create a connector for the File eWay and another for the Oracle eWay.
-
Navigate to the Application Server Admin Console at htt://localhost:4848.
-
Configure the parameters for your connectors under Resources > Connector > Connector Connection Pool and Resources > Connector > Connector Resources.
-
Launch NetBeans.
-
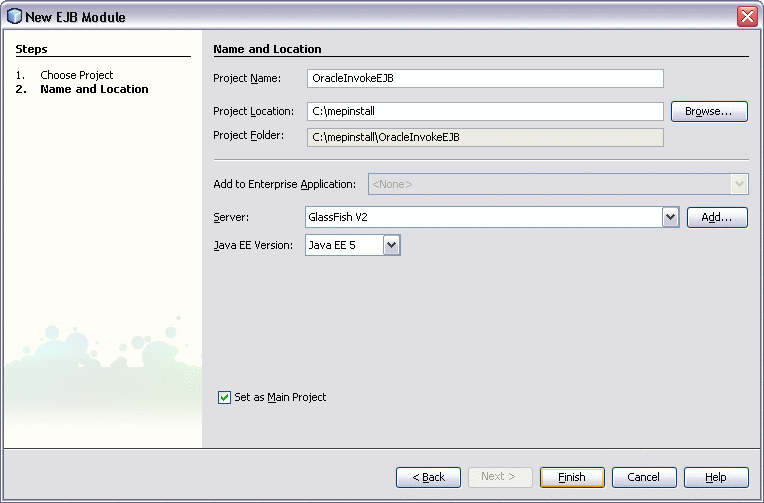
From the File menu, select Enterprise > EJB Module.
-
Create a new EJB project OracleInvokeEJB
-
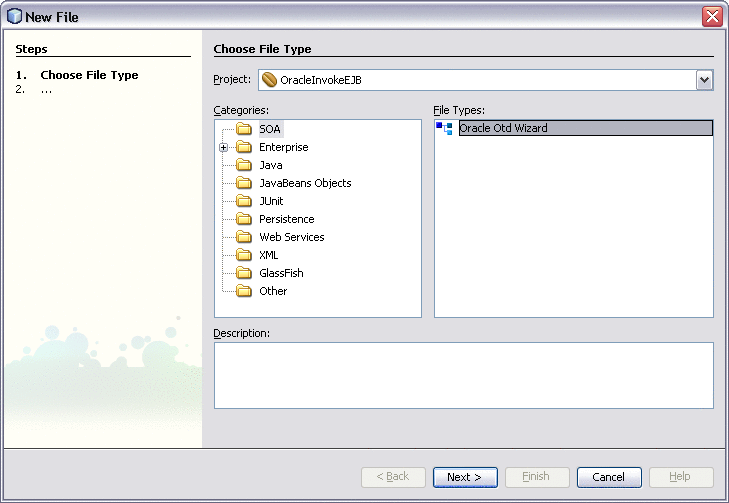
Launch the Oracle wizard by right—clicking on the OracleInvokeEJB project and selecting New.
-
Select Other > SOA > Oracle OTD Wizard.
-
Click Next.
-
Enter the Oracle database connection information, and click Next.
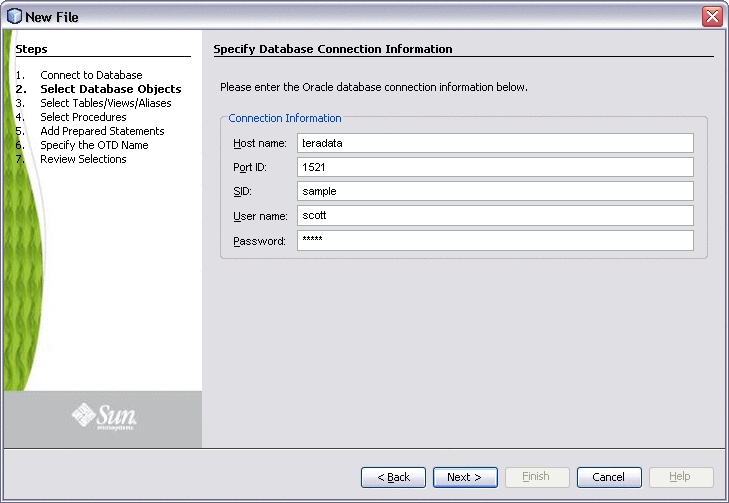
-
Add the database objects (tables, stored procedures, and prepared statements) required for the project, and click OK.
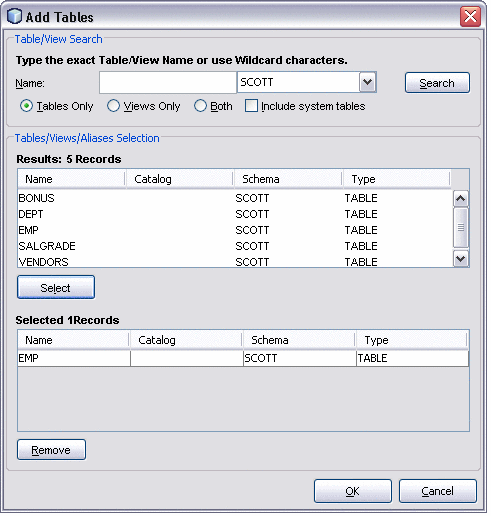
-
Enter a name for the OTD.
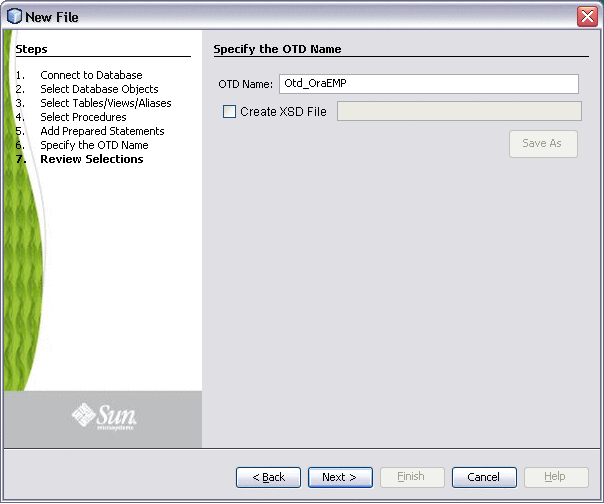
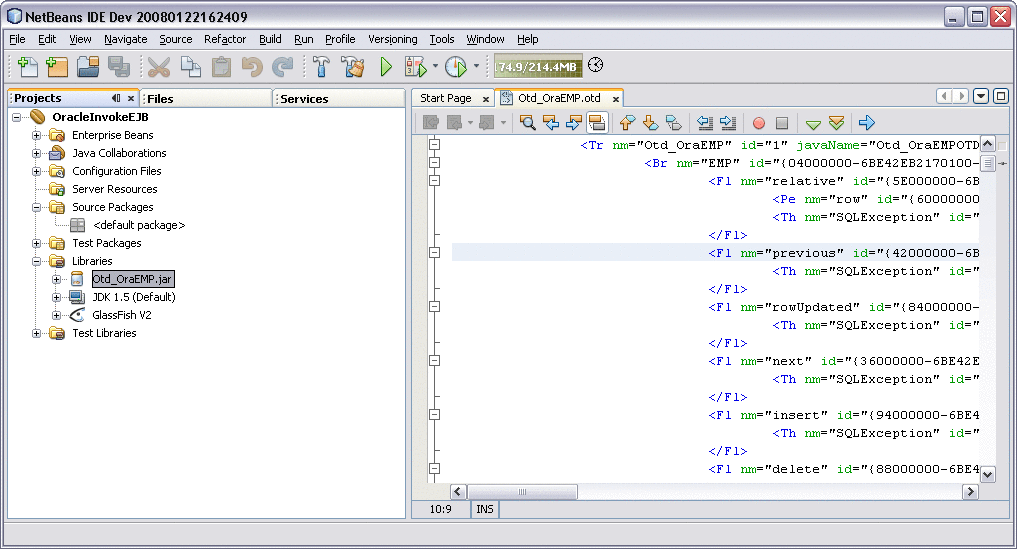
An OTD and a JAR file containing the code corresponding to the above selected database objects are generated. The OTD is generated in the project at the location src/java/otds. The JAR file is added to the project libraries.
-
Create a JCA-driven MDB by navigating to the File menu, and selecting New Project > Enterprise.
-
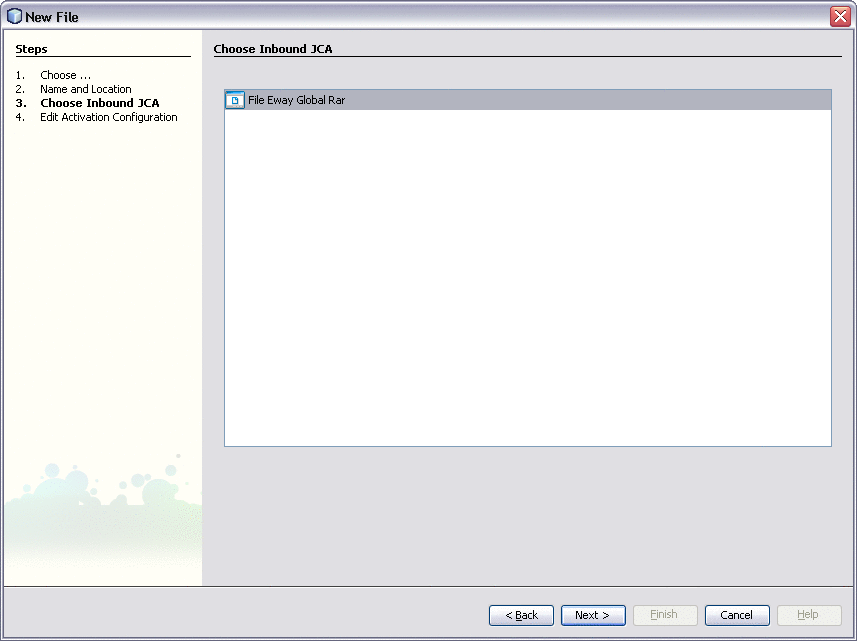
Select File Inbound RAR as the Inbound JCA.
-
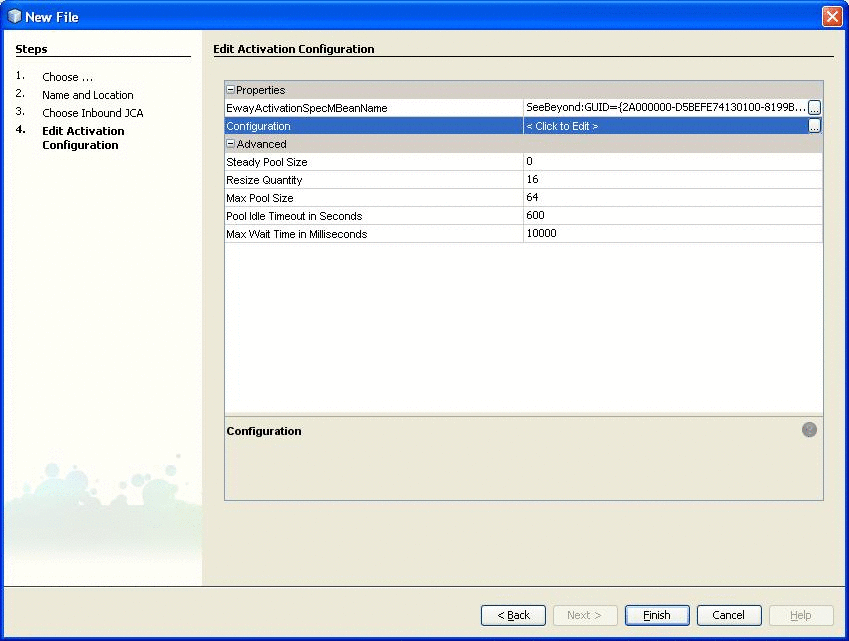
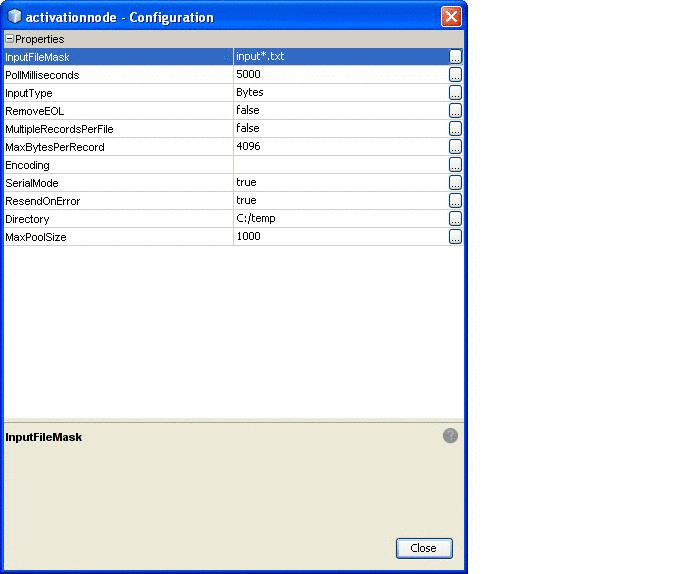
Edit the Inbound File JCA configuration parameters in the following two dialogue windows.
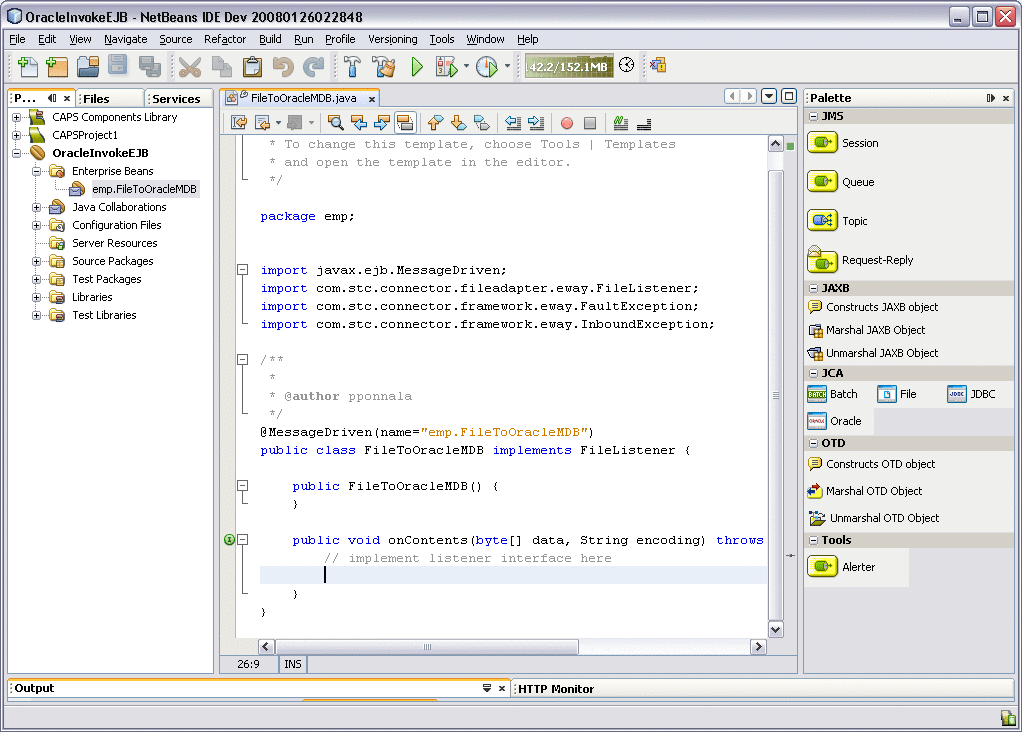
An MDB is created.
-
In the generated MDB, drag Oracle from the palette to invoke Oracle.
-
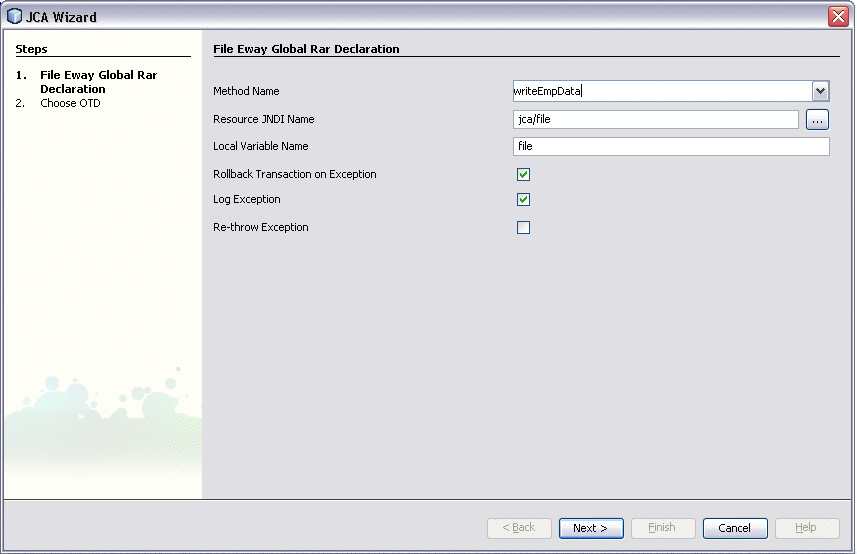
Drag and drop the File JCA onto the onContents() of the MDB, and enter the parameters for the File eWay JCA Adapter declarations.
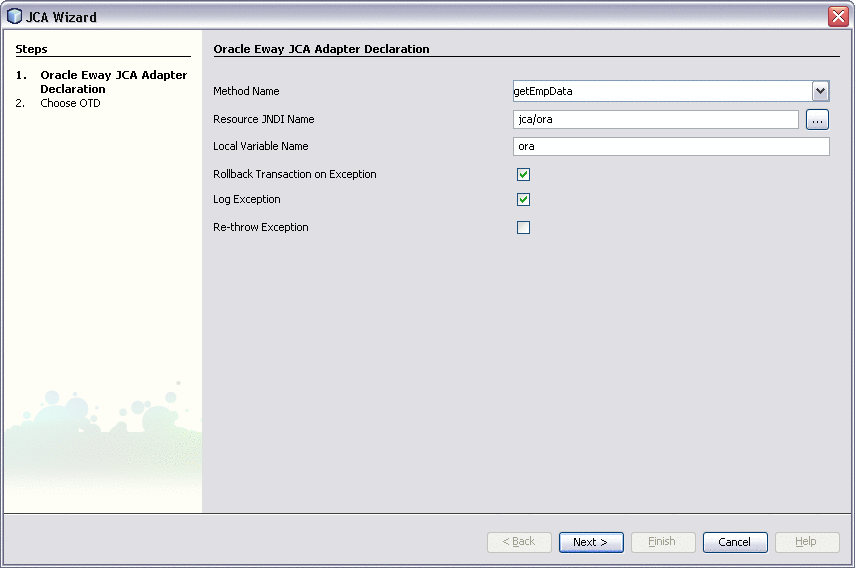
The Resource JNDI Name should be the same as that declared in the GlassFish Application Server (for example, Resources > Connector > Connector Resources)
-
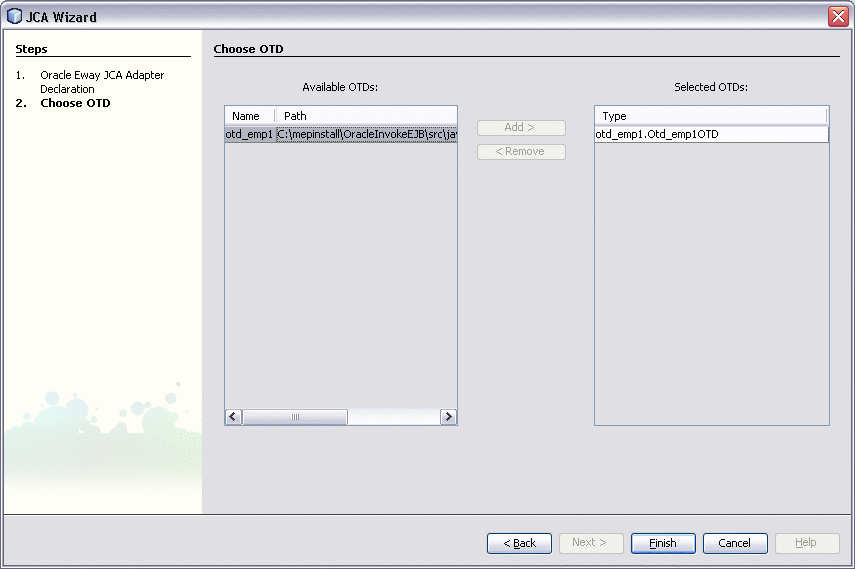
Select the Oracle OTD that is generated and click Finish.
-
Issue a select statement and iterate through the resultset, and write to File.
-
The resulting Java template is created.
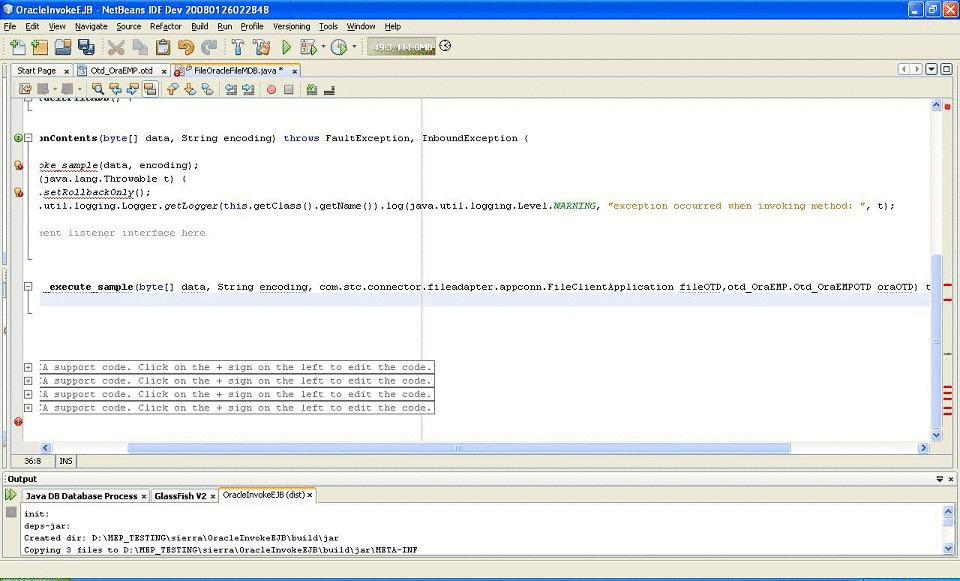
-
Implement the following Java code:
The following code is the output:
public void onContents(byte[] data,
				String encoding) throws FaultException, InboundException {

	try {
		_invoke_getEmpData(data, encoding);
	} catch (java.lang.Throwable t) {
	ectx.setRollbackOnly();
	java.util.logging.Logger.getLogger(this.getClass().getName()).log(java.util.
		logging.Level.WARNING,
	"exception occurred when invoking method: ", t);
	}

	try {
		_invoke_writeEmpData(data, encoding);
	} catch (java.lang.Throwable t) {
		ectx.setRollbackOnly();
		java.util.logging.Logger.getLogger(this.getClass().getName()).log(java.util.
			logging.Level.WARNING,
		"exception occurred when invoking method: ", t);
        }
   }
    private String _execute_getEmpData(byte[] data, String encoding,
			otd_emp1.Otd_emp1OTD oraOTD) throws java.lang.Exception {
	//select all records from EMP table using the method select available
	//on the OTD
	oraOTD.getEMP().select("");
	//Iterate thru the resultset and write to File.
	while(oraOTD.getEMP().next()) {
           enameValues = oraOTD.getEMP().getENAME() + ", " + enameValues;
	}

}

    private void _execute_writeEmpData(byte[] data, String encoding,
					com.stc.connector.fileadapter.appconn.FileClientApplication fileOTD)
						throws java.lang.Exception {

       fileOTD.setText(new String(data));
	fileOTD.write();
     }
Using the Oracle Applications Wizard and JCA Adapter Tooling with an EJB Project
The following task outlines the steps need to implement a specific EJB project using the Oracle Applications Adapter Wizard. The results are written to an output file.
 To implement the Oracle Applications JCA Adapter
with an EJB Project
-
Create the required connector or connectors in the Application Server. In this particular example, create a connector for the File eWay and another for the Oracle Applications eWay.
-
Navigate to the Application Server Admin Console at htt://localhost:4848.
-
Configure the parameters for your connectors under Resources > Connector > Connector Connection Pool and Resources > Connector > Connector Resources.
-
Launch NetBeans.
-
From the File menu, select Enterprise > EJB Module.
-
Create a new EJB project OracleAppsInvokeEJB
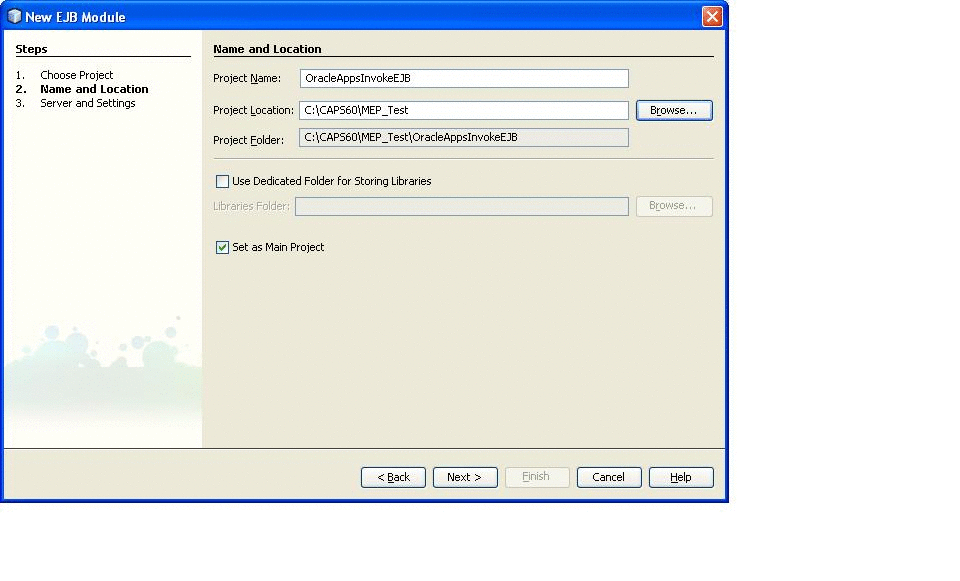
-
Launch the Oracle wizard by right—clicking on the OracleAppsInvokeEJB project and selecting New.
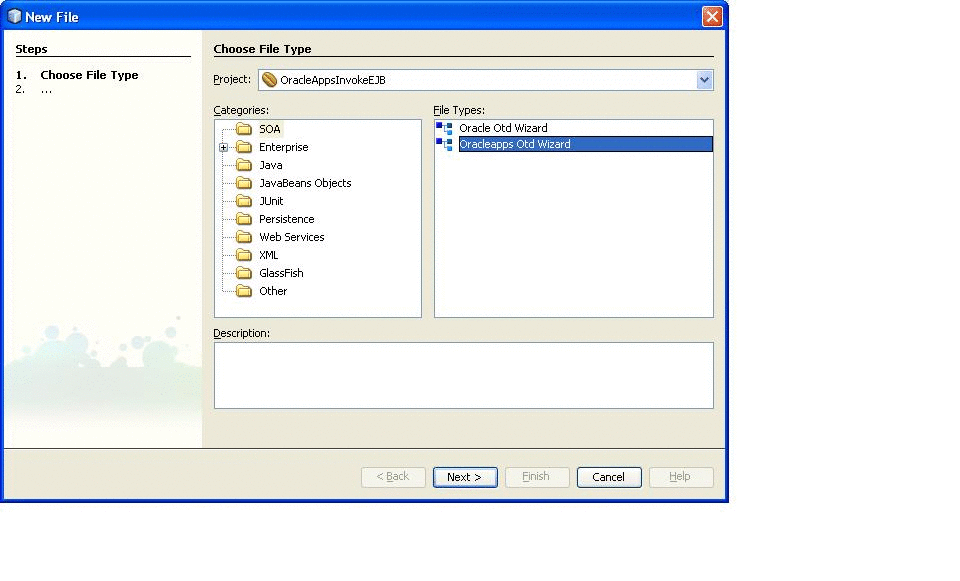
-
Select Other > SOA > Oracleapps OTD Wizard.
-
Click Next.
-
Enter the Oracle Applications database connection information, and click Next.
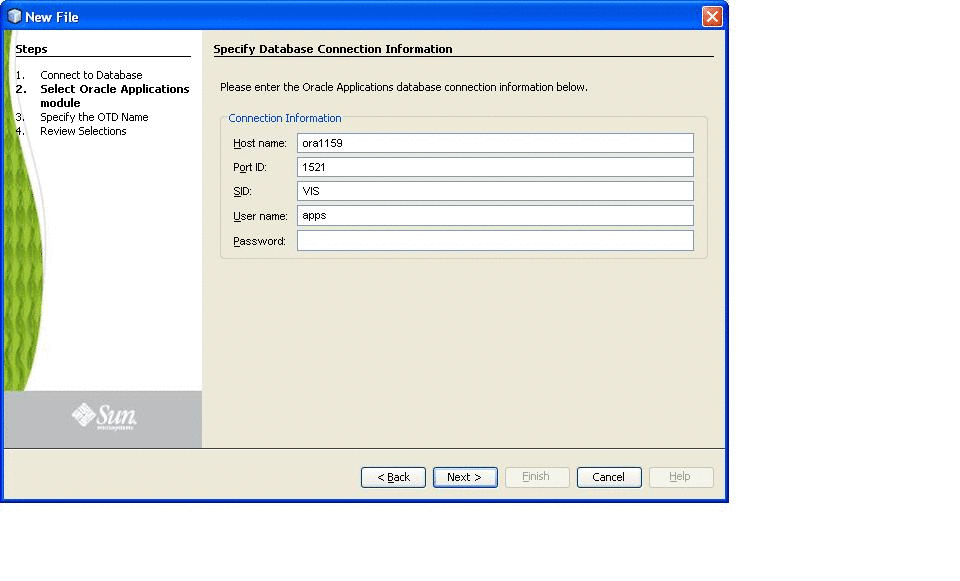
-
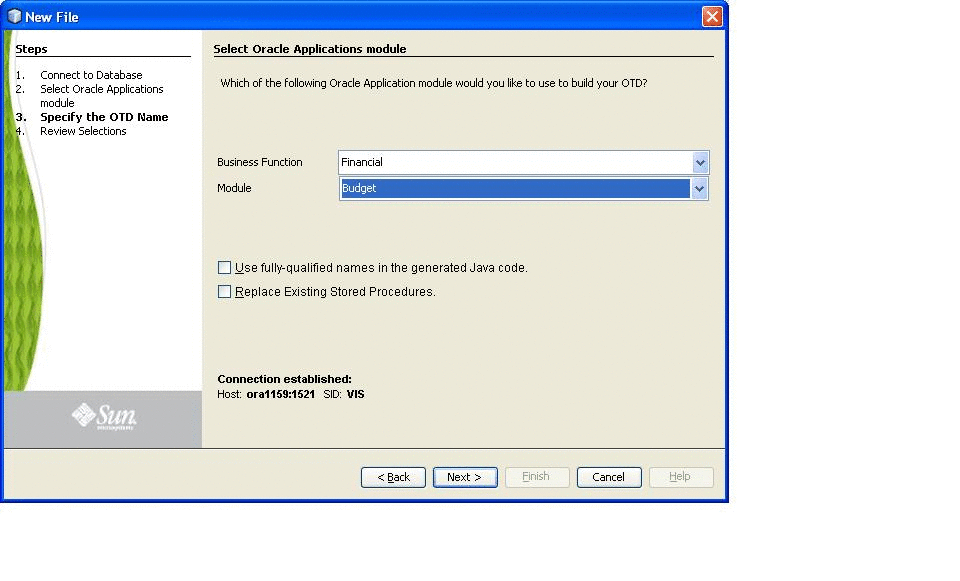
Select the Oracle Applications Business Function and Module for the project, and click Next.
-
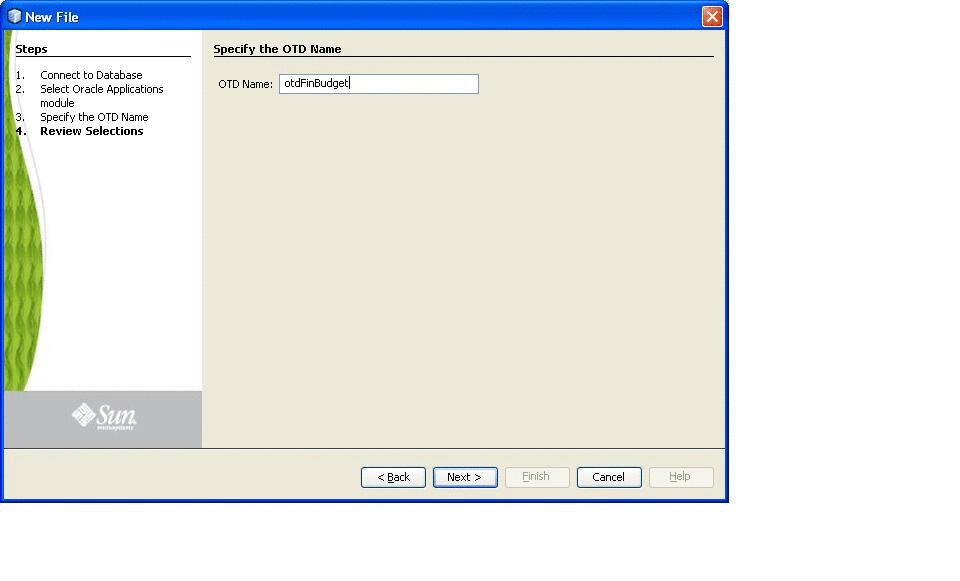
Enter a name for the OTD.
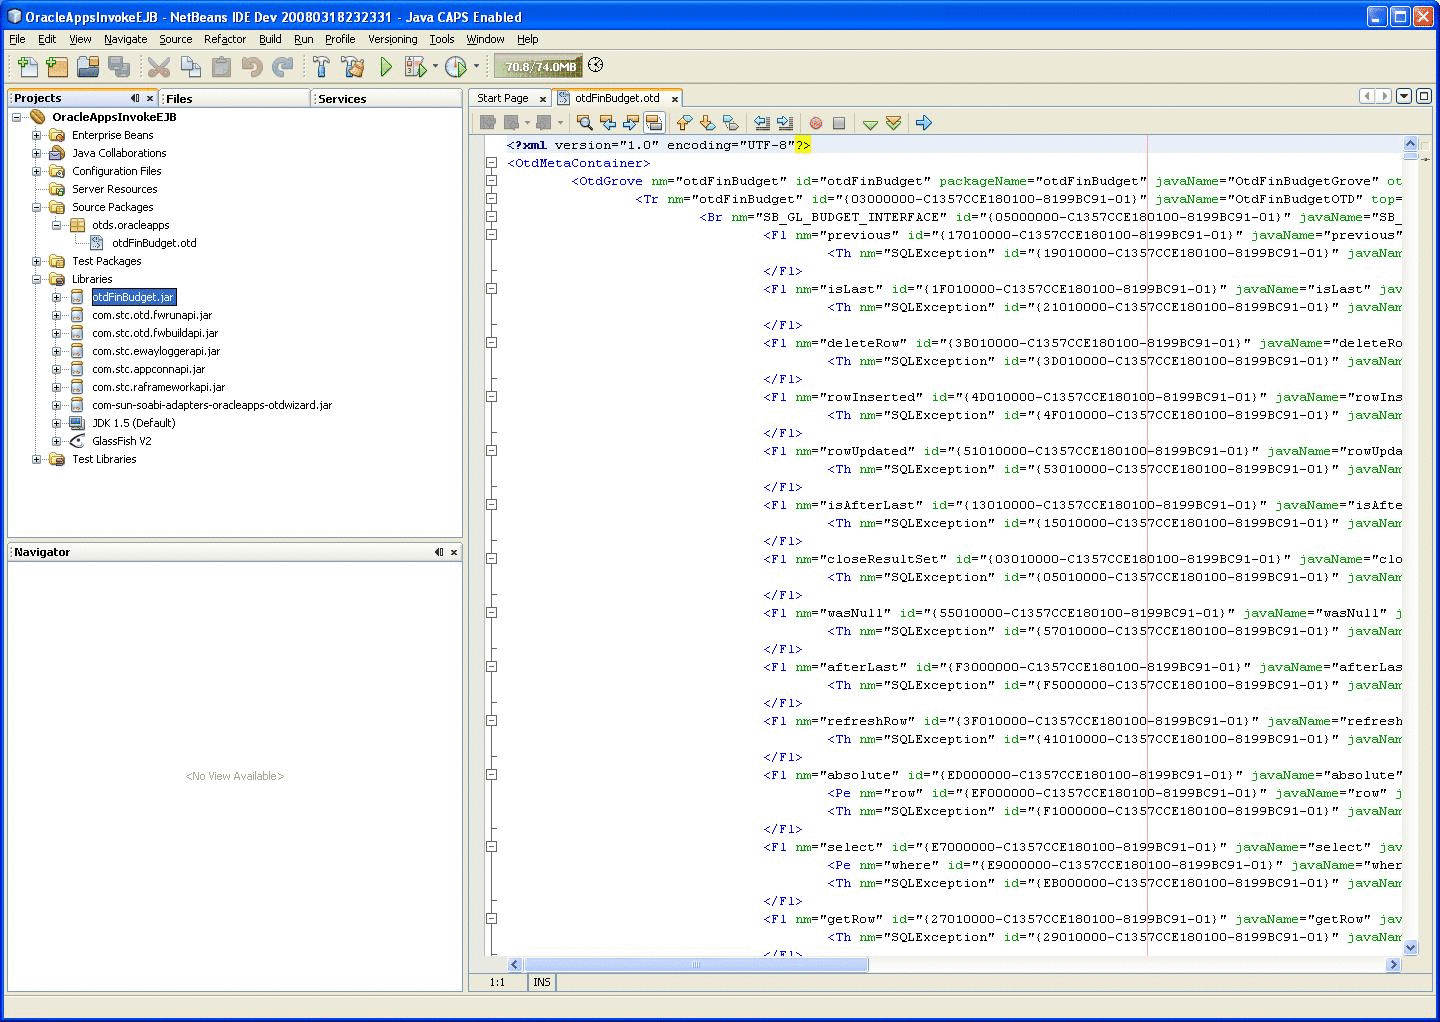
An OTD and a JAR file containing the code corresponding to the above selected database objects are generated. The OTD is generated in the project at the location src/java/otds. The JAR file is added to the project libraries.
-
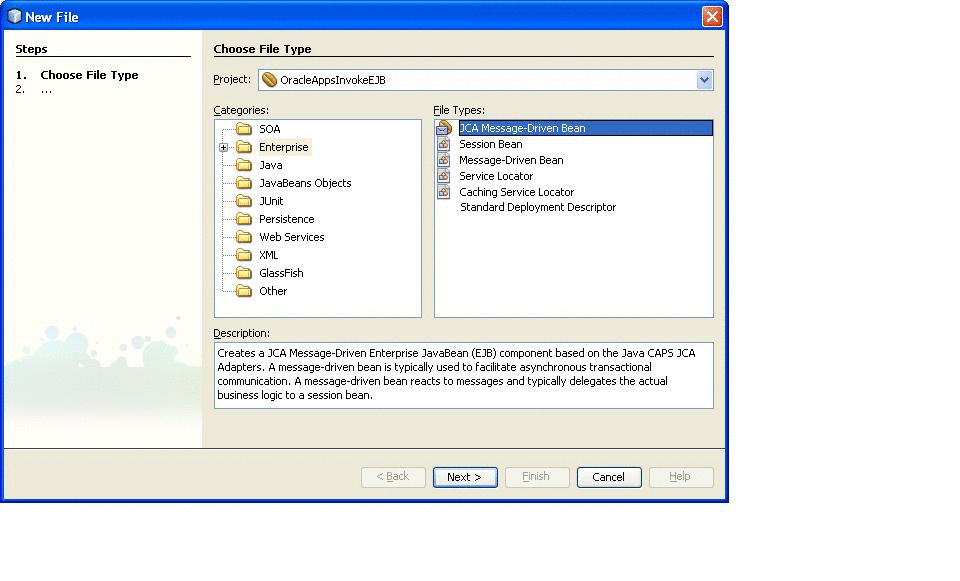
Create a JCA-driven MDB by navigating to the File menu, and selecting New Project > Enterprise.
-
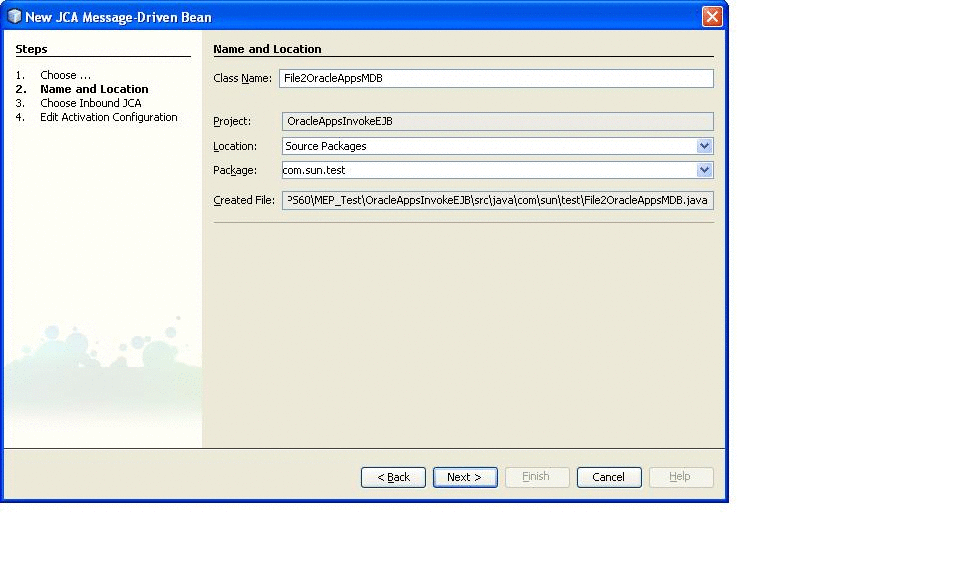
Enter the required information for the JCA-driven MDB.
-
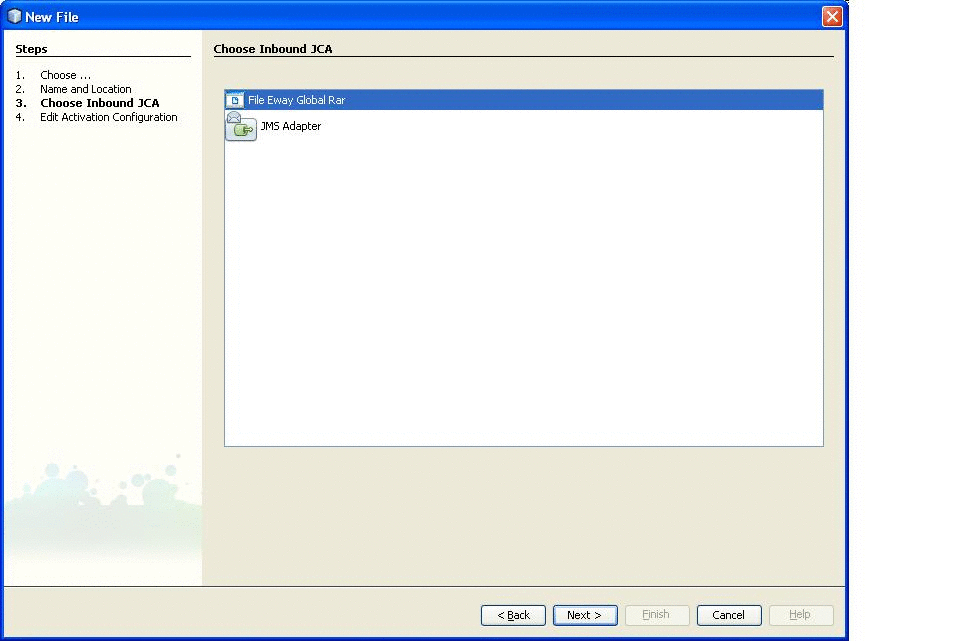
Select File Inbound RAR as the Inbound JCA.
-
Edit the Inbound File JCA configuration parameters in the following two dialogue windows.
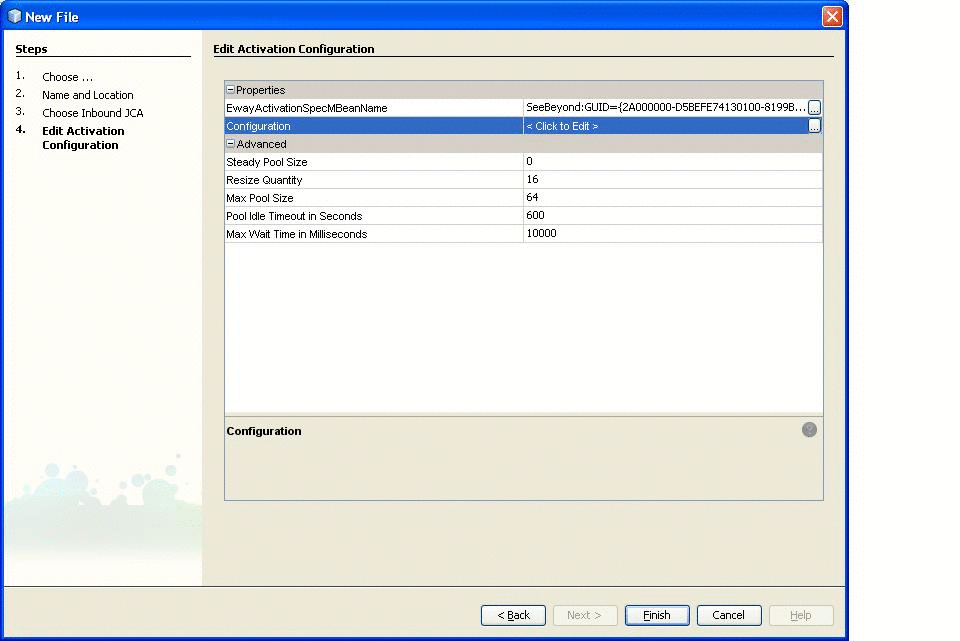
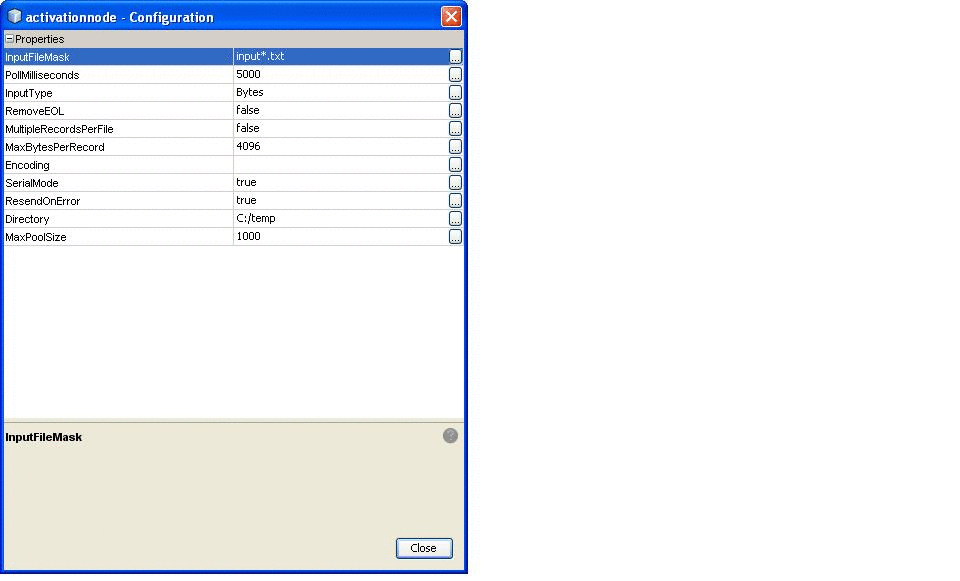
An MDB is created.
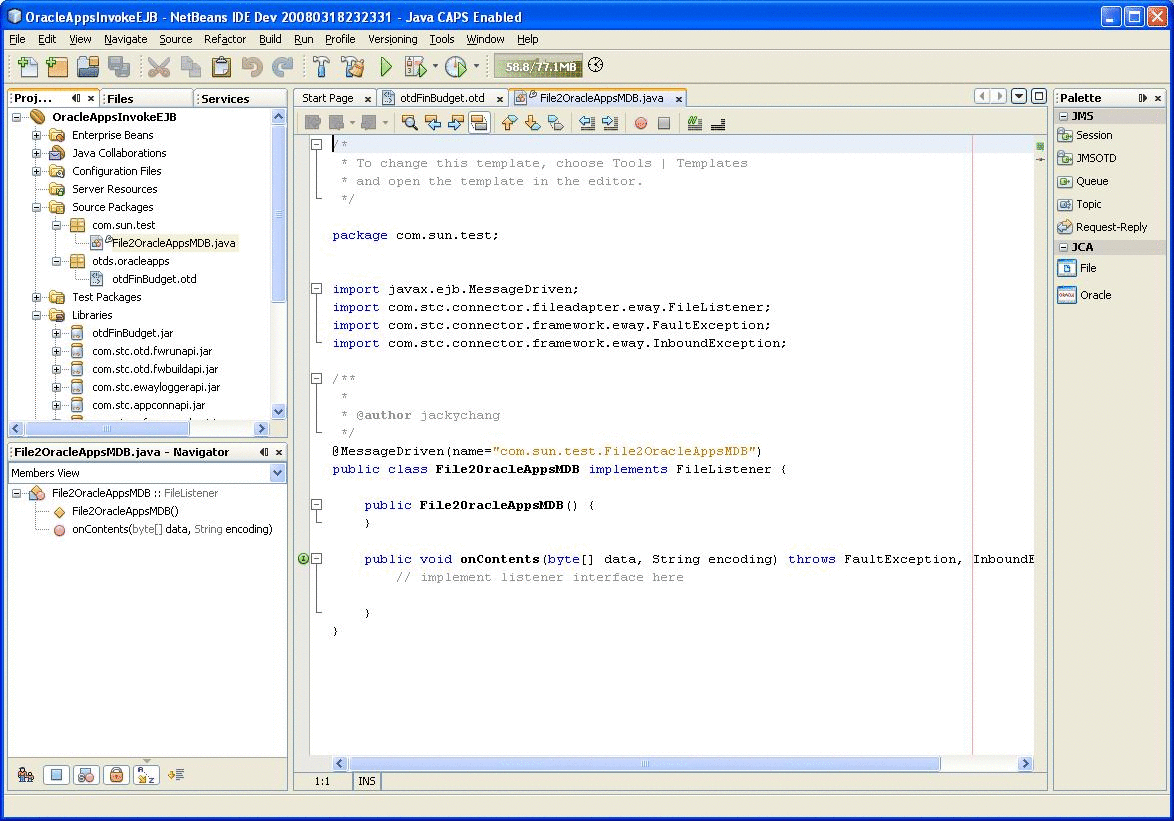
-
In the generated MDB, drag Oracle Applications from the palette to invoke Oracle Applications.
-
Drag and drop the File JCA onto the onContents() of the MDB, and enter the parameters for the File eWay JCA Adapter declarations.
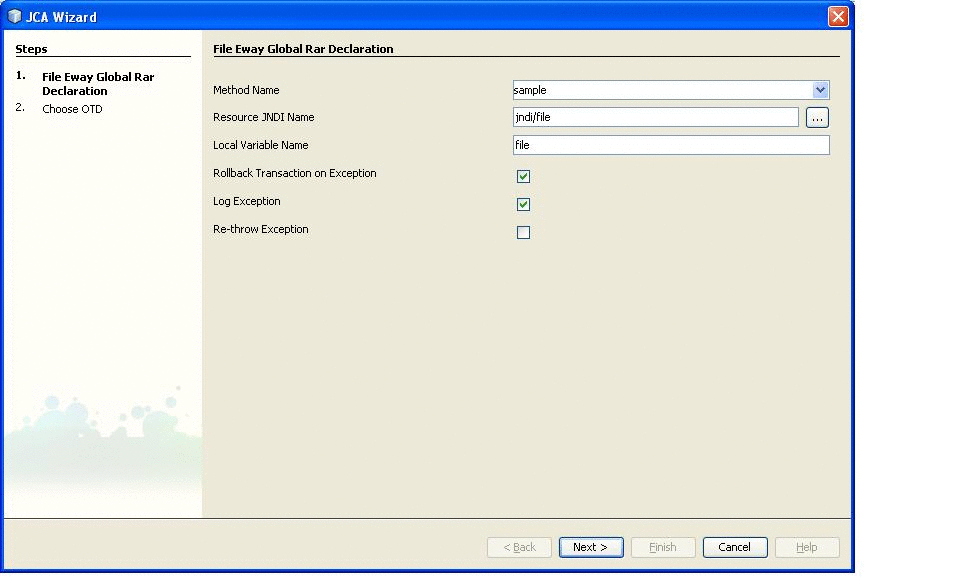
The Resource JNDI Name should be the same as that declared in the GlassFish Application Server (for example, Resources > Connector > Connector Resources)
-
Select the File OTD that is generated and click Finish.
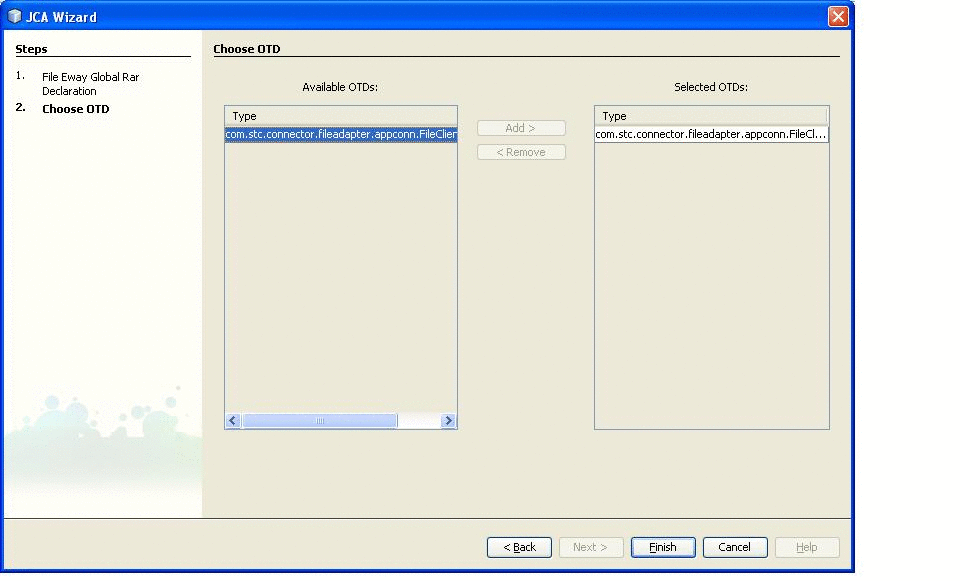
-
The resulting Java template is created.
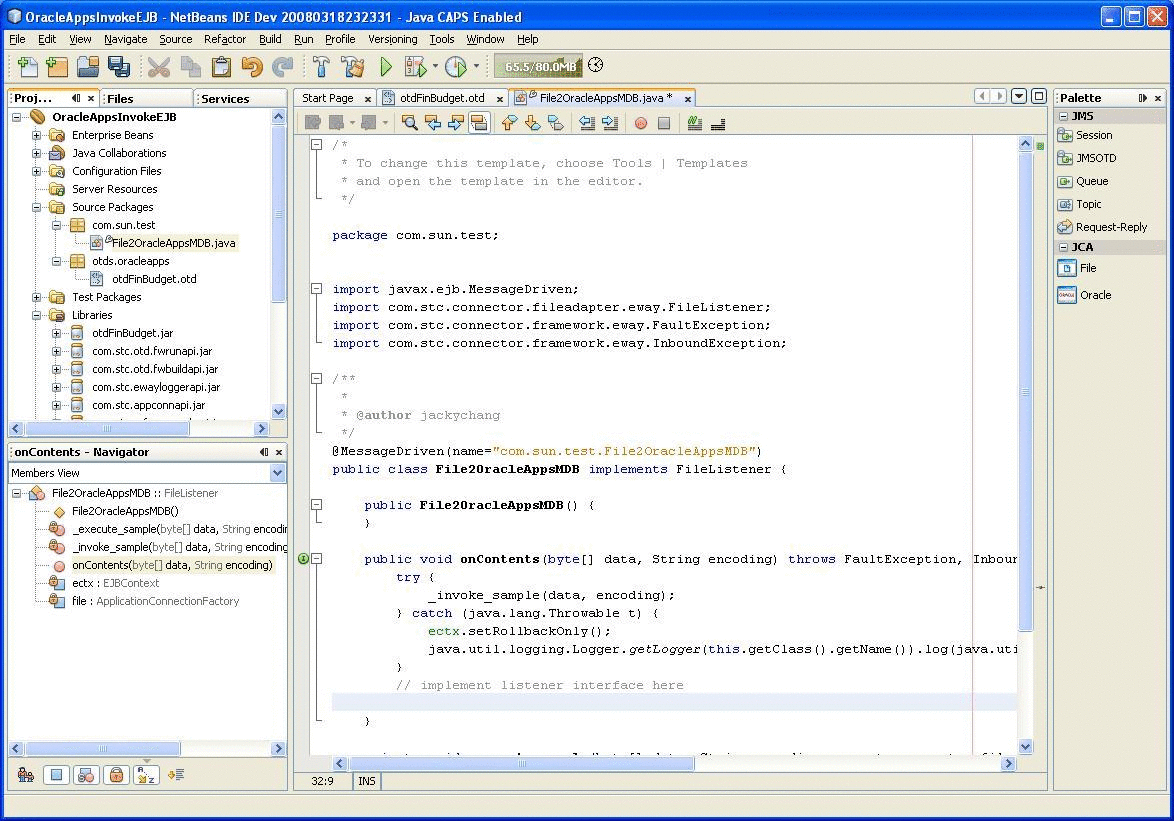
-
Drag and drop the Oracle Applications JCA onto the onContents() of the MDB, and enter the parameters for the Oracle Applications JCA Adapter declarations.
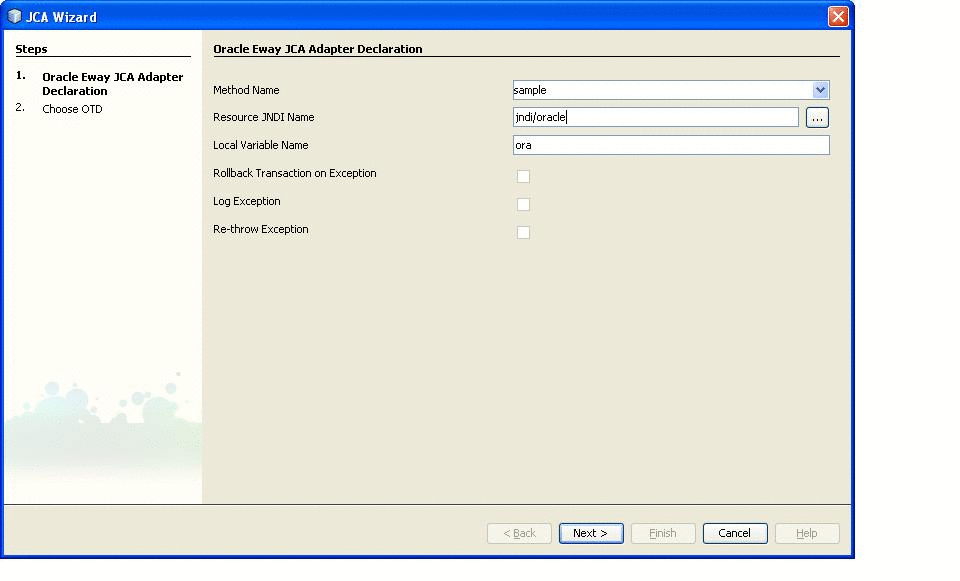
The Resource JNDI Name should be the same as that declared in the GlassFish Application Server (for example, Resources > Connector > Connector Resources)
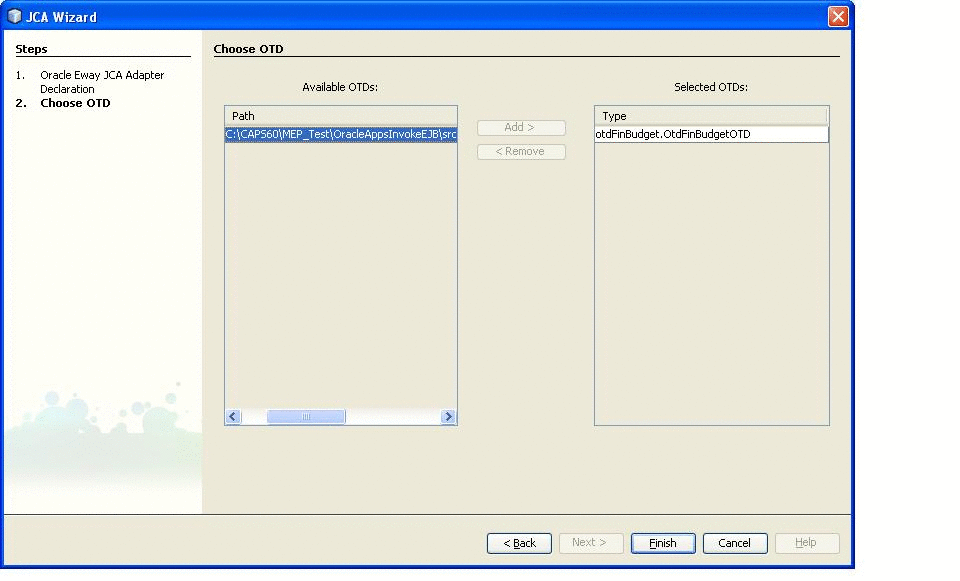
-
Select the Oracle Applications OTD that is generated and click Finish.
-
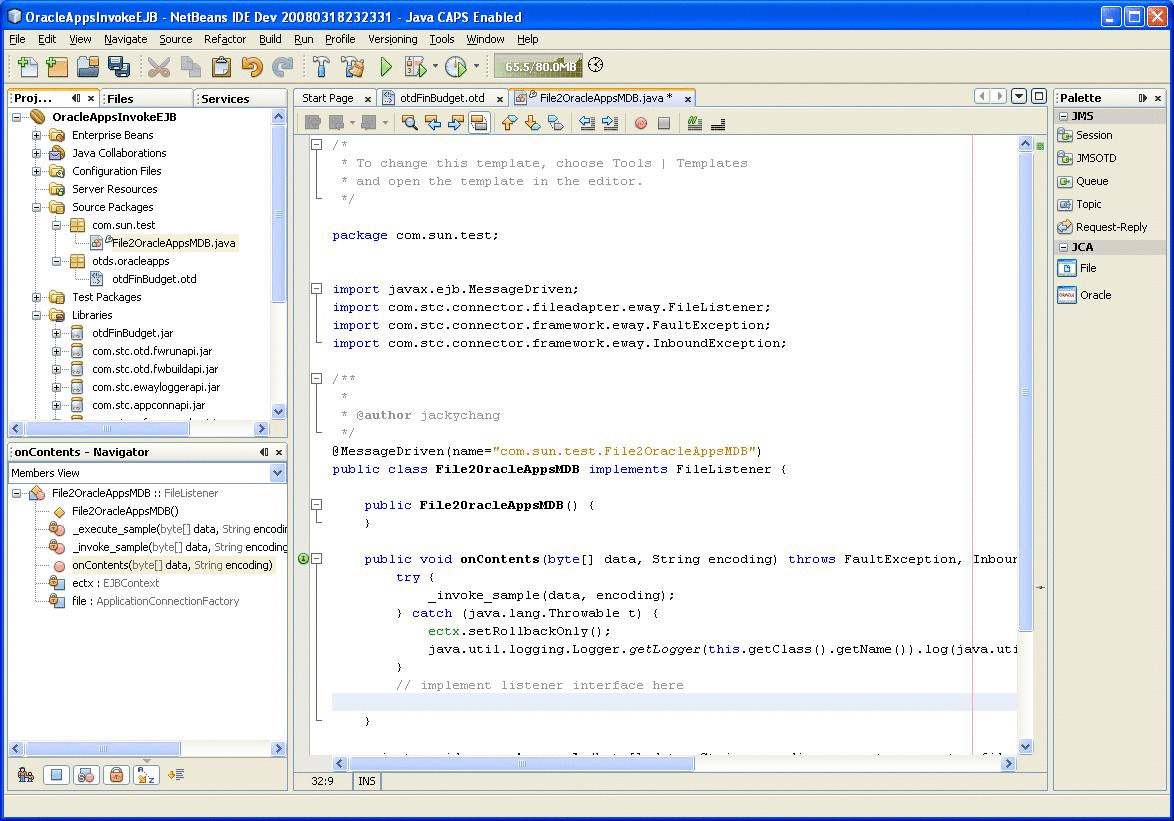
The resulting Java template is created.
-
Implement the following Java code to the _execute_sample method:
private void _execute_sample(byte[] data, String encoding,
com.stc.connector.fileadapter.appconn.FileClientApplication fileOTD,otdFinBudget.
OtdFinBudgetOTD oraOTD) throws java.lang.Exception {

        int counter = 0;

        int budget_count = 0;

        int budget_error_count = 0;

        int request_ID = -1;

        String org_ID = "204";

        // Set eWayID

        String eWayID = "B";

        // Set GroupID

        String GroupID = "B";

        // Set ObjectID

        String ObjectID = "B";

        fileOTD.setText("1. =====> Insert record into Budget SB Staging table ..");

        fileOTD.write();

        oraOTD.getSB_GL_BUDGET_INTERFACE().insert();

        oraOTD.getSB_GL_BUDGET_INTERFACE().setBUDGET_ENTITY_ID
(new java.math.BigDecimal("1000"));

        oraOTD.getSB_GL_BUDGET_INTERFACE().setBUDGET_ENTITY_NAME("RP_Opnames");

        oraOTD.getSB_GL_BUDGET_INTERFACE().setBUDGET_VERSION_ID
(new java.math.BigDecimal("1002"));

        oraOTD.getSB_GL_BUDGET_INTERFACE().setBUDGET_NAME("CORPORATE 1996");

        oraOTD.getSB_GL_BUDGET_INTERFACE().setCURRENCY_CODE("USD");

        oraOTD.getSB_GL_BUDGET_INTERFACE().setFISCAL_YEAR
(new java.math.BigDecimal("1996"));

        oraOTD.getSB_GL_BUDGET_INTERFACE().setUPDATE_LOGIC_TYPE("A");

        oraOTD.getSB_GL_BUDGET_INTERFACE().setSET_OF_BOOKS_ID
(new java.math.BigDecimal("1"));

        oraOTD.getSB_GL_BUDGET_INTERFACE().setPERIOD_TYPE("Month");

        oraOTD.getSB_GL_BUDGET_INTERFACE().setDR_FLAG("Y");

        oraOTD.getSB_GL_BUDGET_INTERFACE().setACCOUNT_TYPE("A");

        oraOTD.getSB_GL_BUDGET_INTERFACE().setPERIOD1_AMOUNT
(new java.math.BigDecimal("100"));

        oraOTD.getSB_GL_BUDGET_INTERFACE().setPERIOD2_AMOUNT
(new java.math.BigDecimal("200"));

        oraOTD.getSB_GL_BUDGET_INTERFACE().setPERIOD3_AMOUNT
(new java.math.BigDecimal("300"));

        oraOTD.getSB_GL_BUDGET_INTERFACE().setPERIOD4_AMOUNT
(new java.math.BigDecimal("400"));

        oraOTD.getSB_GL_BUDGET_INTERFACE().setPERIOD5_AMOUNT
(new java.math.BigDecimal("500"));

        oraOTD.getSB_GL_BUDGET_INTERFACE().setPERIOD6_AMOUNT
(new java.math.BigDecimal("600"));

        oraOTD.getSB_GL_BUDGET_INTERFACE().setPERIOD7_AMOUNT
(new java.math.BigDecimal("700"));

        oraOTD.getSB_GL_BUDGET_INTERFACE().setPERIOD8_AMOUNT
(new java.math.BigDecimal("800"));

        oraOTD.getSB_GL_BUDGET_INTERFACE().setPERIOD9_AMOUNT
(new java.math.BigDecimal("900"));

        oraOTD.getSB_GL_BUDGET_INTERFACE().setPERIOD10_AMOUNT
(new java.math.BigDecimal("1000"));

        oraOTD.getSB_GL_BUDGET_INTERFACE().setPERIOD11_AMOUNT
(new java.math.BigDecimal("1100"));

        oraOTD.getSB_GL_BUDGET_INTERFACE().setPERIOD12_AMOUNT
(new java.math.BigDecimal("1200"));

        oraOTD.getSB_GL_BUDGET_INTERFACE().setCODE_COMBINATION_ID
(new java.math.BigDecimal("17378"));

        oraOTD.getSB_GL_BUDGET_INTERFACE().setSEGMENT1("01");

        oraOTD.getSB_GL_BUDGET_INTERFACE().setSEGMENT2("760");

        oraOTD.getSB_GL_BUDGET_INTERFACE().setSEGMENT3("7420");

        oraOTD.getSB_GL_BUDGET_INTERFACE().setSEGMENT4("0000");

        oraOTD.getSB_GL_BUDGET_INTERFACE().setSEGMENT5("000");

        oraOTD.getSB_GL_BUDGET_INTERFACE().setSB_EWAY_ID(eWayID);

        oraOTD.getSB_GL_BUDGET_INTERFACE().setSB_GROUP_ID(GroupID);

        oraOTD.getSB_GL_BUDGET_INTERFACE().setSB_OBJECT_ID(ObjectID);

        oraOTD.getSB_GL_BUDGET_INTERFACE().insertRow();

        fileOTD.setText("2. =====> Counting record in Budget staging table ...");

        fileOTD.write();

        oraOTD.getSB_BUDGET_UTILS_PKG_FN_CNT_GL_BUDGET_INT().setP_GROUP_ID(GroupID);

        oraOTD.getSB_BUDGET_UTILS_PKG_FN_CNT_GL_BUDGET_INT().setP_OBJECT_ID(ObjectID);

        oraOTD.getSB_BUDGET_UTILS_PKG_FN_CNT_GL_BUDGET_INT().setP_EWAY_ID(eWayID);

        oraOTD.getSB_BUDGET_UTILS_PKG_FN_CNT_GL_BUDGET_INT().setP_CODE("A");

        oraOTD.getSB_BUDGET_UTILS_PKG_FN_CNT_GL_BUDGET_INT().execute();

        budget_count = oraOTD.getSB_BUDGET_UTILS_PKG_FN_CNT_GL_BUDGET_INT().
getRETURN_VALUE1().intValue();

        fileOTD.setText("     returned Budget Count  =
".concat( Integer.toString( budget_count )));

        fileOTD.write();

        fileOTD.setText("\nDone with Step 2");

        fileOTD.write();

    }
Using the Oracle Applications Object Type Definition
Each of the Oracle Applications Object Type Definition modules is divided into submodules, representing a logical division of workflow. Each submodule uses at least one corresponding set of tables and scripts. For a high level hierarchy of the Manufacturing and Financial modules and further details on their submodules, see Building an Oracle Applications Custom Pre-Validation Package in Designing with Application Adapters
Once an Oracle Applications OTD is generated, all of the staging tables and stored procedures for the corresponding submodules are generated in the Oracle database. These staging tables and procedures can be invoked through the OTD.
In general, a user can take the following steps to invoke operations in a database:
-
Insert data into the staging table.
-
Get a count of the data in the staging table.
-
-
Run a pre-validation script to check data integrity.
-
Count invalid records, if any.
-
Find error codes, if any.
-
Count the valid records in the staging table.
-
-
Move the valid records to the Open Interface table.
-
Calling the initialize function.
-
Calling the concurrent manager.
-
Getting the Request status.
-
Cleaning the staging table.
For what follows we will use the Financial –> General Ledger —> Budget module as a sample. Assume the Oracle Applications OTD is called oraOTD.
-
Insert data into the staging table:
oraOTD.getSB_GL_BUDGET_INTERFACE().insert();

oraOTD.getSB_GL_BUDGET_INTERFACE().
		setBUDGET_ENTITY_ID(new java.math.BigDecimal("1000"));

oraOTD.getSB_GL_BUDGET_INTERFACE().setBUDGET_ENTITY_NAME("RP_Opnames");

oraOTD.getSB_GL_BUDGET_INTERFACE().
		setBUDGET_VERSION_ID(new java.math.BigDecimal("1002"));

oraOTD.getSB_GL_BUDGET_INTERFACE().setBUDGET_NAME("CORPORATE 1996");

oraOTD.getSB_GL_BUDGET_INTERFACE().setCURRENCY_CODE("USD");

oraOTD.getSB_GL_BUDGET_INTERFACE().
		setFISCAL_YEAR(new java.math.BigDecimal("1996"));

oraOTD.getSB_GL_BUDGET_INTERFACE().setUPDATE_LOGIC_TYPE("A");

oraOTD.getSB_GL_BUDGET_INTERFACE().
		setSET_OF_BOOKS_ID(new java.math.BigDecimal("1"));

oraOTD.getSB_GL_BUDGET_INTERFACE().setPERIOD_TYPE("Month");

oraOTD.getSB_GL_BUDGET_INTERFACE().setDR_FLAG("Y");

oraOTD.getSB_GL_BUDGET_INTERFACE().setACCOUNT_TYPE("A");

oraOTD.getSB_GL_BUDGET_INTERFACE().
		setPERIOD1_AMOUNT(new java.math.BigDecimal("100"));

oraOTD.getSB_GL_BUDGET_INTERFACE().
		setPERIOD2_AMOUNT(new java.math.BigDecimal("200"));

oraOTD.getSB_GL_BUDGET_INTERFACE().
		setPERIOD3_AMOUNT(new java.math.BigDecimal("300"));

oraOTD.getSB_GL_BUDGET_INTERFACE().
		setPERIOD4_AMOUNT(new java.math.BigDecimal("400"));

oraOTD.getSB_GL_BUDGET_INTERFACE().
		setPERIOD5_AMOUNT(new java.math.BigDecimal("500"));

oraOTD.getSB_GL_BUDGET_INTERFACE().
		setPERIOD6_AMOUNT(new java.math.BigDecimal("600"));

oraOTD.getSB_GL_BUDGET_INTERFACE().
		setPERIOD7_AMOUNT(new java.math.BigDecimal("700"));

oraOTD.getSB_GL_BUDGET_INTERFACE().
		setPERIOD8_AMOUNT(new java.math.BigDecimal("800"));

oraOTD.getSB_GL_BUDGET_INTERFACE().
		setPERIOD9_AMOUNT(new java.math.BigDecimal("900"));

oraOTD.getSB_GL_BUDGET_INTERFACE().
		setPERIOD10_AMOUNT(new java.math.BigDecimal("1000"));

oraOTD.getSB_GL_BUDGET_INTERFACE().
		setPERIOD11_AMOUNT(new java.math.BigDecimal("1100"));

oraOTD.getSB_GL_BUDGET_INTERFACE().
		setPERIOD12_AMOUNT(new java.math.BigDecimal("1200"));

oraOTD.getSB_GL_BUDGET_INTERFACE().
		setCODE_COMBINATION_ID(new java.math.BigDecimal("17378"));

oraOTD.getSB_GL_BUDGET_INTERFACE().setSEGMENT1("01");

oraOTD.getSB_GL_BUDGET_INTERFACE().setSEGMENT2("760");

oraOTD.getSB_GL_BUDGET_INTERFACE().setSEGMENT3("7420");

oraOTD.getSB_GL_BUDGET_INTERFACE().setSEGMENT4("0000");

oraOTD.getSB_GL_BUDGET_INTERFACE().setSEGMENT5("000");

oraOTD.getSB_GL_BUDGET_INTERFACE().setSB_EWAY_ID(eWayID);

oraOTD.getSB_GL_BUDGET_INTERFACE().setSB_GROUP_ID(GroupID);

oraOTD.getSB_GL_BUDGET_INTERFACE().setSB_OBJECT_ID(ObjectID);

oraOTD.getSB_GL_BUDGET_INTERFACE().insertRow();
Get a count of the data in the staging table.
oraOTD.getSB_BUDGET_UTILS_PKG_FN_CNT_GL_BUDGET_INT().setP_GROUP_ID(GroupID); oraOTD.getSB_BUDGET_UTILS_PKG_FN_CNT_GL_BUDGET_INT().setP_OBJECT_ID(ObjectID); oraOTD.getSB_BUDGET_UTILS_PKG_FN_CNT_GL_BUDGET_INT().setP_EWAY_ID(eWayID); oraOTD.getSB_BUDGET_UTILS_PKG_FN_CNT_GL_BUDGET_INT().setP_CODE("A"); oraOTD.getSB_BUDGET_UTILS_PKG_FN_CNT_GL_BUDGET_INT().execute(); budget_count = oraOTD.getSB_BUDGET_UTILS_PKG_FN_CNT_GL_BUDGET_INT(). getRETURN_VALUE1().intValue(); -
Run a pre-validation script to check data integrity.
oraOTD.getSB_GL_BUDGET_INTERFACE().
		getSB_VALIDATE_GL_BUDGET_PKG_VALIDATE().setP_GROUP_ID( GroupID );

OraOTD.getSB_GL_BUDGET_INTERFACE().
		getSB_VALIDATE_GL_BUDGET_PKG_VALIDATE().setP_OBJECT_ID( ObjectID );

OraOTD.getSB_GL_BUDGET_INTERFACE().
		getSB_VALIDATE_GL_BUDGET_PKG_VALIDATE().setP_EWAY_ID( eWayID );

OraOTD.getSB_GL_BUDGET_INTERFACE().
		getSB_VALIDATE_GL_BUDGET_PKG_VALIDATE().execute();
-
Count invalid records, if any.
OraOTD.getSB_GL_BUDGET_INTERFACE(). getSB_BUDGET_UTILS_PKG_FN_CNT_GL_BUDGET_INT().setP_GROUP_ID( GroupID ); OraOTD.getSB_GL_BUDGET_INTERFACE(). getSB_BUDGET_UTILS_PKG_FN_CNT_GL_BUDGET_INT().setP_OBJECT_ID( ObjectID ); OraOTD.getSB_GL_BUDGET_INTERFACE(). getSB_BUDGET_UTILS_PKG_FN_CNT_GL_BUDGET_INT().setP_EWAY_ID( eWayID ); OraOTD.getSB_GL_BUDGET_INTERFACE(). getSB_BUDGET_UTILS_PKG_FN_CNT_GL_BUDGET_INT().setP_CODE( "F" ); OraOTD.getSB_GL_BUDGET_INTERFACE(). getSB_BUDGET_UTILS_PKG_FN_CNT_GL_BUDGET_INT().execute(); budget_error_count = OraOTD.getSB_GL_BUDGET_INTERFACE(). getSB_BUDGET_UTILS_PKG_FN_CNT_GL_BUDGET_INT().getRETURN_VALUE1().intValue(); -
Find error codes, if any.
if (budget_error_count > 0) { OraOTD.getSB_GL_BUDGET_INTERFACE(). qqgetGET_INVALID_ROWS_GL_BUDGET_INT().setEWAY_ID( eWayID ); OraOTD.getSB_GL_BUDGET_INTERFACE(). qqgetGET_INVALID_ROWS_GL_BUDGET_INT().setGROUP_ID( GroupID ); OraOTD.getSB_GL_BUDGET_INTERFACE(). qqgetGET_INVALID_ROWS_GL_BUDGET_INT().setOBJECT_ID( ObjectID ); OraOTD.getSB_GL_BUDGET_INTERFACE(). qqgetGET_INVALID_ROWS_GL_BUDGET_INT().executeQuery(); if (OraOTD.getSB_GL_BUDGET_INTERFACE(). getGET_INVALID_ROWS_GL_BUDGET_INT().resultsAvailable()) { while (OraOTD.getSB_GL_BUDGET_INTERFACE(). getGET_INVALID_ROWS_GL_BUDGET_INT(). get$GET_INVALID_ROWS_GL_BUDGET_INTResults().next()) { JMS_1.sendText( " SB_ERROR_CODE: ". concat( OraOTD.getSB_GL_BUDGET_INTERFACE(). getGET_INVALID_ROWS_GL_BUDGET_INT(). get$GET_INVALID_ROWS_GL_BUDGET_INTResults(). getSB_ERROR_CODE() ).concat( " SB_ERROR_MESSAGE: ". concat( OraOTD.getSB_GL_BUDGET_INTERFACE(). getGET_INVALID_ROWS_GL_BUDGET_INT(). get$GET_INVALID_ROWS_GL_BUDGET_INTResults().getSB_ERROR_MESSAGE() ) ) ); } } } -
Count the valid records in the staging table.
OraOTD.getSB_GL_BUDGET_INTERFACE().
		getSB_BUDGET_UTILS_PKG_FN_CNT_GL_BUDGET_INT().setP_GROUP_ID( GroupID );

OraOTD.getSB_GL_BUDGET_INTERFACE().
		getSB_BUDGET_UTILS_PKG_FN_CNT_GL_BUDGET_INT().setP_OBJECT_ID( ObjectID );

OraOTD.getSB_GL_BUDGET_INTERFACE().
		getSB_BUDGET_UTILS_PKG_FN_CNT_GL_BUDGET_INT().setP_EWAY_ID( eWayID );

OraOTD.getSB_GL_BUDGET_INTERFACE().
		getSB_BUDGET_UTILS_PKG_FN_CNT_GL_BUDGET_INT().setP_CODE( "P" );

OraOTD.getSB_GL_BUDGET_INTERFACE().
		getSB_BUDGET_UTILS_PKG_FN_CNT_GL_BUDGET_INT().execute();

                    budget_count = OraOTD.getSB_GL_BUDGET_INTERFACE().
		getSB_BUDGET_UTILS_PKG_FN_CNT_GL_BUDGET_INT().getRETURN_VALUE1().intValue();
-
-
Move the valid records to the Open Interface table.
OraOTD.getSB_GL_BUDGET_INTERFACE().
		getSB_BUDGET_UTILS_PKG_SP_MOV_GL_BUDGET_INT().setP_GROUP_ID( GroupID );

OraOTD.getSB_GL_BUDGET_INTERFACE().
		getSB_BUDGET_UTILS_PKG_SP_MOV_GL_BUDGET_INT().setP_OBJECT_ID( ObjectID );

OraOTD.getSB_GL_BUDGET_INTERFACE().
		getSB_BUDGET_UTILS_PKG_SP_MOV_GL_BUDGET_INT().setP_EWAY_ID( eWayID );

OraOTD.getSB_GL_BUDGET_INTERFACE().
		getSB_BUDGET_UTILS_PKG_SP_MOV_GL_BUDGET_INT().setP_CODE( "P" );

OraOTD.getSB_GL_BUDGET_INTERFACE().
		getSB_BUDGET_UTILS_PKG_SP_MOV_GL_BUDGET_INT().execute();
-
Calling the initialize function.
OraOTD.getSB_INITIALIZE_INITIALIZE_PROFILE().setP_ORGID( org_ID );

OraOTD.getSB_INITIALIZE_INITIALIZE_PROFILE().execute();
-
Calling the concurrent manager.
OraOTD.getFN_REQUEST_BUDGET().setP_USER_NAME( "OPERATIONS" );

OraOTD.getFN_REQUEST_BUDGET().setP_RESPONSIBILITY( "GENERAL_LEDGER_SUPER_USER" );

OraOTD.getFN_REQUEST_BUDGET().setP_ORGID( org_ID );

OraOTD.getFN_REQUEST_BUDGET().setAPPLICATION( "SQLGL" );

OraOTD.getFN_REQUEST_BUDGET().setPROGRAM( "GLBBSU" );

OraOTD.getFN_REQUEST_BUDGET().setDESCRIPTION( "Budget Spreadsheet Upload" );

OraOTD.getFN_REQUEST_BUDGET().execute();

request_ID = OraOTD.getFN_REQUEST_BUDGET().getRETURN_VALUE1().intValue();

OraOTD.commit();
-
Getting the Request status.
if (request_ID > 0) { OraOTD.getFN_REQUEST_STATUS(). setINP_REQUEST_ID( new java.math.BigDecimal( Integer.toString( request_ID ) ) ); OraOTD.getFN_REQUEST_STATUS(). setINP_INTERVAL_SEC( new java.math.BigDecimal( "15" ) ); OraOTD.getFN_REQUEST_STATUS(). setINP_MAXIMUM_SEC( new java.math.BigDecimal( "30" ) ); OraOTD.getFN_REQUEST_STATUS().execute(); Result_status = OraOTD.getFN_REQUEST_STATUS().getRETURN_VALUE1() ); -
Cleaning the staging table.
OraOTD.getSB_GL_BUDGET_INTERFACE().
		getSB_BUDGET_UTILS_PKG_SP_DEL_GL_BUDGET_INT().setP_GROUP_ID( GroupID );

OraOTD.getSB_GL_BUDGET_INTERFACE().
		getSB_BUDGET_UTILS_PKG_SP_DEL_GL_BUDGET_INT().setP_OBJECT_ID( ObjectID );

OraOTD.getSB_GL_BUDGET_INTERFACE().
		getSB_BUDGET_UTILS_PKG_SP_DEL_GL_BUDGET_INT().setP_EWAY_ID( eWayID );

OraOTD.getSB_GL_BUDGET_INTERFACE().
		getSB_BUDGET_UTILS_PKG_SP_DEL_GL_BUDGET_INT().setP_CODE( "A" );

OraOTD.getSB_GL_BUDGET_INTERFACE().
		getSB_BUDGET_UTILS_PKG_SP_DEL_GL_BUDGET_INT().execute();
- © 2010, Oracle Corporation and/or its affiliates
