Installing the TCP/IP HL7 Adapter and Sample Projects
The TCP/IP HL7 Adapter is not installed by default with a standard Java CAPS installation; you need to install the Adapter manually. The Adapter is installed with the base HL7 OTD Library files and with V2.6. You can install additional HL7 OTD Library versions if needed. After install the TCP/IP HL7 Adapter to the Repository, the sample projects are available to download.
The Java Composite Application Platform Suite Installer is a web-based application, used to select and upload adapters and add-on files to install. The Suite Installer serves as an Update Center, Management Center, and Dashboard to gain access to available applications.
Installing the TCP/IP HL7 Adapter
If you have already installed the TCP/IP HL7 Adapter using the Suite Installer but have not installed the Adapter in NetBeans, skip to Installing the TCP/IP Adapter in the NetBeans IDE. If you have installed the Adapter in both the Repository and NetBeans, skip to Downloading the Sample Projects.
 To Install the TCP/IP HL7 Adapter
Before You Begin
Java CAPS must be installed before starting this procedure.
-
Start the Java CAPS Repository.
The start_repository executable file is located in your Java CAPS home directory.
-
Open a web browser and type the following URL to access the Suite Installer:
http://localhost:port_number
where localhost is the TCP/IP host name of the Repository server and not the name of the Repository itself, and port_number is the port number you specified during installation for the Repository.
The Login page of the Suite Installer appears.
-
Enter the username and password, and then click Login.
Note –The default username is admin and the default password is adminadmin.
The Java Composite Application Platform Suite Uploader page appears.
-
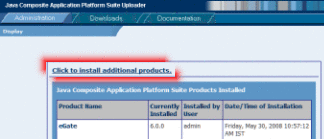
On the Administration Page, click to Install Additional Products.

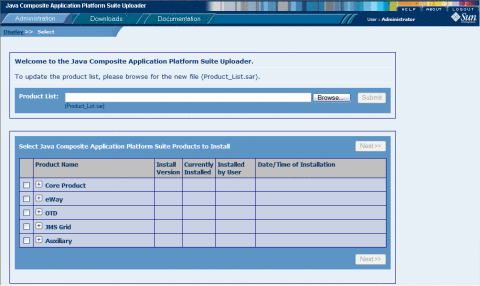
The Welcome to the Java Composite Application Platform Suite Uploader page appears.

-
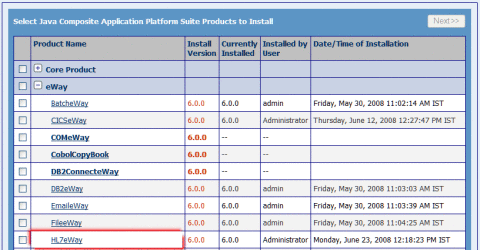
Expand eWay under the Product Name column, and then select HL7eWay.

-
If you are using a version of HL7 other than V2.6, expand OTD and select HL7OTDLibrary along with the HL7 libraries for the version you are using.
Note –Note that there are several items to select to install the full V3 HL7 Library.
-
Click Next in the top-right or bottom-right corner of the page.
The Selecting Files to Install page appears.

-
Click Browse, and then navigate to and select the SAR file for the listed product. Click Next.
-
Repeat the above steps for each product to install.
Note –Based on your previous selection, some dependent products may have been added to the list.
When you click Next after the last SAR file is selected, the Installation Status page appears, displaying the status of the installation. The lower portion of the page displays additional information about the installation process. Once a product is installed, a check mark appears next to it. This might take several minutes.
When the installation is complete, the following confirmation message appears: Installation finished.
Installing the TCP/IP Adapter in the NetBeans IDE
After you install the TCP/IP Adapter in the Repository, the related plug-ins can be installed in NetBeans. This allow you to incorporate the Adapter into your Repository-based projects.
 To Install the TCP/IP Adapter in the NetBeans
IDE
-
Start NetBeans from the Java CAPS home directory.
-
In NetBeans, connect to the Repository (Tools menu > CAPS Repository > Connect).
-
From the NetBeans IDE menu bar choose Tools and then Plugins.
-
On the Plugins window, click the Settings tab.
-
In the Configuration of Update Centers panel, select CAPS Repository Update Center and deselect all other options.
If CAPS Repository Update Center does not appear in the list, do the following:
-
On the Settings page, click Add.
The Update Center Customizer dialog box appears.
-
In the Name field, enter CAPS Repository Update Center.
-
In the URL field, enter the following:
http://HostName:PortNo/repository/RepName/data/files/InstallManager/catalog.xml
where HostName is the name of the Repository server (or localhost), PortNo is the Repository base port number, and RepName is the name of the Repository.
-
Click OK.
Tip –You might need to click Reload Catalog on the Installed tab in order to see the available Java CAPS plug-ins.
-
-
Click the Available Plugins tab.
The TCP/IP HL7 components appear in the list.
-
Select the individual components to install, or right-click in the list and select Check All.
-
Click Install.
-
On the NetBeans IDE Installer, click Next, accept the license, and click Install.
Note –Ignore any validation or unsigned warnings and continue with the installation.
-
When the installation completes, click Finish.
The IDE will restart to complete the installation.
Downloading the Sample Projects
The following instructions provide the steps to download the Enterprise Manager from the Suite Installer.
Note –
Before beginning this procedure, make sure the Repository is running for the Suite Installer.
 To Download Files From the Repository
-
On the Suite Installer, click the Downloads tab.
A list of components ready to be downloaded appears.
-
For the purposes of this tutorial, select HL7 Adapter Inbound Collaboration Project.
-
Save the prjHL7Inbound.zip file to a local directory.
-
Repeat the previous step for HL7 Adapter Outbound Collaboration Project.
-
If you want to work with the schematron validation Projects for HL7 V3, download HL7 Adapter Inbound Collaboration Project for HL7V3 PRPA_IN403001UV01 With Schematron Validation Enabled.
Note –In order to import the V3 projects, you must have the HL7 V3 Libraries installed.
- © 2010, Oracle Corporation and/or its affiliates
