Importing the Sample TCP/IP HL7 Adapter Projects
Before you can begin working with the sample projects, you need to import them into the NetBeans IDE. For this tutorial, you need to import two projects: prjHL7Inbound and prjHL7Outbound.
Do the following to import the sample projects and make them available for editing:
Importing the TCP/IP Adapter Sample Projects
This section describes how to import the standard inbound and outbound samples for HL7 V2.x.
 To Import TCP/IP HL7 Adapter Sample Projects
Before You Begin
In order to import the TCP/IP HL7 Adapter sample projects, the Adapter needs to be installed and the sample projects downloaded. For more information, see Installing the TCP/IP HL7 Adapter and Sample Projects.
-
On the NetBeans IDE, save all unsaved work.
-
On the NetBeans menu bar, select Tools, point to CAPS Repository, and then select Import Project from the drop-down menu.
A confirmation dialog box appears asking if you need to save any changes.
-
Click Yes to proceed with importing a project.
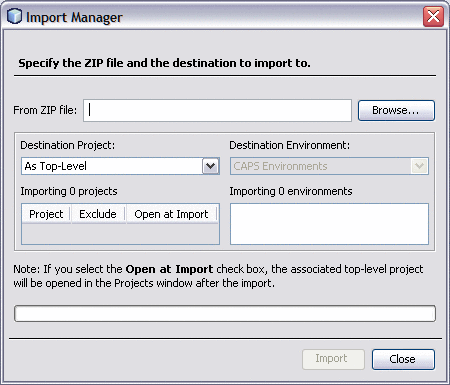
The Import Manager appears.

-
Click Browse, navigate to the location of the project ZIP files, and select prjHL7Inbound.zip.
Note –The associated top-level project is opened in the projects window after the import if you select the Open at Import check box.
-
Click Import.
Note –A warning message appears if you already have a project of the same name in the CAPS Repository. Determine whether you want to overwrite the existing project. In some cases the imported file will add files to an existing project. If you do not want to overwrite the existing project, cancel the import and exit the Import Manager. Rename and save the existing project, and attempt the import again.
It may take a few seconds to import the project. When the project is imported, the Import Status dialog box appears.
-
Click OK on the dialog box.
The CAPS Repository is refreshed.
-
Repeat the above steps on the Import Manager to import prjHL7Outbound.zip.
-
Close the Import Manager.
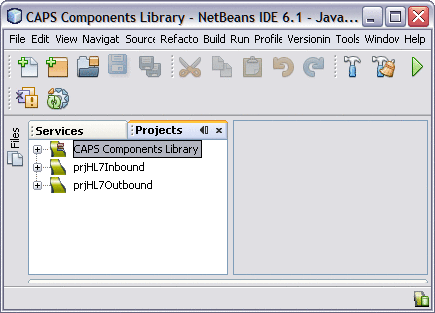
You should now have two new projects, prjHL7Inbound and prjHL7Outbound, in the tree structure of the projects window, as shown below.

Checking Out the Imported Projects
After you import a project and the Repository refreshes, the project and all of its components are check into version control, which means they can only be viewed and not edited. You need to check the project out to edit the components.
 To Check Out the Imported Projects
-
On the Projects window, right-click prjHL7Inbound, point to Version Control, and then select Check Out.
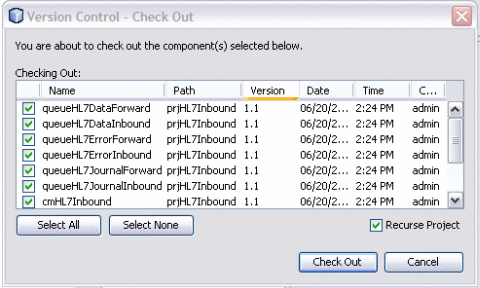
The Version Control - Check Out dialog box appears.
-
Select Recurse Project to ensure all components of the prjHL7Inbound are listed.

Note –You can select either one or more components.
-
Click Select All and then click Check Out.
This checks out all components of the project so you can edit them as needed.
-
Repeat the above steps for prjHL7Outbound.
- © 2010, Oracle Corporation and/or its affiliates
